Advertisement
Table of Contents
Advertisement
Table of Contents

Related Manuals for OPTIX TLP150HDW


Summary of Contents for OPTIX TLP150HDW
- Page 1 MODEL : TLP150HDW License Plate Camera QUALITY PRODUCTS FOR THE PROFESSIONAL INSTALLER...
- Page 2 MODEL : TLP150HDW Table of Contents INTRODUCTION Contents DEVICE INSTALLATION Wiring...
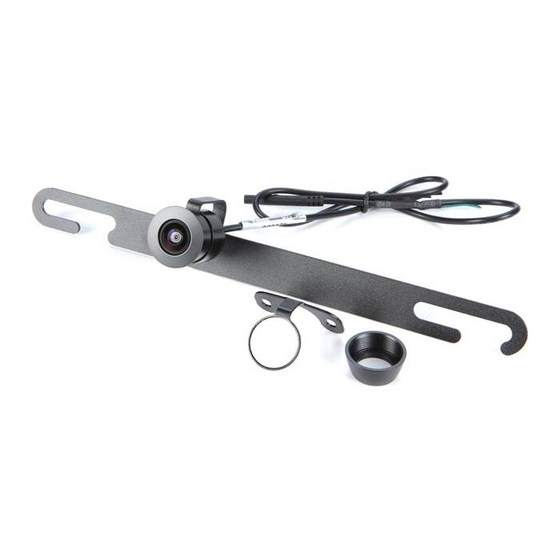
- Page 3 MODEL : TLP150HDW INTRODUCTION Congratulations on your purchase of the Optix “License Plate Camera”. With camera installed, you are able to have a great visual of what is behind your vehicle while going in reverse. You also get parking Lines to guide you while backing up into a parking space, driveway, bays, etc. Contents 1- Camera 1- License plate bracket, surface bracket, flush bracket 1- Hardwire plug...
- Page 4 MODEL : TLP150HDW DEVICE 1. Mount the camera license plate bracket to the OEM license plate mounting location . 2. Route wires into the vehicle 3. Depending on the camera location/orientation please use wiring diagram below: * Monitor Not Included Green Loop : Not Cut - Parking Lines Cut - No Parking Lines Flush Mount White Loop : Not Cut - Mirror Image 22mm hole Cut - Non Mirror Image required for Flush Mounting Power to LCD or (+) Trigger for your Surface Mount Mount The Camera Double Din 28.6mm License plate bracket with screw hole the existing License Plate distance mounting fasteners or Black : Ground desired mounting locations Red: Tap into your (+) Backup Light with alternative mounts . Accele Electronics will not be responsible for damages caused to your car due to improper installation. For complete owners manual please visit https://accele.com/technical-support-ii/tlp150hdwThank you for being a valued customer of ACCELE ELECTRONICS...
Need help?
Do you have a question about the TLP150HDW and is the answer not in the manual?
Questions and answers