Table of Contents
Advertisement
Quick Links
Advertisement
Table of Contents

Subscribe to Our Youtube Channel
Related Manuals for Wisdom WP-350007P12


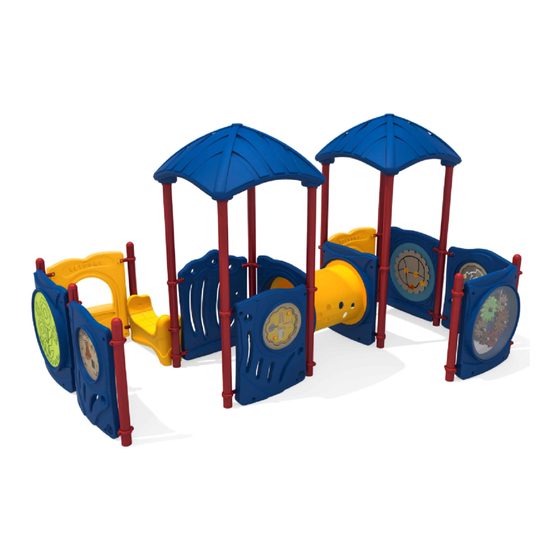
Summary of Contents for Wisdom WP-350007P12
- Page 2 Customer Name: Sales Number: Unit Number: WP-350007P12 Distributor Name: Distributor Phone Number:...
- Page 3 Dear Valued Wisdom Playground Customer, Thank you for purchasing our Wisdom Playground commercial play system. We appreciate the confidence you have placed in our company. We look forward to working together on this playground project as well as those in the future.
-
Page 4: Table Of Contents
Look Below Ground Look Above Ground At Ground Level Look Outside the Area Conduct Your Inventory Preparing Your Site Layout Warning Labels Manufacturing Labels Tools Required Wisdom Playground Warranty Supervision Guidelines Loose-Filled Surfacing Maintenance Guidelines Maintenance Inspection Audit Records Maintenance Checklist... -
Page 5: Commercial Playground Safety Guidelines
Commercial Playground Safety Guidelines When installing your playground, it is essential always to consider the specific conditions of your location. Becoming familiar with the safety guidelines set forth by the Consumer Product Safety Commission (CPSC) will help you in maximizing your play value while enhancing your child’s safety. -
Page 6: Use Zones
The playground safety surfacing manufacture will also be able to recommend the appropriate depth of playground safety surfacing based on the critical fall height for the playground equipment. The critical fall height for the playground equipment is noted on the plan view as HDPS Highest Designated Play Surface. -
Page 7: Site Preparations
Site Preparation Review the entire Wisdom Playground Owner’s Manual & Assembly Instruction Manual before beginning the installation. Wisdom Playground takes great pride and effort to ensure your equipment meets or exceeds all current Consumer Product Safety Commission (CPSC), American Society for Testing and Materials (ASTM) guidelines, and International Play Equipment Manuf actur ers Association (IPEMA) standards in ef f ect at the time of your pur chase. -
Page 8: Look Below Ground
Look Below Ground Always arrange for your state’s 811 underground utility services to locate any buried utilities, which could include the following: ● Water ● Sewer ● Telecommunications ● Cable ● Electric ● Sprinklers ● Drainage pipes This is a free service and knowing where underground utilities are located will determine if your site location is suitable and can influence how your playground will be configured. -
Page 9: At Ground Level
This will ensure that the components are accounted for as you get ready to star . If you have any missing or damaged parts, please contact your sales representative IMMEDIATELY! Wisdom Playgr ound is not r esponsible f or par ts discover ed m issing over ten days after receipt of the shipment. -
Page 10: Preparing Your Site Layout
Preparing Your Site Layout The site plan and the footing diagram provide accurate measurements and markings for the playground footprint. Use the dimensions shown between footings on the footing diagram to layout the actual footprint of the play structure. Locate any freestanding play equipment in the same manner, providing the necessary clearance between the equipment as well as any fences, trees, etc. -
Page 11: Warning Labels
Consumer Product Safety Commission. Warning Labels Wisdom Playground provides warning labels that must be installed on vertical posts to comply with ASTM 1487, which reads, Warning: Installation over a hard surface such as concrete, asphalt or packed earth may result in serious injury or death from falls. -
Page 12: Tools Required
Tools Required With the tamper-resistant hardware, the manufacturer provides a TORX-head tool. Tools normally required include the following: Wheelbarrow (for mixing concrete) Power Drill, 3/8” (with extension cord if necessary) Levels ○ String Level ○ Magnetic Torpedo Level ○ 4ft Level Standard Tool Kit Wrench Set Allen Wrench Set... -
Page 13: Wisdom Playground Warranty
Wisdom Playground Warranty Wisdom Playground warrants to its original customer for as long as the original customer owns the product and uses the product with regular use and installation in accordance with published specifications to be free from defects in materials and workmanship. - Page 14 Wisdom Playground is not responsible for labor costs to replace the part. Wisdom Playground reserves the right to inspect all products identified as defective, and photos of defective equipment will be...
-
Page 15: Supervision Guidelines
Supervision Guidelines Even playgrounds that are designed, installed, and maintained in accordance with safety guidelines and standards can still present hazards to children in the absence of adequate supervision. The goal of playground safety is to remove hazards and minimize injury while playing, but these risks cannot be eliminated entirely. -
Page 16: Loose-Filled Surfacing
Watch for and stop children from wandering away from the play area Check for properly maintained protective surfacing Prohibit use of playground while wet ○ Wet equipment will not provide the necessary traction and gripping capability ○ Slips or falls may occur Observe play patterns to note possible hazardous play and overcrowding on playground equipment Loose-Fill Surfacing... -
Page 17: Maintenance Guidelines
Maintenance Guidelines A consistent and thorough maintenance plan for each playground and independent play unit is the most effective way to keep your playground safe. Train the right people to oversee maintenance schedules and conduct inspections. We recommend the playground safety course offered by the National Recreation and Parks Association. -
Page 18: Inspection
We recommend the following maintenance procedures be followed: •On a daily basis: A responsible individual should conduct a brief visual check for structural defects, signs of vandalism, and litter of foreign matter that needs to be removed. •On a weekly basis: A responsible individual should complete the checklist on the following pages. -
Page 19: Records
Records All maintenance and signed inspection reports must be kept on file. The maintenance records support your audit and action plan. The audit will continue to play a major role in the inspection and maintenance pr ogr am by measur ing pr ogr ess, r ecor ding actions taken, and recommendations made. -
Page 20: Maintenance Checklist
Maintenance Checklist Play Structure in General Post and component footings are not exposed, cracked, or loose Clamps show no sign of slippage, cracking, or failure Clamp drive rivets and hardware are secure Welds are intact and free of cracks Slide and Deck Enclosures Overhead Activities Climbers No rust or corrosion... - Page 21 Play Events Plastic is not cut or cracked All slide supports/anchors are intact and secure All ‘S’ hooks are closed and not excessively worn Swings All ‘S’ hooks or clevises are closed and not excessively worn No exposed metal on swing seats Swing chain is in good condition and not excessively worn, especially at connection points Connectors and chain have free movement...
-
Page 22: Installation/Footings
Footings Any components that require a footing (vertical post, slide foot, climbers, etc.) are set at a length to accommodate 12” of surfacing material. If a different depth of surfacing will be used, modifications need to be made. EXAMPLE: If only 8 of surfacing material will be used, posts or legs will either need to be cut down 4 or footings will need to be dug When concrete is poured in footing, 4”... - Page 24 Thank-You for the Opportunity Serve You! 3879 US Highway 421, Unit 110 & 120, Wilmington, NC 28401 www.wisdomplayground.com 910-769-3576...
- Page 26 Site Layout...
- Page 27 Footing Diagram...
- Page 29 As shown on the overhead drawing, the marked panels are fixed with the corresponding 90 Degree or 180 Degree Panel Clamps, and the unmarked ones are fixed with Universal Clamps.
- Page 30 35-210001-113 3.5" x 77" Steel Support Post Ground Level Number Name Model Quantity...
- Page 31 35-210302 3.5" x 112" Steel Support Post 3ft Post Installation w/o Deck Deck Height w/o Roof (Tan) Number Name Model Quantity...
- Page 32 66-21003 Saddle Seat Installation Steps: Number Name Model Quantity TAMPER RESISTANT TORX-BOLT M8*120 1:Confirm the location of Saddle Seat TAMPER RESISTANT TORX-BOLT M8*30 2: Fix the tube clamp to the support bar on FLAT WASHER 10.5/25*T1.5 both sides. LOCK NUT 3: Fix the support bar to the metal posts.
- Page 33 64-21002 Shopping Center Installation steps Number Name Model Quantity TAMPER RESISTANT TORX-BOLT M8*65 1 Confirm the location of shopping FLAT WASHER 9/20*T1.2 center panel, as shown in the LOCK NUT diagram. 2: Align the penal with the corresponding holes on the panel clamps.
- Page 34 66-21001 Safety Panel Installation Steps: Number Name Model Quantity TAMPER RESISTANT TORX-BOLT M8*65 Note: Panel (Below Deck) 1: Confirm the location of safety panel, as LOCK NUT shown in the diagram. FLAT WASHER 9/20*T1.2 TAMPER RESISTANT TORX-BOLT M8*20 2: Align the panel with the corresponding holes on post clamps.
- Page 35 66-21013 Four In A Row Panel Installation Steps: Number Name Model Quantity TAMPER RESISTANT TORX-BOLT M8*20 1: Confirm the location of four in a row panel, as shown on the overhead FLAT WASHER 9/20*T1.2 drawing. 2: Insert corresponding hardware and tighten.
- Page 36 66-21014 ABC Panel Installation Steps: Number Name Model Quantity TAMPER RESISTANT TORX-BOLT M8*20 1: Confirm the location of ABC panel, as shown on the overhead drawing. FLAT WASHER 9/20*T1.2 2: Insert corresponding hardware and tighten.
- Page 37 66-21015 Gears Panel Installation Steps: Number Name Model Quantity TAMPER RESISTANT TORX-BOLT M8*20 1: Confirm the location of gears panel, as shown on the overhead drawing. FLAT WASHER 9/20*T1.2 2: Insert corresponding hardware and tighten.
- Page 38 66-21004 Panel for Large Active Insert Installation Steps: Number Name Model Quantity TAMPER RESISTANT TORX-BOLT M8*65 Note: Panel (Below Deck) 1: Confirm the location of panel, as LOCK NUT shown in the diagram. FLAT WASHER 9/20*T1.2 TAMPER RESISTANT TORX-BOLT M8*20 2: Align the panel with the corresponding holes on post clamps.
- Page 39 66-21016 Beads & Cups Panel Installation Steps: Number Name Model Quantity 1: Remove screw A & screw B as shown TAMPER RESISTANT TORX-BOLT M8*45 in FIG. 1. Please note that the spacing TAMPER RESISTANT Quincunx nut M8*20 between A and B is 4.4". LARGE FLAT HEAD TAPPING SCREW M4*20 2: As shown in FIG.
- Page 40 66-21017 Maze Panel Installation Steps: Number Name Model Quantity 1: Remove screw A & screw B as shown TAMPER RESISTANT TORX-BOLT M8*45 in FIG. 1. Please note that the spacing TAMPER RESISTANT Quincunx nut M8*20 between A and B is 4.4". LARGE FLAT HEAD TAPPING SCREW M4*20 2: As shown in FIG.
- Page 41 66-21018 Puzzle Panel Installation Steps: Number Name Model Quantity 1: Align the Puzzle Panel with the TAMPER RESISTANT TORX-BOLT M8*45 corresponding holes on the Panel for TAMPER RESISTANT Quincunx nut M8*20 Small Activity Insert. LARGE FLAT HEAD TAPPING SCREW M4*20 2: Insert corresponding hardware and tighten.
- Page 42 66-21005 Panel for Small Active Insert Installation Steps: Number Name Model Quantity TAMPER RESISTANT TORX-BOLT M8*65 Note: Panel (Below Deck) 1: Confirm the location of panel, as LOCK NUT shown in the diagram. FLAT WASHER 9/20*T1.2 TAMPER RESISTANT TORX-BOLT M8*20 2: Align the panel with the corresponding holes on post clamps.
- Page 43 Installation Steps: Number Name Model Quantity Note: Panel (Below Deck) TAMPER RESISTANT TORX-BOLT M8*65 1: Confirm the location of crawl tunnel, LOCK NUT as shown in the diagram. FLAT WASHER 9/20*T1.2 2: Align the tunnel with the corresponding holes on post clamps. 3: Insert corresponding hardware and tighten.
- Page 44 69-21004 Square Leaf Roof Installation Steps: Number Name Model Quantity TAMPER RESISTANT TORX-BOLT M10*20 NOTE:Please remove the Post Cap 10.5/25*T1.5 FLAT WASHER before assemble the Square Leaf Roof. 1: Insert the roof connector. set screws 2: Align the square leaf roof with each of the posts.
Need help?
Do you have a question about the WP-350007P12 and is the answer not in the manual?
Questions and answers