Advertisement
Quick Links
Advertisement

Related Manuals for TEGRAS Concept Airnet 320


Summary of Contents for TEGRAS Concept Airnet 320
- Page 1 Compressed air generator user manual...
- Page 2 introduction Dear customer: Many thanks for having placed your trust in a quality product from TEINNOVA. This product has been made using modern manufacturing procedures and a range of measures to guarantee quality. We endeavour to do everything possible to ensure you are satisfied with this product and have no problems when working with it.
- Page 3 contents symbols 5-29 safety warnings 6-29 intended conditions of use 7-29 get to know your machine 8-29 accessories and related equipment 9-29 operating instructions 11-29 transport 20-29 maintenance and care 21-29 Compressed air generator 3-29...
- Page 4 contents problem solving guide 26-29 technical specifications 27-29 conditions of the warranty 28-29 declaration of compliance 29-29 Compressed air generator 4-29...
- Page 5 symbols All of the graphic symbols shown in this manual as well as those indicated on the equipment itself are explained in this section. It is important to read the text relating to these symbols with special care as it concerns personal and equipment safety.
- Page 6 The AIRNET 320 compressed air generating equipment must not be used for purposes other than those outlined in this instruction manual. The use of the AIRNET 320 by several people at the same time is unnecessary and is also prohibited for safety reasons.
- Page 7 The AIRNET 320 is a machine for generating compressed air using a double boxer-type piston. Keeping a space free for ventilation around the machine while it is working is essential for its proper operation. Keep a distance of more than 1.5 metres between the air generator and any other object or wall.
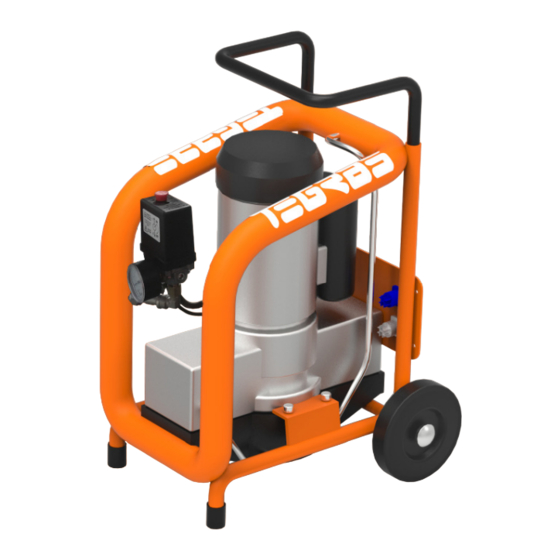
- Page 8 get to know your machine Components: 1- Resettable Fuse 8- Manual discharge valve 2- Auxiliary outlet for compressed air 9- Front foot 3- Electric power supply 10- Back wheel 4- Power outlet 11- Carrying handle 5- Main compressed air outlet 12- ON/OFF switch 6- Air filters 13- Pressure gauge (for internal pressure)
- Page 9 accessories and related equipment Related equipment: Pneumatic saw Pneumatic jigsaw capable of working at 10000 impacts per minute. With an impact length of 3/8”. Code: HE7100200 Pneumatic drill 1/2HP pistol-type pneumatic drill with 2000rpm free rotation speed. Alumin- ium tool with rubber handle. Code: HE7100100 forte Pneumatic brushing robot for cleaning ducts.
- Page 10 accessories and related equipment multipro Pneumatic brushing robot for cleaning ducts. Code: TG3310202 Pneumatic brushing robot for cleaning ducts. Code: Electric-pneumatic brushing robot cleaning ducts. Code: Compressed air generator 10-29...
- Page 11 Connect the cable to the mains electricity and then connect it to your AIRNET 320. The connec- tion to your AIRNET 320 is made by turning the blue connector to the right, as shown in the image.
- Page 12 This combined hose is not provided with the AIRNET 320. If your AIRNET 320 is to be connected to other Tegras or Tecai brushing machines, then use a hose that just has pneumatic connections which is not provided with the AR20.
- Page 13 Stop your AIRNET 320 that supplies the pneumatic tool with compressed air. Once stopped, operate the tool so that any compressed air remaining in the circuit can be released. This image represents the AIRNET 320, which is stopped by using the on/off switch as shown in the diagram.
- Page 14 AIRNET 320. The connection to your AIRNET 320 is made by turning the blue connector to the right, as shown in the image. Connect the combined hose to the mains electricity connection on the TECAI ELEMENT AUTO. The connection to your TECAI ELEMENT AUTO is made by turning the blue connector to the right, as shown in the image.
- Page 15 operating instructions Disconnect the blue electrical connection from the TECAI ELE- MENT AUTO. It is disconnected by turning the blue connector to the left and pulling it out as shown in the image. Disconnect blue electrical connection from AIRNET 320. disconnected by turning the blue connector to the left and pulling it out as shown in the image.
- Page 16 Using with the auxiliary tool: This connection is made by using a low pressure hose. Connect the low pressure hose to your AIRNET 320. Connect the low pressure hose to the pneumatic intake connec- tion on the auxiliary tool.
- Page 17 Stop your AIRNET 320 that supplies the pneumatic tool with compressed air. Once stopped, operate the tool so that any compressed air remaining in the circuit can be released. This image represents the AIRNET 320, which is stopped by using the on/off switch as shown in the diagram.
- Page 18 Turning your AIRNET 320 on: Once the tool or machine to be powered by the AIRNET 320 has been connected, turn on the AIRNET 320 using the switch located on one of the sides of the machine as shown in the diagram. The use of high-perfor- mance electric motors, combined with the low energy consumption of the machine enables dramatic savings to be made in energy use, comparable with the A++ class of domestic appliances.
- Page 19 Stopping your AIRNET 320: Turn off the AIRNET 320 when the work is finished and unplug it. Stop the AIRNET 320 by pulling out the on/off switch as shown in the diagram. Remove the AIRNET 320 from the mains by turning the blue connector to the left and pulling it out as shown in the image.
- Page 20 transport The machine has been designed to be transported in a small van. When transporting the machine it should be firmly tied in order to prevent any type of damage. Additionally, it should be placed in its normal working position (vertical) and the front wheel brakes should be on. Placing the machine on a transport pallet or anything similar is not advised.
- Page 21 The cooling system uses cool air produced by a built-in ventilator and blown over the whole area with fins, both around the motor and the head. Dust particles are deposited on the surfaces when the AIRNET 320 is operating, creating a barrier. This means that the outer surfaces of the compressor must be kept clean to ensure that the cooling system is efficient.
- Page 22 Maintenance operations: Thermal protection: Follow these steps when the thermal switch is triggered and the AIRNET 320 stops. First disconnect the electric current from the pressure switch us- ing the ON/OFF switch. Wait a few minutes then press the RESET button to restart oper- ations.
- Page 23 maintenance and care Purge condensation water in the tank: To release the condensation water collected in the boiler, open the valve located underneath the tank (Fig 8), with the com- pressed air in the interior to improve and accelerate the release. Keep the valve open until all the air has come out.
- Page 24 maintenance and care Cleaning and/or replacement of the suction filters: Remove the screws holding the two filters as shown in the im- age. Once the screw has been removed, take the protective cover off. Take the filter out as shown in the image and clean it with compressed air, aiming the flow of air in the opposite direction to the suction when operating.
- Page 25 maintenance and care Spare parts: TEINNOVA has replacements for all parts of the machine as well as for consumables for all the maintenance tasks mentioned in this manual. If you require any part or consumable, contact TEINNOVA’s Customer Service Department on telephone number: +34 941 44 50 56.
- Page 26 problem solving guide problem p o s s i b l e solution look up Compressed air generator 26-29...
- Page 27 Features AIRNET 320 110V / 60Hz 220V / 50Hz Min. section power cable: 1.5 mm 2.33 x 10 Rated pressure: 10 bar // 145.04 psi Air output (5 bar// 72.52 psi): 200 litres/min // 7.06 cfm Tank capacity: 330 litres/min // 11.65 cfm...
- Page 28 conditions of the warranty In order to use the warranty the corresponding invoice or invoices must be submitted along with proof of their full payment. The warranty lasts for 1 year from the date of purchase and is valid in accordance with the conditions of use specified in this instruction manual.
- Page 29 Telephone: +34 941 44 50 65 Fax: +34 941 25 24 71 Website: www.teinnova.net MODEL: AIRNET 320 TECAI INNOVA, S.L., with full responsibility, certifies that the model of the machine described above complies with all essential requirements of the following directives:...
Need help?
Do you have a question about the Airnet 320 and is the answer not in the manual?
Questions and answers