Advertisement
Quick Links
Advertisement

Related Manuals for Massoth DiMAX 8175201


Summary of Contents for Massoth DiMAX 8175201
- Page 1 DiMAX PC Modul USB DiMAX PC Module USB 8175201...
- Page 2 Version der Firm- latest version of the firmware and ware und Dokumentation erhalten documentation can be obtained Sie über das Softwareprogramm from the Massoth Service Tool Massoth Service Tool (MST) und (MST) software program and auf www.massoth.de. from www.massoth.de. 1.1 Funktionsumfang 1.1 Summary of Functions • Plug and Play USB Anschluss...
- Page 3 • DiMAX PC Module • USB 2.0 Kabel • USB 2.0 cable • FastUpdate Programmierkabel • FastUpdate programming cable • USB Stick (mit Massoth Service • USB Stick (including Massoth Tool, Bedienungsanleitungen, etc.) Service Tool, Manuals, etc.) • Bedienungsanleitung • Manual 1.3 Warnhinweise...
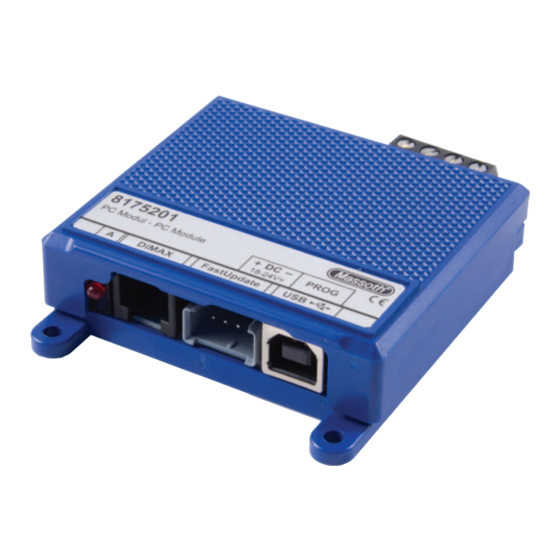
- Page 4 18-24V DC (min. 2A) #8135301 recommended Programmierausgang Programming output Status-LED Massoth Busanschluss USB 2.0 Anschluss Massoth Bus Connector USB 2.0 Connector FastUpdate Schnittstelle FastUpdate Interface Abbildung 1: Anschlüsse des DiMAX PC Moduls Illustration #1: Connections of the DiMAX PC Module...
- Page 5 2.2 Spannungsversorgung 2.2 Power supply Über die Schraubklemmen The PC Module needs to be (Abbildung 1) wird das PC powered by an external power Modul mit Spannung versorgt. Der source (see illustr. 1). A power Spannungsbereich liegt zwischen source from 18 - 24V is required. 18-24 Volt Gleichspannung.
- Page 6 USB stick auf dem beiliegenden USB Stick and on the product page of the PC und auf der Produktseite des PC module at www.massoth.de. Moduls auf www.massoth.de. Achtung! Attention! Beachten Sie beim ersten Anschluss When connecting your PC to the PC...
- Page 7 Programmierstrom in zwei Stufen ming current can be adjusted eingestellt werden (Abbildung 2): in two steps (illustration #2): • 250mA (RailCommunity • 250mA (RailCommunity Standard, Brücke links). standard, Jumper set left) • 2 Ampere* (gartenbahntaugliche • 2 Amps* (standard for garden Begrenzung, Brücke rechts) railways, Jumper set right) *Im Auslieferungszustand steht *2 Amps is the standard factory die Brücke auf 2,0 Ampere. setting.
- Page 8 Decodern durchzuführen. product firmware. (Abbildung 1, Seite 4) (see illustration #1 on page 4) • Verwenden Sie hierfür das Soft- • Use the Massoth Service Tool wareprogramm Massoth Service (MST) software program for this Tool (MST). purpose. • Achten Sie darauf, daß beim Pro- • Make sure that only the decoder...
- Page 9 Modul angeschlossene Program- ming track connected to the PC miergleis). module). • Verwenden Sie das Massoth • Use the Massoth Service Tool Service Tool (MST) und das (MST) and the corresponding entsprechende Decoderprofil um decoder profile to read or program CVs auszulesen oder zu program- CVs.
- Page 10 Programmiergleis). Alternativ kann module). Alternatively, the service auch das Serviceboard verwendet board can also be used. werden. • Use the Massoth Service Tool • Verwenden Sie das Massoth (MST) and follow the on-screen Service Tool (MST) und folgen instructions. Sie den Anweisungen auf dem • Like the CV programming, the...
- Page 11 Modus automatisch eine „Zentra- be updated via the bus cable. le“ und versorgt das zu aktualisie- • Use the Massoth Service Tool rende Gerät über das Buskabel. (MST) to install the latest firm- • Verwenden Sie das Massoth ware.
- Page 12 FastUpdate socket on the PC am PC Modul. module. • Starten Sie die Updatefunktion im • Start the update function in the Massoth Service Tool über den Massoth Service Tool via the Button „FastUpdate“, insofern “FastUpdate” button, if available, verfügbar und folgen Sie den and follow the instructions on the Anweisungen am Bildschirm.
- Page 13 Massoth Service Tool for the Service Tool. Beachten Sie die update. Follow the instructions Anleitung des Massoth Service of the Massoth Service Tool. For Tools. Zum Selbstupdate schließen the self-update, only connect the Sie nur die Spannungsversor- power supply and the USB cable.
- Page 14 Gewährleistung & Kundendienst 4.1 Warranty & Service MASSOTH gewährt die Fehlerfrei- MASSOTH warrants this product heit dieses Produkts im Rahmen against defects in materials and der gesetzlichen Vorgaben, workmanship under the relevant mindestens jedoch für ein Jahr ab...
- Page 15 Sie die jeweils aktuellen Broschü- and software updates. Er- ren, Produktinformationen, Doku- rors and changes excepted. mentation und Softwareprodukte rund um MASSOTH Produkte. Irrtümer und Änderungen vorbe- halten. 5.1 Hotline 4.2 Hotline Gerne stehen wir Ihnen für We will be happy to answer your Rückfragen zu diesem Produkt zur...
- Page 16 Massoth Elektronik GmbH QUALITY Frankensteiner Str. 28 · D-64342 Seeheim · Germany MADE IN FON: +49 (0)6151-35077-0 · FAX: +49 (0)6151-35077-44 GERMANY eMail: info@massoth.de · www.massoth.de RoHS COMPLIANT 991098 BDA 8175201 2021.06...
Need help?
Do you have a question about the DiMAX 8175201 and is the answer not in the manual?
Questions and answers