Table of Contents
Advertisement
Quick Links
Advertisement
Table of Contents

Summary of Contents for FLOWBIRD CWT Compact S4 Touch
- Page 1 CWT Compact S4 Touch Installation & Maintenance Manual...
- Page 2 Issue 3, Published: 2020-01-14. © 2020 Cale Access AB. All rights reserved. Flowbird reserves all proprietary rights relating to the contents of this document. Flowbird reserves all rights over usage, reproduction, representation, marketing, translation, adaptation or modification, and generally all rights over present and future utilisation by any means, for any purpose and in any territory, throughout the period of protection.
-
Page 3: Table Of Contents
Sensors ...................... 31 4.5.1.2 Printer mounting ..................32 4.5.1.3 Paper supply ....................33 4.5.2 Preprinting on printer media ................33 4.5.3 Black mark location ..................34 Issue 3 CWT Compact S4 Touch Installation & Maintenance Manual for CWT 1.0-0 Page 3... - Page 4 Program loading ....................62 Changing the settings of the terminal ............. 63 Daily operation Changing and emptying the coin box .............. 63 Paper refill ....................... 65 Preventive maintenance Issue 3 CWT Compact S4 Touch Installation & Maintenance Manual for CWT 1.0-0 Page 4...
- Page 5 CWTC S4 Touch door ..................85 10.1 CWTC S4 Touch Display Panel ..............85 10.2 CWTC S4 Touch Display unit ................. 86 10.3 Keyword Index Issue 3 CWT Compact S4 Touch Installation & Maintenance Manual for CWT 1.0-0 Page 5...
-
Page 6: Aprovals
All available functions are described in the manual without specifically mentioning which functions are implemented as standard and which of them that is optional. Some of the figures show optional items. Issue 3 CWT Compact S4 Touch Installation & Maintenance Manual for CWT 1.0-0 Page 6... -
Page 7: Available Formats
· WebHelp with viewer for Windows (.EXE) Flowbird distributors can download them from the Partner Area of our website www.calegroup.se. We recommend that you visit the web site regularly to ensure that you have the latest version of the handbook. -
Page 8: References
CWT 104 S, CWT Compact all models). CWTC S4 Touch A CWT Compact terminal with a touch screen display and wake up button. The display is tilted inwards. Electro Static Discharge Issue 3 CWT Compact S4 Touch Installation & Maintenance Manual for CWT 1.0-0 Page 8... - Page 9 Liquid Crystal Display (LCD) which uses Thin-Film Transistor (TFT) technology to improve image quality. TFT LCD is one type of active matrix LCD, though it is usually synonymous with LCD. Issue 3 CWT Compact S4 Touch Installation & Maintenance Manual for CWT 1.0-0 Page 9...
-
Page 10: Safety
Turn OFF the power supply. Unscrew or switch OFF the fuse if there is one. Make sure that the equipment is not exposed to moisture while you are working. Issue 3 CWT Compact S4 Touch Installation & Maintenance Manual for CWT 1.0-0 Page 10... -
Page 11: Batteries
The battery must be replaced at least every 5 years. See Batteries for a description how best to replace the battery. Figure 1, Backup Battery case Issue 3 CWT Compact S4 Touch Installation & Maintenance Manual for CWT 1.0-0 Page 11... -
Page 12: Short-Circuit Risk
The charger must be OFF both when you connect and when you disconnect the battery. Follow all applicable local worker safety regulations. Issue 3 CWT Compact S4 Touch Installation & Maintenance Manual for CWT 1.0-0 Page 12... -
Page 13: Disposal
Before the terminal is fixed with screws to the floor or ground, there is a risk that it may tip, especially if you open the doors. The top cabinet can tip forward if it is not fixed to the pedestal. Issue 3 CWT Compact S4 Touch Installation & Maintenance Manual for CWT 1.0-0 Page 13... -
Page 14: Esd Protection
ESD protection bag when handled outside the terminal. Remember that the bags’ insulating properties gradually wears out. Always use a new bag. The following ESD protection accessories can be ordered from Flowbird. Issue 3 CWT Compact S4 Touch Installation & Maintenance Manual for CWT 1.0-0 Page 14... -
Page 15: Product Description
Even a full alpha-numeric keyboard can, for instance, be presented in the display. The information panel above the display is fully customizable. The surface can also contain instructions or advertising elements. Issue 3 CWT Compact S4 Touch Installation & Maintenance Manual for CWT 1.0-0 Page 15... -
Page 16: Means Of Payment
To verify that a card is valid, the card number is evaluated according to prescribed rules before being checked against a blacklist containing non-valid card numbers. Issue 3 CWT Compact S4 Touch Installation & Maintenance Manual for CWT 1.0-0 Page 16... -
Page 17: Coin System
Cash collection system Flowbird provides a complete system for secure collection and transport of coins. With this system, the coins will never be displayed at any stage of the collection process. Contact Flowbird or your local Flowbird representative for more information. -
Page 18: Anti-Pin Module
A bit further in there is a barrier plate that usually covers the coin slot. The barrier plate is pulled into closed position by a tension spring. Issue 3 CWT Compact S4 Touch Installation & Maintenance Manual for CWT 1.0-0 Page 18... - Page 19 The trap door also forces the barrier plate to the right to allow the metal object to be fully inserted. See figure below. Issue 3 CWT Compact S4 Touch Installation & Maintenance Manual for CWT 1.0-0 Page 19...
- Page 20 As the trap door opens, the compression spring will close the coin slot by pushing the barrier plate to the left. Issue 3 CWT Compact S4 Touch Installation & Maintenance Manual for CWT 1.0-0 Page 20...
-
Page 21: Coin Verifier
Coin verifier The coin verifier reveals if valid coins have been used. The verifier also includes sophisticated electronics for determining what type of coin is passing. Issue 3 CWT Compact S4 Touch Installation & Maintenance Manual for CWT 1.0-0 Page 21... - Page 22 Flowbird provides pre-programmed coin verifiers for all countries where the terminals are sold, but clients can also program the modules themselves if necessary. Contact Flowbird for further information about coin verifier programming. Issue 3 CWT Compact S4 Touch Installation & Maintenance Manual for CWT 1.0-0 Page 22...
-
Page 23: Escrow
The figure above shows the escrow flap in home position, that is, the position it has until the customer either accepts or cancels the purchase. Any inserted coins remain inside the escrow funnel. Issue 3 CWT Compact S4 Touch Installation & Maintenance Manual for CWT 1.0-0 Page 23... -
Page 24: Coin Handling Board
Figure 12, Escrow in Cancelled Purchase position. 4.1.1.4 Coin handling board A PCB assembly named Coin Handling Board is mounted on the left side of the coin unit. Issue 3 CWT Compact S4 Touch Installation & Maintenance Manual for CWT 1.0-0 Page 24... -
Page 25: Coin Box
All structural joints on the coin box are riveted or welded. Screw fittings are not used. This reduces the risk of anyone breaking into the coin box without leaving any traces. Issue 3 CWT Compact S4 Touch Installation & Maintenance Manual for CWT 1.0-0 Page 25... -
Page 26: Card Readers
For operation and maintenance instructions, see Changing and emptying the coin box Card readers The CWTC S4 and CWTC S4 Touch models can be equipped with a Xenoa card reader. Issue 3 CWT Compact S4 Touch Installation & Maintenance Manual for CWT 1.0-0 Page 26... -
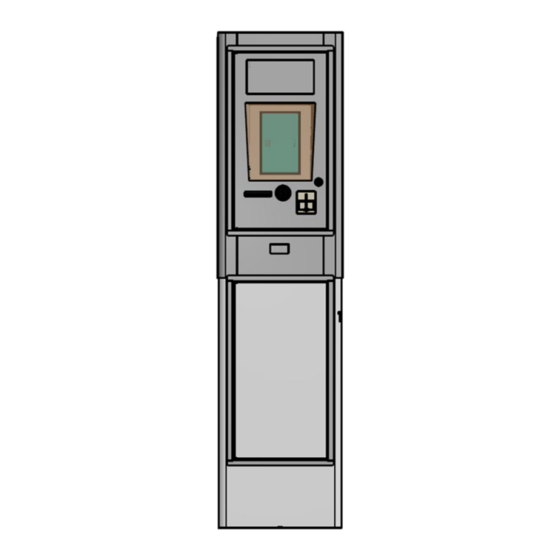
Page 27: Touch Enabled Colour Display
3. inwards tilted display with touch panel 4. Ticket outlet 5. Coin insertion slot 6. Wake Up Button 7. Card Reader Warning/error indicator Issue 3 CWT Compact S4 Touch Installation & Maintenance Manual for CWT 1.0-0 Page 27... -
Page 28: Data Communication
– 100 mm. Paper loading is automatic and full cutting is supported. There is a translucent sensor for preprinted black marks used for precise positioning of printing and cutting. Issue 3 CWT Compact S4 Touch Installation & Maintenance Manual for CWT 1.0-0 Page 28... -
Page 29: Gebe Gtp4672 Thermal Printer
CWT Software Configuration Handbook section GEBE printer for information regarding all other aspects of printer control and printer settings. 1. Paper guide 2. Printer 3. Ticket presenter Issue 3 CWT Compact S4 Touch Installation & Maintenance Manual for CWT 1.0-0 Page 29... - Page 30 1. Test printout button 2. Status indicator. The Status Indicator will blink when an error occurs 3. Feed button 4. Connector for a paper out sensor Issue 3 CWT Compact S4 Touch Installation & Maintenance Manual for CWT 1.0-0 Page 30...
-
Page 31: Sensors
5 mm this is interpreted as out of paper. Presenter Document presence in presenter area. Issue 3 CWT Compact S4 Touch Installation & Maintenance Manual for CWT 1.0-0 Page 31... -
Page 32: Printer Mounting
To remove the actual printer from the module, simply release the two bolds holding it in place. Lift the printer from the mounting plate. Issue 3 CWT Compact S4 Touch Installation & Maintenance Manual for CWT 1.0-0 Page 32... -
Page 33: Paper Supply
Ink used for preprinting in the black mark zone and in the centre of the paper on the non-thermal side shall have no influence on the reflective IR-sensor. OCR-blind ink shall be used. Issue 3 CWT Compact S4 Touch Installation & Maintenance Manual for CWT 1.0-0 Page 33... -
Page 34: Black Mark Location
When using black mark, you cannot use rolls for a Zebra printer in a GeBe printer as the black marks are on different locations on the paper Figure 18, Paper with both Zebra and Gebe black marks Issue 3 CWT Compact S4 Touch Installation & Maintenance Manual for CWT 1.0-0 Page 34... -
Page 35: The Service Menu
The terminal comes in 2 parts: 1. the upper part or Cabinet. See Inside the cabinet 2. the lower part or Pedestal. See Inside the pedestal Issue 3 CWT Compact S4 Touch Installation & Maintenance Manual for CWT 1.0-0 Page 35... -
Page 36: Product Label
The items found inside the cabinet vary between the CWT Compact models and between different versions of each model. The figures show a CWT Compact model equipped for payment with coins, credit cards, and optional contact-less cards. Issue 3 CWT Compact S4 Touch Installation & Maintenance Manual for CWT 1.0-0 Page 36... - Page 37 8. Card reader slot 9. Permanent magnet 10. Inwards tilted display frame including display mounting frame. The yellow line indicates the border of the tilted frame Issue 3 CWT Compact S4 Touch Installation & Maintenance Manual for CWT 1.0-0 Page 37...
-
Page 38: Inside The Pedestal
8. Door lock mecanism 4.7.4 Inside the pedestal The contents of the pedestal may vary depending on local regulations, needs for specific electrical components, etc. Issue 3 CWT Compact S4 Touch Installation & Maintenance Manual for CWT 1.0-0 Page 38... -
Page 39: Coin Box Vault
The key does not have any serrated surfaces neither any sharp or pointed edges. Registered locks and keys are available. Issue 3 CWT Compact S4 Touch Installation & Maintenance Manual for CWT 1.0-0 Page 39... -
Page 40: Door Locks
Abloy. It is a mechanical lock that is opened with a key. The lock can be protected against dirt and water by two flaps that slide apart when the key is inserted (option). Figure 25, standard mechanical door key. Issue 3 CWT Compact S4 Touch Installation & Maintenance Manual for CWT 1.0-0 Page 40... -
Page 41: Electronic Locks
PIN code at the keyboard (CWTC S3A with keyboard and CWTC Touch). In a CWTC S3A without keyboard and in terminals without a Issue 3 CWT Compact S4 Touch Installation & Maintenance Manual for CWT 1.0-0 Page 41... - Page 42 The E-locks are connected to the CPU board (Connector J16) board Please note that if an upgrade from mechanical to electronic lock is desired, the locking bar also needs to be replaced. Issue 3 CWT Compact S4 Touch Installation & Maintenance Manual for CWT 1.0-0 Page 42...
-
Page 43: Door-Open Sensors
The door-open sensor consists of a permanent magnet mounted on the door and a magnetic field sensitive sensor mounted inside the door frame. Figure 29, Door-open sensor in the cabinet. Issue 3 CWT Compact S4 Touch Installation & Maintenance Manual for CWT 1.0-0 Page 43... -
Page 44: Heating System
A warning event can be generated and sent to WebOffice if the voltage drops below a certain warning level. The default value is 11.9 V. Issue 3 CWT Compact S4 Touch Installation & Maintenance Manual for CWT 1.0-0 Page 44... -
Page 45: Battery Charging By Solar Power
A restore event will be generated when the current reaches the recovery level. Reference: See CWT Software Configuration Handbook for more information about this. Issue 3 CWT Compact S4 Touch Installation & Maintenance Manual for CWT 1.0-0 Page 45... -
Page 46: Battery Charging By Mains Power
Flowbird supplies programs and services for credit card administration, collection, terminal maintenance, etc. Contact Flowbird or your nearest Flowbird representative for more information. You are welcome to visit https://www.caleaccess.com for details. Issue 3 CWT Compact S4 Touch Installation & Maintenance Manual for CWT 1.0-0 Page 46... -
Page 47: Cwt Compact Interconnections
This board requires Compact AVR AVE version 3.0.0.28 or later The figure below shows the positions of connectors etc. The figure is followed by a list of all connectors and their use. Issue 3 CWT Compact S4 Touch Installation & Maintenance Manual for CWT 1.0-0 Page 47... - Page 48 Product description Figure 32, CPU board version 0501-E0150 Rev H Connector Com port Type/Outlet name Function 4A Fuse ATO Issue 3 CWT Compact S4 Touch Installation & Maintenance Manual for CWT 1.0-0 Page 48...
- Page 49 Status LEDS and Ambient light sensor Ambient light Com 1 External SPI UART 5V_COM_1) Touch controller - Serial 5 ( AVR JTAG for loading of AVR software Issue 3 CWT Compact S4 Touch Installation & Maintenance Manual for CWT 1.0-0 Page 49...
- Page 50 Colour display with LDVS and Backlight Colour Display 12 V Printer Not mounted Microphone JTAG imx53 Not mounted Not mounted On/Off Switch OFF ON Modem Antenna WGSM SIM Card Issue 3 CWT Compact S4 Touch Installation & Maintenance Manual for CWT 1.0-0 Page 50...
-
Page 51: Terminal Measurements
The distance at the right side allows easy insertion of the door key and gives enough space if a locking mechanism needs to be repaired. Issue 3 CWT Compact S4 Touch Installation & Maintenance Manual for CWT 1.0-0 Page 51... -
Page 52: Solar Power Positioning
The drawing below illustrates how a Flowbird terminal is installed on an undefined street with obstacles (buildings) on both sides. The illustration also shows the angle where the solar panel will get the most sun during the day. -
Page 53: Placing The Terminal On An Existing Concrete Foundation
The bottom plate extends 1.5 mm below the housing of the pedestal and you can place the pedestal directly on top of the foundation without any risk of damaging the housing. Issue 3 CWT Compact S4 Touch Installation & Maintenance Manual for CWT 1.0-0 Page 53... -
Page 54: Pouring A New Concrete Foundation
If the installation site does not have an existing concrete base or the equivalent, you can pour a concrete foundation, casting a base anchor (0403-B0122) into position. The Flowbird base anchor is supplied as a flat package containing parts to be assembled at the installation site. -
Page 55: Power Supply
Danger: Follow local regulations regarding electrical installations. 5.1.5 Power supply Danger: Only qualified personnel may carry out electrical installation. Follow all local regulations. Issue 3 CWT Compact S4 Touch Installation & Maintenance Manual for CWT 1.0-0 Page 55... -
Page 56: Installing The Terminal
The function of the coin system and the water drainage (door shelf) may be interrupted if the terminal leans more than a couple of degrees in any direction. Issue 3 CWT Compact S4 Touch Installation & Maintenance Manual for CWT 1.0-0 Page 56... -
Page 57: Mounting The Cabinet On Top Of The Pedestal
Connect the 12 V supply cable from connectors J5 and J14 on the CPU board to the battery. Issue 3 CWT Compact S4 Touch Installation & Maintenance Manual for CWT 1.0-0 Page 57... -
Page 58: Connecting To The Mains Power Grid
The end customer is entirely responsible for the set up and function of the modem communication unless otherwise is agreed upon in writing with the Flowbird representative. Parts required · Flowbird modem 3G expansion board part number 0501-E0051 Issue 3 CWT Compact S4 Touch Installation & Maintenance Manual for CWT 1.0-0 Page 58... - Page 59 4. Write the subscription telephone number / SIM card number on the label and attach the label, fully legible, inside the cabinet, not on the modem itself because it might be necessary to replace the modem some time. Issue 3 CWT Compact S4 Touch Installation & Maintenance Manual for CWT 1.0-0 Page 59...
- Page 60 Modem registered to a network. No call, no data transfer active. 500ms on / 500 ms off Limited Network Service (e.g. because no SIM, no PIN or during network search) Issue 3 CWT Compact S4 Touch Installation & Maintenance Manual for CWT 1.0-0 Page 60...
-
Page 61: Loading Paper In A Gebe Printer
4. Put the roll onto the roll hub. Make sure the role clicks in place to prevent it dropping off during operation 5. Let the terminal boot up in service mode (leaving the upper door open and bottom door closed). Issue 3 CWT Compact S4 Touch Installation & Maintenance Manual for CWT 1.0-0 Page 61... -
Page 62: Installing The Coin Box
The CWT application software itself is subject to continuous improvements which means that all CWT terminals will benefit from being updated now and then. Issue 3 CWT Compact S4 Touch Installation & Maintenance Manual for CWT 1.0-0 Page 62... -
Page 63: Changing The Settings Of The Terminal
· changing the CWT Compact software and firmware Changing and emptying the coin box To empty the coin box, follow the 3 steps described below Issue 3 CWT Compact S4 Touch Installation & Maintenance Manual for CWT 1.0-0 Page 63... - Page 64 Important: If the knob is accidentally turned to the horizontal position at this point, the Issue 3 CWT Compact S4 Touch Installation & Maintenance Manual for CWT 1.0-0 Page 64...
-
Page 65: Paper Refill
WebOffice when the battery is charged to its normal level again. If a Warning is sent and no recovery event is sent within a day, it may be time to change the battery Issue 3 CWT Compact S4 Touch Installation & Maintenance Manual for CWT 1.0-0 Page 65... - Page 66 Preventive maintenance Note: The gel type, lead-acid battery supplied by Flowbird is maintenance free but will wear out over time. Verify on a regular base if the contacts are not corroded. If so the battery and the cable should be replaced as soon as possible.
-
Page 67: Gebe Printer Gtp4672
Figure 44, Mounting screws on printer shelf version 1 Remove the 4 screws from the top front of the printer and the bottom back of the casing Issue 3 CWT Compact S4 Touch Installation & Maintenance Manual for CWT 1.0-0 Page 67... - Page 68 Preventive maintenance Pull the metal lever to release the Ticket Presenter 45, Release lever Issue 3 CWT Compact S4 Touch Installation & Maintenance Manual for CWT 1.0-0 Page 68...
- Page 69 70 °C which develops a black or blue dot (depends on the type of paper used). Print speed, number of burn pulses and burn time can be adjusted for optimal print result. See CWT Software Configuration Handbook. Issue 3 CWT Compact S4 Touch Installation & Maintenance Manual for CWT 1.0-0 Page 69...
-
Page 70: Cleaning
To clean the printer, disconnect and dismount the printer from the module and from its casing. Open the printer using the leaver on the bottom of the printer. See Print head for detailed figures Issue 3 CWT Compact S4 Touch Installation & Maintenance Manual for CWT 1.0-0 Page 70... -
Page 71: Testing
Coin handling unit Cleaning Get into the habit of regularly checking (once or twice per year) for foreign matter in the various parts of the coin unit. Issue 3 CWT Compact S4 Touch Installation & Maintenance Manual for CWT 1.0-0 Page 71... -
Page 72: Card Readers
Testing Test the function of the card reader regularly by making test purchases with a Flowbird test card. Issue 3 CWT Compact S4 Touch Installation & Maintenance Manual for CWT 1.0-0 Page 72... -
Page 73: Display Module
Cabinet door display window, cleaning , regarding cleaning of the display window in the cabinet door. · See Section Solar panel, cleaning , regarding cleaning of the solar panel. Issue 3 CWT Compact S4 Touch Installation & Maintenance Manual for CWT 1.0-0 Page 73... -
Page 74: Solar Panel
An exception is USB cables and USB devices that can be connected and disconnected without switching OFF the terminal. In this chapter: · Lead battery replacement · Printer replacement · Coin unit replacement Issue 3 CWT Compact S4 Touch Installation & Maintenance Manual for CWT 1.0-0 Page 74... -
Page 75: Lead Battery Replacement
Carefully lift the battery holder tongue a little when you remove the battery cell. Warning: Avoid using conductive objects due to the risk of short circuiting the battery. Issue 3 CWT Compact S4 Touch Installation & Maintenance Manual for CWT 1.0-0 Page 75... -
Page 76: Printer Replacement
1. Disconnect all cables from the coin unit. The number of cables depends on the terminal model and configuration. 2. Unscrew the two screw nuts, one on each side of the Coin Return opening. 3. Remove the coin unit. Issue 3 CWT Compact S4 Touch Installation & Maintenance Manual for CWT 1.0-0 Page 76... -
Page 77: Coin Verifier Replacement
2. Keep the locking latch pulled out while you lower the coin verifier a bit and remove it. 3. Disconnect the cable at the back of the verifier. Figure 48, Removing the coin verifier Assembly Issue 3 CWT Compact S4 Touch Installation & Maintenance Manual for CWT 1.0-0 Page 77... -
Page 78: Card Reader Replacement
CWTC S4 Touch Display unit gives an exploded view drawing of the display unit itself. The display module consists of the following parts: Issue 3 CWT Compact S4 Touch Installation & Maintenance Manual for CWT 1.0-0 Page 78... - Page 79 · lift out the touch panel. You may need to apply some force as the gasket sits very tight. Issue 3 CWT Compact S4 Touch Installation & Maintenance Manual for CWT 1.0-0 Page 79...
-
Page 80: Connecting The Display To The Cpu Board
The display must be connected to the CPU board in different locations depending on the type of the display. 1. Display connector 2. Touch Screen Connector 3. Status indicator Issue 3 CWT Compact S4 Touch Installation & Maintenance Manual for CWT 1.0-0 Page 80... -
Page 81: Cabinet & Pedestal
Cabinet & pedestal Cabinet and pedestal lacquer, touching up Flowbird provides kits including touch-up paint (3 x 0.3 litres), sandpaper and instructions. When ordering, please state the article number and the colour number (usually a RAL number) indicated on labels inside the cabinet and pedestal. -
Page 82: E-Lock Replacement
2. Remove four nuts and remove the E-lock. A small box spanner (10 mm) is required to remove the lower E-lock due to limited space. Assembly Ensure that the dowel pin (see arrow) mates with the locking latches. Issue 3 CWT Compact S4 Touch Installation & Maintenance Manual for CWT 1.0-0 Page 82... - Page 83 Figure 50, The dowel pin should mate with the locking latches Check that the DIP switch setting corresponds to the E-lock position in the terminal. Issue 3 CWT Compact S4 Touch Installation & Maintenance Manual for CWT 1.0-0 Page 83...
-
Page 84: Changing The Cwt Compact Software And Firmware
USB stick for instance, via the USB port on the CPU board. Issue 3 CWT Compact S4 Touch Installation & Maintenance Manual for CWT 1.0-0 Page 84... -
Page 85: Appendix
The Exploded view drawings are unfortunately partly in Swedish but the part numbers are correct. 10.1 CWTC S4 Touch door 10.2 CWTC S4 Touch Display Panel Issue 3 CWT Compact S4 Touch Installation & Maintenance Manual for CWT 1.0-0 Page 85... -
Page 86: Cwtc S4 Touch Display Unit
Appendix 10.3 CWTC S4 Touch Display unit Issue 3 CWT Compact S4 Touch Installation & Maintenance Manual for CWT 1.0-0 Page 86... -
Page 87: Keyword Index
Pedestal Changing the terminal’s settings - H - Chip-card reader Heating system Cleaning Heavy lifting Testing High voltage Coin handling unit Hybrid card reader Issue 3 CWT Compact S4 Touch Installation & Maintenance Manual for CWT 1.0-0 Page 87... - Page 88 Paper low sensor area Preprinting on printer media Print side Printer replacement Product description Product label Program loading - R - References Risk of explosion Issue 3 CWT Compact S4 Touch Installation & Maintenance Manual for CWT 1.0-0 Page 88...
Need help?
Do you have a question about the CWT Compact S4 Touch and is the answer not in the manual?
Questions and answers