Table of Contents
Advertisement
Quick Links
Advertisement
Table of Contents

Related Manuals for Quantrax COMPUTHERM Q20


Summary of Contents for Quantrax COMPUTHERM Q20
- Page 1 COMPUTHERM Q20 Programmable, digital room thermostat Operating Instructions...
-
Page 2: Table Of Contents
TABLE OF CONTENTS 1. A general description of the thermostat 2. Important warnings and safety recommendations 3. Information appearing on the display of the thermostat 4. Location of the thermostat and receiver unit 5. Putting the thermostat into operation, basic settings 5.1. - Page 3 8.1. Economy mode 8.2. Comfort mode 8.3. Manual mode ( ) 8.4. Programmed mode 8.4.1. A description of programming 8.4.2. Steps of programming the device 8.4.3. The use of “COPY” function (copying the program of a day to another day or other days) 8.4.4. Modifying the programs of the device 8.4.5. Program inspection 8.5. Temporary manual mode until the next program switching 8.6. Temporary manual mode for 1 to 99 hours (party program) 8.7. Temporary manual mode for 1 to 99 days (holiday program) 9. Operation of backlight 10. Locking the control buttons 11.
-
Page 4: A General Description Of The Thermostat
A GENERAL DESCRIPTION OF THE THERMOSTAT The COMPUTHERM Q20 type switch mode room thermostat is suitable for regulating a large majority of boilers, air conditioners, humidifiers and dehumidifiers in circulation in Hungary. It can easily be connected to any gas boiler, air conditioner, humidifier and dehumidifier with two-wire room thermostat connection point and to other electrical devices, regardless of whether the device has a 24 V or 230 V control circuit. - Page 5 The device can be programmed as needed so that the heating/cooling or humidifier/dehumidifier system heats/cools and humidifies/dehumidifies your apartment or office to the desired temperature or humidity at the times you want, and it contributes to the reduction of energy costs in addition to providing comfort.
-
Page 6: Important Warnings And Safety Recommendations
2. IM POR TA NT WA R NINGS A ND SA FE T Y R ECOM M E NDATIONS • Before starting to use the device, please study carefully the instructions for use and follow strictly the instructions therein. • The thermostat is designed for business or household (non-industrial) use, it can be used to control any electrical device, the power of which does not exceed 1.38 kW (load capacity: max. -
Page 7: Information Appearing On The Display Of The Thermostat
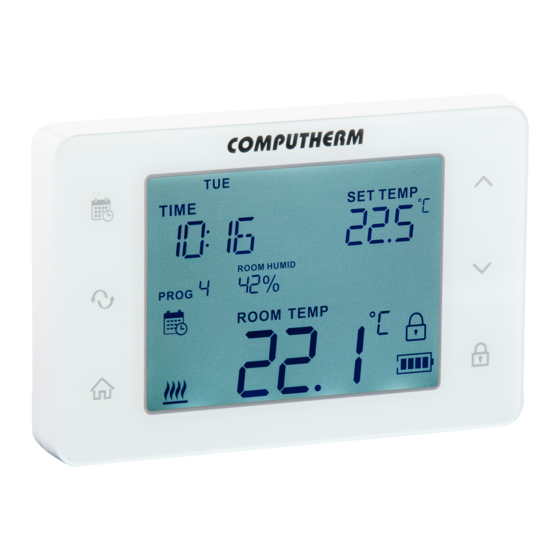
3. INFORMATION APPEARING ON THE DISPLAY OF THE THERMOSTAT Set temperature/humidity Icons showing that the humi- Current day difing/dehumidifing is switched on Current/left time Programming button Icon indicating that the party/holiday program is Up/Down button switched on Mode button Measured humidity Current program Programmed mode icon Menu button... -
Page 8: Location Of The Thermostat And Receiver Unit
4. LOCATION OF THE THERMOSTAT AND RECEIVER UNIT It is reasonable to locate it in a room used regularly or for many hours per day so that it is in the direction of natural ventilation in the room but protec- ted from drought or extreme heat (e.g. - Page 9 Modifying the thermostat can cause electric shock or product failure. Pressing the lock on the upper side of the housing of the thermostat, remo- ve the back cover of the thermostat as shown in the figure Fix the back of the device to the wall using the included screws and some tools.
- Page 10 relay. If you would like to operate an old boiler or any other device that has no connection points for thermostats, then the 1 (NO) and 2 (COM) connection points of the thermostat should be connected to the mains cable of the device, simi- larly as a switch would be connected.
-
Page 11: Commissioning The Thermostat
5.2. Commissioning the thermostat The battery compartment is in the inner side of the front panel of the hou- sing. Insert 2 AA alkaline batteries (LR6 type) in accordance with the diagram in the battery compartment. Warning! Alkaline batteries may only be used for this appliance. Car- bonzinc batteries known as durable or long life batteries and chargeable accumulators are not suitable for the operation of this appliance. - Page 12 6. OPERATION OF THE THERMOSTAT THAT HAS BEEN PUT INTO OPERATION The thermostat controls (manually or via programming) the devices (e.g. gas boiler, pump or dehumidifier) connected thereto on the basis of the humidity/temperature measured by it and being set, considering the switching sensitivity of the thermostat (±0.2 °C/±1.0% according to factory default) This means that when the thermostat is set to heating mode and 22 °C then at switching sensitivity of ±0.2 °C the connection points of the output relay of the...
-
Page 13: Operation Of The Thermostat That Has Been Put Into Operation
7. SETTINGS ATTENTION! According to factory default setting the key lock of the thermostat automatically switches on after 30 seconds which is indicated by the icon that appears in the bottom right corner of the display. To unlock the keyboard, touch the button for 2 seconds until the icon disappears from the display. - Page 14 Factory default Detailed Displayed Description of the setting Setting options abbreviation setting description HEA: heating COO: cooling FUNC Operating mode Chapter 7.1. HUM: humidifying DEH: dehumidifying OFF: Switched off. In this case the thermostat is working in a manually set Economy mode or comfort mode. Switching on and off PROGRAM Chapter 7.2.
- Page 15 Factory default Detailed Displayed Description of the setting Setting options abbreviation setting description H CALIB Calibration of the humidity sensor -10 – +10% RH 0% RH Chapter 7.5. OFF: function switched off Setting humidity limit in H LIMIT 80% RH Chapter 7.6. case of cooling 30-99: if the measured humidity is higher than the set value then the cooling system switches off...
- Page 16 OFF: automatic key lock is switched off LOCK Automatic key lock ON: automatic key lock is switched on (the key lock is activated 30 seconds after touching the last button) OFF: switched off Switching on and off of the pump PUMP Chapter 7.7.
-
Page 17: Settings
7.1. Selecting the operating mode (FUNC) You can easily switch between heating (HEA; factory default setting), cooling (COO), humidifying (HUM) and dehumidifying (DEH) modes. The connection points of the output relay of the receiver unit 1 (NO) and 2 (COM) close at temperatures below those set in the heating mode, at temperatures above those set in the cooling mode, below the humidity level set in the humidifying mode and above the humidity level set in the dehumidifying mode (taking the switching sensitivities into account). -
Page 18: Selecting Switching Sensitivity (Hyster)
temperatures/humidity levels (comfort and economy), and you can easily switch between the two modes by touching the button. In this case the devices connected to the thermostat cannot be controlled according to the pre-set program. 7.3. Selecting switching sensitivity (HYSTER) The switching sensitivity can be adjusted. By modifying this value, you can define the difference below/above the set temperature/humidity where the thermostat should switch on/off the device connected thereto. -
Page 19: Calibration Of The Temperature Sensor (T Calib)
some special cases, we propose to use ±0.1 °C or ±0.2 °C (factory default) when a heating/cooling system should be controlled. For humidification/ dehumidification we recommend you use a switching sensitivity of ±1% (factory default) or ±2%. For more information about switching sensitivity please refer to Chapter 6. -
Page 20: Switching On And Off Of The Pump Protecting Function (Pump)
condensation occurs which can cause serious damages. Using this function, you can set the humidity level above which the thermostat will stop cooling to prevent condensation. 7.7. Switching on and off of the pump protecting function (PUMP) In order to prevent the pump from jamming, the activated pump protection function will start the devices connected thereto for 1 minute every day at 12:00 p.m. -
Page 21: Operating Modes Of The Device
8. OPERATING MODES OF THE DEVICE The thermostat has the following four operating modes: • When the programmed mode is off o Economy mode ( ; Chapter 8.1.) o Comfort mode ( ; Chapter 8.2.) • When the programmed mode is on o Manual mode ( ;... -
Page 22: Economy Mode ( )
Chapter 8.6.) • Temporary manual mode for 1 to 99 days (holiday program) ( Chapter 8.7.) The thermostat can be used for control on the basis of temperature and humidity alike. In every mode the temperature/humidity to be maintained by the thermostat can be defined in 0.5 °C / 0.5 °F / 1% increments within the intervals specified in the settings. -
Page 23: Manual Mode
8.3. Manual mode ( In manual mode the thermostat provides the temperature/humidity corresponding to the set temperature/humidity in the vicinity of the place of installation until the next intervention. Using buttons these values can be modified at any time while this operating mode is used. 8.4. Programmed mode ( ... - Page 24 switching will remain valid from the time of switching to the time PROG of next switching ( PROG • The time of switching is 00:00 that cannot be modified, only PROG the temperature assigned thereto can be changed to meet individual requirements.
- Page 25 • In default position – switchings are inactive (their PROG PROG time is ), but can be activated according to needs. The times of – switchings are freely adjustable in 10 minutes PROG PROG increments between with the proviso that the device és 23:5O enables settings of times only in ascending chronological order so...
- Page 26 description of programming can be found in Chapter 8.4.2. • If there are days of the week on which you intend to use the same program then it is sufficient to write this program only once because it can be easily adopted to an optional day with the help of the “COPY” function according to Chapter 8.4.3.
-
Page 27: Steps Of Programming The Device
8.4.2. Steps of programming the device a) Touch the button to move the thermostat to home screen then touch the button for 2 seconds. Then the device gets to programming mode and the syllable indicating the relevant day(s) flashes in the top line of the display. - Page 28 c) Then the device offers to set the temperature/humidity of PROG switching that belongs to the day(s) selected. During the setting process the currently set value (in case of heating function the default setting is 20 °C) is flashing. Using button set the desired temperature / humidity then touch the button to record the...
- Page 29 f) Then the device offers to set the time of setting, and the display PROG of the device will flash the time value (the default setting is ) to be set. To set switchings — (in the same was as PROG PROG ...
-
Page 30: The Use Of "Copy" Function (Copying The Program Of A Day To Another Day Or Other Days)
for 1 minute. Then the display of the device returns to the home screen. If you would like to copy the program written for the day selected in section “b” to another day/other days you can easily do it by means of the “COPY” function as described in Chapter 8.4.3. - Page 31 • Touch the button to copy the program of the selected day. After copying has been completed, the syllable indicating the copied day stops flashing and becomes continuously visible. • Using és buttons select the day to which you wish to copy the day that has been copied previously.
-
Page 32: Modifying The Programs Of The Device
• You can perform further copying of programs according to your need by repeating the steps described above. 8.4.4. Modifying the programs of the device • Set values can be freely modified at any time by repeating the programming steps. • You can increase the number of switchings activated previously as you like according to Chapter 8.4.2. -
Page 33: Program Inspection
• Touching the button you can save and finish modifications. The device will automatically acknowledge the settings even if no button is touched for 1 minute. Then the display of the device returns to the home screen. • If you intend to write a whole new program then cancel the set programs as described above or reset the device to factory default as described in Chapter 7.10. -
Page 34: Temporary Manual Mode Until The Next Program Switching
programming process you programmed every day of the week (MON, TUE, WED, THU, FRI, SAT, and SUN), simultaneously then you can view the programs of all days only together. If you selected the 5+2 (MON, TUE, WED, THU, FRI, SAT and SUN) programming mode, you can inspect either programming of the first 5 days (MON, TUE, WED, THU, and FRI) or of the last two days (SAT SUN) and you can swich between these options with... -
Page 35: Temporary Manual Mode For 1 To 99 Hours (Party Program)
temperature/humidity until the time of the next switching, and during this time the temperature and humidity can be freely modified with buttons During the temporary manual mode the segments indicating the time on the display alternately show the exact time (TIME), and the time remaining in , that is 4 hours and 2 minutes). -
Page 36: Temporary Manual Mode For 1 To 99 Days (Holiday Program)
Then using buttons set the temperature to be maintained during the party program period. Until the expiry of the set period the device will maintain the temporary temperature/humidity that differ from the default mode and can be freely modified with buttons during the party program period. - Page 37 Using buttons the intended duration can be freely set between 1 and 99 days (one day means 24 hours from the moment of setting). The set holiday program starts automatically and enters into effect after approx. 10 seconds. Then using buttons set the temperature to be maintained during the holiday program period.
-
Page 38: Operation Of Backlight
9. OPERATION OF BACKLIGHT By factory default the backlight of the thermostat automatically switches on for 15 seconds after touching any button. Regardless of the automatic backlight, touching the button you can switch on/off the backlight. If you touch any button while the backlight is active, the backlight will go out only 10 seconds after the last button has been touched. -
Page 39: Battery Replacement
By default setting the thermostat automatically locks the control buttons 30 seconds after the last button has been touched. This setting can be switched off as described in Chapter 7. 11. BATTERY REPLACEMENT The average life span of the batteries is 1 year, but frequent use of backlight can shorten this period considerably. - Page 40 FREQUENTLY ASKED QUESTIONS When you think that your appliance is operating incorrectly or encounter any problem while the appliance is being used then we recommend that you read Frequently Asked Questions (FAQ) available on our website, where we collected the problems and questions that most frequently occur while our appliances are being used, along with the solutions thereto: https://www.computherm.info/en/faq The vast majority of the problems encountered can be solved easily by using...
- Page 41 - 41 -...
- Page 42 PRODUCT INFORMATION DATA SHEET: • Trademark: COMPUTHERM ; Model identifier: Q20 • Temperature control class: I. class • Contribution to the efficiency of seasonal space heating: 1% Remark: In addition to using modern temperature regulators, the following up-to-date regulation methods also contribute significantly to the improvement of the comfort provided by the heating network, the energy efficiency of the heating network and the coefficient of performance: •...
-
Page 43: Technical Data
13. TECHNICAL DATA • Temperature measurement range: 0 to 48 °C (in 0.1 °C increments) / 32 to 100 °F (in 0.1 °F increments) • Humidity measurement range 0 to 99% RH (in 1.0% increments) • Adjustable temperature range: 5 to 45 °C (in 0.5 °C- increments) / 41 to 97 °F (in 0.5 °F increments) •... - Page 44 • Storage temperature: -10 °c to +50 °c • Operating temperature: 0 °c to +48 °c • Operating humidity: 5% to 90% (without condesation) • Protection against environmental impacts: IP30 • Dimensions: 125 x 82x 24,5 mm (W x H x D) • Weight: 149 g •...
- Page 45 RED 2014/53/EU and RoHS 2011/65/EU. QUANTRAX Ltd. Manufacturer: Fülemüle u. 34., Szeged, H-6726, Hungary Phone: +36 62 424 133 • Fax: +36 62 424 672 E-mail: iroda@quantrax.hu Web: www.quantrax.hu • www.computherm.info Origin: designed in the EU, manufactured in China Copyright © 2022 Quantrax Ltd. All rights reserved. - 45 -...
Need help?
Do you have a question about the COMPUTHERM Q20 and is the answer not in the manual?
Questions and answers