Advertisement
Quick Links
Introduction
Welcome to the world of LUMAHAWK LCD On-Camera Monitors.
The LMM-PRO400 is designed for composing and focusing images directly from your
DSLR or DV camera as well as viewing images and video clips from it. It's simple
to use and accepts a variety of popular input formats. To take advantage of all the
features and to ensure safe operation, please read through this instruction manual.
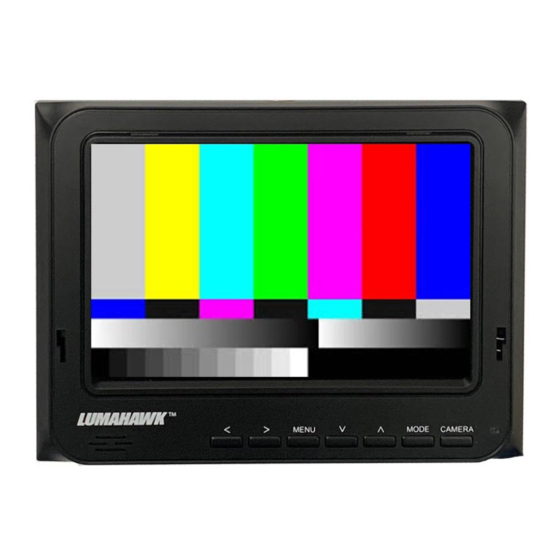
Front
1
3
4
5
2
1. Sun hood slot
2. Speaker
3. Screen marker display
4. Speaker volume
5. OSD MENU display
Back
11
12
13
14
16
15
11. HDMI output
12. HDMI input
13. Composite video input
14. Analog audio input
Included Accessories
•
5.6" LCD HD Camera Monitor
•
F Style DV Battery Plate
•
Shoe Mount Ball Head
Turning Monitor on and selecting signal source
The power switch is located on the back of the monitor. Once the monitor is turned
on, the screen will turn blue and display the LUMAHAWK logo. The power indicator
LED on the front will also turn red.
Push the MODE button to select the signal source. The LMM-PRO400 will display
signals from HDMI and composite video. When the monitor is receiving a signal from
the selected source, the image will appear on the screen and the power indicator LED
will turn green.
•
Select HDMI to display a source connected to the monitor's HDMI input.
•
Select VIDEO to display a source connected to the monitor's composite Video and
Audio inputs.
1
6
7
8
9
10
6. Check Field Display
7. Peak Focus Assist
8. MODE selection
9. CAMERA power
10. Power LED
Side
18
17
19
15. Power switch
18. Firmware port
16. DC power input
19. Headphone jack
17. Battery plate
•
AC/DC Adapter
•
Folding Sun Hood
•
Mini HDMI to HDMI Cable
Instructions for Set-up of the
LMM-PRO400 On-Camera LCD Monitor
Powering the LMM-PRO400
The LMM-PRO400 can be powered with either the supplied AC adaptor or with an F-style
DV battery such as the LUMAHAWK F-550 Li Ion Battery.
NOTE: Remove the battery from the monitor when not in use to ensure maximum battery
life.
Front Panel Controls
The most frequently used monitor controls are directly accessed with the front panel
buttons. These are:
V -Check Field Display
Push the 'V' button to step through the RED, GREEN, BLUE and MONOCHROME check
fields.
Ʌ - Peak Focus Assist
Push the 'Ʌ' button to toggle Peak Focus assist off and on.
> – Monitor Speaker Volume
Push the '>' button to increase speaker volume. While the Volume window is displayed,
you can also push '<' to decrease speaker volume. After adjusting volume, push MENU
button to hide the Volume window.
< – Screen Marker Display
Push the '<' button to adjust the viewfinder perimeter indicator between 80%, 85%,
90%, 93%, 96% and Off.
MENU
Display and hide OSD menu.
MODE
Select input sources HDMI or composite VIDEO. The source's name will be displayed
briefly when the button is pushed.
CAMERA
Toggle the input source signal off and on.
Attaching the sun hood
Always close the sun hood before attaching it to or removing it from the monitor.
•
To attach the sun hood to the monitor insert the two teeth towards the bottom on
the hood's frame into the two slots on the front of the monitor, just above the control
buttons. With the teeth inserted all the way in, apply firm pressure on the top of the
hood's frame and slide it down into the slot.
•
To open the hood, lift the top panel up followed by the left panel out and then the right
panel out (i.e starting with the top panel, open in a counter-clockwise order.)
•
To close the hood, start with the right panel going in, then the left and finally the top (i.e
opposite order from opening)
•
To remove the hood, first close it. Then push the hood frame upwards towards the top of
the monitor and lift away from the monitor face.
Troubleshooting
It's normal for the screen to go dark for a few seconds when turning the camera or signal
source on or when toggling between different sources. It's also normal for bright lines to
briefly appear on the screen when the monitor is turned on.
Image displayed is black and white
•
Check that the hue and saturation levels are properly set.
•
Set the Check Field to None.
•
Ensure that cables running from the camera to the monitor are securely and properly
connected.
Image displayed is an abnormal or distorted color
•
Check that the hue and saturation levels are properly set.
•
Set the Check Field to None.
•
Ensure that cables running from the camera to the monitor are securely and properly
connected.
No image being displayed
•
Check that both monitor and camera are turned on.
•
Ensure that cables running from the camera to the monitor are securely and properly
connected.
•
Check that the correct signal source is selected with the MODE button.
•
Check that power LED is green, indicating that the camera is sending a signal to the
monitor.
No Sound
•
Check that volume on monitor is turned up.
•
Ensure that cables running from the camera to the monitor are securely and properly
connected.
•
Check that the correct signal source is selected with the MODE button.
Caution
•
Only use the supplied power supply when not powering the monitor with a battery.
•
Remove the battery when not using the monitor.
•
Do not expose the monitor to extreme heat or humidity.
•
Do not use harsh chemicals to clean the monitor. Gently wipe the screen with a clean
cloth to remove smudges and fingerprints.
•
This monitor does not contain any user-serviceable parts inside. Do not attempt to
open the casing, as this will void your warranty. If service is required, please contact the
LUMAHAWK offices directly.
Advertisement

Related Manuals for LUMAHAWK LMM-PRO400


Summary of Contents for LUMAHAWK LMM-PRO400
- Page 1 LMM-PRO400 On-Camera LCD Monitor Powering the LMM-PRO400 The LMM-PRO400 can be powered with either the supplied AC adaptor or with an F-style DV battery such as the LUMAHAWK F-550 Li Ion Battery. NOTE: Remove the battery from the monitor when not in use to ensure maximum battery life.
- Page 2 In composite Video mode, the image standard (NTSC or PAL) is indicated. HDMI Pass-through The LMM-PRO400 features an HDMI output port that allows for HDMI pass-though. This Color means that an additional HDMI monitor can be attached to the PRO400 via the HDMI •...
Need help?
Do you have a question about the LMM-PRO400 and is the answer not in the manual?
Questions and answers