Table of Contents
Advertisement
Quick Links
Introduction
Welcome to the world of LUMAHAWK LCD On-Camera Monitors.
The LMM-PRO600 is designed for composing and focusing images directly from your
DSLR or DV camera as well as viewing images and video clips from it. It's simple
to use and accepts a variety of popular input formats. To take advantage of all the
features and to ensure safe operation, please read through this instruction manual.
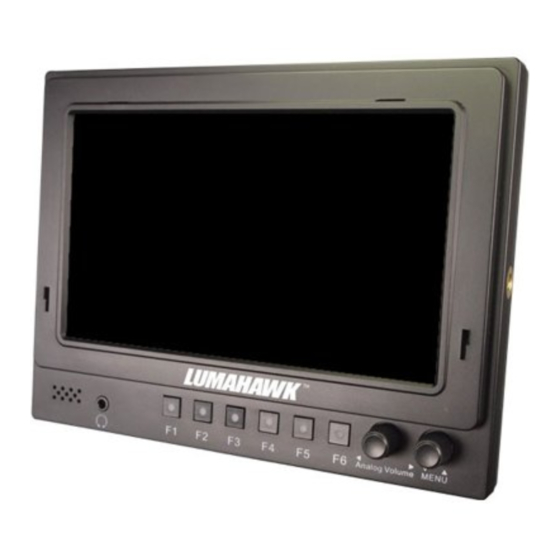
Front
1
2
3
4 4 4 4 4 5
Back
8
12
9
10
11
Included Accessories
•
7" LCD HD Camera Monitor
•
F Style DV Battery Plate
•
Shoe Mount Ball Head
•
AC/DC Adapter
Powering the LMM-PRO600
The LMM-PRO600 can be powered in the following ways:
•
With the supplied AC adapter.
•
A 12V DC power supply fitted with an XLR plug.
•
An F-style DV battery such as the LUMAHAWK F-550 Li Ion Battery.
NOTE: Remove the battery from the monitor when not in use to ensure maximum
battery life.
Attaching the sun hood
Always close the sun hood before attaching it to or removing it from the monitor.
•
To attach the sun hood to the monitor insert the two teeth towards the bottom
on the hood's frame into the two slots on the front of the monitor, just above the
control buttons. With the teeth inserted all the way in, apply firm pressure on the
top of the hood's frame and slide it down into the slot.
•
To open the hood, lift the top panel up followed by the left panel out and then the
right panel out (i.e starting with the top panel, open in a counter-clockwise order.)
•
To close the hood, start with the right panel going in, then the left and finally the
top (i.e opposite order from opening)
•
To remove the hood, first close it. Then push the hood frame upwards towards the
top of the monitor and lift away from the monitor face.
1. Sun hood slot
2. Speaker
3. Headphone jack
4. Function Key
5. Input Signal Select
6. Volume / Parameter
adjust
7. OSD Menu /
Parameter select
1
6
7
8. HDMI output
9. HDMI input
10. SDI output
11. SDI input
12. Battery plate
13
13. Firmware port
14
14. Power switch
15. DC power input
15
16. XLR power input
16
•
XLR Power Input Socket
•
Folding Sun Hood
•
Mini HDMI to HDMI Cable
Instructions for Set-up of the
LMM-PRO600 On-Camera LCD Monitor
Turning the monitor on and selecting a signal source
The power switch is located on the back of the monitor. Once the monitor is turned on, the
screen will turn blue and display the LUMAHAWK logo.
Push F6 to select the signal source. The LMM-PRO600 will display signals from HDMI and
SDI-HD video.
Front Panel Controls
The most frequently used monitor controls are directly accessed with the front panel
buttons. These are:
•
F1/F2/F3/F4/F5
User assignable function keys
•
F6
Toggle between HDMI and SDI inputs. When the monitor switches from one input to the
other, it will breifly display the input type and resolution in the top right corner of the
screen.
•
Volume
Rotate the Volume knob to adjust the speaker or headphone volume. Push the knob to
access Brightness, Contrast, Saturation and Sharpness. Rotate the volume knob to adjust
the selected parameter. When the OSD menu is visable, push the knob to hide it.
•
MENU
Push the MENU knob to display the OSD menu. Rotate the knob to navigate through the
menu items.
HDMI / SDI Pass-through
The LMM-PRO600 features HDMI and SDI-HD output ports that allow for unmodified signal
pass-though.
This means that additional monitors can be attached to the PRO600 via these output ports.
These additional monitors will receive the unmodified image (e.g. no centre markers or
check field display) from the original source (i.e. the source attached to the HDMI or SDI
input ports).
Using OSD to adjust monitor settings
Push the MENU knob to display the OSD (On Screen
Display) menu.
From this menu you can access and make adjustments to
all the monitor's parameters.
•
Rotate the MENU knob to scroll through the main menu
sections and push again to enter a section. Within a
section, rotate the menu knob to highlight the desired
parameter or function.
•
Once highlighted, rotate the VOLUME knob to cycle
through the function's options.
•
After the function has been adjusted, rotate the MENU knob to move to another
function or push the VOLUME knob to hide the OSD.
Auxiliary Functions
•
Single Color
Use the Volume knob to select Off, Red, Green, Blue or
Grayscale.
•
Pseudo Color
Pseudo Color displays the luminance of the image using
the industry-standard IRE scale.
•
Zebra Crossing
The Zebra Crossing filter highlights over exposed regions
of the image with a red zebra pattern.
•
Assist in Focus
The Assist in Focus filter highlights the in-focus regions of the image in Red, Blue or
Yellow, as selected in the 'Focus Color' setting. Use the Volume knob to choose between:
-Color image with focus highlighted
-Grey scale image with focus indicated
-Off
•
Focus Color
Set 'Assist to Focus' color to Red, Blue or Yellow.
•
Histogram
Display a Histogram of the image on the screen.
•
Audio Column
Display Audio level meters for the image source displayed on the screen.
•
Pattern Generator
Display an industry-standard set of color bars, continuous tone grey scale and stepped
grey scale image.
•
5D2 Camera
Turn the signal from the selected source camera Off and On.
Advertisement
Table of Contents

Related Manuals for LUMAHAWK LMM-PRO600


Summary of Contents for LUMAHAWK LMM-PRO600
- Page 1 The power switch is located on the back of the monitor. Once the monitor is turned on, the screen will turn blue and display the LUMAHAWK logo. Push F6 to select the signal source. The LMM-PRO600 will display signals from HDMI and SDI-HD video.
- Page 2 About Nadel Enterprises and Lumahawk when the OSD is not showing. Turn off the timer Nadel Enterprises and the Lumahawk brand are recognized worldwide as the leading to reset it. brand of high quality equipment for both professional and amateur photographers.
Need help?
Do you have a question about the LMM-PRO600 and is the answer not in the manual?
Questions and answers