Advertisement
Quick Links
PRECISION INSIDE MEASURING INSTRUMENT
DIGITAL INSIDE MICROMETER
Thank you for purchasing the Niigata Seiki DIGITAL INSIDE MICROMETER.
●For safe and proper use of this product, please read this instruction manual before use and follow the procedures
described. Please keep manual where it is accessible to user for future reference.
●Keep this manual with the instrument if transferred or leased to a third party.
●For inquiries about this product, please contact dealer or Niigata Seiki.
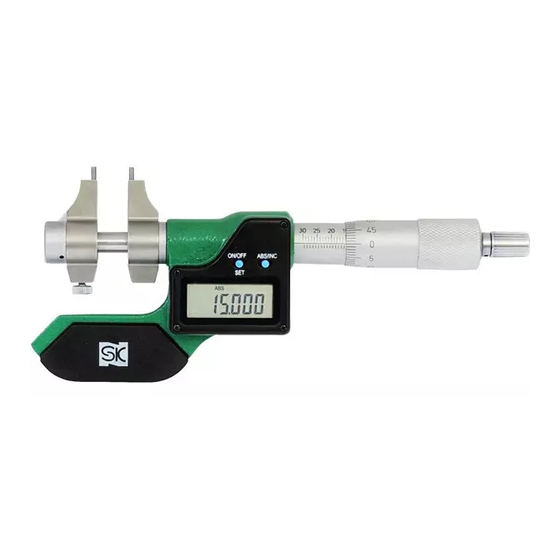
■PART IDENTIFICATION
※Model QEM394-50I shown.
【ACCS.】
●Spanner
●CR2032
Included for test.
CR2032
Please insert a new battery
before use.
●
Ring Gauge
Insulating Cover
Included Ring Gauge
Reference is
Ring Gauge
meeting JIS standards.
Frame
※Not incl. quantization error ( ±1 count )
SPECIFICATIONS
Maximum
Included
Meas. Range
Model No.
permissible
Ring Gauge
(mm)
※
( µm )
(
error
Nom.Size.
φ5mm
QEM394-30I
5
-
30
6
φ25mm
QEM394-50I
25
-
50
6
φ50mm
QEM394-75I
50
-
75
8
φ75mm
QEM394-100I
75
-
100
8
●Resolution:0.001mm
TROUBLESHOOTING
ERROR
CORRECTIVE ACTION
●Clean measuring surfaces
●Measured value
is wrong.
with cloth.
●Confirm 0-Point setting and
re-zero with long press of
[ ON/OFF/SET ] Button ( >2 sec. )
●When turning Thimble, be
gentle and do not apply force.
●LCD does not
●Cycle power by removing
display.
and replacing battery.
●Displayed value is
●Replace battery with new
unstable.
one.
●Display is not clear.
※If problem persists, or if you have any questions,
please contact distributor.
※Please note, manufacturer is unable to respond to inquires
or provide service directly. Please contact distributor.
Model
INSTRUCTION MANUAL
No.
Jaws
Spindle
Clamp
Sleeve
Thimble
ON/OFF
ABS/INC
SET
Scale
[ ABS/INC ] Btn.
[ ON/OFF/SET ] Btn.
※QEM394-30I
QEM394-50Ionly
LCD Display
FEATURES
●Inside Micrometer with digital display
●Constant pressure mechanism ( Ratchet Stop )
)
●Carbide measuring surfaces
●Auto-display-off function ( approx. 20 minutes. )
CAUTION
●Always clean measuring surfaces with soft cloth before use.
●Do not turn spindle more than 3mm above upper
measurement range.
●When turning Thimble, be gentle and do not apply
force. High force on Thimble will cause inaccuracy.
●This is a precision instrument, handle with care. Do
not drop or subject to excessive forces.
●Keep away form high voltage and strong magnetic
fields. Instrument damage may result.
●Keep instrument away from direct sunlight or high
temperatures such as in a car, or near a stove or
heat source.
●Do not expose to water or oils.
●Do not disassemble or modify.
●After use, wipe with a soft cloth to remove any dirt or
grime, and apply a rust preventative oil before
storage. Keep out of reach of children.
●Please do not use organic solvents to clean the body
of the instrument.
●Remove battery if instrument will not be used for a
long period of time. Batteries may leak if left in
unused instrument for an extended period.
●Only use as directed. Improper use may cause
accident or injury.
CAUTION
QEM394- ***
①Rotate the Battery Cover on rear
using coin or Spanner.
②Insert battery with "+" side up.
③Replace Battery Cover.
Press [ ON/OFF/SET ] Button to turn power ON; measurement will display on the LCD.
Press a second time to turn power OFF.
Setting the origin used for normal measurements.
Once set, even when power is off the origin is saved and does not have to be reset with each use.
Ratchet
When battery is replaced, origin will go to default setting. Please reset.
Stop
①Remove any grease or dust from the measuring surfaces and Ring Gauge using a clean cloth, such as
a lens cleaning cloth. Make sure no foreign matter is adhered to the measuring surfaces.
②Loosen the Spindle Clamp and turn the Ratchet Stop to allow the Jaws to fit inside the supplied Ring Gauge.
③Place the Jaws inside the Ring Gauge and turn the Ratchet Stop until the measurement surfaces make
0-Point Adj. Hole
contact and the Ratchet Stop clicks 1~3 times.
※Make sure the Measurement Surfaces are flat against the Gauge. If they are at an angle or misaligned
the measurement reading will not be accurate.
④Press the [ ON/OFF/SET ] Button for more than two seconds.
LCD will display "SET" for 0.5 seconds. The origin is now set and display will read as shown below:
●QEM394-30I ・・・・・ 5.000 ●QEM394-50I ・・・・・ 25.000
Battery
●QEM394-75I ・・・・ 50.000 ●QEM394-100I ・・・・ 75.000
【
【
】
】
Cover
Rear
Rear
⑤Check to see if the Thimble Scale aligns with the "0" line on the
Sleeve according to the above values.
To align the Thimble Scale 0-Point reference lines.
1. Lock Spindle using Spindle Clamp.
2. Insert the spanner into 0-point Adjustment Hole on rear of
Thimble.
3. Use spanner to rotate Sleeve to align the 0-Point lines.
The right figure
The gauge is now ready to take measurements.
①Remove any grease or dust from the measuring
surfaces using a clean cloth, such as lens
cleaning cloth. Make sure no foreign objects
are adhered to the measuring surfaces.
②Loosen the Spindle Clamp and position the
Jaws inside the object to be measured.
③With the Jaws inside the part to be measured,
turn the Ratchet Stop until the measuring
surfaces are in contact and the Ratchet Stop
clicks 1~3 times.
④After performing the above measurement, the
accurate measurement is the value displayed on
the LCD display plus the value printed on the Ring
Gauge ( the actual dimension deviation )
※Measurement can also be read off Thimble and
Sleeve Scale as with a standard micrometer.
For comparative measurements, the display reading can be
zeroed at any position by pressing the [ ABS/INC ] Button. In this
mode, the zero point is retained in memory.
Press the [ ABS/INC ] Button again to return to absolute mode.
Only use CR2032 type
O pen
battery.
Battery
Cover
Example
●Ex:QEM394-75I
The actual size of the
reference Ring Gauge
shown is "-0.001"
・Meas. = Display value -0.001
●Ex:QEM394-100I
The actual size of the
reference Ring Gauge
shown is "+0.002"
See Ex.
・Meas. = Display value +0.002
Make sure the Battery
Cover is closed securely.
Please make sure the
gasket is in the proper
place on the Battery
Cover.
Rotate until origins match
ON/OFF
ABS/INC
SET
Spanner
<Reference Ring Gauge>
Nom. Size
Act.
Dimension
φ
(deviation)
5 0
− 0.001
(actual size)
φ
75
+ 0.002
(actual size)
Niigata Seiki Co., Ltd.
5-3-14, Tsukanome, Sanjo, Niigata, Japan, 955-0055
Tel. : +81-256-33-5522 Fax. : +81-256-33-5518
MAIL intl.sales@niigataseiki.co.jp
URL
http://www.niigataseiki.co.jp
Advertisement

Related Manuals for Niigata seiki QEM394 Series


Summary of Contents for Niigata seiki QEM394 Series
- Page 1 Please keep manual where it is accessible to user for future reference. ●Keep this manual with the instrument if transferred or leased to a third party. Press a second time to turn power OFF. ●For inquiries about this product, please contact dealer or Niigata Seiki. ■PART IDENTIFICATION Jaws Setting the origin used for normal measurements.
- Page 2 電池は必ずCR2032をお使いください。 取扱説明書 品番 ご注意 電 QEM394- ** I 開ける 池 ①本体裏面の電池蓋を、キースパナの平面やコインなどで回し デジタルインサイドマイ クロメータ の て開けます。 精密内側測定器 入 電池蓋が軽く浮き上がるまで矢印の向きに回してください。 れ ②電池を必ず(+)側を表にしてセットしてください。 方 この度は「デジタルインサイドマイクロメータ」をお買上げいただきありがとうございます。 電池蓋 ③電池蓋を元通りに装着してください。 ●正しく安全にお使いいただくため、ご使用の前に本取扱説明書を必ず読み、記載の手順に従ってご使用ください。 お読みになった後は、お使いになる方がいつでも見ることができる場所に大切に保管してください。 電池蓋は確実に閉めてください。 電 ON/OFF/SETボタンを押すと電源がONになり、LCD表示部に数 ●第三者に譲渡・貸与される場合も、この説明書を必ず添付してください。 値が表示されます。 パッキンが電池蓋から外れてい 源 ●当商品に関するお問い合わせは、お買い求めの販売店もしくは当社にご連絡ください。 ないことを確認してください。 もう一度押すと電源がOFFになります。 測定子 ■各部の名称 通常測定で使用する原点を設定します。 スピンドル 0...