
Related Manuals for Truper SME-10B


Summary of Contents for Truper SME-10B
- Page 1 Manual Table Saw 2.5 Hp with Stand Power Applies for: Model Code SME-10B 101796 SME-10B Read this manual thoroughly CAUTION before using the tool.
-
Page 2: Table Of Contents
Assembly Keep this manual for future references. Parts The illustrations in this manual are for reference Settings only. They might be different from the real tool. Operation Maintenance Troubleshooting Notes Authorized Service Centers Warranty Policy SME-10B ENGLISH... -
Page 3: Technical Data
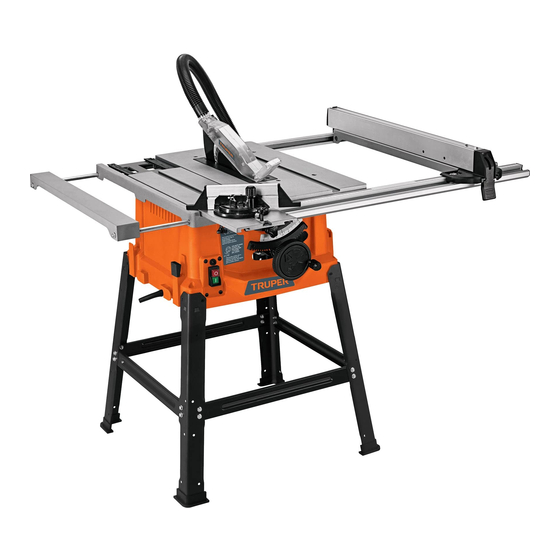
Technical data SME-10B Code 101796 Description Table saw with stand Work table 27 5/32” x 20” extendable up to 47 15/64” Maximum 90° cutting capacity 3 1/4” Maximum 45° cutting capacity 2 1/4” Bevel range 0°- 45° Axis diameter 5/8”... -
Page 4: General Power Tool Safety Warnings
General Power Tools Safety Warnings WARNING! Read carefully all safety warnings and instructions listed below. Failure to comply with any of these warnings may result in electric shock, fire and / or severe damage. Save all warnings and instructions for future references. -
Page 5: General Safety Warnings For Electric Saws
Safety Warnings for electric saws Before operating the saw Kickback CAUTION • Obtain training from a qualified person • Avoid kickback (when the work piece is thrown against the familiar with the equipment and its operation. operator). Keep the disc sharp, saw fence parallel to the •... -
Page 6: Parts List
Parts list • Unpack the equipment and check that it has not been damaged during transportation. • Clearly identify the individual parts shown in the parts list. 1. Legs A (X4) 2. Long crossbeams B (X2) 3. Long crossbeams C (X2) 4. -
Page 7: Assembly
Assembly Table base • With the help of another person turn the table and motor cabinet assembly over and place it on a flat, level and solid surface (A). Then remove the 8 screws from the corners of the cabinet (B). •... - Page 8 Assembly • With the help of another person, rotate the table into its normal position. • Finally mount the two brackets (J), one on each rear leg by means of two sets of nuts and bolts to complete the assembly of the base. ENGLISH...
- Page 9 Assembly Spacer assembly Retractable guard assembly • Using a wrench, turn the table insert lock (A) to its open • Assemble the retractable guard (G) with the bolt (H) in position (B). the upper hole of the spacer (I). • Do not screw the bolt too tightly; the CAUTION guard should move freely.
- Page 10 Assembly Sawing guide • Lift the locking lever (A) of the sawing guide head. • Rest the guide head on the front rail (B) and the rear stop on the rear rail (C). • Lower the lever to secure the saw fence in position. •...
-
Page 11: Parts
Parts Left extension Cutting of the blade working table Work table Overload protection switch Right worktable extension Switch Adjustment wrenches Power Cutting scale cord Handwheel for blade tilt and height adjustment Push stick Sliding table Table insert rails lock Cutting scale pointer Left worktable Rail slides... - Page 12 Parts Accessory brackets • The saw is equipped with different supports in which the accessories can be placed when not in use. Push stick Sawing guide supports and auxiliary guide supports Holder for wrenches and cutting blades (The blade is factory assembled Miter fence on the motor shaft) support...
-
Page 13: Settings
Settings WARNING • Before making any adjustments be sure to turn off and unplug the saw. Blade height CAUTION • The blade height should be adjusted so that the tips of the blade teeth are above the surface of the workpiece by approximately 1/8” to 1/4”, and the grooves are below the surface of the workpiece. - Page 14 Settings Use of table extensions • Right table extension (A): To traverse and increase the table length, loosen the locking knobs (B) located under the table, one at the front and the other at the rear. • Travel the rails until the extension reaches the desired position.
- Page 15 Settings Adjusting the miter gauge • Loosen the clamping handle (A) to allow the fence frame to rotate freely to the desired angle. The fence can be adjusted from 0° to 60° left and right. • The front bumper (B) can slide left and right by loosening the two wing nuts.
-
Page 16: Operation
Operation • Handling power tools involve some danger to the operator. Before attempting regular work, we recommend familiarizing yourself with the operations using scrap wood to check the settings. • Read all instructions before starting to cut the workpiece. Always heed safety warnings to avoid personal injury. WARNING Make sure the guard and spreader are installed and functioning properly to avoid possible serious... - Page 17 Operation Cutting across the wood grain • Place the workpiece against the miter gauge (A) and advance the workpiece by pushing it with the miter gauge towards the disc. • Start the cut slowly and push the workpiece with a steady, continuous motion.
-
Page 18: Maintenance
Operation Cutting of small parts Groove cutting • If you are going to make cuts in small • Remove the spacer (C) to be able to make groove cuts. WARNING pieces or lengthwise cuts in narrow strips of wood, always •... -
Page 19: Troubleshooting
Troubleshooting Problem Cause Solution The saw will not start. • Cable disconnected from power supply. • Connect the power supply cable. • Overload protection switch activated. • Reset the overload protection switch (see page 16). • Damaged cable. • Replace the cable. •... -
Page 20: Notes
Notes ENGLISH... -
Page 21: Authorized Service Centers
En caso de tener algún problema para contactar un Centro de Servicio Autorizado Truper consulte nuestra página ® www.truper.com donde obtendrá un listado actualizado, o llame al: 800 690-6990 ó 800 018-7873 donde le informa- rán cuál es el Centro de Servicio más cercano. DE TODO PARA LA CONSTRUCCIÓN FIX FERRETERÍAS... -
Page 22: Warranty Policy
It includes the costs of transportation of the product that derive from its fulfillment of its service network. . Phone number 800-018-7873. Made in China. Imported by Truper, S.A. de C.V. Parque Industrial 1, Parque Industrial Jilotepec, Jilotepec, Edo. de Méx. C.P. 54257, Phone number 761 782 9100.
Need help?
Do you have a question about the SME-10B and is the answer not in the manual?
Questions and answers