Table of Contents
Advertisement
Quick Links
Advertisement
Table of Contents

Related Manuals for Orange Pi R1 Plus LTS


Summary of Contents for Orange Pi R1 Plus LTS
- Page 1 Pi 用户手册 深圳市迅龙软件有限公司版权所有 Orange Pi R1 Plus LTS User Manual...
-
Page 2: Table Of Contents
1.3. Who is for?..........................1 1.4. Hardware features of Orange Pi R1 Plus LTS..............2 1.5. Top view and Bottom view of Orange Pi R1 Plus LTS............3 1.6. Orange Pi R1 Plus LTS interface details................4 2. Introduction to the use of the development board............5 2.1. - Page 3 range Pi 用户手册 深圳市迅龙软件有限公司版权所有 3.4.2. Lan port test................... 34 3.5. SSH remote login to the development board..............36 3.5.1. SSH remote login development board under Ubuntu......36 3.5.2. SSH remote login development board under Windows......36 3.6. USB interface test......................38 3.6.1.
- Page 4 range Pi 用户手册 深圳市迅龙软件有限公司版权所有 4.2.1. Compile OpenWRT Source Code............60 5. Linux system instructions....................61 5.1. Supported Linux Release version and kernel version............61 5.2. linux5.10 kernel driver adaptation situation..............61 5.3. Linux system default login account and password............62 5.4. Start the rootfs in the auto-expanding TF card for the first time........62 5.5.
- Page 5 range Pi 用户手册 深圳市迅龙软件有限公司版权所有 5.18. 13pin interface GPIO, I2C, UART test................85 5.18.1. 13pin GPIO port test................86 5.18.2. 13pin I2C test..................87 5.18.3. 13pin UART test.................. 89 5.19. Method of outputting kernel print information to 13pin serial port........91 5.20. View the serial number of the RK3328 chip..............92 5.21.
- Page 6 range Pi 用户手册 深圳市迅龙软件有限公司版权所有 8.3.2. Compile the kernel................119 8.3.3. Compile Android..................119 8.3.4. Firmware packaging................120 8.3.5. Generate upgrade image...............120 8.3.6. Automatically compile scripts............. 120...
-
Page 7: Basic Features Of Orange Pi R1 Plus Lts
Orange Pi is an open source single-board computer, a new generation of arm-64 development board, it can run Android 9.0, Ubuntu, Debian and OpenWRT and other operating systems. Orange Pi R1 Plus LTS uses Rockchip rk3328 system-on-chip and has 1GB LPDDR3 memory 1.2. -
Page 8: Hardware Features Of Orange Pi R1 Plus Lts
Pi 用户手册 深圳市迅龙软件有限公司版权所有 1.4. Hardware features of Orange Pi R1 Plus LTS Hardware Specification introduction Rockchip RK3328 Quad-core ARM Cortex-A53 64-bit processor, main frequency speeds up to 1.5GHz Mali-450MP2 Supports OpenGL ES 1.0/2.0 Power management RK805 chip Memory(SDRAM) 1GB LPDDR3( shared with GPU)... -
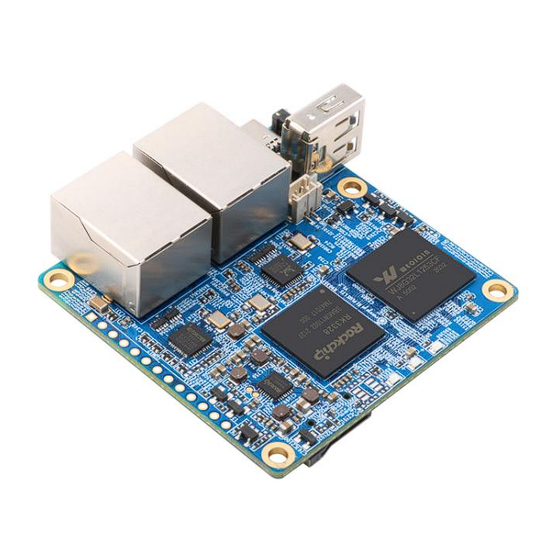
Page 9: Top View And Bottom View Of Orange Pi R1 Plus Lts
Pi 用户手册 深圳市迅龙软件有限公司版权所有 Orange Pi™ is a trademark of the Shenzhen Xunlong Software CO., Limited 1.5. Top view and Bottom view of Orange Pi R1 Plus LTS Top view: Bottom view: www.orangepi.cn www.xunlong.tv... -
Page 10: Orange Pi R1 Plus Lts Interface Details
Pi 用户手册 深圳市迅龙软件有限公司版权所有 1.6. Orange Pi R1 Plus LTS interface details www.orangepi.cn www.xunlong.tv... -
Page 11: Introduction To The Use Of The Development Board
1) TF card, a high-speed card of class 10 or higher with a minimum capacity of 8GB, it is recommended to use SanDisk TF card. Orange Pi tests are all SanDisk TF cards. Other brands of TF cards may cause the system to fail to start. - Page 12 The way to insert the interface board into the development board is as follows, remember not to insert it backwards The 13pin header on the Orange Pi R1 Plus LTS development board can be connected to the interface board to expand the functions that are not on the development board.
- Page 13 IR receiving function Android system can be controlled by IR remote control d.The schematic diagram of the 13pin header of Orange Pi R1 Plus LTS is shown below 5) CPU fan, used to dissipate heat to the CPU, the interface voltage is 5V, the interface specification is 2pin, 1.5mm spacing...
- Page 14 range Pi 用户手册 深圳市迅龙软件有限公司版权所有 7) 100M or 1000M network cable, used to connect the development board to the Internet 8) AV video cable, used to connect the development board to the TV through the CVBS interface to display video (only available for Android System) 9) USB to TTL module and DuPont cable, when using the serial port debugging function, you need USB to TTL module and DuPont cable to connect the development board and the computer...
-
Page 15: Download The Image And Related Information Of The Development Board
range Pi 用户手册 深圳市迅龙软件有限公司版权所有 Windows PC Used to burn Android, Linux and OpenWRT images 2.2. Download the image and related information of the development board 1) The download URL of the Chinese version is http://www.orangepi.cn/downloadresourcescn/ 2) The download URL of the English version is http://www.orangepi.org/downloadresources/ 3) The information mainly contains Android source code: saved on Baidu Cloud Disk and Google Cloud Disk... -
Page 16: Method To Burn Linux Image Or Openwrt Image To Tf Card Based On Windows Pc
range Pi 用户手册 深圳市迅龙软件有限公司版权所有 2.3. Method to burn Linux image or OpenWRT image to TF card based on Windows PC 1) The method of burning OpenWRT image based on Windows PC is the same as the method of burning Linux image. The following is an example of burning Linux image 2) First prepare a TF card with 8GB or larger capacity. - Page 17 5) Download the Linux operating system image file compression package that you want to burn from the Orange Pi data download page, and then use the decompression software to decompress it. In the decompressed file, the file ending with ".img" is the operating system image file.
-
Page 18: Method Of Flashing Linux Image Or Openwrt Image To Tf Card Based On Ubuntu Pc
range Pi 用户手册 深圳市迅龙软件有限公司版权所有 After the image is written, click the "Exit" button to exit, then you can pull out the TF card and insert it into the development board to start 2.4. Method of flashing Linux image or OpenWRT image to TF card based on Ubuntu PC 1) The method of flashing OpenWRT image based on Ubuntu PC is the same as that of flashing Linux image. - Page 19 7) Download the Linux operating system image file compression package you want to burn from Orange Pi's data download page, and then use the decompression software to decompress it. In the decompressed file, the file ending with ".img" is the operating system image file.
- Page 20 range Pi 用户手册 深圳市迅龙软件有限公司版权所有 test@test:~$ sha256sum -c *.sha Orangepir1plus-lts_2.1.4_ubuntu_bionic_server_linux5.10.44.img: Success 9) Then double-click balenaEtcher-1.5.109-x64.AppImage on the graphical interface of Ubuntu PC to open balenaEtcher (no installation required), the opened interface is shown in the figure below a. First select the path of the linux image file b.
-
Page 21: Method Of Flashing Android Firmware To Tf Card
2) Then use a card reader to insert the TF card into the computer 3) Download Android 9.0 firmware and SDDiskTool burning tool from Orange Pi's data download page 4) Use the decompression software to decompress the downloaded Android firmware compressed package. - Page 22 range Pi 用户手册 深圳市迅龙软件有限公司版权所有 6) After opening SD_Firmware_Tool, if the TF card is recognized normally, the name and capacity of the TF card will be displayed when the removable disk device is selected. Please make sure that the displayed TF card device information is consistent with the device information of the TF card you want to burn.
- Page 23 range Pi 用户手册 深圳市迅龙软件有限公司版权所有 After clicking "Start to create", a warning box will pop up, select "Yes (Y)" to start burning b. After starting to burn, the partition currently being burned will be displayed below www.orangepi.cn www.xunlong.tv...
- Page 24 range Pi 用户手册 深圳市迅龙软件有限公司版权所有 8) After burning, the display of SD_Firmware_Tool is as shown in the figure below. At this time, click the OK button to close SD_Firmware_Tool, and then you can unplug the TF card from the computer and insert it into the development board to start www.orangepi.cn www.xunlong.tv...
-
Page 25: Start The Orange Pi Development Board
深圳市迅龙软件有限公司版权所有 2.6. Start the Orange Pi development board 1) Insert the burned image TF card into the TF card slot of the Orange Pi development board 2) The development board has an Ethernet port, which can be plugged into a network... - Page 26 4) The schematic diagram of connecting the USB to TTL module to the computer and the Orange Pi development board is shown below 5) If you are using a CP2102 USB to TTL module, under the condition of a baud rate of 1.500000, some systems may encounter garbled or unusable problems.
-
Page 27: How To Use The Debug Serial Port On Ubuntu Platform
range Pi 用户手册 深圳市迅龙软件有限公司版权所有 win7 win10 Not available CP2102 ubuntu14.04 ubuntu18.04 Not available ubuntu20.04 Not available How to use the debug serial port on Ubuntu platform? 2.7.2. 1) If the USB to TTL module is connected normally, you can see the corresponding device node name under /dev of Ubuntu PC, remember this node name, you will use it when setting up the serial port software later test@test:~$ ls /dev/ttyUSB*... - Page 28 range Pi 用户手册 深圳市迅龙软件有限公司版权所有 6) First select the setting interface of the serial port 7) Then set the parameters of the serial port a. Set the Serial line to connect to to /dev/ttyUSB0 (modify to the corresponding www.orangepi.cn www.xunlong.tv...
- Page 29 range Pi 用户手册 深圳市迅龙软件有限公司版权所有 node name, generally /dev/ttyUSB0) b. Set Speed(baud) to 1500000 (baud rate of serial port) c. Set Flow control to None 8) After setting the serial port setting interface, return to the Session interface a. First select the Connection type as Serial b.
-
Page 30: How To Use The Debug Serial Port On Windows Platform
range Pi 用户手册 深圳市迅龙软件有限公司版权所有 9) After starting the development board, you can see the Log information output by the system from the opened serial terminal How to use the debug serial port on Windows platform? 2.7.3. 1) There are many serial debugging software that can be used under Windows, such as www.orangepi.cn www.xunlong.tv... - Page 31 range Pi 用户手册 深圳市迅龙软件有限公司版权所有 SecureCRT, MobaXterm, etc. The following demonstrates how to use MobaXterm. This software has a free version and can be used without purchasing a serial number. 2) Download MobaXterm Download MobaXterm URL as follows https://mobaxterm.mobatek.net/ b. After entering the MobaXterm download page, click GET XOBATERM NOW! Then choose to download the Home version d.
- Page 32 range Pi 用户手册 深圳市迅龙软件有限公司版权所有 3) After downloading, use the decompression software to decompress the downloaded compressed package, you can get the executable software of MobaXterm, and then double-click to open it 4) After opening the software, the steps to set the serial connection are as follows a.
- Page 33 range Pi 用户手册 深圳市迅龙软件有限公司版权所有 5) After clicking the "OK" button, you will enter the following interface, and you can see the output information of the serial port when you start the development board www.orangepi.cn www.xunlong.tv...
-
Page 34: Openwrt System Instructions
range Pi 用户手册 深圳市迅龙软件有限公司版权所有 3. OpenWRT system instructions 3.1. OpenWRT version 1)There are two branches of openwrt code on Github OpenWRT version Kernel version OpenWRT openwrt-21.02 branch Linux5.4 OpenWRT master branch Linux5.10 2)Openwrt-21.02 is developed based on OpenWrt v21.02.1 Release version, and the function tends to be stable 3)The master branch is based on the snapshot version of openwrt, which is an unstable and under development version... -
Page 35: Openwrt System Default Login Account And Password
range Pi 用户手册 深圳市迅龙软件有限公司版权所有 3.2. OpenWRT system default login account and password It is recommended to change a safer password for web login and ssh login before use Account password root password Modify root password 3.2.1. For example, to change the root password to 12345678, enter passwd root on the command line root@OpenWrt:/# passwd root Enter new UNIX password:... - Page 36 range Pi 用户手册 深圳市迅龙软件有限公司版权所有 4) Select the rootfs partition to be expanded and Right-click, and select "Resize/Move" www.orangepi.cn www.xunlong.tv...
- Page 37 range Pi 用户手册 深圳市迅龙软件有限公司版权所有 5) Allocate all the unallocated space to rootfs, drag here to the end, and then click "Resize/Move" 6) Click the "√" above, and click "application" to apply the operation to the device www.orangepi.cn www.xunlong.tv...
- Page 38 range Pi 用户手册 深圳市迅龙软件有限公司版权所有 7) The expansion process generally does not take long 8) After the expansion is completed, you can see that the rootfs size is the actual capacity of the TF card 9) After the system starts, execute the df -h command to check the size of rootfs. If it is www.orangepi.cn www.xunlong.tv...
-
Page 39: Ethernet Port Test
range Pi 用户手册 深圳市迅龙软件有限公司版权所有 consistent with the actual capacity of the TF card, it can also indicate that the expansion is successful rroot@OpenWrt:/# df -h Filesystem Size Used Available Use% Mounted on /dev/root 14.5G 238.7M 14.3G 2% / tmpfs 495.6M 2.8M 492.8M 1% /tmp... -
Page 40: Lan Port Test
range Pi 用户手册 深圳市迅龙软件有限公司版权所有 RX bytes:142098 (138.7 KiB) TX bytes:13503 (13.1 KiB) Interrupt:27 4) The command to test network connectivity is as follows root@OpenWrt:/# ping www.baidu.com -I eth0 PING www.baidu.com (14.215.177.38): 56 data bytes 64 bytes from 14.215.177.38: seq=0 ttl=56 time=6.169 ms 64 bytes from 14.215.177.38: seq=1 ttl=56 time=5.473 ms 64 bytes from 14.215.177.38: seq=2 ttl=56 time=5.114 ms 64 bytes from 14.215.177.38: seq=3 ttl=56 time=5.992 ms... - Page 41 range Pi 用户手册 深圳市迅龙软件有限公司版权所有 inet6 fd50:32f6:413::d00 prefixlen 128 scopeid 0x0<global> inet6 fd50:32f6:413:0:6bbf:bc59:16e2:1f76 prefixlen 64 scopeid 0x0<global> ether 40:b0:76:60:17:c3 txqueuelen 1000 (以太网) RX packets 4331701 bytes 2941416494 (2.9 GB) RX errors 0 dropped 0 overruns 0 frame 0 TX packets 13649801 bytes 5762726379 (5.7 GB) TX errors 0 dropped 0 overruns 0 carrier 0 collisions 0 4) The command to test network connectivity is as follows test@ubuntu:~# ping 192.168.2.1...
-
Page 42: Ssh Remote Login To The Development Board
range Pi 用户手册 深圳市迅龙软件有限公司版权所有 3.5. SSH remote login to the development board The OpenWRT system has SSH remote login enabled by default, and allows root users to log in to the system. Before ssh login, you need to make sure that the Ethernet is connected, and then use the ifconfig command or check the router to get the IP address of the development board SSH remote login development board under Ubuntu... - Page 43 range Pi 用户手册 深圳市迅龙软件有限公司版权所有 c. Then enter the IP address of the development board in Remote host d. Then enter the username of the Linux system, “root” e. Finally click OK 3) The display after successfully logging in to the system is shown in the figure below www.orangepi.cn www.xunlong.tv...
-
Page 44: Usb Interface Test
Connect USB storage device test 3.6.1. 1) First insert the U disk into the USB port of the Orange Pi development board 2) Execute the following command, if you can see the output of sdX, it means that the U disk is successfully recognized root@OpenWrt:~# cat /proc/partitions | grep "sd*"... -
Page 45: Onboard Led Light Test Instructions
range Pi 用户手册 深圳市迅龙软件有限公司版权所有 root@OpenWrt:~# df -h | grep "sd" /dev/sda 14.4G 187.2M 14.2G 1% /mnt 3.7. Onboard LED light test instructions 1) There are three LED lights on the development board, two yellow lights and one red light. The default display of the LED lights when the system starts is as follows Power status light The system starts, the red light is always on (red light) -
Page 46: Log In Through The Wan Port
range Pi 用户手册 深圳市迅龙软件有限公司版权所有 enter http://192.168.2.1 to login OpenWRT management interface, and enter the username “root”and password “password” or none(default), and then click “login” Log in through the wan port 3.8.2. 1) Connect the WAN port of OrangePi R1 Plus to your main router with a network cable 2) Connect the WAN port of the computer to your main router with a network cable 3) Use the ifconfig command or check the router to obtain the IP address of OrangePi R1 Plus... -
Page 47: Install On The Package Management Page
range Pi 用户手册 深圳市迅龙软件有限公司版权所有 root@OpenWrt:/# opkg update 2) Get the software list root@OpenWrt:/# opkg list 3) Install the specified software package root@OpenWrt:/# opkg install < Package name > 4) View installed software root@OpenWrt:/# opkg list-installed 5) Uninstall software root@OpenWrt:/# opkg remove < Package name > Install on the package management page 3.9.2. - Page 48 range Pi 用户手册 深圳市迅龙软件有限公司版权所有 3) Find the software that needs to be installed and click "install" 4) After the installation is complete, you can see the installed software on the "Installed" page, and you can remove the software www.orangepi.cn www.xunlong.tv...
-
Page 49: Install Packages From Unofficial Sources
When installing third-party software packages, you need to be aware that some software packages have system architecture restrictions. The system architecture of Orange Pi R1 Plus LTS is aarch64_generic, which also belongs to armv8. You need to select the software package of the corresponding architecture when downloading. Find... -
Page 50: Mount External Storage Devices
range Pi 用户手册 深圳市迅龙软件有限公司版权所有 Unknown package 'v2ray-core-mini'. Collected errors: * pkg_hash_fetch_best_installation_candidate: Packages for v2ray-core-mini found, incompatible with the architectures configured * opkg_install_cmd: Cannot install package v2ray-core-mini. 2) The related library has been provided by the old version of the software, causing the installation to fail. -
Page 51: Mount On The Mount Point Management Page
range Pi 用户手册 深圳市迅龙软件有限公司版权所有 3) Use the mount command to mount the U disk to /mnt, and then you can view the files in the U disk root@OpenWrt:~# mount /dev/sda /mnt/ root@OpenWrt:~# ls /mnt/ test.txt 3.10.2. Mount on the mount point management page 1) Connect the U disk (or other storage device) to OrangePi R1 Plus 2) Click "System"... - Page 52 range Pi 用户手册 深圳市迅龙软件有限公司版权所有 4) Select the actual connected device /dev/sda1 in the UUID column of the general settings (choose according to your own device) 5) Use custom in the mount point column, fill in the target directory to be mounted to, here is the /mnt directory as an example, check the "enabled"...
- Page 53 range Pi 用户手册 深圳市迅龙软件有限公司版权所有 7) After saving, you can see in "Mounted File System", the storage device has been mounted www.orangepi.cn www.xunlong.tv...
-
Page 54: Using Aria2
range Pi 用户手册 深圳市迅龙软件有限公司版权所有 3.11. Using Aria2 1) Click "Service" -> "Aira2" to enter the Aira2 management page 2) Check "Enabled" to enable Aira2, set the directory for downloading files in "Download Catalog", and click "Save and Apply" to save the settings www.orangepi.cn www.xunlong.tv... -
Page 55: Use Samba Network Share
range Pi 用户手册 深圳市迅龙软件有限公司版权所有 3) After saving, click "AriaNg" to enter the downloader, click the "New" button, and enter the download link in the box to download 3.12. Use samba network share 1) Click "Service" -> "Network" to enter the samba network share management page 2) Click "Add"... - Page 56 range Pi 用户手册 深圳市迅龙软件有限公司版权所有 3) To access Samba under windows10 system, sharing needs to confirm whether window10 has started network discovery and sharing. If it is not started, first set the following settings a) Enable Samba v1/v2 access Go to "Control Panel" -> "Programs" -> "Turn Windows features on or off", select "SMB 1.0/CIFS File Sharing Support", and click "OK"...
-
Page 57: Install Luci-App-Openclash
range Pi 用户手册 深圳市迅龙软件有限公司版权所有 4) After the setting is completed, enter \\OpenWrt in the address bar of the explorer to access the shared directory, the user name is root, and the password is password (you don't need a password) 3.13. Install luci-app-openclash 1) First download the package of luci-app-openclash on github, the github repository address is https://github.com/vernesong/OpenClash... - Page 58 range Pi 用户手册 深圳市迅龙软件有限公司版权所有 2) 选择软件包版本并下载 3) Before installing luci-app-openclash, you need to install the following dependencies root@OpenWrt:/# opkg update root@OpenWrt:/# opkg remove dnsmasq && opkg install dnsmasq-full root@OpenWrt:/# opkg install coreutils-nohup bash iptables dnsmasq-full \ curl ca-certificates ipset ip-full iptables-mod-tproxy iptables-mod-extra \ libcap libcap-bin ruby ruby-yaml kmod-tun (这是一条命令)...
-
Page 59: V2Ray Instructions
range Pi 用户手册 深圳市迅龙软件有限公司版权所有 root@OpenWrt:/# opkg install luci-app-openclash_0.43.09-beta_all.ipk b. In the OpenWRT management interface, in System -> Package, click "Upload Package..." to upload and install 5) Restart after the installation is complete, re-enter the OpenWRT management interface, click "Service" -> "OpenClash" to enter the settings, specific use needs to be configured by yourself 3.14. - Page 60 range Pi 用户手册 深圳市迅龙软件有限公司版权所有 echo "src/gz kuoruan_packages http://openwrt.kuoruan.net/packages/releases/\ $(. /etc/openwrt_release ; echo $DISTRIB_ARCH)" >> /etc/opkg/customfeeds.conf (This is a command) 3) Update the package and install v2ray root@OpenWrt:/# opkg update root@OpenWrt:/# opkg install v2ray-core 4) Download luci-app-v2ray and the Chinese package on github, the github warehouse address is https://github.com/kuoruan/luci-app-v2ray/releases 5) There are two ways to install luci-app-v2ray and Chinese package...
-
Page 61: Zerotier Instructions For Use
range Pi 用户手册 深圳市迅龙软件有限公司版权所有 6) After the installation is complete, you can configure it on the OpenWRT management page 3.15. zerotier instructions for use The OpenWRT system has been pre-installed with the zerotier client. After creating a virtual local area network on the zerotier official website, the client can directly join it through the Network ID. - Page 62 range Pi 用户手册 深圳市迅龙软件有限公司版权所有 2) Click to enter the web console page, you can set the privacy option to public, so that the added network node does not need to be verified 3) The address is automatically assigned below. Here you can choose the network segment yourself, here is 172.27.*.* 4) Enter the following command in the OpenWRT terminal to join the virtual local area network created above, where 8286ac0e47d53bb5 is the Network ID of the virtual local...
- Page 63 range Pi 用户手册 深圳市迅龙软件有限公司版权所有 inet6 addr: fe80::e82f:d0ff:fe5a:867e/64 Scope:Link UP BROADCAST RUNNING MULTICAST MTU:2800 Metric:1 RX packets:18 errors:0 dropped:0 overruns:0 frame:0 TX packets:48 errors:0 dropped:0 overruns:0 carrier:0 collisions:0 txqueuelen:1000 RX bytes:1720 (1.6 KiB) TX byte81 (8.2 KiB) 6) Install the zerotier client on another device (here, Ubuntu 18.04 is taken as an example), execute the following command to install it, and restart the computer after the installation is complete test@ubuntu:~$ curl -s https://install.zerotier.com | sudo bash...
-
Page 64: Shadowsocks-Libev Instructions
range Pi 用户手册 深圳市迅龙软件有限公司版权所有 4 packets transmitted, 4 packets received, 0% packet loss round-trip min/avg/max = 1.136/1.195/1.235 ms 9) Zerotier other commonly used commands root@OpenWrt:/# zerotier-one -d #启动 zerotier 客户端 root@OpenWrt:/# zerotier-cli status #获取地址和服务状态 root@OpenWrt:/# zerotier-cli join # Network ID #加入网络... -
Page 65: Openwrt Sdk Instructions
range Pi 用户手册 深圳市迅龙软件有限公司版权所有 HOME_URL="https://openwrt.org/" BUG_URL="https://bugs.openwrt.org/" SUPPORT_URL="https://forum.openwrt.org/" BUILD_ID="r16325-88151b8303" OPENWRT_BOARD="rockchip/armv8" OPENWRT_ARCH="aarch64_generic" OPENWRT_TAINTS="no-all" OPENWRT_DEVICE_MANUFACTURER="OpenWrt" OPENWRT_DEVICE_MANUFACTURER_URL="https://openwrt.org/" OPENWRT_DEVICE_PRODUCT="Generic" OPENWRT_DEVICE_REVISION="v0" OPENWRT_RELEASE="OpenWrt 21.02.1 r16325-88151b8303" 4. OpenWRT SDK instructions 4.1. Download the source code of OpenWRT SDK Download OpenWRT from github 4.1.1. 1) At present, there are two branches of openwrt code on github. The openwrt-21.02 branch is adapted based on the official stable version of openwrt, and its functions tend to be stable. -
Page 66: Compile Openwrt
range Pi 用户手册 深圳市迅龙软件有限公司版权所有 included test@test:~/openwrt$ ls BSDmakefile Config.in include Makefile README.md scripts toolchain Config feeds.conf.default LICENSE package rules.mk target tools 4.2. Compile OpenWRT Compile OpenWRT Source Code 4.2.1. 1) First install the following dependent software (currently only tested to compile on Ubuntu 18.04 and need to install the following software, if you compile on other versions of the system, please install the dependent software yourself according to the error message) -
Page 67: Linux System Instructions
range Pi 用户手册 深圳市迅龙软件有限公司版权所有 6) Save your personal package configuration for next use test@test:~/openwrt$ ./scripts/diffconfig.sh > ./configs/my_config 7) Image generation location openwrt/bin/targets/rockchip/armv8/ openwrt-rockchip-armv8-xunlong_orangepi-r1plus-ext4-sysupgrade.img.gz 5. Linux system instructions 5.1. Supported Linux Release version and kernel version Release version Kernel version Server version Desktop version Ubuntu 18.04 Linux5.10... -
Page 68: Linux System Default Login Account And Password
range Pi 用户手册 深圳市迅龙软件有限公司版权所有 5.3. Linux system default login account and password Account Password root orangepi orangepi orangepi 5.4. Start the rootfs in the auto-expanding TF card for the first time 1) When the TF card starts the linux system for the first time, it will call the orangepi-resize-filesystem script through the orangepi-resize-filesystem.service systemd service to automatically expand the rootfs, so there is no need to manually expand 2) After logging in to the system, you can use the df -h command to check the size of... - Page 69 range Pi 用户手册 深圳市迅龙软件有限公司版权所有 name and the following command The names shown are not necessarily the same, please modify according to the actual situation test@test:~$ ls /media/test/27e62f92-8250-4ef1-83db-3d8f0c2e23db/ bin boot dev etc home lib lost+found media mnt opt proc root run sbin selinux srv sys tmp usr var Then switch the current user to root user in Ubuntu PC test@test:~$ sudo -i...
-
Page 70: How To Modify The Linux Log Level (Loglevel)
Starting kernel ... Uncompressing Linux... done, booting the kernel. Orange Pi 2.1.0 Focal ttyS0 orangepi login: 2) When there is a problem with the linux system startup, you can use the following method to modify the value of loglevel, so as to print more log information to the serial port for debugging. -
Page 71: Ethernet Port Test
range Pi 用户手册 深圳市迅龙软件有限公司版权所有 5.6. Ethernet port test Lan Port Test 5.6.1. 1) First, plug the network cable into the onboard Ethernet interface of the development board, and ensure that the network is unblocked 2) After the system starts, it will automatically assign an IP address to the Ethernet card through DHCP 3) The command to view the IP address is as follows root@orangepir1plus-lts:~# ifconfig lan0... -
Page 72: Wan Port Test
range Pi 用户手册 深圳市迅龙软件有限公司版权所有 64 bytes from 180.101.49.42 (180.101.49.42): icmp_seq=4 ttl=53 time=26.7 ms --- www.a.shifen.com ping statistics --- 4 packets transmitted, 4 received, 0% packet loss, time 3003ms rtt min/avg/max/mdev = 25.839/26.478/27.254/0.583 ms Wan Port Test 5.6.2. 1) First insert the network cable into the usb to Ethernet interface of the development board, and make sure that the network is unblocked 2) After the system starts, it will automatically assign an IP address to the Ethernet card through DHCP... -
Page 73: Ssh Remote Login To The Development Board
range Pi 用户手册 深圳市迅龙软件有限公司版权所有 root@orangepir1plus-lts:~# ping www.baidu.com -I eth0 PING www.a.shifen.com (14.215.177.39) from 192.168.1.62 eth0: 56(84) bytes of data. 64 bytes from 14.215.177.39 (14.215.177.39): icmp_seq=2 ttl=56 time=6.51 ms 64 bytes from 14.215.177.39 (14.215.177.39): icmp_seq=3 ttl=56 time=6.45 ms 64 bytes from 14.215.177.39 (14.215.177.39): icmp_seq=4 ttl=56 time=6.44 ms 64 bytes from 14.215.177.39 (14.215.177.39): icmp_seq=5 ttl=56 time=6.59 ms --- www.a.shifen.com ping statistics --- 13 packets transmitted, 12 received, 7% packet loss, time 12032ms... -
Page 74: Ssh Remote Login Development Board Under Windows
range Pi 用户手册 深圳市迅龙软件有限公司版权所有 4) If the following error is prompted during ssh login test@test:~$ ssh root@192.168.1.62 Connection reset by 192.168.1.62 port 22 You can enter the following command on the development board and try to connect root@orangepir1plus-lts:~# rm /etc/ssh/ssh_host_* root@orangepir1plus-lts:~# dpkg-reconfigure openssh-server SSH remote login development board under Windows 5.7.2. - Page 75 range Pi 用户手册 深圳市迅龙软件有限公司版权所有 3) Then you will be prompted to enter a password. The default passwords for both root and orangepi users are orangepi 4) The display after successfully logging in to the system is as shown in the figure below www.orangepi.cn www.xunlong.tv...
-
Page 76: Onboard Led Light Test Instructions
range Pi 用户手册 深圳市迅龙软件有限公司版权所有 5.8. Onboard LED light test instructions 1) There are three LED lights on the development board, two yellow lights and one red light. The default display of the LED lights when the system starts is as follows Power status light (red The system starts, the red light flashes light) -
Page 77: Usb Port Test
Connect USB storage device test 5.9.1. 1) First insert the U disk into the USB port of the Orange Pi development board 2) Execute the following command, if you can see the output of sdX, it means that the U disk is successfully recognized root@orangepir1plus-lts:~# cat /proc/partitions | grep "sd*"... -
Page 78: Rtl8723Bu Test
range Pi 用户手册 深圳市迅龙软件有限公司版权所有 5.10.1. RTL8723BU test 1) First insert the RTL8723BU wireless network card module into the USB interface of the development board 2) Then the Linux OS will automatically load RTL8723BU related kernel modules, and you can see the following output through the lsmod command root@orangepir1plus-lts:~# lsmod | grep "rtl8"... -
Page 79: Rtl8821Cu Test
range Pi 用户手册 深圳市迅龙软件有限公司版权所有 TX errors 0 dropped 0 overruns 0 carrier 0 collisions 0 5) Then you can see a Bluetooth device through the hciconfig command. The node with the Bus type as USB is the Bluetooth node of RTL8723BU. For the Bluetooth test method, please refer to the Bluetooth test section root@orangepir1plus-lts:~# hciconfig hci0:... -
Page 80: Wifi Connection Test
range Pi 用户手册 深圳市迅龙软件有限公司版权所有 [ 3987.974248] Bluetooth: hci0: RTL: fw version 0x826ca99e [ 3987.998204] rtl8821cu 2-1:1.2 wlxd0c0bf8742cd: renamed from wlan0 4) Then you can see the device node of RTL8821CU WIFI through the ifconfig command, please refer to the WIFI connection test section for WIFI connection and test method root@orangepir1plus-lts:~# ifconfig wlxd0c0bf8742cd... - Page 81 range Pi 用户手册 深圳市迅龙软件有限公司版权所有 3) Enter the interface opened by nmtui as shown below 4) Select Activate a connect and press Enter 5) Then you can see all the searched WIFI hotspots www.orangepi.cn www.xunlong.tv...
- Page 82 range Pi 用户手册 深圳市迅龙软件有限公司版权所有 6) Select the WIFI hotspot you want to connect to, then use the Tab key to position the cursor on Activate and press Enter 7) Then a dialog box for entering the password will pop up, enter the corresponding password in Pssword and press Enter to start connecting to WIFI 8) After the WIFI connection is successful, a "*"...
- Page 83 range Pi 用户手册 深圳市迅龙软件有限公司版权所有 9) The IP address of wifi can be viewed through the ifconfig command root@orangepir1plus-lts:~# ifconfig wlxd0c0bf8742cd wlxd0c0bf8742cd: flags=4163<UP,BROADCAST,RUNNING,MULTICAST> 1500 192.168.1.198 inet netmask 255.255.255.0 broadcast 192.168.1.255 inet6 fe80::db3a:3ea6:b98d:3fc9 prefixlen 64 scopeid 0x20<link> ether d0:c0:bf:87:42:cd txqueuelen 1000 (Ethernet) RX packets 528 bytes 91350 (91.3 KB) RX errors 0 dropped 0 overruns 0 frame 0 TX packets 26 bytes 3802 (3.8 KB)
-
Page 84: Usb Wireless Network Card Bluetooth Test
range Pi 用户手册 深圳市迅龙软件有限公司版权所有 5 packets transmitted, 5 received, 0% packet loss, time 4005ms rtt min/avg/max/mdev = 7.391/8.607/10.296/1.021 ms 5.12. USB wireless network card Bluetooth test 5.12.1. Linux OS test method 1) The bluez tool is required to use the Bluetooth connection. Use the following command to install the bluez tool root@orangepir1plus-lts:~# apt update root@orangepir1plus-lts:~# apt install bluez... -
Page 85: Usb Camera Test
Device 44:F2:1B:B8:76:7B Roy 5.13. USB camera test 1) First insert the USB camera into the USB port of the Orange Pi development board 2) Then through the lsmod command, you can see that the kernel has automatically loaded the following modules root@orangepir1plus-lts:~# lsmod | grep "uvc"... - Page 86 range Pi 用户手册 深圳市迅龙软件有限公司版权所有 videobuf2_v4l2 36864 1 uvcvideo videobuf2_common 65536 2 videobuf2_v4l2,uvcvideo videodev 311296 3 videobuf2_v4l2,uvcvideo,videobuf2_common 65536 4 videodev,videobuf2_v4l2,uvcvideo,videobuf2_common (note that the l in v4l2 is a lowercase letter l, not a number 3) Through the v4l2-ctl command, you can see that the device node information of the USB camera is /dev/video0 root@orangepir1plus-lts:~# apt update root@orangepir1plus-lts:~# apt install v4l-utils...
-
Page 87: Temperature Sensor
/etc/init.d/motion restart [ ok ] Restarting motion (via systemctl): motion.service. Please make sure that the Orange Pi development board can connect to the network normally before using motion, and then obtain the IP address of the development board through the ifconfig command... -
Page 88: How To Install Docker
range Pi 用户手册 深圳市迅龙软件有限公司版权所有 as follows root@orangepir1plus-lts:~# cat /sys/class/thermal/thermal_zone0/type soc-thermal root@orangepir1plus-lts:~# cat /sys/class/thermal/thermal_zone0/temp 61664 5.15. How to install Docker 1) This method is not applicable on debian10 system 2) Uninstall the old version of docker that may exist first root@orangepir1plus-lts:~# apt remove docker docker-engine docker-ce docker.io 3) Then install the following packages root@orangepir1plus-lts:~# apt update root@orangepir1plus-lts:~# apt install -y apt-transport-https ca-certificates curl... -
Page 89: 13Pin Transfer Board Interface Pin Description
1) Please refer to the figure below for the sequence of the 13 pin interface of the Orange Pi R1 Plus LTS development board 2) The schematic diagram of the 13pin interface of the Orange Pi R1 Plus LTS development board is shown below www.orangepi.cn... - Page 90 Orange Pi R1 Plus LTS b. When the 13 pin interface of the Orange Pi R1 Plus LTS development board is not connected to the adapter board, pins 3, 4, 5, 6, 10, 11, 12 and 13 can be used as ordinary...
-
Page 91: How To Install Wiringop
WiringOP. Use Please ignore when 5.18. 13pin interface GPIO, I2C, UART test wiringOP has been adapted to the Orange Pi R1 Plus LTS development board, using wiringOP can test the functions of GPIO, I2C and UART www.orangepi.cn... -
Page 92: 13Pin Gpio Port Test
range Pi 用户手册 深圳市迅龙软件有限公司版权所有 5.18.1. 13pin GPIO port test 1) Below, take pin 5-corresponding to GPIO as GPIO3_A4--corresponding to wPi serial number as 2-as an example to demonstrate how to set the high and low levels of the GPIO port 2) First set the GPIO port to output mode, and the third parameter needs to input the serial number of the wPi corresponding to the pin root@orangepir1plus-lts:~/wiringOP# gpio mode... -
Page 93: 13Pin I2C Test
range Pi 用户手册 深圳市迅龙软件有限公司版权所有 4) Then set the GPIO port to output high level. After setting, you can use a multimeter to measure the value of the pin voltage. If it is 3.3v, it means that the high level is set successfully root@orangepir1plus-lts:~/wiringOP# gpio write 2 Use gpio readall to see that the value (V) of pin 7 has become 1... - Page 94 range Pi 用户手册 深圳市迅龙软件有限公司版权所有 b. Then set overlays=i2c0 in /boot/orangepiEnv.txt to open the configuration of i2c0 overlays=i2c0 Then restart the system. When booting, you can see the configuration output of I2C DT overlays in the boot log of u-boot Applying kernel provided DT overlay rockchip-i2c0.dtbo 2698 bytes read in 8 ms (329.1 KiB/s) Applying kernel provided DT fixup script (rockchip-fixup.scr) d.
-
Page 95: 13Pin Uart Test
range Pi 用户手册 深圳市迅龙软件有限公司版权所有 sda pin corresponds to pin 3 sck pin corresponds to pin 4 vcc pin corresponds to pin 1 gnd pin corresponds to pin 2 4) Then use the i2cdetect -y 0 command if the address of the connected i2c device can be detected, it means that i2c can be used normally 5.18.3. - Page 96 range Pi 用户手册 深圳市迅龙软件有限公司版权所有 b. Then set overlays=uart1 in /boot/orangepiEnv.txt to open the configuration of uart1 overlays=uart1 Then restart the system. When starting, you can see the configuration output of UART related DT overlays in the u-boot startup log Applying kernel provided DT overlay rockchip-uart1.dtbo 2698 bytes read in 8 ms (329.1 KiB/s) Applying kernel provided DT fixup script (rockchip-fixup.scr) d.
-
Page 97: Method Of Outputting Kernel Print Information To 13Pin Serial Port
range Pi 用户手册 深圳市迅龙软件有限公司版权所有 [CC] serialTest.c [link] root@orangepir1plus-lts:~/wiringOP/examples# 5) Finally run serialTest, if you can see the following print, it means that the serial communication is normal root@orangepir1plus-lts:~/wiringOP/examples# ./serialTest Out: 0: -> Out: 1: -> Out: 2: -> Out: 3: -> Out: 4: ->... -
Page 98: View The Serial Number Of The Rk3328 Chip
range Pi 用户手册 深圳市迅龙软件有限公司版权所有 Image Name: Created: Tue Dec 8 02:35:43 2020 Image Type: ARM Linux Script (uncompressed) Data Size: 2448 Bytes = 2.39 KiB = 0.00 MiB Load Address: 00000000 Entry Point: 00000000 Contents: Image 0: 2440 Bytes = 2.38 KiB = 0.00 MiB 4) Then connect the USB to TTL module to the UART1 pin of the 13pin interface through the Dupont line Connect the GND of the USB to TTL module to the GND of the 13pin interface... -
Page 99: Method To Restart The System
range Pi 用户手册 深圳市迅龙软件有限公司版权所有 development boards root@orangepir1plus-lts:~# cat /sys/devices/platform/board/info Hardware : ORANGEPI-R1PLUS Revision : 0002 Serial : 9b25e2e5a704467c Model : OrangePi R1PLUS Manufacturer : Shenzhen Xunlong Software CO.,Limited 5.21. Method to restart the system 1) Restart using the reboot command root@orangepir1plus-lts:~# reboot 2) Use the poweroff command to shut down. -
Page 100: Get The Source Code Of Linux Sdk
range Pi 用户手册 深圳市迅龙软件有限公司版权所有 Linux SDK on WSL 6.1. Get the source code of linux sdk Download orangepi-build from github 6.1.1. 1) First download the code of orangepi-build. The code of orangepi-build is modified based on the armbian build system. Currently, the rk3328 series development board supports the current branch. - Page 101 range Pi 用户手册 深圳市迅龙软件有限公司版权所有 2) The image URL of the cross-compilation tool chain in China is the open source software image site of Tsinghua University https://mirrors.tuna.tsinghua.edu.cn/armbian-releases/_toolchain/ 3) After toolchains is downloaded, it will contain multiple versions of cross-compilation toolchains test@test:~/orangepi-build$ ls toolchains/ gcc-arm-9.2-2019.12-x86_64-aarch64-none-linux-gnu gcc-arm-9.2-2019.12-x86_64-arm-none-linux-gnueabihf gcc-linaro-4.9.4-2017.01-x86_64_arm-linux-gnueabi...
-
Page 102: Orangepi-Build Complete Directory Structure Description
range Pi 用户手册 深圳市迅龙软件有限公司版权所有 gcc-arm-9.2-2019.12-x86_64-aarch64-none-linux-gnu Orangepi-build complete directory structure description 6.1.3. 1) After the orangepi-build repository is downloaded, it does not contain the linux kernel, u-boot source code and cross-compilation tool chain. The source code of linux kernel and u-boot are stored in a separate git repository (please do not download and use the kernel and u separately -boot source code to compile, unless you know how to use it) The git repository where the linux5.10 kernel source code is stored is as follows https://github.com/orangepi-xunlong/linux-orangepi/tree/orange-pi-5.10-rockchip64/... -
Page 103: Compile U-Boot
range Pi 用户手册 深圳市迅龙软件有限公司版权所有 system is running userpatches: store configuration files needed to compile scripts test@test:~/orangepi-build$ ls build.sh external kernel LICENSE output README.md scripts toolchains u-boot userpatches 6.2. Compile u-boot 1) Run the build.sh script, remember to add sudo permissions test@test:~/orangepi-build$ sudo ./build.sh 2) Select U-boot package, then press Enter 3) Then select the model of the development board... - Page 104 range Pi 用户手册 深圳市迅龙软件有限公司版权所有 compilation are explained as follows u-boot source version [ o.k. ] Compiling u-boot [ v2020.10 ] b. The version of the cross-compilation toolchain [ o.k. ] Compiler version [ aarch64-none-linux-gnu-gcc 9.2.1 ] The path of u-boot deb package generated by compiling [ o.k.
- Page 105 range Pi 用户手册 深圳市迅龙软件有限公司版权所有 │ ├──idbloader.bin │ ├──uboot.img //u-boot binary file │ └──trust.bin └── u-boot ├── LICENSE ├── orangepi_r1_plus_rk3328_defconfig └── platform_install.sh 3 directories, 6 files 7) When the orangepi-bulid build system compiles the u-boot source code, it will first synchronize the u-boot source code with the u-boot source code of the github server, so if you want to modify the u-boot source code, you first need to turn off the download and update function of the source code (You need to compile u-boot once to turn off this function, otherwise you will be prompted that u-boot's source code cannot be found),...
- Page 106 range Pi 用户手册 深圳市迅龙软件有限公司版权所有 Then select 5 Install/Update the bootloader on SD/eMMC After pressing the Enter key, a Warring will pop up first g. Press Enter again to start updating u-boot, and the following information will be displayed after the update www.orangepi.cn www.xunlong.tv...
-
Page 107: Compile The Linux Kernel
range Pi 用户手册 深圳市迅龙软件有限公司版权所有 h. Then you can restart the development board to test whether the u-boot modification takes effect 6.3. Compile the Linux kernel 1) Run the build.sh script, remember to add sudo permissions test@test:~/orangepi-build$ sudo ./build.sh 2) Select Kernel package, then press Enter 3) Then select the model of the development board www.orangepi.cn www.xunlong.tv... - Page 108 range Pi 用户手册 深圳市迅龙软件有限公司版权所有 4) Then the kernel configuration interface opened by make menuconfig will pop up. At this time, you can directly modify the kernel configuration. If you don’t need to modify the kernel configuration, just exit it. After exiting, the kernel source code will be compiled If you do not need to modify the configuration options of the kernel, when you run the build.sh script, pass in KERNEL_CONFIGURE=no to temporarily block the...
- Page 109 range Pi 用户手册 深圳市迅龙软件有限公司版权所有 test@test:~/orangepi-build$ sudo ./build.sh KERNEL_CONFIGURE=no b. You can also set KERNEL_CONFIGURE=no in the orangepi-build/userpatches/config-default.conf configuration file to disable this feature permanently If the following error is prompted when compiling the kernel, this is because the terminal interface of the Ubuntu PC is too small and the make menuconfig interface cannot be displayed.
- Page 110 range Pi 用户手册 深圳市迅龙软件有限公司版权所有 [ o.k. ] File name [ linux-image-current-rockchip64_2.1.4_arm64.deb ] g. Compile time [ o.k. ] Runtime [ 25 min] h. At the end, it will display the compiling command to recompile the kernel selected last time. Use the following command without selecting through the graphical interface, you can directly start compiling the kernel source code [ o.k.
- Page 111 range Pi 用户手册 深圳市迅龙软件有限公司版权所有 │ ├── config-5.10.44-rockchip64 //编译内核源码使用的配置文件 │ ├── System.map-5.10.44-rockchip64 │ └── vmlinuz-5.10.44-rockchip64 //编译生成的内核镜像文件 ├── etc │ └── kernel ├── lib │ └── modules //编译生成的内核模块 ├── linux-image-current-rockchip64_2.1.4_arm64.deb └── usr ├── lib └── share 8 directories, 4 files 8) When the orangepi-bulid compilation system compiles the linux kernel source code, it first synchronizes the linux kernel source code with the linux kernel source code of the github server, so if you want to modify the linux kernel source code, you first need to turn off the source code update function (you need to complete the compilation once This...
-
Page 112: Compile Rootfs
range Pi 用户手册 深圳市迅龙软件有限公司版权所有 root@orangepir1plus-lts:~# dpkg -i linux-image-current-rockchip64_2.1.4_arm64.deb d. Then restart the development board, and then check whether the kernel-related changes have taken effect 10) The method of installing the kernel header file into the Linux OS is as follows Upload the deb package of the compiled linux header file to the Linux OS of the development board test@test:~/orangepi-build$ cd output/debs... - Page 113 range Pi 用户手册 深圳市迅龙软件有限公司版权所有 3) Then select the model of the development board 4) Then select the type of rootfs buster Debian 10 bionic Ubuntu 18.04 focal Ubuntu 20.04 The Linux distributions supported by linxu5.10 are as follows 5) If you are compiling the server version of the image, you can also choose to compile the Standard version or the Minimal version.
- Page 114 range Pi 用户手册 深圳市迅龙软件有限公司版权所有 Type of rootfs [ o.k. ] local not found [ Creating new rootfs cache for bionic] b. The storage path of the compiled rootfs compressed package [ o.k. ] Target directory [ external/cache/rootfs ] The name of the rootfs compressed package generated by the compilation [ o.k.
-
Page 115: Compile Linux Image
9) Since it takes a long time to compile rootfs, if you don’t want to compile rootfs from scratch, or if there is a problem with compiling rootfs, you can directly download the rootfs compressed package cached by Orange Pi. The download link of rootfs compressed package Baidu cloud disk is shown below, download A good rootfs compressed package (don’t decompress it) needs to be placed in the external/cache/rootfs... - Page 116 range Pi 用户手册 深圳市迅龙软件有限公司版权所有 4) Then select the type of rootfs buster Debian 10 bionic Ubuntu 18.04 focal Ubuntu 20.04 The Linux distributions supported by linxu5.10 are as follows 5) If you are compiling the server version of the image, you can also choose to compile the Standard version or the Minimal version.
- Page 117 range Pi 用户手册 深圳市迅龙软件有限公司版权所有 packages needed for the compilation process b. Download the source code of u-boot and linux kernel (if it is cached, only update the code) Compile u-boot source code and generate u-boot deb package d. Compile linux source code, generate linux related deb package Make deb package of linux firmware Make deb package of orangepi-config tool g.
-
Page 118: Android Os Instructions
range Pi 用户手册 深圳市迅龙软件有限公司版权所有 7. Android OS instructions 7.1. Supported Android version Android version Kernel version Android 9.0 Linux4.4 7.2. Android 9.0 function adaptation situation Function 状态 USB2.0 TF card start USB to Gigabit network Gigabit network card Infrared CVBS video Headphone audio LED light Reset button... -
Page 119: How To Use Adb
range Pi 用户手册 深圳市迅龙软件有限公司版权所有 7.4. How to use ADB Open USB debugging option 7.4.1. 1) The USB debugging mode is turned on by default, and the ADB debugging can be used directly by default. If there is a problem with the use of ADB, you can use the following method to turn it on, first select settings 2) Then select device preferences www.orangepi.cn... -
Page 120: Use Network Connection Adb Debugging
range Pi 用户手册 深圳市迅龙软件有限公司版权所有 3) Then open the developer options 4) Then confirm the USB connection status and USB debugging Use network connection adb debugging 7.4.2. 1) To use the network adb, there is no need to use the Type-C interface data cable to connect the computer and the development board, but to communicate through the network, so first make sure that the wired network of the development board has been connected, and then obtain the IP address of the development board. -
Page 121: Use Data Cable To Connect Adb For Debugging
range Pi 用户手册 深圳市迅龙软件有限公司版权所有 console:/ # getprop | grep "adb.tcp" [service.adb.tcp.port]: [5555] 4) If service.adb.tcp.port is not set, you can use the following command to set the port number of network adb console:/ # setprop service.adb.tcp.port 5555 console:/ # stop adbd console:/ # start adbd 5) Install adb tool on Ubuntu PC test@test:~$ sudo apt update... -
Page 122: Android Sdk Instructions
range Pi 用户手册 深圳市迅龙软件有限公司版权所有 sufficient for the development board to work normally) 3) Install adb tool on Ubuntu PC test@test:~$ sudo apt update test@test:~$ sudo apt install adb 4) View the identified ADB device test@test:~$ adb devices List of devices attached 20080411 device 5) Then you can log in to the Android OS through adb shell on the Ubuntu PC... -
Page 123: Build Android Compilation Environment
range Pi 用户手册 深圳市迅龙软件有限公司版权所有 2) After downloading the sub-volume compressed package, you can first use the md5sum -c *.md5sum command to calculate whether the checksum is correct. If the prompt is successful, it means that the downloaded image is correct, and you can decompress it without worry. -
Page 124: Compile Android Image
range Pi 用户手册 深圳市迅龙软件有限公司版权所有 b. Hard disk space: minimum 150GB or more 5) Install JDK test@test:~$ sudo add-apt-repository ppa:openjdk-r/ppa test@test:~$ sudo apt-get update test@test:~$ sudo apt-get install openjdk-8-jdk 6) Configure JAVA environment variables First determine the installation path of java, generally test@test:~$ ls /usr/lib/jvm/java-8-openjdk-amd64 ASSEMBLY_EXCEPTION bin docs include jre lib man src.zip THIRD_PARTY_README... - Page 125 range Pi 用户手册 深圳市迅龙软件有限公司版权所有 2) After compiling, three files of trust.img, rk3328_loader_vx.xx.xxx.bin and uboot.img will be generated uboot version: U-Boot 2017.09-gdc89501087 (Dec 17 2020 - 19:43:15) pack uboot.img success! merge success(rk3328_loader_v1.16.250.bin) merge success(trust.img) Platform RK3328 is build OK, with new .config(make rk3328_defconfig) Compile the kernel 8.3.2.
- Page 126 range Pi 用户手册 深圳市迅龙软件有限公司版权所有 Firmware packaging 8.3.4. After completing the above compilation, execute the mkimage.sh script in the root directory of the SDK to generate the firmware, and all the images required for programming will be copied to the rockdev/Image-rk3328_box directory. test@ubuntu:~/OrangePi_R1Plus_RK3328$ ./mkimage.sh Generate upgrade image 8.3.5.
- Page 127 range Pi 用户手册 深圳市迅龙软件有限公司版权所有 www.orangepi.cn www.xunlong.tv...
Need help?
Do you have a question about the R1 Plus LTS and is the answer not in the manual?
Questions and answers