Brewista BWRRS1 - Ratio Scale Manual
- Quick start manual (2 pages) ,
- Owner's manual (17 pages)
Advertisement
- 1 Ratio Scale Components
- 2 General Maintenance and Care
- 3 Specifications and Functions
- 4 Mode Setting
- 5 Charging the Battery
- 6 Operation
- 7 Zero (Tare) Function
- 8 Auto-off Setting
- 9 Changing Units of Measurement
- 10 Changing The Set Ratio
- 11 Calibration
- 12 Correct Disposal of this Product
- 13 Warning Messages
- 14 Washing Instructions
- 15 Documents / Resources
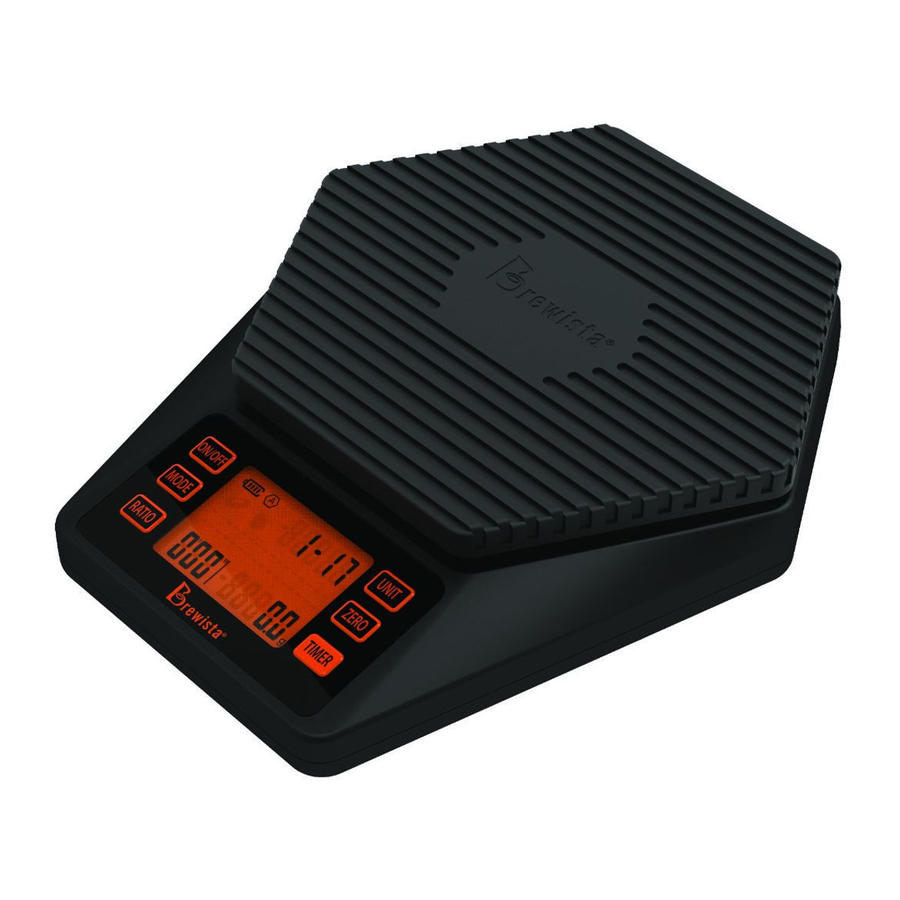
Ratio Scale Components

- Silicone Pad
- Platform
- LCD Readout
- USB charging port (on back)
- Coffee Bean Icon
- Battery life icon
- MODE indicator
- Kettle Icon
- Ratio / Target Weight readout
- ON/OFF button
- MODE button
- RATIO button
- "Target" rate bar segments
- "Actual" rate bar segments
- Timer
- Actual Weight readout
- Weight Unit (g or oz)
- UNIT button
- ZERO button
- TIMER button
General Maintenance and Care
- Avoid exposure to extreme heat or cold.
- Always allow your scale to acclimate to normal room temperature before use.
- Keep your scale in a clean environment.
- Excessive dust, dirt, vibration, air currents, as well as close proximity to other electronic equipment may have an adverse effect on the accuracy and reliability of the scale.
- Handle the scale with care.
- Gently set all items to be weighed on top of the platform and center them.
- Although this scale is designed to be quite durable, avoid rough treatment as this may permanently damage the internal components.
- Always avoid violent shaking and dropping.
- This is a precision instrument and should be handled as such.
Specifications and Functions
- Capacity: 2000g
- Accuracy: 0.1g
- Units: grams (g), ounces (oz)
- Key functions: ON/OFF, MODE, RATIO, UNIT, ZERO, TIMER
- Display: LCD with backlight
- Auto-off
- Auto-off function is set to 180 seconds by default.
- Auto-off can be set to 60 seconds, 120 seconds, 180 seconds, or disabled manually.
- Operating modes: Automatic mode and Manual mode
- Power: (1) Rechargable battery
- Operation temperature range: 50° to 85°Fahrenheit (10° to 30°Celsius).
Mode Setting
- Turn on the scale by pressing the ON/OFF button.
- Wait until the LCD displays zero.
- Press the MODE button;
- The display will read " A " (automatic) or " M " (manual) in the upper left of the LCD readout.
- Press MODE again to toggle between these two modes.
Notes:
- The scale's mode cannot be changed when weight is on the platform or during the brewing process.
- The last mode used is retained when the scale is turned off. Scale returns to the last mode used when turned back on.
Charging the Battery
- Open the orange USB port cover at the back of the scale and insert the small end of the USB cable in this port.
- Plug the USB cable into a USB compatible outlet to charge your scale's battery.
- The scale will automatically turn on to verify the charging connection.
- Turning off the scale manually will reduce the charging time.
- Scale is fully charged when the battery icon has 4 bars.
 Our scale battery comes with protection circuit to avoid over-charging. We strongly recommend unplugging the scale when it is fully charged.
Please charge the scale as soon as possible when the last bar in the battery sign disappears, instead of waiting till scale shuts off due to the power depletion.
Operation
Please note:
- When removing weight from scale, do not apply downward force or slide items off of the platform. Doing so may result in inaccurate readings. Lift items directly off of the platform.
- Heat transfered from the brew vessel to the scale will alter weight readings slightly. To minimize this, be sure to use the silicone pad.
Turning Scale On
- Press the ON/OFF button once to power on the scale.
- Wait for scale to zero before adding weight to the platform.
- Scale returns to last mode used when turned on.
- Manual Mode is set as the factory default mode.
- Refer to the "Mode Setting" section earlier in this manual to select the desired mode of use.
- The brewing ratio will display in the upper right for 3 seconds then go blank.
- The last ratio that was used will be displayed.
- The ratio is set to 1-17 by default.
- Refer to the "Changing Ratio Amount" section later in this manual to select the desired ratio.
Manual Mode
 : (No Automatic Functions)
- Place your brewing vessel onto the platform. Weight is shown in the lower weight display.
- Press ZERO button to tare and set display to zero.
- Brewing vessel weight must be zeroed out before adding coffee grounds.
- When the coffee bean icon appears, add desired amount of coffee grounds to your brewing vessel.
- Press RATIO button.
- Scale will calculate the target weight using the selected ratio.
- Target weight will be displayed in the upper right of the LCD screen.
- When kettle icon appears and weight in lower right of LCD reads, "0.0":
- Start the timer by pressing the TIMER button.
- LCD will flash once.
- Begin adding water to your brewing vessel.
- Weight of the water will be displayed in the lower right as water is added.
- As the timer counts up, the Upper "Target" rate bar segments appear at 10 second intervals.
- As water is added, the Lower "Actual" rate bar segments appear.
- Numeric time is displayed in the lower left LCD.
- When the weight of the water added reaches 60g less than the calculated amount shown at the top right, the screen begins to flash. This means that you are close to the final amount of water needed.
- Once the lower display reading reaches the upper display volume the entire display screen will change color from orange to white.
- Stop adding water to the brewing vessel.
- If the vessel is removed from the scale weight in lower right will show a negative reading.
- Timer will continue. Press the TIMER button to stop the timer.
- Press the TIMER button again to reset the timer to zero.
- Press the ZERO button to clear the weight reading and the ratio.
Auto Mode
 : (Automatic Zero and Timer)
- Place brewing vessel on the scale platform.
- After 3 seconds, weight reading goes to "0.0" (Auto-tares).
- When the coffee bean icon appears in the upper left of the LCD screen, add coffee grounds to the brewing vessel.
- Adjust the amount of coffee grounds as needed.
- Press the RATIO button.
- The upper right of the LCD shows the calculated target weight and the lower display shows zero.
- When the kettle icon appears, begin adding water to your brewing vessel.
- The count-up timer begins automatically.
- The Upper "Target" rate bar segments appear at 10 second intervals.
- The Lower "Actual" rate bar segments appear as water is added.
- Pour brewing water at a rate that keeps the lower and upper bars even.
- When the weight of the added water reaches 60g less than the calculated amount shown at the top right of the LCD, the screen begins to flash. This means that you are close to the final amount of water needed.
- Once the Target Weight is reached, the display color will change from orange to white.
- Timer continues to count up.
- Weight reading will show actual weight even if it is greater than the target weight.
- Remove brewing vessel after brewing is complete.
- Weight and final Time reading remains on the display for five seconds then return to zero.
- Scale is now ready for another brew.
Zero (Tare) Function
- Zero function is disabled under "AUTO" mode.
- Under Manual mode: press the ZERO button as needed.
Auto-off Setting
- Auto-off function is set to 180 seconds by default.
- Auto-off can be set to 60 seconds, 120 seconds, 180 seconds, or disabled manually.
- To change the Auto-off time setting or disable this function:
- Turn off the scale.
- Press and hold the ON/OFF button.
- While holding the ON/OFF button, press the ZERO button 4-5 times quickly until "180" is shown on the LCD display.
- Release both buttons.
- Press the ZERO button to switch between "0/60/120/180".
- If "0" is selected, the Auto-off function will be disabled.
- After choosing the desired time, press the ON/OFF button again.
- The display will show "PASS" to confirm this setting.
- The scale will turn off automatically.
Note:
- If "60", "120", or "180" is chosen, the scale will turn off after the designated number of seconds of inactivity.
- If the Auto-off function is disabled, the scale will not shut off on its own.
Please note: To maintain a longer battery life, turn off the scale by pressing the ON/OFF button after each use.
Changing Units of Measurement
- Press the UNIT button to switch between grams (g) and ounces (oz).
- Grams (g) is the default unit of measurement.
- Units cannot be changed during the brewing process.
Changing The Set Ratio
- Press and hold the RATIO button for 3 seconds.
- The ratio will display blinking in the upper right of the LCD.
- Press the RATIO button until the desired ratio is displayed.
- The default ratio is 1:17 (add 1 part coffee to 17 parts water).
- Scale has 7 pre-set ratios: 1:14, 1:15, 1:16, 1:17, 1:18, 1:19, and 1:20
- Wait three seconds and the scale will automatically store the new ratio and return to the mode you were in last.
- Ratio cannot be changed once the brewing process has begun.
Calibration
- While the scale is off, press and hold the ON/OFF button and ZERO button at the same time.
- The LCD will read "CAL" in the upper right.
- Press the ZERO button again and the LCD will flash "500.0g".
- Place a 500g calibration weight onto the center of the platform.
- The LCD will read "PASS" then return to the normal weighing mode.
- Calibration is complete.
Correct Disposal of this Product

This symbol indicates that this product should not be disposed of with other household wastes throughout the European Union. To prevent possible harm to the environment or human health from uncontrolled waste disposal, recycle it responsibly to promote the sustainable reuse of material resources. To return your used device, please use the return and collection systems or contact the retailer where the product was purchased. They can collect this product for environmentally safe recycling.
Warning Messages
- "
![]() ": Overload
": Overload - Quickly remove weight from platform to protect the scale.
- "
![]() ": Unstable
": Unstable - Scale is not steady during start up. Please turn off scale, set on a stable surface and restart scale.
- Water is inside the scale. Shake out excess water and let dry.
 ": Overload
  ": Unstable
 Washing Instructions
This scale has been treated with a water-resistant nanocoating. However, washing the scale under running water is not recommended. Please follow these instructions when washing:
- Wash the exterior of the scale with a soft, damp cloth
- Do not wash scale under running water.
- Leave scale to dry on a dish rack with LCD and buttons pointing upward.
DO NOT use liquid bleach or other harsh chemicals.
DO NOT use steel wool or abrasive sponges as this can scratch the surface.
DO NOT submerge the scale.
Avoid pouring water directly into your scale, as water may become trapped. If this occurs drying time may exceed 4 hours.
Water drops on the LCD display will not interfere with your weighing. These drops will dry and disappear.
If the scale displays "  " or the readings jump after washing, then water is still inside the scale. Simply shake out the excess water and let your scale dry longer.
By following these washing instructions, you will experience shorter drying times and your scale will provide you with years of reliable service.

Documents / ResourcesDownload manual
Here you can download full pdf version of manual, it may contain additional safety instructions, warranty information, FCC rules, etc.
Advertisement
Thank you! Your question has been received!


Need Assistance?
Do you have a question about the BWRRS1 that isn't answered in the manual? Leave your question here.