Advertisement
- 1 Components
- 2 LCD Display / Buttons
- 3 Introduction
- 4 Fitting the batteries
- 5 Setting the clock
- 6 Assembling the pet feeder
- 7 Calculation of daily feed units
- 8 Setting meal sizes
- 9 Reviewing meal sizes
- 10 Setting meal times
- 11 Reviewing meal times
- 12 Extra feed
- 13 Advance feed
- 14 Manual feed
- 15 Frequent feed
- 16 Turning the feeder off and on
- 17 Changing the batteries
- 18 Securing the feeder to a board
- 19 Cleaning
- 20 Troubleshooting
- 21 Documents / Resources
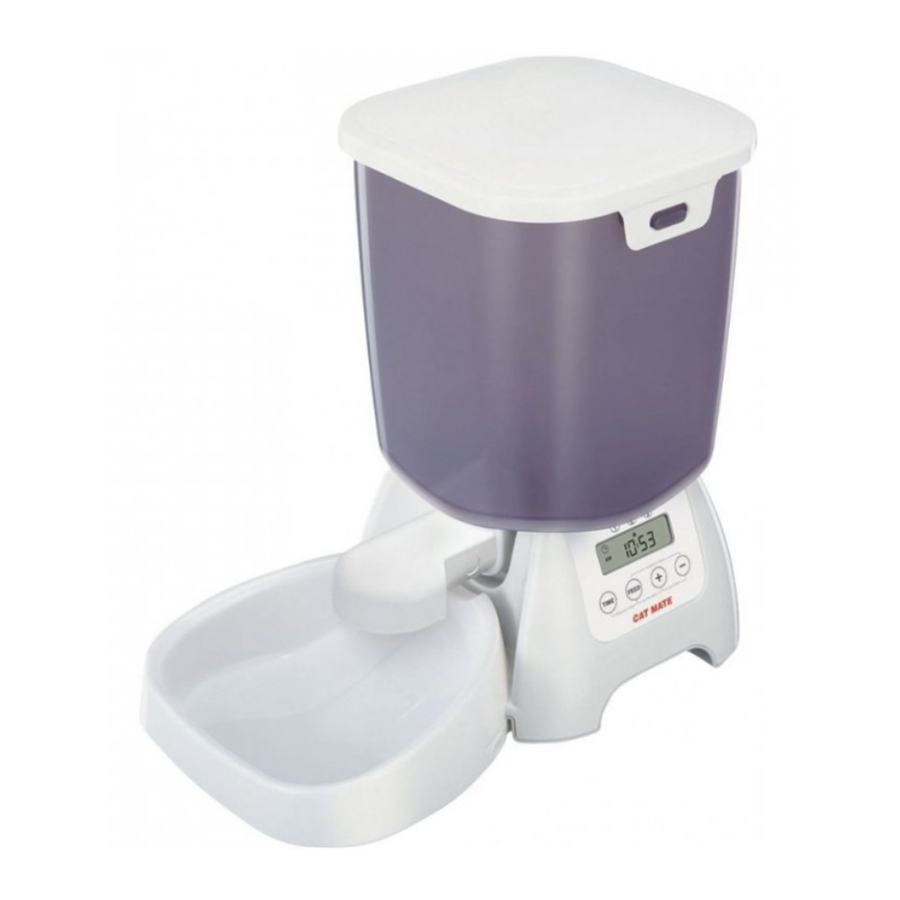
Components

- Hopper lid
- Feeding bowl
- Food hopper
- Feeding mechanism
- Feeding nozzle
- Battery cover
- Base unit
LCD Display / Buttons

- 'TIME' button
- AM/PM indicators (12hr mode)
- 'CLOCK' indicator
- MEAL 1 indicator
- MEAL 2 indicator
- MEAL 3 indicator
- FREQUENT FEED indicator
- Low battery indicator
- '- (MINUS)' button
- '+ (ADVANCE)' button
- Display
- 'FEED' button
Introduction
The Cat Mate Electronic Pet Feeder allows you to program up to 3 meals over a 24 hour period with the ability to serve each meal in units of approximately 10g (1/3 oz). In addition, the feeder will allow you to serve meals in advance of their programmed times, as well as serve extra meals on demand. For pets with specific dietary requirements (e.g. diabetic cats) there is a 'frequent feeding' option which will dispense a programmed meal over a longer period of time.
To ensure your chosen settings cannot easily be tampered with, the control buttons need to be pressed firmly to operate.
If you start the set-up process and abandon it before completion, the operating system will 'time out' after 60 seconds and the current time will be displayed.
Your Cat Mate feeder is manufactured from top quality materials and is assembled to comply with rigorous quality standards. However, we do recommend that before use, you supervise its correct operation over a period of at least 3 days.
This feeder is designed to make a noise when serving food. The noise may frighten timid pets at first, but they will soon learn to associate the noise with feeding time.
The feeder is designed for use with dry (not moist) foods with a maximum size of 16mm (5/8"). However, larger irregular food may be suitable.
When leaving your pet, ensure adequate water and toilet arrangements have been made. Pets, in particular puppies and kittens, must not be left alone for long periods without someone to check periodically that all is well.
Fitting the batteries
- Lift the hopper out of the base unit.
- Invert the base unit and remove the battery cover by releasing the retaining clip.
![]()
- Insert 4 good quality alkaline 'C' batteries using the orientation symbols marked in the bottom of the battery compartment. Replace the battery cover.

Setting the clock
- Press and hold the 'TIME' button for 5 seconds until the hour figure on the clock starts to flash.
- Press the '+' or '-' buttons to adjust the clock to the correct hour. Hold down either the '+' or '-' button for longer than 3 seconds to scroll through.
- Press the 'TIME' button and the minute figure will flash. Adjust the minutes using the '+' or '-' buttons.
- Press the 'TIME' button to save the setting.
- To change the clock between 12 hour (AM/PM) and 24 hour formats, press and hold the 'TIME' button and within 3 seconds press the '+' button.
Wait 60 seconds for the display to stop flashing and the clock to set before proceeding to the next step.
Assembling the pet feeder
- Open the hopper lid and remove the feeding bowl, feeding nozzle and feeding mechanism.
![]()
- Push the nozzle in to the front aperture at the base of the hopper. Ensure correct location with the nozzle opening turned downwards.
![]()
- Carefully insert the feeding mechanism in to the rear aperture at the base of the hopper until the retaining clip clicks in to position. Fit assembled hopper to base unit.
![]()
- Fit the feeding bowl by locating the tab at the back bowl in to the base unit and clicking the sprung clips either side of the bowl in to position.
![]()


Calculation of daily feed units
We strongly recommend that you check your dry food packaging for the 'Daily Feeding Guide' giving information on the quantity that is needed to maintain your pet's health. Many pets are overfed which is both expensive and detrimental to your pet's health.
To calculate the number of 'feed units' for your pet's daily requirement, proceed as follows:
- Fill the hopper with a suitable quantity of dry food well in excess of a daily amount. To maintain maximum food freshness/appeal, we recommend that a maximum of 10 days food is loaded.
- Fill the feeding mechanism by pressing and holding the 'FEED' button and within 3 seconds pressing and holding the '+' button until the display shows '10'. When feeding stops, press the 'TIME' button to display the clock again. Return food in bowl to hopper.
- Repeat step 2 above, this time holding both buttons until the required daily amount of food has been dispensed. When the desired daily amount of food appears in the feeding bowl release both buttons and the feeder will complete its current feed unit. Make a note of the number of feed units displayed on the LCD.After 60 seconds the display will revert to the clock.
- We recommend that you weigh the dispensed food from the feeding bowl and cross reference to the 'Daily Feeding Guide'on the food packaging. If the weight is correct, your pet's 'daily feed units'will be the displayed number noted in step 3. If incorrect, return all of the food back to the hopper and repeat step 3, making use of the feed unit count on the LCD to increase/decrease the amount of dispensed food.
Setting meal sizes
Once you have calculated the number of daily feed units for your pet, decide how you would like that number of units to be dispensed across the programmed meal time settings. (Example: A pet's daily allowance of 20 units can be divided over 3 meal time settings of 6 units in the morning, 8 units at midday and 6 units in the evening.) Alternatively, consider using the Frequent Feed option.
Set the meal sizes for each programmed meal time as follows:
- Press and hold the 'FEED' button for 5 seconds. The letter 'F' next to two zeros ('00') will appear and flash on the display. Press the '+' or '-' buttons to set the number of feed units for this meal setting.
![]()
- Press the 'FEED' button again to set the meal sizes for 'MEAL 2' (and 'MEAL 3').
NOTE:Programming the feed units to two zeros ('00') denotes that the feed unit is set to 'off'and the meal indicator will not be displayed when this procedure is completed. - When all meal sizes are programmed, save your settings by pressing the 'FEED' button.

Once the settings are saved, the clock indicator will be shown and the programmed meal indicators will be displayed under the respective food bowl icons. The indicator representing the next meal time due to be served will flash.
Reviewing meal sizes
When the clock indicator is showing you can review all your programmed meal size settings as follows:
- Press the 'FEED' button - the programmed feed units set for 'MEAL 1' will display for 60 seconds.
- Press the 'FEED' button again within 60 seconds to view the programmed feed units for 'MEAL 2' and again for 'MEAL 3'.
- Press the 'FEED' button again to return to the clock display.
Setting meal times
Not required for Frequent Feeding option
- Press and hold the 'TIME' button for 5 seconds until the hour figure on the clock starts to flash.
- Press the 'TIME' button twice - the hour figure and the 'MEAL 1' indicator will flash.
- Set the meal time in the same way as setting the clock, by pressing the '+' or '-' buttons to adjust the hours, press the 'TIME' button again and adjust the minutes.
- When the desired meal time is displayed press the 'TIME' button. Repeat previous step to set 'MEAL 2' and 'MEAL 3'.
NOTE:If only one (or two) meals per day are required, the setting for 'MEAL 2'(and 'MEAL 3') are not critical. - When all meal times are programmed, save your settings by pressing the 'TIME' button repeatedly until the clock indicator displays (after 'MEAL 3').
Reviewing meal times
When the clock indicator is showing you can review all your meal time settings as follows:
- Press the 'TIME' button to display the programmed meal time set for 'MEAL 1'.
- Press the 'TIME' button again within 60 seconds to view the programmed meal times for 'MEAL 2' and again for 'MEAL 3'.
- Press the 'TIME' button again to return to the clock display.
Extra feed
in addition to a Set Meal
If you would like to serve your pet additional units of food at any time, press the 'FEED' and '+' buttons together. The feeder will dispense one unit of food. To serve a number of units, keep both buttons held down and the LCD will display the total number of units dispensed. Release both buttons and the unit will complete its current feed unit. The number of units dispensed will remain displayed for 60 seconds.
Advance feed
serving the next Set Meal early
If you would like to bring a programmed set meal forward, press the 'FEED' and '-' buttons together. The feeder will dispense the next programmed meal due and you may now release both buttons. Once the advanced set meal (e.g. MEAL 2) has been served the next programmed meal indicator (i.e. MEAL 3) will flash on the display and food will not be dispensed until that set time.
You may only advance meals programmed for the same day.
Manual feed
dispensing controlled feeds on demand
This function allows you to serve a predetermined amount of food without programming meal times. Proceed as follows:
- Calculate the number of feed units you would like to serve per meal.
- Set 'MEAL 1' with the number of feed units.
- Whilst the 'MEAL 1'setting is flashing, press and hold the '+'and '-'buttons together for 5 seconds until 'OFF' is displayed.
![]()

Each time you now press and hold the 'FEED' button for 5 seconds, the programmed 'MEAL 1' will be dispensed.
To turn the feeder back on:
- Press and hold the '+' and '-' buttons together for 5 seconds.
The LCD will flash until clock setting is restored.
Frequent feed
small feeds at regular intervals
The Frequent Feed function allows the daily feed units to be served over the course of a day, dispensing a single feed unit at a regular interval between a programmed start and finish time. The function is designed for pets with specific dietary requirements (e.g. diabetic cats) or if you wish to regulate the speed of your pet's food intake.
The start/finish times and the feed units can be programmed as follows:
- Press and hold the 'TIME' and 'FEED' buttons together for 5 seconds until the Frequent Feed indicator ('F') appears on the LCD.
- Press and hold the 'TIME' button for 5 seconds until the hour figure on the clock starts to flash.
- Press the 'TIME' button twice - the hour figure and the 'MEAL 1' (start time) indicator will flash.
- Set the start time in the same way as setting the clock, by pressing the '+' or '-' buttons to adjust the hours, then pressing the 'TIME' button again to adjust the minutes.
- Press the 'TIME' button. The 'MEAL 3' (finish time) indicator will flash. Repeat step 4 to set the finish time.
- Press the 'TIME' button, the letter 'F' next to two zeros ('00') will appear and flash on the display. Press the '+' or '-' buttons to set the total daily feed units.
- Press the 'TIME' button to save these settings.
The LCD will return to displaying the clock with the 'Frequent Feed', 'MEAL 1' and 'MEAL 3' indicators displayed.
To review, press the 'TIME' button once to view the start time and again for the finish time. Press again to view the feed units and press finally to return to the clock.
To return the feeder to standard operation, press and hold the 'TIME' and 'FEED' buttons together for 5 seconds. The 'Frequent Feed' indicator will disappear and the clock indicator will be displayed along with the meal indicators of any previously saved settings programmed.
Turning the feeder off and on
To turn off the feeder and keep the programmed settings:
- Press and hold the '+' and '-' buttons together for 5 seconds until 'OFF' is displayed on the LCD.
To turn the feeder back on:
- Press and hold the '+' and '-' buttons together for 5 seconds until LCD displays the clock and the set meal indicators.
Changing the batteries
When the low battery indicator flashes on the LCD, the batteries need replacing. Good quality alkaline batteries should normally last approximately 12 months (depending on the number of feed units dispensed).

- To keep the clock and all the meal settings, you must remove and replace all of the batteries within 60seconds! The low battery indicator should extinguish when the next meal is served.
- DO NOT press any buttons during the removal or replacement of the batteries. Doing so will reset theunit and you will need to re-programme your settings.
Securing the feeder to a board
If your pet(s) are likely to interfere with the feeder, we recommend the feeder is screwed to a suitably sized wooden board. By the following method, the feeder is easily removed from the board without tools when required:
- Place the base unit in the desired position on the board. With a pencil, draw around the footprint.
![]()
- Draw a centre line on the base unit outline and mark the screw position as shown below.
![]()
- Select a suitable screw and screw it into the board, leaving a distance of 25mm (1") between the board and the base of the screw head to enable the feeder to be removed for battery replacement and cleaning.
![]()
- Locate the base unit on to the screw and slide it in to the fastened position.

- Line up the base unit within the drawn outline and mark the front screw positions at the narrowest end of the screw holes.
![]()
- Remove the base unit from the board. Apply 2 further screws and locate the base unit back on to the board (as in step 4). If necessary, these 2 screws may be screwed down further to secure the feeder more firmly.


Cleaning
The hopper, hopper lid, feeding bowl and feeding mechanism (F) are made from food-safe materials that may be washed in a dishwasher. Clean the base unit using a cloth dampened with water only - detergents and polishes may cause damage.
- Remove the feeding bowl from the base unit by holding in the sprung clips on either side and pulling the bowl away from the unit.
![]()
- Remove the feeding mechanism by releasing the retaining clip.
![]()


Troubleshooting
Feeder Blockage
Your Cat Mate feeder has been extensively tested with a variety of dry foods but in the unlikely event that the feeder becomes jammed, the base unit is programmed with an automatic clearing function. If however the feeder is unable to clear the blockage, the whole LCD screen will flash. The blockage will need to be cleared manually, as follows:
- Lift the hopper out of the base unit.
- Rotate feeding mechanism by hand as shown below until food is moving freely again.
![]()
NOTE:Before reassembling the feeder, we recommend the batteries are replaced. Also consider the use of a different feed that may be less prone to blockage. - Reassemble the feeder and press the 'TIME' button to stop the display flashing and resume normaloperation.

Display non-responsive
In the unlikely event that the display becomes non-responsive, wait 3 minutes before attempting to press any buttons. If full function is not returned remove batteries for 5 minutes. Then replace batteries and re-programme feeder.

Documents / ResourcesDownload manual
Here you can download full pdf version of manual, it may contain additional safety instructions, warranty information, FCC rules, etc.
Download CAT MATE C3000 Automatic Dry Food Pet Feeder Manual
Advertisement


Need help?
Do you have a question about the C3000 and is the answer not in the manual?
Questions and answers