SONY ICD-UX570F - IC Recorder Manual Review and Sound Test Video
- Help manual (250 pages) ,
- Help manual (247 pages) ,
- Operating instructions manual (12 pages)
Advertisement
Refer to the Help Guide
This is the Operating Instructions, which provides you with instructions on the basic operations of the IC recorder.
The Help Guide is an online manual.
Refer to the Help Guide when you would like to know further details, operations and possible solutions when a problem occurs.
https://rd1.sony.net/help/icd/u57/h_zz/

Check the supplied items
- IC Recorder (1)
- Carrying case (1)
- Operating Instructions (this sheet)
- Warranty card (1)
- Application Software, Sound Organizer 2 (Installer file stored in the built-in memory so that you can install it to your computer.)
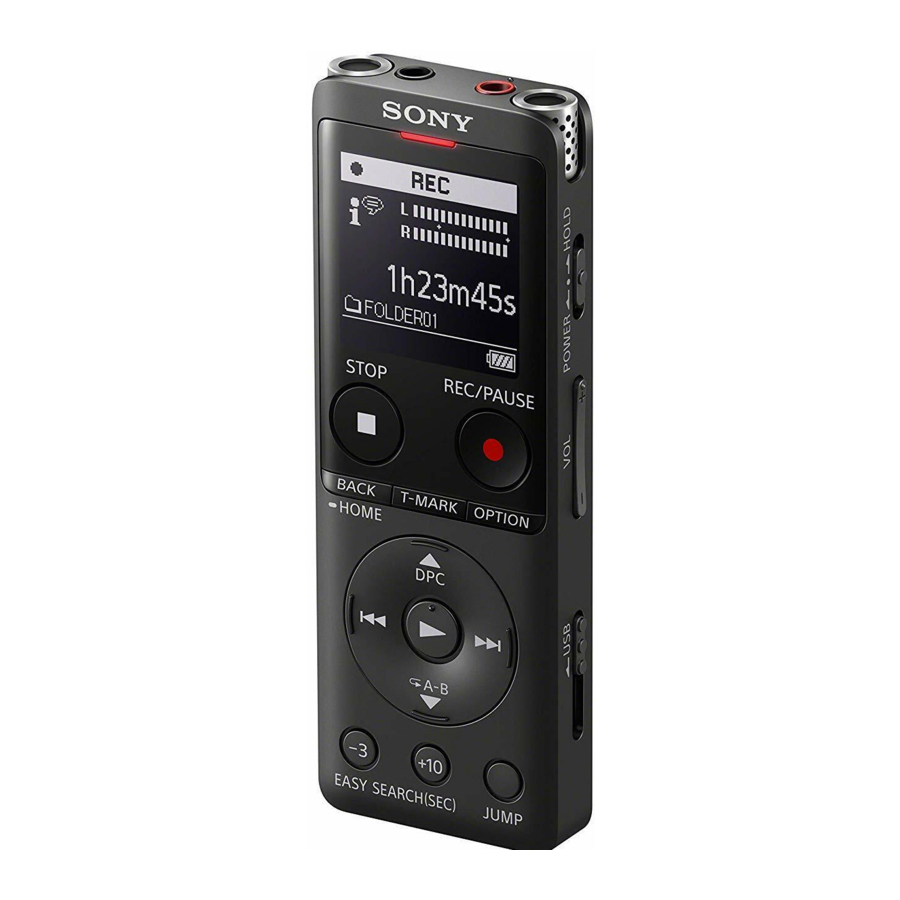
Parts and controls

- Built-in microphones
- Operation indicator
- Display window
![]() REC/PAUSE (record/pause) button
REC/PAUSE (record/pause) button![]() STOP button
STOP button- T-MARK (track mark) button
- BACK/
![]() HOME button
HOME button - OPTION button
![]() (play/enter) button*1
(play/enter) button*1- Control button (
![]() DPC (Digital Pitch Control),
DPC (Digital Pitch Control), ![]() A-B (repeat A-B),
A-B (repeat A-B), ![]() (review/fast backward),
(review/fast backward), ![]() (cue/fast forward))
(cue/fast forward)) - 3 EASY SEARCH(SEC) button
- +10 EASY SEARCH(SEC) button
- USB connector cover (You can find the USB connector retracted behind the cover.)
- Strap hole (No strap is supplied with your IC recorder.)
- POWER•HOLD switch*2
- VOL –/+*1 (volume –/+) button
- USB slide lever
- JUMP (time jump) button
![]() (microphone) jack*1
(microphone) jack*1![]() (headphones) jack
(headphones) jack- microSD card slot (The card slot is located under the cover.)
- Slot cover
- Built-in speaker
 REC/PAUSE (record/pause) button
 HOME button
 DPC (Digital Pitch Control),
  A-B (repeat A-B),
  (review/fast backward),
  (cue/fast forward))
 (headphones) jack
*1 The  (play/enter) button, VOL + (volume +) button, and
  (microphone) jack have a tactile dot. Use the tactile dot as a reference when operating the IC recorder.
*2 Sliding the POWER•HOLD switch to "POWER" and holding it for 8 seconds or longer restarts your IC recorder. For detailed instructions, refer to the Help Guide.
Let's try out your new IC recorder
Charge

- Charge the IC recorder.
Slide the USB slide lever in the direction of the arrow, and insert the USB connector into the USB port of a running computer.
When the battery is fully charged, the battery indicator changes from the charging animation to "![]() ".
". - Disconnect the IC recorder.
Make sure that the message "Accessing" is no longer on the display window. Then refer to the Help Guide to remove the IC recorder safely.
 ".
".Power on

Slide and hold the POWER•HOLD switch in the direction of "POWER" until the window display appears.
To turn the power off, slide the POWER•HOLD switch to "POWER" and hold it until "Power Off" appears on the display window.
To prevent unintentional operations (HOLD)
Slide the POWER•HOLD switch in the direction of "HOLD."


To release the IC recorder from the HOLD status, slide the POWER•HOLD switch OFF towards the center.
Initial settings

When you power on your IC recorder for the first time, the "Configure Initial Settings" screen appears on the display window. You can then select the display language, set the clock, and turn on/off the beep sound.
- Press
![]() to start the initial settings.
to start the initial settings.
![]()
- Select the display language.
You can select from the following languages: Deutsch (German), English*, Español (Spanish), Français (French), Italiano (Italian), Русский (Russian), Türkçe (Turkish), 한국어 (Korean), 简体中文 (Simplified Chinese), 繁體中文 (Traditional Chinese)
* Default setting - Set the current year, month, day, hour, and minute.
![]()
![]()
To go back to the previous clock setting item, press BACK/HOME. - Select "Next."
![]()
- Select "ON" or "OFF" to turn on or off the beep sound.
When the initial settings finish, the completion message and then the HOME menu screen appear.
![]()


 Notes
Notes
- If you take 30 seconds or longer before proceeding to the next step, the display window will turn off. To turn on the display window for continuing the initial settings, press BACK/HOME.
- You can change any of the initial settings at any time later. For detailed instructions, refer to the Help Guide.
The display window turns off automatically
The "Screen Off Timer" setting on your IC recorder is set to "30 Sec" by default to save battery power. If you leave the IC recorder untouched for 30 seconds, the display window will turn off, but you can still perform any button operations. To turn the display window back on, press BACK/HOME.

You can keep the display window from turning off or change the default setting to another timer interval. Press and hold BACK/HOME and select " Settings" - "Common Settings" - "Screen Off Timer," and then select "No Auto Screen Off," "15 Sec," "30 Sec," "1 Min," "3 Min," or "5 Min."
Record

- Before you start recording, make sure that the HOLD status is released.
- You can select a recording scene for each situation by selecting "Scene Select" in the OPTION menu.
- Select "
![]() Record" from the HOME menu.
Record" from the HOME menu.
The recording standby screen appears. - Select a storage and a folder to save the recorded file.
![]()
To save the recorded file on the microSD card, you need to change the file storage destination folder. Select "Recording Folder" - "SD Card" from the OPTION menu, and then start recording. - Turn the IC recorder so that its built-in microphones point in the direction of the target sound source.
- Press
![]() REC/PAUSE.
REC/PAUSE.
"REC" appears on the display window to indicate that recording has started, and the operation indicator lights in red.
![warning]() Note
Note
If you press and hold![]() REC/PAUSE, the IC recorder will pause. It will not start recording.
REC/PAUSE, the IC recorder will pause. It will not start recording.

The recording level guide (![]() ) is displayed while recording. The section between + and + (
) is displayed while recording. The section between + and + (![]() ) is the optimal input level for recording. Please adjust the orientation of the built-in microphones, the distance from the sound source, the microphones' sensitivity setting, or the "Scene Select" setting so that the recording level fits within the optimal range, as illustrated.
) is the optimal input level for recording. Please adjust the orientation of the built-in microphones, the distance from the sound source, the microphones' sensitivity setting, or the "Scene Select" setting so that the recording level fits within the optimal range, as illustrated. - Press
![]() STOP to stop recording.
STOP to stop recording.
"Saving..." and then recording standby screen appear on the display window.
 Record" from the HOME menu.
 ) is displayed while recording. The section between + and + (
 ) is the optimal input level for recording. Please adjust the orientation of the built-in microphones, the distance from the sound source, the microphones' sensitivity setting, or the "Scene Select" setting so that the recording level fits within the optimal range, as illustrated.
Listen

- Select "
![]() Recorded Files" from the HOME menu.
Recorded Files" from the HOME menu. - Select "Latest Recording," "Search by REC Date," "Search by REC Scene," or "Folders."
- Select your desired file.
Playback starts and the operation indicator lights in green.
![]()
- Press VOL + or VOL - to adjust the volume.
- Press
![]() STOP to stop playback.
STOP to stop playback.
 Recorded Files" from the HOME menu.
Right after you stopped recording, you can press to play the file you have just recorded.
To add a track mark
You can add a track mark at a point at which you want to divide a file later or locate during playback. You can add a maximum of 98 track marks to each file.
You can also add track marks during recording.
Locating the desired playback point quickly (Time Jump, Easy Search)
- Using the time jump function allows you to move to any of the 10 points throughout the total duration of a file. You can use this function with
![]() or
or ![]() in the time jump mode.
in the time jump mode. - Using the easy search function allows you to forward or reverse a fixed number of seconds (10 seconds for forwarding, 3 seconds for reversing) during playback.
Delete

Note
Once a file is deleted, you cannot restore it.
- Select the file you want to delete from the list of recorded files or play back the file you want to delete.
- Select "Delete File" from the OPTION menu.
![]()
"Delete?" appears and the selected file starts playing for your confirmation. - Select "Yes."
![]()
"Please Wait" appears and stays until the selected file is deleted.


Using the HOME menu
You can use the HOME menu for a variety of operations, including locating and playing a recorded file and changing the settings of your IC recorder.

- Press and hold BACK/HOME.
The HOME menu screen appears.
![]()
The HOME menu items are aligned in the following sequence.
![]()
- Select your desired function from the following:
* The function you are currently using is displayed in "XX."![]() Music
Music You can select and play one of the files you have imported from a computer. To locate a music file, select "All Songs," "Albums," "Artists," or "Folders." When importing files, be sure to import them into the MUSIC folder. ![]() Recorded Files
Recorded Files You can select and play one of the files you have recorded with your IC recorder. To locate a recorded file, select "Latest Recording," "Search by REC Date," "Search by REC Scene," or "Folders." ![]() Record
Record You can display the record standby screen, and then start recording. ![]() FM Radio
FM Radio You can display the FM radio screen, and then listen to or record radio broadcasts. ![]() Settings
Settings You can display the Settings menu screen and change various settings on the IC recorder. ![]() Back to XX*
Back to XX* You can go back to the screen that was displayed before the HOME menu screen.


 Music
Music  FM Radio
  Back to XX*
Press  STOP to return to the screen displayed before you entered the HOME menu.
Using the OPTION menu
You can use the OPTION menu to perform a variety of functions, including changing the settings of your IC recorder.
The available items differ depending on the situation.

- Select your desired function from the HOME menu, and then press OPTION.
![]()
- Select the menu item for which you want to change the setting.
- Select your desired setting option.

Copying files from your IC recorder to a computer
You can copy the files and folders from your IC recorder to a computer to store them.
- Follow the instructions in "Charge" to connect your IC recorder to a computer.
- Drag and drop the files or folders you want to copy from "IC RECORDER" or "MEMORY CARD" to the local disk on the computer.
To copy a file or folder (Drag and drop)

- Click and hold,
- drag,
- and then drop.
- Disconnect your IC recorder from the computer.

Installing Sound Organizer 2
Install Sound Organizer on your computer.
Sound Organizer allows you to exchange files between your IC recorder and your computer.
Songs imported from music CDs and other media, MP3 and other audio files imported to a computer can also be played and transferred to the IC recorder.
Notes
- Sound Organizer is compatible with Windows computers only. It is not compatible with Mac.
- This IC recorder is compatible with Sound Organizer 2 only.
- If you format the built-in memory, all data stored there will be deleted. (The Sound Organizer software installer will also be deleted.)
- When installing Sound Organizer, log in to an account with administrator privileges.
- The installation procedure varies depending on the Windows version. The following procedure uses Windows 10 as an example.
- Follow the instructions in "Charge" to connect your IC recorder to a computer.
- Make sure the IC recorder is successfully detected by the computer.
"Connecting" appears and stays on the IC recorder's display window while the IC recorder is connected to the computer. - Right-click at the bottom left corner of the desktop, and then click [File Explorer] on the menu.
- Double-click [IC RECORDER] - [FOR WINDOWS].
- Double-click [SoundOrganizer_V2002] (or [SoundOrganizer_V2002.exe]).
Follow the computer's on-screen instructions. - When the [Welcome to Sound Organizer 2 Installer] window appears, click [Next].
- Make sure that you accept the terms of the license agreement, select [I accept the terms in the license agreement], and then click [Next].
- When the [Setup Type] window appears, select [Standard] or [Custom], and then click [Next].
Follow the instructions on the screen and set the installation settings when you select [Custom]. - When the [Ready to Install the Program] window appears, click [Install].
The installation starts. - When the [Sound Organizer 2 has been installed successfully.] window appears, check [Launch Sound Organizer 2 Now], and then click [Finish].
![warning]() Note
Note
You may need to restart your computer after installing Sound Organizer 2.
Precautions
On power
DC 3.7V: the built-in rechargeable lithium-ion battery
DC 5.0V: when charged using USB
Rated current consumption: 500mA
On handling
- Do not leave the unit in a location near heat sources, or in a place subject to direct sunlight, excessive dust or mechanical shock.
- Should any solid object or liquid fall into the unit, remove the battery and have the unit checked by qualified personnel before operating it any further.
- When using your IC recorder, remember to follow the precautions below in order to avoid warping the cabinet or causing the IC recorder to malfunction.
- Do not sit down with the IC recorder in your back pocket.
- Do not put your IC recorder into a bag with the headphones/earphones cord wrapped around it and subject the bag to strong impact.
- Be careful not to allow water to splash on the unit. The unit is not waterproof. In particular, be careful in the following situations.
- When you have the unit in your pocket and go to the bathroom, etc. When you bend down, the unit may drop into the water and may get wet.
- When you use the unit in an environment where the unit is exposed to rain, snow, or humidity.
- In circumstances where you get sweaty. If you touch the unit with wet hands or if you put the unit in the pocket of sweaty clothes, the unit may get wet.
- Listening with this unit at high volume may affect your hearing.
- For traffic safety, do not use this unit while driving or cycling.
- Do not use this unit at a place where the inability to hear surrounding sounds may present a danger.
- You may feel pain in your ears if you use the headphones when the ambient air is very dry.
This is not because of a malfunction of the headphones, but because of static electricity accumulated in your body. You can reduce static electricity by wearing non-synthetic clothes that prevent the emergence of static electricity. - Do not place this product close to medical devices.
This product (including accessories) has magnet(s) which may interfere with pacemakers, programmable shunt valves for hydrocephalus treatment, or other medical devices. Do not place this product close to persons who use such medical devices. Consult your doctor before using this product if you use any such medical device.
On noise
- Noise may be heard when the unit is placed near an AC power source, a fluorescent lamp or a mobile phone during recording or playback.
- Noise may be recorded when an object, such as your finger, etc., rubs or scratches the unit during recording.
On maintenance
To clean the exterior, use a soft cloth slightly moistened in water. Then use a soft dry cloth to wipe the exterior. Do not use alcohol, benzine or thinner.
If you have any questions or problems concerning your unit, please consult your nearest Sony dealer.

- Do not expose the batteries (battery pack or batteries installed) to excessive heat such as sunshine, fire or the like for a long time.
- Do not subject the batteries to extreme low temperature conditions that may result in overheating and thermal runaway.
- Do not dismantle, open or shred secondary cells or batteries.
- In the event of a cell leaking, do not allow the liquid to come in contact with the skin or eyes. If contact has been made, wash the affected area with copious amounts of water and seek medical advice.
- Do not use any charger other than that specifically provided for use with the equipment.
- Secondary cells and batteries need to be charged before use. Always use the correct charger and refer to the manufacturer's instructions or equipment manual for proper charging instructions.
- After extended periods of storage, it may be necessary to charge and discharge the cells or batteries several times to obtain maximum performance.
- Dispose of properly.

- Risk of explosion if battery is replaced by an incorrect type. Dispose of used batteries according to the instructions.
- This equipment has been tested and found to comply with the limits set out in the EMC regulation using a connection cable shorter than 3 meters.
Notice for users
- All rights reserved. This manual or the software described herein, in whole or in part, may not be reproduced, translated or reduced to any machine readable form without prior written approval from Sony Corporation.
- What you record is for personal enjoyment and use only. Copyright laws prohibit other forms of use without the permission of the copyright holders.
Specifications
Capacity (User available capacity*1*2)
4 GB (approx. 3.20 GB = 3,435,973,837 Byte)
Maximum recording time*3*4 (Built-in memory)
The maximum recording time of all the folders is as follows.
| LPCM 44.1 kHz/16 bit (STEREO) | 5 hours 20 minutes |
| MP3 192 kbps (STEREO) | 39 hours 45 minutes |
| MP3 128 kbps (STEREO) | 59 hours |
| MP3 48 kbps (MONO) | 159 hours |
Battery Life (a built-in rechargeable lithium-ion battery)*5
The battery life spans provided here are all approximate periods of time.
| Recording mode | Recording | Recording (while monitoring) | Recording FM radio broadcasts | |
| LPCM 44.1 kHz/16 bit (STEREO) | 20 hours | 12 hours | - | |
| MP3 192 kbps (STEREO) | 22 hours | 13 hours | 10 hours | |
| MP3 128 kbps (STEREO) | 22 hours | 13 hours | 10 hours | |
| MP3 48 kbps (MONO) | 22 hours | 13 hours | 10 hours | |
| Music file (MP3 128 kbps) | - | - | - | |
| FM radio reception | - | - | - | |
| Recording mode | Playback with the built-in speaker | Playback with the headphones | ||
| LPCM 44.1 kHz/16 bit (STEREO) | 5 hours | 34 hours | ||
| MP3 192 kbps (STEREO) | 5 hours | 47 hours | ||
| MP3 128 kbps (STEREO) | 5 hours | 47 hours | ||
| MP3 48 kbps (MONO) | 5 hours | 47 hours | ||
| Music file (MP3 128 kbps) | 5 hours | 47 hours | ||
| FM radio reception | - | 10 hours | ||
Dimensions (w/h/d) (not incl. projecting parts and controls)
Approx. 36.6 mm × 102.8 mm × 12.2 mm
Mass
Approx. 48 g
Temperature/Humidity
| Operating temperature | 5°C - 35°C |
| Operating humidity | 25% - 75% |
| Storage temperature | -10°C - +45°C |
| Storage humidity | 25% - 75% |
Compatible memory cards
- microSDHC cards from 4 GB to 32 GB
- microSDXC cards of 64 GB or more
*1 A small amount of the built-in memory is used for file management and therefore not available for user storage.
*2 When the built-in memory is formatted with the IC recorder.
*3 The maximum recordable time in this topic is provided for your reference only.
*4 Default settings for the recording scenes.
*5 Measured values acquired under our measurement conditions. These values may decrease depending on the usage conditions.

VideosSony Voice recorder UX570F unboxing, review and sound test Video
Documents / Resources
References
Download manual
Here you can download full pdf version of manual, it may contain additional safety instructions, warranty information, FCC rules, etc.
Download SONY ICD-UX570F - IC Recorder Manual Review and Sound Test Video
Advertisement


Need help?
Do you have a question about the ICD-UX570F and is the answer not in the manual?
Questions and answers