SONY ICD-PX370 - IC Recorder Manual and Review Video
- Help manual (220 pages)
Advertisement
- 1 Check the supplied items
- 2 Parts and controls
- 3 Power on
- 4 Initial settings
- 5 Record
- 6 Listen
- 7 Delete
- 8 Using the HOME menu
- 9 Using the OPTION menu
- 10 Copying files from your IC recorder to a computer
- 11 Installing Sound Organizer 2
- 12 Precautions
- 13 Specifications
- 14 Videos
- 15 Documents / Resources
Check the supplied items
- IC Recorder (1)
- LR03 (size AAA) alkaline batteries (2)
- Operating Instructions (this sheet)
- Warranty card
- Application Software, Sound Organizer 2 (Installer file stored in the built-in memory so that you can install it to your computer.)
Optional accessories
Electret condenser microphone ECM-CS3, ECM-TL3
Note
Depending on the country or region, some of the models or optional accessories are not available.
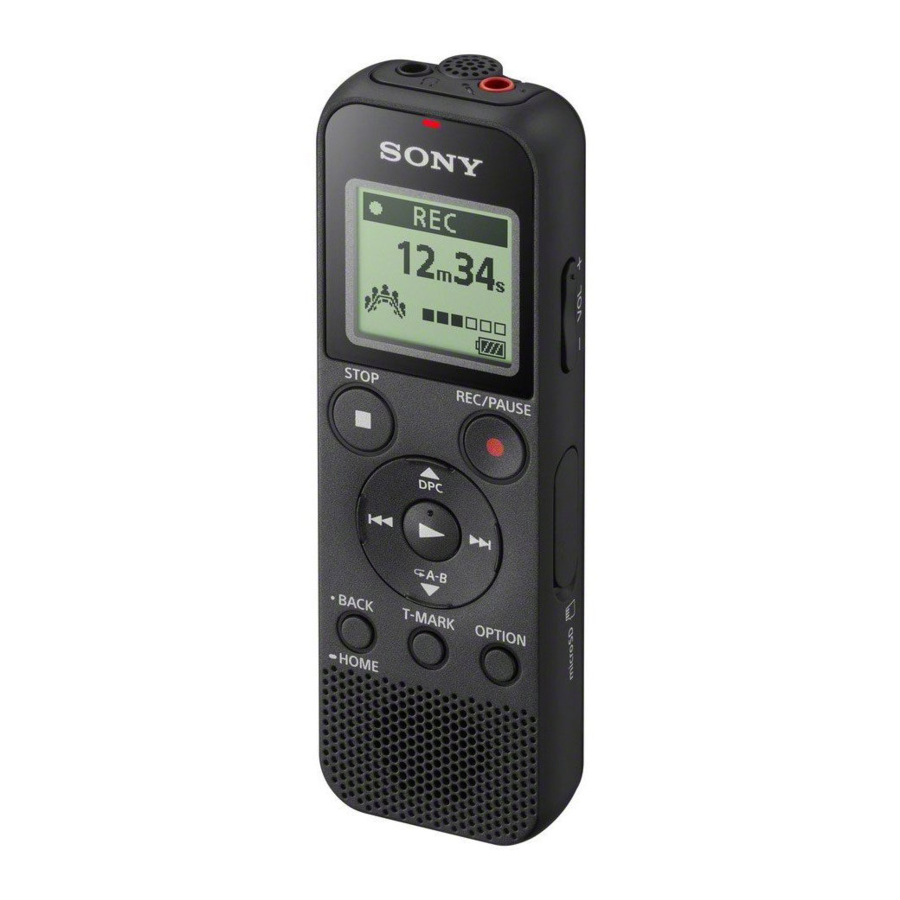
Parts and controls

- Built-in microphone (monaural)
![]() (headphones) jack
(headphones) jack- Operation indicator
- Display window
![]() REC/PAUSE (record/pause) button
REC/PAUSE (record/pause) button![]() STOP button
STOP button- Control button (
![]() DPC (Digital Pitch Control),
DPC (Digital Pitch Control), ![]()
![]() A-B (repeat A-B)/
A-B (repeat A-B)/ ![]() (review/fast backward),
(review/fast backward), ![]() (cue/fast forward))
(cue/fast forward)) ![]() (play/enter) button*
(play/enter) button*![]() BACK/
BACK/ ![]() HOME button (
HOME button ( ![]() : press,
: press, ![]() : press and hold)
: press and hold)- T-MARK (track mark) button
- OPTION button
- Built-in speaker
- Strap hole (No strap is supplied with your IC recorder.)
- USB connector compartment
![]() (microphone) (PLUG IN POWER) jack*
(microphone) (PLUG IN POWER) jack*- VOL –/+ (volume –/+) button*
- Slot cover
- microSD card slot (The card slot is located under the cover.)
- USB slide lever
- HOLD•POWER switch
- Battery compartment
 (headphones) jack
 REC/PAUSE (record/pause) button
 DPC (Digital Pitch Control),
 A-B (repeat A-B)/
  (review/fast backward),
  (cue/fast forward))
 HOME button (
  : press and hold)
* The  (play/enter) button, VOL –/+ (volume –/+) button, and
  (microphone) (PLUG IN POWER) jack have a tactile dot. Use the tactile dot as a reference when operating the IC recorder.
Power on

- Slide and lift the battery compartment lid, insert LR03 (size AAA) alkaline batteries with the correct polarity, and close the lid.
- Turn the power on.
To turn the power on
Slide and hold the HOLD![]() POWER switch in the direction of "POWER" until the window display appears.
POWER switch in the direction of "POWER" until the window display appears.
To turn the power off, slide the HOLD![]() POWER switch to "POWER" and hold it until "Power Off" appears on the display window.
POWER switch to "POWER" and hold it until "Power Off" appears on the display window.
To prevent unintentional operations (HOLD)
Slide the HOLD•POWER switch in the direction of "HOLD."
![]()

 To release the IC recorder from the HOLD status, slide the HOLD
  POWER switch towards the center.
Initial settings

When you turn on your IC recorder for the first time, the "Configure Initial Settings" screen appears on the display window. You can then select the display language, set the clock, and turn on/off the beep sound.
- Select "Yes" to start the initial settings.
![]()
- Select the display language.
You can select from the following languages:
English*, Español (Spanish), Français (French)
* Default setting - Set the current year, month, day, hour, and minute.
![]()
![information]() To go back to the previous clock setting item, press BACK/HOME.
To go back to the previous clock setting item, press BACK/HOME. - Select "Next."
![]()
- Select "ON" or "OFF" to turn on or off the beep sound.
When the initial settings finish, the completion message and then the HOME menu screen appears.
![]()


- You can change any of the initial settings at any time later. For detailed instructions, refer to the Help Guide.
- When you re-insert batteries, or when you replace batteries with new ones, the clock setting display appears, and the approximate date and time when you last operated the IC recorder before removing the batteries is displayed. Set the clock to the current time again.
- To check the current time after the initial settings, slide the HOLD•POWER switch in the direction of "HOLD."
Record

- Before you start using the IC recorder, make sure that the HOLD•POWER switch is at the center dot position.
- You can select a recording scene for each situation by selecting "Scene Select" in the OPTION menu.
Recorded audio files are stored in "FOLDER01" under "  Recorded Files" by default.
- Select "
![]() Record" from the HOME menu.
Record" from the HOME menu.
The recording standby screen appears on the display window.
![]()
- Select the folder you want to store the recorded files.
To store the audio files in a folder other than "FOLDER01," create a new folder and change the file storage destination folder to the new folder. For detailed instructions, refer to the Help Guide. - Turn the IC recorder so that its built-in microphone points in the direction of the recording source.
- Press
![]() REC/PAUSE.
REC/PAUSE.
Recording starts, "REC" appears on the display, and the operation indicator lights in red.
Pressing and holding the![]() REC/PAUSE does not start recording.
REC/PAUSE does not start recording.
Doing so makes your IC recorder pause for recording.
![]()
During recording, the recording level guide (
![]() ) is displayed.
) is displayed.
Adjust the orientation of the built-in microphone, the distance from the sound source, or the sensitivity setting of the microphone so that the input level indicated by![]() stays at 3/6 or 4/6, which fits within the optimum range, as illustrated above.
stays at 3/6 or 4/6, which fits within the optimum range, as illustrated above. - Press
![]() STOP to stop recording.
STOP to stop recording.
"Saving..." appears on the display, and then the display returns to the record standby screen.
After you stopped recording, you can press![]() to play the file you have just recorded.
to play the file you have just recorded.
 Record" from the HOME menu.

 ) is displayed.
Listen

Recorded audio files are stored in "FOLDER01" under " Recorded Files" by default.
- Select "
![]() Recorded Files" from the HOME menu.
Recorded Files" from the HOME menu. - Select "Folders" - "Built-In Memory" - "FOLDER01," and then press
![]() .
.
To listen to recorded audio files stored on a microSD card, select "Folders" - "SD Card." - Select your desired file.
Playback starts.
![]()
- Press
![]() STOP to stop playback.
STOP to stop playback.

- Press VOL -/+ to adjust the volume.
- The built-in speaker is provided mainly for checking recorded audio files. If you find the volume not loud enough or have difficulty in understanding what you hear, use headphones (not supplied).
- When you select " Recorded Files," the file search categories of the stored files appear on the display window. You can select one of the search categories from "Latest Recording," "Search by REC Date," "Search by REC Scene," or "Folders."
To add a track mark
You can add a track mark at a point at which you want to divide a file later or locate during playback. You can add a maximum of 98 track marks to each file.
You can also add track marks during a recording.
Delete

Note
Once a file is deleted, you cannot restore it.
- Select the file you want to delete from the list of recorded files or play back the file you want to delete.
- Select "Delete a File" from the OPTION menu.
![]()
"Delete?" appears and the selected file starts playing for your confirmation. - Select "Yes."
![]()
"Please Wait" appears and stays until the selected file is deleted.


Using the HOME menu
You can use the HOME menu for a variety of operations, including locating and playing a recorded file and changing the settings of your IC recorder.

- Press and hold BACK/HOME.
The HOME menu screen appears.
![]()
The HOME menu items are aligned in the following sequence.

* The function you are currently using is displayed in "XX." - Select your desired function from the following:


 Music Music | You can select and play one of the files you have imported from a computer. To locate a music file, select "All Songs," "Albums," "Artists," or "Folders." |
 Recorded Files Recorded Files | You can select and play one of the files you have recorded with your IC recorder. To locate a recorded file, select "Latest Recording," "Search by REC Date," "Search by REC Scene," or "Folders." |
 Record Record | You can display the record standby screen, and then start recording. |
 Settings Settings | You can display the Settings menu screen and change various settings on the IC recorder. |
 Back to XX* Back to XX* | You can go back to the screen that was displayed before the HOME menu screen. * The function you are currently using is displayed in "XX." |
Press  STOP to return to the screen displayed before you entered the HOME menu.
Using the OPTION menu
You can use the OPTION menu to perform a variety of functions, including changing the settings of your IC recorder.
The available items differ depending on the situation.

- Select your desired function from the HOME menu, and then press OPTION.
![]()
- Select the menu item for which you want to change the setting.
- Select your desired setting option.

Copying files from your IC recorder to a computer
You can copy the files and folders from your IC recorder to a computer to store them.
- Slide the USB slide lever in the direction of the arrow, and insert the USB connector into the USB port of a running computer.
- Drag and drop the files or folders you want to copy from "IC RECORDER" or "MEMORY CARD" to the local disk on the computer.
To copy a file or folder (Drag and drop)

- Click and hold,
- drag,
- and then drop.
- Make sure that "Accessing" is not displayed on the display window of your IC recorder, and then disconnect the IC recorder from the computer.
Installing Sound Organizer 2
Install Sound Organizer on your computer.
Sound Organizer allows you to exchange files between your IC recorder and your computer.
Songs imported from music CDs and other media, MP3 and other audio files imported to a computer can also be played and transferred to the IC recorder.
Notes
- Sound Organizer is compatible with Windows computers only. It is not compatible with Mac.
- This IC recorder is compatible with Sound Organizer 2 only.
- If you format the built-in memory, all data stored there will be deleted. (The Sound Organizer software will also be deleted.)
When installing Sound Organizer, log in to an account with administrator privileges.
- Slide the USB slide lever in the direction of the arrow, and insert the USB connector into the USB port of a running computer.
- Make sure the IC recorder is successfully detected by the computer.
"Connecting" appears and stays on the IC recorder's display window while the IC recorder is connected to the computer. - Go to the [Start] menu, click [Computer], and then double-click [IC RECORDER] - [FOR WINDOWS].
- Double-click [SoundOrganizer_V2001] (or [SoundOrganizer_V2001. exe]).
Follow the computer's on-screen instructions. - Make sure that you accept the terms of the license agreement, select [I accept the terms in the license agreement], and then click [Next].
- When the [Setup Type] window appears, select [Standard] or [Custom], and then click [Next].
Follow the instructions on the screen and set the installation settings when you select [Custom]. - When the [Ready to Install the Program] window appears, click [Install].
The installation starts. - When the [Sound Organizer has been installed successfully.] window appears, check [Launch Sound Organizer 2 Now], and then click [Finish].
Note
You may need to restart your computer after installing Sound Organizer.
Precautions
On power
DC 3.0 V: Use two LR03 (size AAA) alkaline batteries
DC 2.4 V: Use two NH-AAA rechargeable batteries
DC 5.0 V: when using USB AC adaptor
Rated current consumption: 500 mA
On safety
Do not operate the unit while driving, cycling or operating any motorized vehicle.
On handling
- Do not leave the unit in a location near heat sources, or in a place subject to direct sunlight, excessive dust or mechanical shock.
- Should any solid object or liquid fall into the unit, remove the batteries and have the unit checked by qualified personnel before operating it any further.
- When using your IC recorder, remember to follow the precautions below in order to avoid warping the cabinet or causing the IC recorder to malfunction.
- Do not sit down with the IC recorder in your back pocket.
- Do not put your IC recorder into a bag with the headphones/earphones cord wrapped around it and subject the bag to strong impact.
- Be careful not to allow water to splash on the unit. The unit is not waterproof. In particular, be careful in the following situations.
- When you have the unit in your pocket and go to the bathroom, etc.
When you bend down, the unit may drop into the water and may get wet. - When you use the unit in an environment where the unit is exposed to rain, snow, or humidity.
- In circumstances where you get sweaty. If you touch the unit with wet hands or if you put the unit in the pocket of sweaty clothes, the unit may get wet.
- When you have the unit in your pocket and go to the bathroom, etc.
- Listening with this unit at high volume may affect your hearing. For traffic safety, do not use this unit while driving or cycling.
- You may feel pain in your ears if you use the headphones when the ambient air is very dry. This is not because of a malfunction of the headphones, but because of static electricity accumulated in your body. You can reduce static electricity by wearing non-synthetic clothes that prevent the emergence of static electricity.
On noise
- Noise may be heard when the unit is placed near an AC power source, a fluorescent lamp or a mobile phone during recording or playback.
- Noise may be recorded when an object, such as your finger, etc., rubs or scratches the unit during recording.
On maintenance
To clean the exterior, use a soft cloth slightly moistened in water. Then use a soft dry cloth to wipe the exterior. Do not use alcohol, benzine or thinner.
If you have any questions or problems concerning your unit, please consult your nearest Sony dealer.

Do not expose the batteries (battery pack or batteries installed) to excessive heat such as sunshine, fire or the like for a long time.

Risk of explosion if battery is replaced by an incorrect type. Dispose of used batteries according to the instructions.
Specifications
Capacity (User available capacity*1*2)
4 GB (approx. 3.20 GB = 3,435,973,837 Byte)
Maximum recording time (Built-in memory)
The maximum recording time of all the folders is as follows.
| MP3 192 kbps*3 | 39 hours 45 minutes |
| MP3 128 kbps | 59 hours 35 minutes |
| MP3 48 kbps (MONO) | 159 hours |
Note
When you are going to record continuously for a long time, you may have to replace the batteries with new ones in the middle of recording. For details on the battery life, see Battery Life.
The maximum recording time in this topic is for your reference only.
Battery Life
When using Sony LR03 (SG) (size AAA) alkaline batteries (JEITA)*4*5
| REC Mode | Recording | Playback with the built-in speaker* 6 | Playback with the headphones |
| MP3 192 kbps | Approx. 55 hours | Approx. 18 hours | Approx. 43 hours |
| MP3 128 kbps | Approx. 57 hours | Approx. 18 hours | Approx. 45 hours |
When using NH-AAA rechargeable batteries (JEITA)*
| REC Mode | Recording | Playback with the built-in speaker* 6 | Playback with the headphones |
| MP3 192 kbps | Approx. 40 hours | Approx. 14 hours | Approx. 34 hours |
| MP3 128 bps | Approx. 41 hours | Approx. 14 hours | Approx. 34 hours |
Dimensions (w/h/d) (not incl. projecting parts and controls) (JEITA)*4
Approx. 1.51 inches (38.3 mm) x 4.50 inches (114.2 mm) x 0.76 inches (19.3 mm)
Mass (JEITA)*4
Approx. 2.7 oz (74 g) (including two LR03 (size AAA) alkaline batteries)
Temperature/Humidity
| Operating temperature | 41°F - 95°F (5°C - 35°C) |
| Operating humidity | 25% - 75% |
| Storage temperature | 14°F - 113°F (-10°C - +45°C) |
| Storage humidity | 25% - 75% |
Compatible memory cards
microSDHC cards from 4 GB to 32 GB
Note
microSDXC cards are not compatible with your IC recorder.
*1 A small amount of the internal memory is used for file management and therefore not available for user storage.
*2 When the built-in memory is formatted with the IC recorder.
*3 Default settings for the recording scenes.
*4 Measured value by the standard of JEITA (Japan Electronics and Information Technology Industries Association)
*5 The battery life may shorten depending on how you operate the IC recorder.
*6 When playing back music with the built-in speaker with the volume level set to 27.

VideosReview: Sony ICDPX370 Mono Digital Voice Recorder Video
Documents / ResourcesDownload manual
Here you can download full pdf version of manual, it may contain additional safety instructions, warranty information, FCC rules, etc.
Download SONY ICD-PX370 - IC Recorder Manual and Review Video
Advertisement


Need help?
Do you have a question about the ICD-PX370 and is the answer not in the manual?
Questions and answers