Advertisement
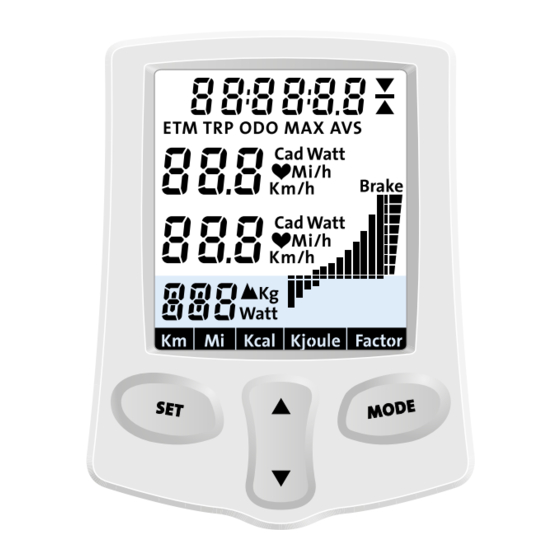
Keys and their functions

| Function during configuration | |
| SET | Press in combination with MODE key for 10 seconds to enter the SETUP menu (countdown appears) |
 | Change setting |
 | Change setting |
| MODE | Next step Exit the SET UP menu |
| Function during cycling | |
| SET | Select training type based on slope or power |
| Change training setting Page through display functions |
| Change training setting Page through display functions |
| MODE | Page through MODE functions Confirm training type |
Resetting training information
When you are not cycling, you can reset the ETM, TRP, MAX and AVS training information by pressing the SET and MODE keys at the same time for 2 seconds. It is not possible to reset the ODO (the total number of kilometres cycled on the trainer). Once it has reached 99,999 km it will automatically reset to 0 km (or miles). All the trip data is also reset when the Flow computer is switched off. When the computer is restarted everything is set to 0 again, except the ODO.
Settings before you begin
When you put the plug into the wall socket, the entire display lights briefly as a test. Then various parameters are shown for two seconds:

- frequency (50 or 60 Hz) and voltage (110 or 220 V) of the mains power
- version number of the firmware
- scale factor (100%)
- body weight (75 kg)
- speed indication and trip energy consumption (km/h, kJoule)
Then the start screen appears. If you want to use the standard settings, you can begin straight away. If not, follow the instructions below.

Press SET and MODE at the same time for 10 seconds. Now the text SET UP appears on the display and the body weight flashes.
Weight
Body weight (without bicycle) flashes. You can use the Up arrow or Down arrow to set the weight between 40 and 120 kg. Use MODE to go to the next step.
Speed
Km flashes. You can change Km to Mi with the Up arrow or Down arrow. Use MODE to go to the next step.
Energy
Kcal flashes. You can change Kcal to kJoule with the Up arrow to the next step.
The accuracy of the Flow's power display depends on factors such as the pressure of the cylinder against the tyre, the tyre pressure, fluctuating magnetic forces and the difference in mains voltage. To guarantee a good power measurement, the brake must be calibrated. For optimal calibration we recommend cycling at least 3 minutes beforehand to warm-up the brake. Make sure the tyre pressure is between 7 and 8 bar.
Brake calibration

The calibration value 0 appears at the bottom. You start the brake calibration with the which causes three dashes to appear at the bottom of the display. Cycle at a speed above 30 km/h (or 19 mi/h) until the word STOP appears. The moment you stop, the Flow computer measures the deceleration of the rear wheel and the new calibration value appears on the display.
If the calibration fails (e.g. because you began pedalling during the measurement), ERROR appears on the display. You can start the calibration again with the
Use MODE to confirm the settings and switch to the training display.
Training with the Flow

The Flow registers four training parameters: speed, power, cadence and heart rate.
Two training parameters are shown at any time, on the 2nd and 3rd lines of the display. With the Up arrow you can switch the 2nd line from speed to cadence, power and heart rate. With the Down arrow you can switch the training parameters on the 3rd line.
MODE functions for SPEED (km/h or mi/h)
The MODE functions on the 1st line of the display correspond to the training parameter on the 2nd line. When the 2nd line is set to speed, the MODE key switches between ETM (elapsed time), TRP (trip time), ODO (odometer), MAX (maximum speed) and AVS (average speed).
 - Mode switching diagram")
The values only reflect the actual time spend cycling since the computer was reset or switched on. If you take a break, the data will be retained. Once you resume cycling, the computer begins calculating again, using all the data.
MODE functions for CADENCE (Cad)
When the 2nd line is set to cadence (Cad), TRP means the total number of pedal revolutions during the trip, MAX means the maximum pedalling frequency and AVS the average pedalling frequency.
 - Mode switching diagram")
MODE functions for POWER (Watt)

When the 2nd line is set to power (Watt), TRP means the trip consumption, MAX the maximum power and AVS the average power. The trip consumption is calculated on the basis of the elapsed time and the power output. This is indicated in kilocalories or kilojoules.
 - Mode switching diagram")
MODE functions for HEART RATE

When the 2nd line is set to heart rate, MAX means the maximum heart rate and AVS the average heart rate.

If the Flow computer does not receive a heart rate signal before the training begins, the heart rate function is not shown. As soon as a heart rate signal is received during the training, this function will become available. When the heart rate signal is interrupted during cycling, three dashes will appear in place of the heart rate value.
Average indicator
This function indicates whether the training information shown on the 1st line is average, above average or below average.
Flow training settings
The Flow allows you to train by slope (%) and power (Watt). Slope makes use of the trainer's cylinder and is adjustable in 14 steps from -4 to +9 (-4 is equivalent to an actual downhill slope of 4% and the same applies for the 9% uphill slope). During power training the computer adjusts the resistance of the cylinder so you always pedal at the selected power setting. You can set this from 10 to 990 Watts in 10 Watt steps.
Setting training value
When you press SET, the slope at the lower left begins to flash. Use the Arrow keys to change the setting and MODE to confirm. The slope is shown on the display in the form of vertical bars. At 0 a horizontal bar is shown.

Once you press SET and the slope begins to flash, if you press SET again the power setting begins to flash. You can adjust this setting with the Arrow keys. Press MODE to confirm the setting.

Operating range
The brake indicator is a visual representation of the brake position. Here you can see at a glance whether the brake is still within the operating range. As the braking unit applies the brakes, the height of the bar increases. The set power is not braked if the bar is at its minimum or maximum height; in this situation the indicator flashes as a warning.
Adjust your speed, cadence and/or power if the brake indicator flashes, showing that the brake is outside the operating range. Select the combination appropriate for you that is applicable at that moment.
Error messages during cycling
You can find the FAQs for the Flow at www.tacx.com under SERVICE. Here you will find up-to-date information about what to do if an error message appears on the screen.

Documents / Resources
References
Download manual
Here you can download full pdf version of manual, it may contain additional safety instructions, warranty information, FCC rules, etc.
Advertisement


Need help?
Do you have a question about the FLOW and is the answer not in the manual?
Questions and answers