Sony MDR-RF811RK - Wireless Stereo Headphone System Manual
- Operating instructions (2 pages) ,
- Operating instructions (2 pages)
Advertisement
How to use
- Insert the supplied rechargeable battery into the left housing of the headphones. Observe the correct polarity when installing battery.
- Press and turn the lid counterclockwise.

- Match the
![]() terminals on the battery to the
terminals on the battery to the ![]() marks in the comportment.
marks in the comportment.
![]()
- Press and turn the lid clockwise.

- Press and turn the lid counterclockwise.
- Connect the AC adaptor.
Insert the plug firmly.
![]()
- Charge the headphones.

- Connect the A/V component using its headphone jack.
Set the volume of the A/V component as high as possible, but not so high that the audio signal becomes distorted.

- Wear the headphones.
Before listening
To reduce the risk of hearing damage, first lower the volume.

- Turn on the A/V component.

- Adjust the volume.
![]()
If you cannot receive a clear audio signal
First change the radio frequency with the CHANNEL selector switch on the transmitter, then change the radio frequency to that of the transmitter with the channel switch on the headphones.


 terminals on the battery to the


Features
Thank you for purchasing the Sony MDR-RF811RK Wireless Stereo Headphone System. Before operating the unit, please read this manual thoroughly and retain it for future reference.
Some features are:
- Wireless system that allows you to listen to a programme free from the restriction of a cord.
- High fidelity sound reproduction.
- 13 hours of continuous use with supplied rechargeable battery.
- Easy connection with TV and HiFi Audio system equipment.
- Up to 100 metres reception range.
- Volume control function on the headphones.
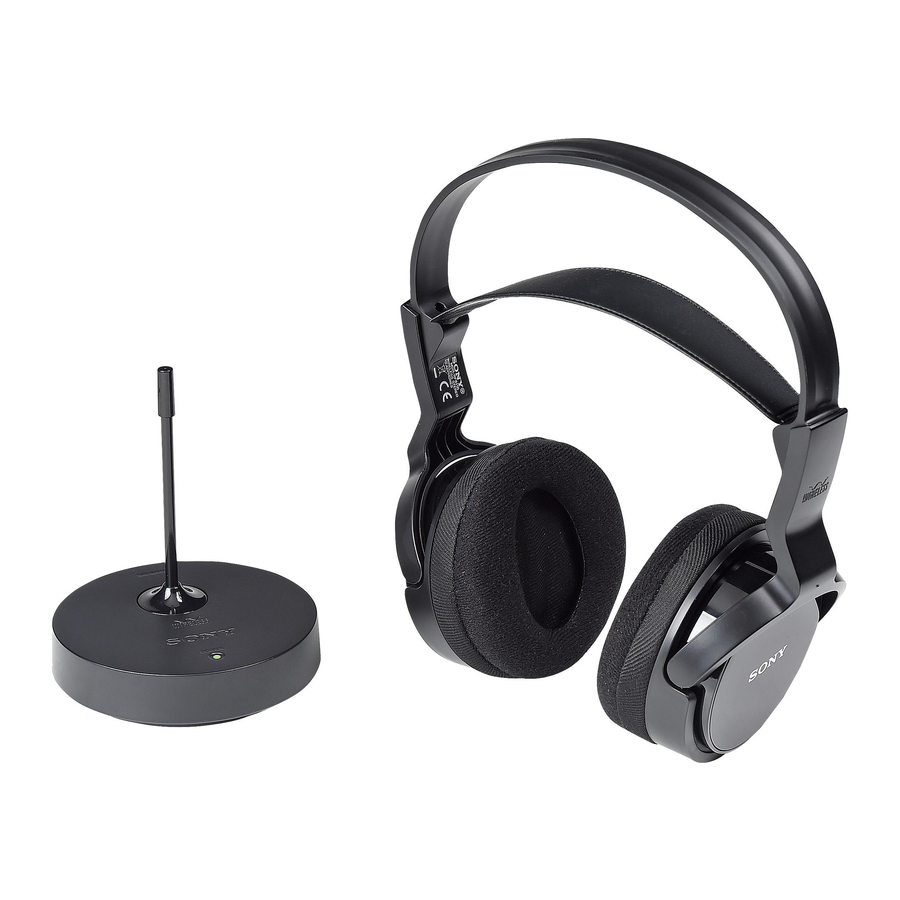
Checking the included items

Transmitter TMR-RF810R (1)
Headphones MDR-RF811R (1)
AC adaptor (1)
Rechargeable nickel-metal hydride battery BP-HP550-11 (1)
Card warranty (1)
Operating Instructions (this manual) (1)
After use
Take off the headphones, then turn off the power.
About sending RF signals
The transmitter starts sending RF signals automatically when it detects an audio signal from the connected component.
Notes
- If hiss is heard, move closer to the transmitter.
- You may hear some noise when you disconnect the AC adaptor from the transmitter before turn off the headphones.
If no signal or low signal is input for about 4 minutes
If the transmitter does not detect an audio signal for more than about 4 minutes, it will stop sending RF signals, and the POWER indicator will blink for 1 minute, and then turn off.
When the transmitter receives an audio signal again, it starts sending the RF signals, and the POWER indicator will light up green again.
You may not hear the beginning of the sound from the headphones until the transmitter starts sending the RF signals after detecting an audio signal.
RF signal transmission may stop when an extremely low sound is input for about 4 minutes. If this happens, raise the volume of the connected A/V component within the range where the sound is not distorted, and lower the volume of the headphones.
Tips for charging
Charge the headphones first
The supplied rechargeable nickel-metal hydride battery is not charged from the first time you use them. Charge them before use.
If the transmitter's POWER indicator does not light up red
Check if the switch on the left housing of the headphones is set to OFF. If the switch is set to ON, the POWER indicator does not light up.
You cannot charge any rechargeable battery or dry battery other than the supplied battery.
Charging and usage time
| Approx. charging time | Approx. usage time1) |
| 1 hour 16 hours2) | 45 minutes3) 13 hours3) |
1) at 1 kHz, 1 mW + 1 mW output
2) hours required to fully charge an empty battery
3) Time may vary, depending on the temperature or conditions of use.
To recharge supplied battery after use
Connect the headphones to the CHARGE plug of the transmitter after use. The POWER indicator lights up red, then charging starts.
When charging is complete, there is no need to remove the headphones from the transmitter.
Remaining battery
To check the remaining battery charge of the headphones, turn on the switch located on the left housing of the headphone, and check the POWER indicator located on the left housing. The battery is still serviceable when the indicator lights up red.
Charge the headphones if the POWER indicator light dims, flashes, or the sound becomes distorted or noisy.
Notes
- Do not connect the CHARGE plug to anything other than these headphones.
- The transmitter automatically stops sending RF signals while charging the battery.
- This system is designed to charge only the supplied rechargeable battery type BP-HP550-11 for safety. Note that other types of rechargeable battery cannot be charged with this system.
- If dry batteries are installed, they cannot be charged.
- Do not attempt to use the supplied BP-HP550-11 rechargeable battery for other components. They are for use with this system only.
- Charge in an environmental temperature of between 0°C and 40°C.
Tips for volume setting
When watching videos, be careful not to raise the volume too high in quiet scenes. You may hurt your ears when a loud scene is played.
To set the input level
If the volume is high using the analogue input, set the ATT (attenuator) switch to "–6 dB."

| Setting | Connected components |
| 0 dB | TV, portable components and other components with a low output level (initial settings) |
| -6 dB | Other components |
Notes
- Be sure to lower the volume before setting the ATT switch.
- If audio input is distorted (sometimes, noise can be heard at the same time), set the ATT switch to "–6 dB."
Using the headphones with separately-sold dry batteries
Commercially available (LR03 (size AAA)) dry batteries can also be used to power the headphones. Install two batteries in the same manner as described ins step 1 of "How to use".
When dry batteries are installed, the battery charge function is not activated.
Battery life
| Battery | Approx. usage time1) |
| Sony alkaline battery LR03 (size AAA) | 28 hours2) |
1) at 1 kHz, 1 mW + 1 mW output
2) Time may vary, depending on the temperature or conditions of use.
Tips for better reception
Receiving performance
This system utilizes very high frequency signals in the 800 MHz band so the receiving performance may deteriorate due to the surroundings. The following examples illustrate conditions that may reduce the reception range or cause interference.
- Inside a building with walls containing steel beams.
- An area with many steel file cabinets, etc.
- An area with many electrical appliances capable of generating electromagnetic fields.
- The transmitter is placed on a metal instrument.
- An area facing a roadway.
- Noise or interfering signals exist in the surroundings due to radio transceivers in trucks, etc.
- Noise or interfering signals exist in the surroundings owing to wireless communication systems installed along roadways.
Effective area of the transmitter
The optimum distance is up to approximately 100 m without the system picking up some interference. However, the distance may vary depending on the surroundings and environment.
- If the system picks up some noise within the above mentioned distance, reduce the distance between the transmitter and the headphones, or select another channel.
- When you use the headphones inside the effective area of the transmitter, the transmitter can be placed in any direction from the listener.
- Even within the signal reception area, there are some spots (dead spots) where the RF signal cannot be received. This characteristic is inherent to RF signals, and does not indicate malfunction. By slightly moving the transmitter, location of the dead spot can be changed.
Replacing the earpads
The earpads are replaceable. If the earpads become dirty or worn out, replace them as illustrated below. The earpads are not commercially available. You can order replacements from the store where you purchased this system, or at your nearest Sony dealer.
- Remove the old earpad by pulling it out of the groove on the housing.

- Place the new earpad on the driver unit.
Hang the edge of the earpad on one side of the driver unit's groove edge, then turn the edge of earpad around the driver unit as illustrated below.
When the earpad is securely inserted into the groove, adjust the earpad to the vertical position.


Troubleshooting
If you run into any problems using this system, use the following checklist. Should any problem persist, consult your nearest Sony dealer.
No sound/Low sound
- Turn on the headphones.
- Check the connection of the transmitter and A/V component, AC adaptor, and AC outlet.
- Check that the A/V component is turned on.
- If you connect the transmitter to the headphone jack of an A/V component, raise the volume level on the connected A/V component within the range where the sound is not distorted.
- Change the radio frequency with the CHANNEL selector on the transmitter, then change the radio frequency to that of the transmitter with the channel switch on the headphones.
- Charge the supplied rechargeable battery, or replace dry batteries with new ones. If the POWER indicator is still off after charging, take the headphones to a Sony dealer.
Distorted or intermittent sound (sometimes with noise)
- Use the headphones near the transmitter, or change the position of the transmitter.
- If you connect the transmitter to an A/V component using the headphone jack, lower the volume level on the connected A/V component within the range where the sound is not distorted.
- Change the radio frequency with the CHANNEL selector on the transmitter, then change the radio frequency to that of the transmitter with the channel switch on the headphones.
- Charge the supplied rechargeable battery, or replace dry batteries with new ones. If the POWER indicator is still off after charging, take the headphones to a Sony dealer.
Loud background noise
- If you connect the transmitter to the headphone jack of an A/V component, raise the volume level on the connected A/V component within the range where the sound is not distorted.
- Charge the supplied rechargeable battery, or replace dry batteries with new ones. If the POWER indicator is still off after charging, take the headphones to a Sony dealer.
- Use the headphones near the transmitter.
The sound cuts off
- The transmitter turns off if no signal or low signal is input for 4 minutes. If you connect the transmitter to an A/V component using the headphone jack, raise the volume level on the connected A/V component within the range where the sound is not distorted.
Battery cannot be charged/ POWER indicator does not light up red
- Install the supplied rechargeable nickel-metal hydride battery. Dry batteries and rechargeable batteries other than the supplied cannot be charged.
- Check if the switch on the left housing of the headphones is set to OFF. If the switch is set to ON, the POWER indicator does not light up.
Precautions
Notes on the AC adaptor
- Insert the AC adaptor plug firmly.
- Be sure to use the supplied AC adaptor. Using AC adaptors with different plug polarity or other characteristics can cause product failure.
![]()
Unified polarity plug - Be sure to always use the supplied AC adaptor. Even AC adaptors having the same voltage and plug polarity can damage this product due to the current capacity or other factors.

On power sources and placement
- When this system is not to be used for a long period of time, disconnect the AC adaptor from the AC outlet holding the plug, and remove the battery from the headphones to avoid damage caused by battery leakage and subsequent corrosion.
- Do not leave this system in a location subject to direct sunlight, heat or moisture.
- Avoid exposure to temperature extremes, direct sunlight, moisture, sand, dust or mechanical shock.
Specifications
Transmitter (TMR-RF810R)
| Modulation | FM stereo |
| Operating frequency | 863.0 MHz – 865.0 MHz |
| Maximum output power | < 4 mW |
| Channel | Ch1, Ch2 |
| Power source | DC 12 V: supplied AC adaptor |
| Audio input | Stereo mini plug |
| Dimensions | Approx. 108 mm × 128 mm × 108 mm (w/h/d) |
| Mass | Approx. 137 g |
| Rated power consumption | 3 W |
Headphones (MDR-RF811R)
| Frequency response | 20 Hz – 20,000 Hz |
| Power source | Supplied rechargeable nickel-metal hydride battery BP-HP550-11 or commercially available (size AAA) dry-cell batteries |
| Mass | Approx. 270 g (including the supplied rechargeable nickel-metal hydride battery) |
| Rated power consumption | 2 W |
Design and specifications are subject to change without notice.

Documents / ResourcesDownload manual
Here you can download full pdf version of manual, it may contain additional safety instructions, warranty information, FCC rules, etc.
Download Sony MDR-RF811RK - Wireless Stereo Headphone System Manual
Advertisement


Need help?
Do you have a question about the MDR-RF811RK and is the answer not in the manual?
Questions and answers