Advertisement
Technical data
- Food and cooking temperature of the wireless transmission functions.
- Food and temperature, TIMER display.
- Temperature/ Timer gauge alarm functions.
- Meat type and Taste Level selection.
- °C/°F temperature display selected.
- Backlight function.
- Temperature range: 0°C ~ 250°C
- Alarm range between sender and receiver: 20 m (range depends on the space and surroundings)
- Battery included
In the Transmitter
- Slide off the battery compartment cover.
- Place 2 fresh AAA batteries in the compartment as indicated by the polarity symbols (+and-) · Replace the battery compartment cover.
- Set any channel on the transmitter Switch the
- "POWER" switch on the bottom to control the power on / power off.
- After the transmitter connected to power, the LED flashing three times, at this time the transmitter is on and the monitor will receive temperature.
In The Receiver
- Remove the battery compartment cover.
- Place 2 fresh AAA batteries in the compartment.
- Replace the cover.
- Switch the "POWER" switch on the back to control the power on / power off.
- Wait until the receiver shows the channel set on the transmitter. (Depending on the channel selected, CH01/CH02 or CH03 will appear briefly in the display.)
When using 2 or 3 transmitters and receivers
- Set channel 1 on the first transmitter and turn on the transmitter.
- Turn on the first receiver. (LED flashing).
- Wait until the first receiver displays the channel set on the first transmitter (CH01 appears briefly in the display).
- If the receiver does not display the channel set on the transmitter within 30 seconds, please repeat steps 1 – 3 or press the S/S button (reset) for 3 seconds until a signal is audible – after that, the channel on the receiver resets and a short mes sage is shown in the display.
- Set channel 2 on the second transmitter and turn on the transmitter.
- Turn on the second transmitter. (LED flashes). · Wait until the second receiver displays the chan nel set on the second transmitter (CH02 appears briefly in the display).
- If the receiver does not show any temperature within 30 seconds, please do step 4.
- Set channel 3 on the third transmitter and turn on the transmitter.
- Turn on the third transmitter. (LED flashes). · Wait until the third receiver shows the channel set on the third transmitter (CH03 appears briefly in the display).
- If the receiver does not show any temperature within 30 seconds, please do step 4.

- LED INDICATOR
The red LED in the center of the transmitter flashes to indicate that it is on and transmitting. - TRANSMITTER TRANSMIT RULES
If the temperature probe the temperature remains unchanged, the transmitter every 30 seconds at a temperature signal transmission.
If the temperature probe the temperature change of more than 1°C, the transmitter will transmit a signal.
Operation
Plug the probe connector to the transmitter socket. Insert tip of the probe into the center of the meat, taking care not to pierce through it. Do not expose any part of the probe to open flames.
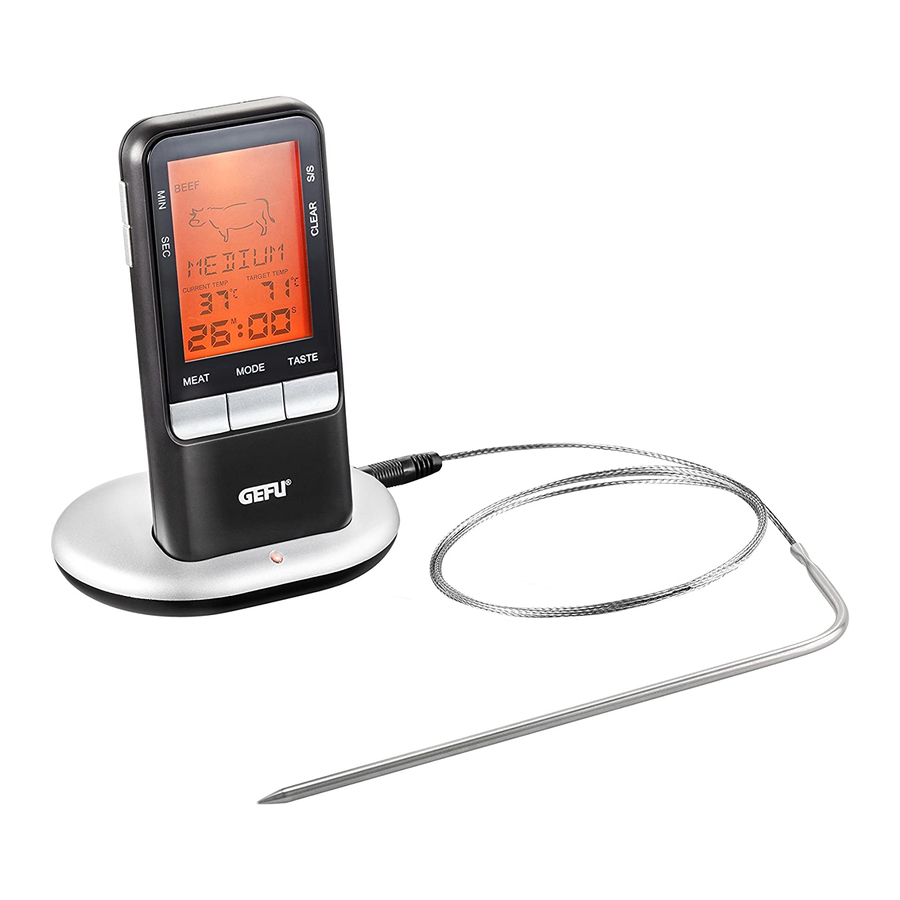
To select meat type and taste level
- Press "MEAT" button to navigate and select the desired meat types: Beef, Lamb, Veal, Hamburger, Porc, Turckey, Chicken, Fish
![]()
- Press "TASTE" button to select the doneness level (Rare, Medium Rare, Medium, Medium Well or Well Done). The target temperature appears on the LCD screen and cooking begins.
- The cooking alerts will sound when the meat has reached the target temperature.

Manually set taget temperature
- Insert the probe into the meat as shown above.
- Press and hold "MODE" button for 3 seconds to switch to manually set the temperature patterns.
- Press "MIN" and "SEC" to select your desired temperature.
- Press "MODE" button to confirm your setting.
- Your target temperature will appear on the LCD screen and cooking begins.
- The cooking alerts will sound as described above.
After cooking
- Once cooking is finished, remove the probe using an oven mitt.
- Clean the probe with water and a mild detergent. To clean the main unit, wipe with a damp cloth.
Temperature display in °C/°F
The temperature is displayed either in °C or °F. To select Fahrenheit or Celsius, Briefly pressing the "MODE" button allows you to switch between the individual models.
COUNT-UP/COUNTDOWN TIMER
The count-up and countdown timers operate independently of the temperature sensor. To set a count-up timer: If no countdown time is set the timer will act as a count up timer. To set a countdown time: Use "MIN" and "SEC" to set the countdown time. To start timer:
- Press "S/S" button to begin.
- Press "S/S" button again to pause,
- Press "CLEAR" button to reset to zero.
- Once the countdown has finished, the unit will beep, to silence the alert press any button. NOTE The countdown timer will count up to 99:59.
Backlight
Press any button to illuminate the screen for 5 seconds.

*Disposal:
Battery:
Please take note, that this unit contains a battery. Batteries or accumulators are not allowed to dispose of the unsorted municipal waste. Users of batteries and accumulators must use the available collection framework for the return, recycling and treatment of batteries and accumulators. Please take care of our environment and dispose your batteries accordingly. Thank you for your assistance.
Item:
This product contains valuable parts that can be recycled to reduce the impact on the environment. Please use public municipal assembly for disposal.


Cook and roast with precision!

Documents / ResourcesDownload manual
Here you can download full pdf version of manual, it may contain additional safety instructions, warranty information, FCC rules, etc.
Download Gefu Händi 21850 - Digital Radio Roast Thermometer Manual
Advertisement


Need help?
Do you have a question about the Händi 21850 and is the answer not in the manual?
Questions and answers