Advertisement
- 1 Technical Data
- 2 First-Time Use
- 3 Directions for Using the Thermometer
- 4 The pre-set selection of the types of meat and their core temperatures
- 5 Manual Setting of Core Temperature
- 6 Directions for using the timer
- 7 Countdown
- 8 Count up
- 9 Changing batteries
- 10 Safety instructions
- 11 Documents / Resources
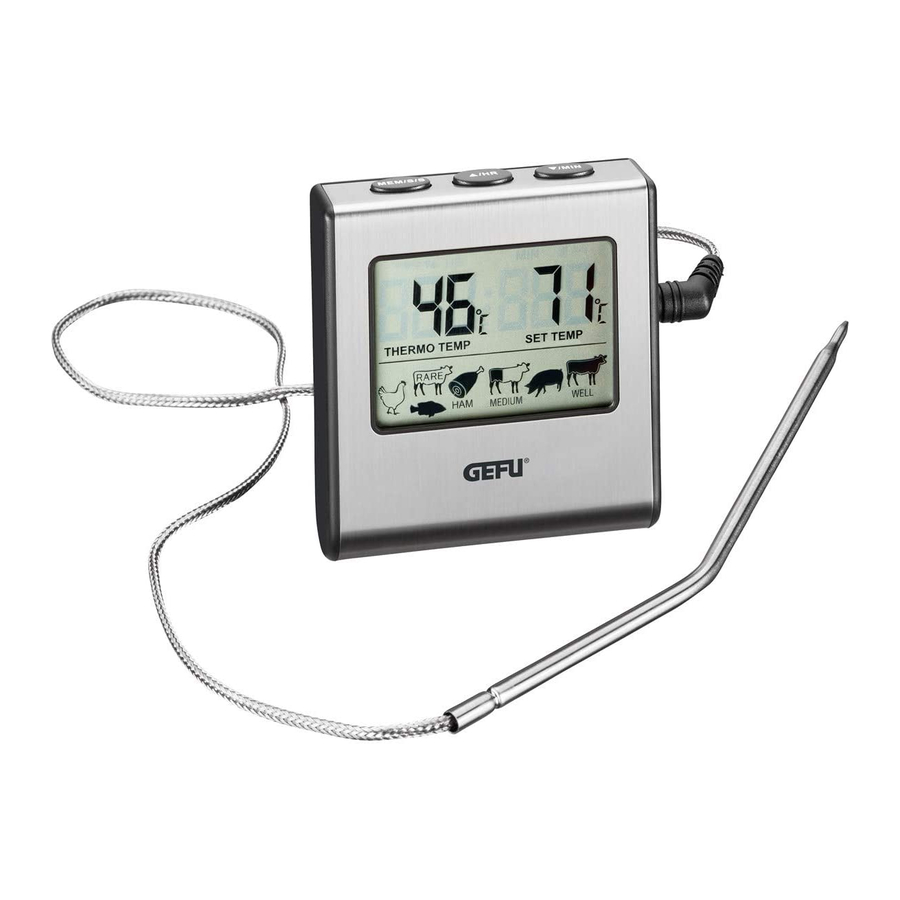
Technical Data
- Display shows core temperature and timer.
- Pictures facilitate selection of types of meat and their pre- set core temperatures.
- Temperature display up to 300°C or 572°F.
- Choice of temperature display in either °C or °F degrees.
- Timer with alarm function max. 99 hours and 59 minutes.
- Magnet on the back for affixing to metal surfaces (refrige- rator).
- Stand on the back of the device.
- Includes AAA battery.
First-Time Use
- Take all components out of the packaging.
- The sensitive probe tip is protected by a cap. Always remo- ve this cap before using the probe and put it on again after using and cleaning the probe.
- Before using the probe, clean it with a damp cloth. Please also follow the relevant instructions in the Cleaning section.
- There is a protective film on the display, which must be re- moved before using your digital roasting thermometer for the first time.
- There is a protective film on the battery in your digital roas- ting thermometer which must be removed before using it for the first time. Please also follow the instructions in the Changing batteries section.
Directions for Using the Thermometer
- Push the control on the left (on the back of the device) in the direction of the thermometer symbol
![]() .
. - If you wish to turn off your thermometer again, push the control on the left (on the back of the device) in the direc- tion of the O symbol.
- Your digital roasting thermometer can display the tempera- ture in Celsius °C or Fahrenheit °F. To set the preferred tem- perature scale, push the control on the right (on the back of the device) in the direction of the desired °C or °F scale.
- Now insert the probe connector into the socket on the side edge of the digital roasting thermometer.
- Insert the tip of the probe into the centre of the item to be measured so that the exact core temperature can be deter- mined.
PLEASE NOTE: It is important to make sure that the probe tip does not jut out of the item that is being measu- red and that it cannot come in contact with an open flame as this could distort the measurement.
The pre-set selection of the types of meat and their core temperatures
- Press the MEM/S/S button to call up the types of meat and their pre-set core temperatures. Use the ▲/HR and ▼/MIN buttons to choose between chicken, "rare" beef / fish, raw ham, "medium" beef, pork and "well-done" beef. The picture of the type of meat you select will flash.
- The current core temperature in the respective meat type is shown on the left in the display. The pre-set core tempera- ture appears on the right in the display.
- A signal sounds as soon as the temperature of the meat reaches the pre-set core temperature.
- PLEASE NOTE: The probe is very hot. Never pull it out with your bare hands; always use an oven glove or pot holder.
Manual Setting of Core Temperature
- Press the MEM/S/S button to switch between the pre-set types of meat and the manual core temperature.
- Use the ▲/HR and ▼ /MIN buttons to increase or decrease the desired core temperature on the right in the display.
- A signal sounds as soon as the item to be measured reaches the pre-set core temperature. PLEASE NOTE: The probe is very hot. Never pull it out with your bare hands; always use an oven glove or pot holder.
| Measured Product | Ideal Degree °C |
| Beef fillet medium-rare | 38 - 55°C |
| Roast beef | 85 - 90°C |
| Beef brisket | 90 - 95°C |
| Veal fillet medium | 50 - 55°C |
| Saddle of veal medium | 50 - 55°C |
| Roast veal | 68 - 74°C |
| Roast pork | 70 - 75°C |
| Saddle of pork | 55 - 60°C |
| Leg of lamb medium | 65 - 70°C |
| Leg of lamb, well done | 80 - 85°C |
| Roast venison | 75 - 80°C |
| Roast wild boar | 75 - 78°C |
| Chicken | 80 - 85°C |
| Duck | 80 - 90°C |
| Turkey | 80 - 90°C |
Directions for using the timer
- Push the control on the left (on the back of the device) in the direction of the
![]() timer symbol. You will see the hours (HR) and minutes (MIN) in the display.
timer symbol. You will see the hours (HR) and minutes (MIN) in the display.
Countdown
(TIMER ▼)
- Use the ▲/HR for hours and ▼/MIN for minutes buttons to set the desired time.
- Press the MEM/S/S button to start the timer. The ▲ and: symbols will flash on the display.
- Press the MEM/S/S button again to stop or continue the timer.
- To reset the timer to zero, first stop it and then press the ▲/HR and ▼/MIN buttons simultaneously.
Count up
(timer ▲)
- Press the MEM/S/S button to start the timer. The ▲ and: symbols will flash on the display.
- Press the MEM/S/S button again to stop or continue the timer.
- To reset the timer to zero, first stop it and then press the ▲/HR and ▼/MIN buttons simultaneously.
Changing batteries
- Push open the lid on the battery compartment on the back of the device and take out the battery. Please also follow the instructions in the Disposal of Used Batteries section.
- Insert a new (AAA) battery into the battery compartment.
- Push the battery compartment lid closed again.
Safety instructions
- Never use the display in a closed oven, grill or microwave.
- Please do not use the device in an environment where the tempe- rature is higher than the device's maximum operating temperature.
- The probe may be exposed only to temperatures up to a maxi- mum of 300°C (572°F). If temperatures exceed 300°C (572°F), there will be a risk of damage.
- The battery should be replaced as soon as the LCD display is too weak. Please follow the instructions for an environment-compatib- le disposal of the battery in the Disposal of Used Batteries section.

Disposal of Used Batteries: Do not dispose of the batteries in household waste. Every consumer is legally obliged to dispose of used batteries at the collection points provided for that purpose in the battery point of sale. The batteries must be fully discharged.

Device: Never throw the device into normal household waste at the end of its service life. Please ask your local government or your local waste disposal company about environmentally compatible ways of disposing of used batteries.
www.gefu.com

Documents / ResourcesDownload manual
Here you can download full pdf version of manual, it may contain additional safety instructions, warranty information, FCC rules, etc.
Download Gefu 21840 - Digital Roast Thermometer with Timer Manual
Advertisement


Need help?
Do you have a question about the TEMPERE and is the answer not in the manual?
Questions and answers