Table of Contents
Advertisement
Quick Links
Advertisement
Table of Contents

Related Manuals for Duplo DP-440


Summary of Contents for Duplo DP-440
- Page 1 DP-440/430 Instruction Manual Ver.2 Correct operation and periodic maintenance are essential for ensuring safe use of this machine. Thoroughly read this manual before using this machine. DUPLO CORPORATION Store this manual so that it can be retrieved whenever needed.
-
Page 2: Introduction
○ ○ ○ ○ ○ ○ ○ ○ ○ ○ ○ ○ ○ ○ ○ ○ ○ ○ ○ ○ ○ ○ ○ ○ ○ ○ ○ ○ ○ ○ ○ ○ ○ ○ ○ ○ ○ ○ ○ ○ ○ ○ ○ ○ ○ ○ ○ ○ ○ ○ ○ ○ ○ ○ ○ ○ ○ ○ ○ ○ ○ Introduction Thank you for your purchase of the Duprinter DP-440/430. To ensure safe and efficient prolonged use of this machine, read and thoroughly understand this manual before using this machine. -
Page 3: Function Quick Reference
○ ○ ○ ○ ○ ○ ○ ○ ○ ○ ○ ○ ○ ○ ○ ○ ○ ○ ○ ○ ○ ○ ○ ○ ○ ○ ○ ○ ○ ○ ○ ○ ○ ○ ○ ○ ○ ○ ○ ○ ○ ○ ○ ○ ○ ○ ○ ○ ○ ○ ○ ○ ○ ○ ○ ○ ○ ○ ○ ○ ○ Function Quick Reference The following is a quick reference to the functions of the DP-440/430 printer. Enlargement/Reduction .. - Page 4 ○ ○ ○ ○ ○ ○ ○ ○ ○ ○ ○ ○ ○ ○ ○ ○ ○ ○ ○ ○ ○ ○ ○ ○ ○ ○ ○ ○ ○ ○ ○ ○ ○ ○ ○ ○ ○ ○ ○ ○ ○ ○ ○ ○ ○ ○ ○ ○ ○ ○ ○ ○ ○ ○ ○ ○ ○ ○ ○ ○ ○ Function Quick Reference Text/Photograph/Text and Photograph Mode ..
- Page 5 ○ ○ ○ ○ ○ ○ ○ ○ ○ ○ ○ ○ ○ ○ ○ ○ ○ ○ ○ ○ ○ ○ ○ ○ ○ ○ ○ ○ ○ ○ ○ ○ ○ ○ ○ ○ ○ ○ ○ ○ ○ ○ ○ ○ ○ ○ ○ ○ ○ ○ ○ ○ ○ ○ ○ ○ ○ ○ ○ ○ ○ Function Quick Reference Multiple Printing ..
- Page 6 ○ ○ ○ ○ ○ ○ ○ ○ ○ ○ ○ ○ ○ ○ ○ ○ ○ ○ ○ ○ ○ ○ ○ ○ ○ ○ ○ ○ ○ ○ ○ ○ ○ ○ ○ ○ ○ ○ ○ ○ ○ ○ ○ ○ ○ ○ ○ ○ ○ ○ ○ ○ ○ ○ ○ ○ ○ ○ ○ ○ ○ Function Quick Reference Sequental Batch Printing ..
-
Page 7: Table Of Contents
○ ○ ○ ○ ○ ○ ○ ○ ○ ○ ○ ○ ○ ○ ○ ○ ○ ○ ○ ○ ○ ○ ○ ○ ○ ○ ○ ○ ○ ○ ○ ○ ○ ○ ○ ○ ○ ○ ○ ○ ○ ○ ○ ○ ○ ○ ○ ○ ○ ○ ○ ○ ○ ○ ○ ○ ○ ○ ○ ○ ○ Contents Introduction ......................... - Page 8 ○ ○ ○ ○ ○ ○ ○ ○ ○ ○ ○ ○ ○ ○ ○ ○ ○ ○ ○ ○ ○ ○ ○ ○ ○ ○ ○ ○ ○ ○ ○ ○ ○ ○ ○ ○ ○ ○ ○ ○ ○ ○ ○ ○ ○ ○ ○ ○ ○ ○ ○ ○ ○ ○ ○ ○ ○ ○ ○ ○ ○ Contents Chapter 3 Printing With Various Function...
- Page 9 ○ ○ ○ ○ ○ ○ ○ ○ ○ ○ ○ ○ ○ ○ ○ ○ ○ ○ ○ ○ ○ ○ ○ ○ ○ ○ ○ ○ ○ ○ ○ ○ ○ ○ ○ ○ ○ ○ ○ ○ ○ ○ ○ ○ ○ ○ ○ ○ ○ ○ ○ ○ ○ ○ ○ ○ ○ ○ ○ ○ ○ Contents Batch Print Mode ......................
-
Page 10: Notes On Safety (Please Read And Observe)
○ ○ ○ ○ ○ ○ ○ ○ ○ ○ ○ ○ ○ ○ ○ ○ ○ ○ ○ ○ ○ ○ ○ ○ ○ ○ ○ ○ ○ ○ ○ ○ ○ ○ ○ ○ ○ ○ ○ ○ ○ ○ ○ ○ ○ ○ ○ ○ ○ ○ ○ ○ ○ ○ ○ ○ ○ ○ ○ ○ ○ Notes on Safety (Please Read and Observe) Safety Precautions Various symbols and pictures are used in this manual and on the stickers affixed to the machine. - Page 11 ○ ○ ○ ○ ○ ○ ○ ○ ○ ○ ○ ○ ○ ○ ○ ○ ○ ○ ○ ○ ○ ○ ○ ○ ○ ○ ○ ○ ○ ○ ○ ○ ○ ○ ○ ○ ○ ○ ○ ○ ○ ○ ○ ○ ○ ○ ○ ○ ○ ○ ○ ○ ○ ○ ○ ○ ○ ○ ○ ○ ○ Notes on Safety (Please Read and Observe) WARNING Do not modify the machine.
- Page 12 ○ ○ ○ ○ ○ ○ ○ ○ ○ ○ ○ ○ ○ ○ ○ ○ ○ ○ ○ ○ ○ ○ ○ ○ ○ ○ ○ ○ ○ ○ ○ ○ ○ ○ ○ ○ ○ ○ ○ ○ ○ ○ ○ ○ ○ ○ ○ ○ ○ ○ ○ ○ ○ ○ ○ ○ ○ ○ ○ ○ ○ Notes on Safety (Please Read and Observe) CAUTION Before moving the machine, remove the power plug from the outlet.
-
Page 13: Warning Sticker
○ ○ ○ ○ ○ ○ ○ ○ ○ ○ ○ ○ ○ ○ ○ ○ ○ ○ ○ ○ ○ ○ ○ ○ ○ ○ ○ ○ ○ ○ ○ ○ ○ ○ ○ ○ ○ ○ ○ ○ ○ ○ ○ ○ ○ ○ ○ ○ ○ ○ ○ ○ ○ ○ ○ ○ ○ ○ ○ ○ ○ Notes on Safety (Please Read and Observe) Warning Sticker Keep the WARNING stickers clean at all times. -
Page 14: Positioning The Machine
○ ○ ○ ○ ○ ○ ○ ○ ○ ○ ○ ○ ○ ○ ○ ○ ○ ○ ○ ○ ○ ○ ○ ○ ○ ○ ○ ○ ○ ○ ○ ○ ○ ○ ○ ○ ○ ○ ○ ○ ○ ○ ○ ○ ○ ○ ○ ○ ○ ○ ○ ○ ○ ○ ○ ○ ○ ○ ○ ○ ○ Notes on Safety (Please Read and Observe) Positioning the Machine Installing the machine on a flat, stable surface. -
Page 15: Maintenance
○ ○ ○ ○ ○ ○ ○ ○ ○ ○ ○ ○ ○ ○ ○ ○ ○ ○ ○ ○ ○ ○ ○ ○ ○ ○ ○ ○ ○ ○ ○ ○ ○ ○ ○ ○ ○ ○ ○ ○ ○ ○ ○ ○ ○ ○ ○ ○ ○ ○ ○ ○ ○ ○ ○ ○ ○ ○ ○ ○ ○ Notes on Safety (Please Read and Observe) Maintenance Clean the exterior of the machine as described below. -
Page 16: Printing And Duplicating Cautions
○ ○ ○ ○ ○ ○ ○ ○ ○ ○ ○ ○ ○ ○ ○ ○ ○ ○ ○ ○ ○ ○ ○ ○ ○ ○ ○ ○ ○ ○ ○ ○ ○ ○ ○ ○ ○ ○ ○ ○ ○ ○ ○ ○ ○ ○ ○ ○ ○ ○ ○ ○ ○ ○ ○ ○ ○ ○ ○ ○ ○ Notes on Safety (Please Read and Observe) Printing and Duplicating Cautions There are restrictions on what you may print on this printer. - Page 17 ○ ○ ○ ○ ○ ○ ○ ○ ○ ○ ○ ○ ○ ○ ○ ○ ○ ○ ○ ○ ○ ○ ○ ○ ○ ○ ○ ○ ○ ○ ○ ○ ○ ○ ○ ○ ○ ○ ○ ○ ○ ○ ○ ○ ○ ○ ○ ○ ○ ○ ○ ○ ○ ○ ○ ○ ○ ○ ○ ○ ○...
- Page 18 Chapter Before Using This Machine This chapter contains essential information such as the names of the machine parts, the names and functions of keys, etc., on the control panel, and the sizes of documents and printing papers that you can use. Please be sure to read this chapter carefully before attempting to use the printer.
-
Page 19: System Setup
System Setup The machine and its optional equipment are set up as follows: Sorter Key card counter Duplo Direct Print System Tape cluster Personal computer Documents prepared on a personal computer can be printed on this machine. Exclusive machine base... -
Page 20: Part Names And Their Functions
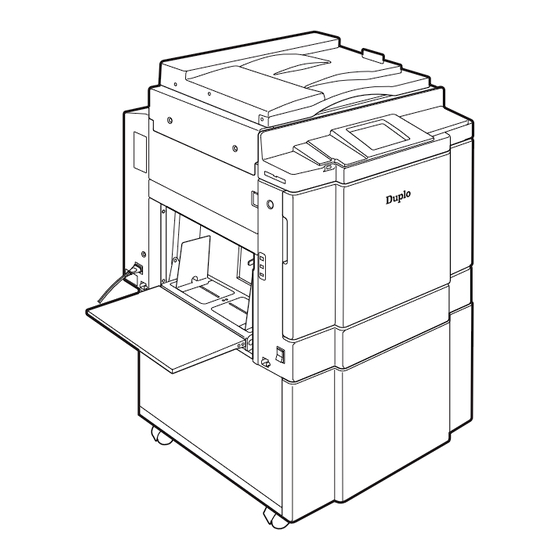
Part Names and Their Functions Printer Appearance Reference Name Function page Document cover Keeps the document in contact with the document glass plate. Connector Connector for connecting to a personal computer. Lever Lock the scanner of the printer. Feed pressure adjuster lever Use to adjust the paper feed pressure. Side guides Slide to match the width of the paper. - Page 21 Part Names and Their Functions Master cover Master roll Lever Scanner unit Press the lever to open the master cover when the master roll is setted up. Lever This lever is locks or unlocks the drum in stopping the drum position. Lever JOG switch Press to pull out the master...
- Page 22 Part Names and Their Functions Reference Name Function page Key card counter This slot is for inserting the key card. (Option) Jump plate Adjust this plate for the width of the paper. JOG switch Press and hold to rotate the drum for a set time. Use to remove 142,143 paper jams, etc.
-
Page 23: Control Panel
Part Names and Their Functions Control Panel See “Keys Inside Panel Cover” on page 24. Reference Name Function page LCD panel Displays the number of prints and other settings. Displays error messages when an error has occurred. “OK” key Enters specified setting. —... - Page 24 Part Names and Their Functions Reference Name Function page “ALL CLEAR” key Returns the control panel settings to the standard — mode settings. Press and hold for at least 1 second. “X” key Enters the number of prints and number of sets. “CLEAR”...
-
Page 25: Lcd Panel
Part Names and Their Functions LCD Panel READY × 1SET PAPER SIZE A3 100% ZOOM PRINT POS. 0.0mm 0.0mm IMAGE MODE TEXT Reference Name Function page Print count Displays the number of prints to be made. Sets Displays the number of sets to be printed. Paper size Displays the selected paper size when push the “PAPER SIZE”... -
Page 26: Turning Power On/Off
Turning Power ON/OFF This section describes the operating sequence from turning ON the power switch until the printer is ready to make prints, and how to turn OFF the printer power. Turning ON Printer Power ○ ○ ○ ○ ○ ○ ○ ○ ○ ○ ○ ○ ○ ○ ○ ○ ○ ○ ○ ○ ○ ○ ○ ○ ○ ○ ○ ○ ○ ○ ○ ○ ○ Connect the power cable to the printer and a wall outlet. -
Page 27: Turning Off Printer Power
Turning Power ON/OFF Turning OFF Printer Power ○ ○ ○ ○ ○ ○ ○ ○ ○ ○ ○ ○ ○ ○ ○ ○ ○ ○ ○ ○ ○ ○ ○ ○ ○ ○ ○ ○ ○ ○ ○ ○ ○ Switch the power switch to the “... -
Page 28: Key Card Counter [Available Only With Key Card Counter Installed]
Turning Power ON/OFF Key Card Counter Available only with Key Card Counter installed With the key card counter installed, you can control the platemaking and print quantities per person or per department, etc. See the Instruction Manual for the Key Card Counter for details. Inserting a key card When you turn on the power, the message “RE-INSERT CARD”... -
Page 29: Document/Printing Paper Specification
Document/Printing Paper Specification Acceptable Documents Document glass plate • Weight : Sheet documents, books, etc, not exceeding 10kg. • Size : 297mm x 432mm max. Acceptable Printing Paper • Document thickness : 64g/m to 128g/m • Document size : 297mm x 432mm max. 100mm x 148mm max. -
Page 30: How Platemaking And Printing Is Performed
How Platemaking and Printing is Performed The machine performs two processes: platemaking and printing. Platemaking In the “platemaking” process, the old master on the drum is removed while the thermal head creates the scanned image on the new master and transfers it onto the drum. Master roll Master ejection box Drum unit... - Page 32 Chapter Printing Using Basic Functions This chapter describes how to make prints using the basic functions, including how to load the document, set zoom ratio, etc. ○ ○ ○ ○ ○ ○ ○ ○ ○ ○ ○ ○ ○ ○ ○ ○ ○ ○ ○ ○ ○ ○ ○ ○ ○ ○ ○ ○ ○ ○ ○ ○ ○ ○ ○ ○ ○ ○ ○ ○ ○ ○ ○ ○ ○ ○ Basic Printmaking ....................
-
Page 33: Basic Printmaking
Basic Printmaking This section describes how to make prints using the basic functions. ○ ○ ○ ○ ○ ○ ○ ○ ○ ○ ○ ○ ○ ○ ○ ○ ○ ○ ○ ○ ○ ○ ○ ○ ○ ○ ○ ○ ○ ○ ○ ○ ○ ○ ○ ○ ○ ○ ○ ○ ○ ○ ○ ○ ○ ○ ○ ○ ○ ○ ○ ○ ○ ○ ○ ○ ○ ○ Turn ON the power. - Page 34 Basic Printmaking ○ ○ ○ ○ ○ ○ ○ ○ ○ ○ ○ ○ ○ ○ ○ ○ ○ ○ ○ ○ ○ ○ ○ ○ ○ ○ ○ ○ ○ ○ ○ ○ ○ ○ ○ ○ ○ ○ ○ ○ ○ ○ ○ ○ ○ ○ ○ ○ ○ ○ ○ ○ ○ ○ ○ ○ ○ ○ Select the zoom ratio.
- Page 35 Basic Printmaking ○ ○ ○ ○ ○ ○ ○ ○ ○ ○ ○ ○ ○ ○ ○ ○ ○ ○ ○ ○ ○ ○ ○ ○ ○ ○ ○ ○ ○ ○ ○ ○ ○ Press (PRINT) key. The feed tray rises so that the top of the paper stack is the height of the feed ring.
-
Page 36: Loading And Replacing Paper
Loading and Replacing Paper This section describes how to load the printer with paper. You can load approximately 1,500 sheets in this printer. ○ ○ ○ ○ ○ ○ ○ ○ ○ ○ ○ ○ ○ ○ ○ ○ ○ ○ ○ ○ ○ ○ ○ ○ ○ ○ ○ ○ ○ ○ ○ ○ ○ Open the support tray if it is closed. -
Page 37: Loading Documents
Loading Documents Positioning the Document The document can be loaded in the “portrait” or “landscape” position. IMPORTANT • A4, B5, and A5-size documents can be loaded in the “portrait” or “landscape” position. • Use the landscape position when enlarging or reducing from standard-size documents to standard-size paper, such as A4 to A3. -
Page 38: Loading Document On Document Glass Plate
Loading Documents Loading Document on Document Glass Plate Use the platen glass when copying from books, thick documents, or thin documents. ○ ○ ○ ○ ○ ○ ○ ○ ○ ○ ○ ○ ○ ○ ○ ○ ○ ○ ○ ○ ○ ○ ○ ○ ○ ○ ○ ○ ○ ○ ○ ○ ○ Gently open the document cover. -
Page 39: Loading Document In Adf [Available Only When Adf Is Installed]
Loading Documents Loading Document in ADF Available only when ADF is installed Load documents that consist of a series of sheets to be printed in the ADF. When one or more documents are loaded in the ADF, platemaking and printing are automatically repeated until the document tray is empty. IMPORTANT •... -
Page 40: Enlarging/Reducing From Standard-Size Document To Standard-Size Paper
Enlarging/Reducing from Standard-Size Document to Standard-Size Paper You can enlarge or reduce a standard-size document onto standard-size printing paper. The following zoom ratios are available when enlarging or reducing a standard-size document onto standard-size printing paper. Enlargements You can enlarge a standard-size document onto standard-size paper using the following zoom ratios: European paper sizes A3 Printout A4R →... - Page 41 Enlarging/Reducing from Standard-Size Document to Standard-Size Paper ○ ○ ○ ○ ○ ○ ○ ○ ○ ○ ○ ○ ○ ○ ○ ○ ○ ○ ○ ○ ○ ○ ○ ○ ○ ○ ○ ○ ○ ○ ○ ○ ○ ○ ○ ○ ○ ○ ○ ○ ○ ○ ○ ○ ○ ○ ○ ○ ○ ○ ○ ○ ○ ○ ○ ○ ○ ○ Press “CURSOR”...
-
Page 42: Selecting Printing Paper Size
Selecting Printing Paper Size Press (PAPER SIZE) key to select a paper size. ○ ○ ○ ○ ○ ○ ○ ○ ○ ○ ○ ○ ○ ○ ○ ○ ○ ○ ○ ○ ○ ○ ○ ○ ○ ○ ○ ○ ○ ○ ○ ○ ○ ○ ○ ○ ○ ○ ○ ○ ○ ○ ○ ○ ○ ○ ○ ○ ○ ○ ○ ○ ○ ○ ○ ○ ○ ○ Press (PAPER SIZE) key. - Page 43 Selecting Printing Paper Size ○ ○ ○ ○ ○ ○ ○ ○ ○ ○ ○ ○ ○ ○ ○ ○ ○ ○ ○ ○ ○ ○ ○ ○ ○ ○ ○ ○ ○ ○ ○ ○ ○ ○ ○ ○ ○ ○ ○ ○ ○ ○ ○ ○ ○ ○ ○ ○ ○ ○ ○ ○ ○ ○ ○ ○ ○ ○ ○ ○ ○ IMPORTANT •...
-
Page 44: Print Output
Print Output This section describes how to remove the printed pages from the machine when installed. Output to Print Tray ○ ○ ○ ○ ○ ○ ○ ○ ○ ○ ○ ○ ○ ○ ○ ○ ○ ○ ○ ○ ○ ○ ○ ○ ○ ○ ○ ○ ○ ○ ○ ○ ○ Open out the print tray. -
Page 45: Truing Up Printed Pages
Print Output Truing up Printed Pages Available only when sorter is installed Adjust when the edges of the printed pages are not trued up. Adjusting jump plate Adjust jump plates according to the paper size. Truing up printed pages When using thinner paper, turn the lever up. When using thicker paper, turn the lever down. -
Page 46: Output To Sorter [Available Only When Sorter Is Installed]
Print Output Output to Sorter Available only when sorter is installed When a sorter is installed and you have specified “Collating Prints” (a page 80), the printed pages are separated either individually or into sets as they are output. The printed pages are output as shown below. Sort Mode The prints from the document pages are collated and output as sets matching the original document into bins, as shown below. - Page 48 Chapter Printing With Various Function This chapter describes how to make prints using the various printer functions. ○ ○ ○ ○ ○ ○ ○ ○ ○ ○ ○ ○ ○ ○ ○ ○ ○ ○ ○ ○ ○ ○ ○ ○ ○ ○ ○ ○ ○ ○ ○ ○ ○ ○ ○ ○ ○ ○ ○ ○ ○ ○ ○ ○ ○ ○ Enlargement and Reduction ................
-
Page 49: Enlargement And Reduction
Enlargement and Reduction You can enlarge or reduce the size of the copy to the desired size. 94% Reduction (a a a a a page 48) You can make a copy that is just slightly smaller than the original document. A4 document A4 printout (94%) -
Page 50: Auto Zoom
Enlargement and Reduction ○ ○ ○ ○ ○ ○ ○ ○ ○ ○ ○ ○ ○ ○ ○ ○ ○ ○ ○ ○ ○ ○ ○ ○ ○ ○ ○ ○ ○ ○ ○ ○ ○ ○ ○ ○ ○ ○ ○ ○ ○ ○ ○ ○ ○ ○ ○ ○ ○ ○ ○ ○ ○ ○ ○ ○ ○ ○ ○ ○ ○ Proceed with steps 1 to 4 of the sequence described in “... - Page 51 Enlargement and Reduction ○ ○ ○ ○ ○ ○ ○ ○ ○ ○ ○ ○ ○ ○ ○ ○ ○ ○ ○ ○ ○ ○ ○ ○ ○ ○ ○ ○ ○ ○ ○ ○ ○ ○ ○ ○ ○ ○ ○ ○ ○ ○ ○ ○ ○ ○ ○ ○ ○ ○ ○ ○ ○ ○ ○ ○ ○ ○ Select a paper size.
- Page 52 Enlargement and Reduction “AUTO ZOOM” was set when return to menu display. READY × 1SET PAPER SIZE A3 AUTO ZOOM ZOOM PRINT POS. 0.0mm 0.0mm IMAGE MODE TEXT ○ ○ ○ ○ ○ ○ ○ ○ ○ ○ ○ ○ ○ ○ ○ ○ ○ ○ ○ ○ ○ ○ ○ ○ ○ ○ ○ ○ ○ ○ ○ ○ ○ ○ ○ ○ ○ ○ ○ ○ ○ ○ ○ ○ ○ ○ ○ ○ ○ ○ ○ ○ ○ ○ ○ ○ ○ ○ Load paper.
-
Page 53: Free Zoom
Enlargement and Reduction Free Zoom You can set a zoom ratio between 50% and 500% in 1% steps. IMPORTANT • Select “FREE ZOOM” before starting platemaking. • You cannot select “94% Reduction” at the same time as “FREE ZOOM”. ○ ○ ○ ○ ○ ○ ○ ○ ○ ○ ○ ○ ○ ○ ○ ○ ○ ○ ○ ○ ○ ○ ○ ○ ○ ○ ○ ○ ○ ○ ○ ○ ○ ○ ○ ○ ○ ○ ○ ○ ○ ○ ○ ○ ○ ○ ○ ○ ○ ○ ○ ○ ○ ○ ○ ○ ○ ○ ○ ○ ○ Proceed with steps 1 to 4 of the sequence described in “... - Page 54 Enlargement and Reduction ○ ○ ○ ○ ○ ○ ○ ○ ○ ○ ○ ○ ○ ○ ○ ○ ○ ○ ○ ○ ○ ○ ○ ○ ○ ○ ○ ○ ○ ○ ○ ○ ○ ○ ○ ○ ○ ○ ○ ○ ○ ○ ○ ○ ○ ○ ○ ○ ○ ○ ○ ○ ○ ○ ○ ○ ○ ○ Press “CURSOR”...
-
Page 55: Adjusting Darkness
Adjusting Darkness If the test print made after platemaking is too light, adjust the print darkness. If you cannot adjust the print darkness sufficiently to give a satisfactory print, adjust the plate darkness. IMPORTANT • You can print immediately after adjusting the print darkness. •... -
Page 56: Adjusting Contrast
Adjusting Darkness Adjusting Contrast The plate contrast can be adjusted in 5 steps. Make the plate more “LOW” if the document is low-contrast, or “HIGH” if the document is high-contrast. IMPORTANT • Set the “Contrast” before making the plate. ○ ○ ○ ○ ○ ○ ○ ○ ○ ○ ○ ○ ○ ○ ○ ○ ○ ○ ○ ○ ○ ○ ○ ○ ○ ○ ○ ○ ○ ○ ○ ○ ○ ○ ○ ○ ○ ○ ○ ○ ○ ○ ○ ○ ○ ○ ○ ○ ○ ○ ○ ○ ○ ○ ○ ○ ○ ○ Open the panel cover. -
Page 57: Adjusting Print Darkness
Adjusting Darkness Adjusting Print Darkness You can adjust print darkness in eleven steps. To make the print darker, select “DARK” (increased ink transfer amount). To make the print lighter, select “LIGHT” (reduced ink transfer amount). ○ ○ ○ ○ ○ ○ ○ ○ ○ ○ ○ ○ ○ ○ ○ ○ ○ ○ ○ ○ ○ ○ ○ ○ ○ ○ ○ ○ ○ ○ ○ ○ ○ ○ ○ ○ ○ ○ ○ ○ ○ ○ ○ ○ ○ ○ ○ ○ ○ ○ ○ ○ ○ ○ ○ ○ ○ ○ Check that printing is not in progress. -
Page 58: Printing Photographs And Color Documents
Printing Photographs and Color Documents You can adjust the print quality to match the quality of the document (text or photos). You can also enhance text and lines, or process non-screened photographs. Text/Photograph/Text and Photograph Mode (a a a a a page 57) In this mode, the print quality is adjusted to match the document. - Page 59 Printing Photographs and Color Documents IMPORTANT • Select “Text/Photograph/Text and Photograph Mode” before starting platemaking. ○ ○ ○ ○ ○ ○ ○ ○ ○ ○ ○ ○ ○ ○ ○ ○ ○ ○ ○ ○ ○ ○ ○ ○ ○ ○ ○ ○ ○ ○ ○ ○ ○ ○ ○ ○ ○ ○ ○ ○ ○ ○ ○ ○ ○ ○ ○ ○ ○ ○ ○ ○ ○ ○ ○ ○ ○ ○ ○ ○ ○ Proceed with steps 1 to 4 of the sequence described in “Basic Printmaking”...
-
Page 60: Fine Text/Screen Mode
Printing Photographs and Color Documents Fine Text/Screen Mode This machine has the following modes for enhancing the printing of fine text and screen processing non- screened photographs. • Text fine Enhances the printing of documents containing fine text • Photos fine Enhances the printing of documents containing fine photographs •... -
Page 61: Photo Dark Mode
Printing Photographs and Color Documents Photo Dark Mode This mode reproduces gradations in dark areas of photographs in detail. IMPORTANT • Select “Photo Dark Mode” before starting platemaking. ○ ○ ○ ○ ○ ○ ○ ○ ○ ○ ○ ○ ○ ○ ○ ○ ○ ○ ○ ○ ○ ○ ○ ○ ○ ○ ○ ○ ○ ○ ○ ○ ○ ○ ○ ○ ○ ○ ○ ○ ○ ○ ○ ○ ○ ○ ○ ○ ○ ○ ○ ○ ○ ○ ○ ○ ○ ○ ○ ○ ○ Proceed with steps 1 to 4 of the sequence described in “Basic Printmaking”... -
Page 62: Book Shadow Eraser Mode
Book Shadow Eraser Mode Prints book documents without shadows This mode erases the shadows caused by the book binding when printing an open spread from a book or other folded document. It also erases the shadow around the periphery of the document. Center &... - Page 63 Book Shadow Eraser Mode ○ ○ ○ ○ ○ ○ ○ ○ ○ ○ ○ ○ ○ ○ ○ ○ ○ ○ ○ ○ ○ ○ ○ ○ ○ ○ ○ ○ ○ ○ ○ ○ ○ ○ ○ ○ ○ ○ ○ ○ ○ ○ ○ ○ ○ ○ ○ ○ ○ ○ ○ ○ ○ ○ ○ ○ ○ ○ ○ ○ ○ Proceed with steps 1 to 4 of the sequence described in “Basic Printmaking”...
-
Page 64: Multiple Printing On One Page
Multiple Printing on One Page This mode allows you to print 2, 4, 8, or 16 copies of the document on one page. Multiple Printing (a a a a a page 63) This mode prints multiple copies of the document on one page. 2 images 4 images Document... - Page 65 Multiple Printing on One Page • Copying A4 to A3 (2 prints on one page) and A4 to A3 (4 prints per page) Portrait Placement A3, LDG A3, LDG Landscape Placement Zoom ratio: Zoom ratio: 100% IMPORTANT • Select “Multiple Printing” before starting platemaking. •...
-
Page 66: 2-In-1 Layout[Available Only With Adf Installed]
Multiple Printing on One Page 2-in-1 Layout Available only with ADF installed Two-in-one (2-in-1) mode allows you to print two small documents on one page and also easily print for creating booklets that will be saddle stitched. When you use 2-in-1 mode, the layout is as follows: Printout1 Printout2 Documents (even number) - Page 67 Multiple Printing on One Page ○ ○ ○ ○ ○ ○ ○ ○ ○ ○ ○ ○ ○ ○ ○ ○ ○ ○ ○ ○ ○ ○ ○ ○ ○ ○ ○ ○ ○ ○ ○ ○ ○ Press (MULTI EXPOSURE) key. A list of the multi exposure is displayed on the LCD panel.
-
Page 68: Saving/Retrieving Settings
Saving / Retrieving Settings You can save and retrieve settings for platemaking and printing. The memory function allows you to save nine sets of settings. These settings are stored in memory even when the power is turned OFF. Tips The following settings are saved: •... - Page 69 Saving / Retrieving Settings ○ ○ ○ ○ ○ ○ ○ ○ ○ ○ ○ ○ ○ ○ ○ ○ ○ ○ ○ ○ ○ ○ ○ ○ ○ ○ ○ ○ ○ ○ ○ ○ ○ SELECT AN ITEM WITH SELECT AN ITEM WITH Press “CURSOR”...
-
Page 70: Retrieving Settings
Saving / Retrieving Settings SAVE CANCEL > PRINT DARKNESS > SHADOW ERASURE > MULTI EXPOSURE > EDIT ○ ○ ○ ○ ○ ○ ○ ○ ○ ○ ○ ○ ○ ○ ○ ○ ○ ○ ○ ○ ○ ○ ○ ○ ○ ○ ○ ○ ○ ○ ○ ○ ○ Press (OK) key to save the settings if they are SAVE... - Page 71 Saving / Retrieving Settings ○ ○ ○ ○ ○ ○ ○ ○ ○ ○ ○ ○ ○ ○ ○ ○ ○ ○ ○ ○ ○ ○ ○ ○ ○ ○ ○ ○ ○ ○ ○ ○ ○ Press “CURSOR” keys to select “JOB SELECT AN ITEM WITH AND PRESS SETTING MEMORY”, and then press...
- Page 72 Saving / Retrieving Settings RETRIEVE CANCEL > PRINT DARKNESS > SHADOW ERASURE > MULTI EXPOSURE > EDIT ○ ○ ○ ○ ○ ○ ○ ○ ○ ○ ○ ○ ○ ○ ○ ○ ○ ○ ○ ○ ○ ○ ○ ○ ○ ○ ○ ○ ○ ○ ○ ○ ○ Press (OK) key to retrieve the settings if they RETRIEVE...
-
Page 73: Batch Printing
Batch Printing You can print the specified number of sets of prints in each set. Batch Printing (a a a a a page 72) The machine stops after each set of prints. 1st set 2nd set 3rd set 5 copies x 2 sets 3 copies x 4 sets 2 copies x 5 sets Document... - Page 74 Batch Printing ○ ○ ○ ○ ○ ○ ○ ○ ○ ○ ○ ○ ○ ○ ○ ○ ○ ○ ○ ○ ○ ○ ○ ○ ○ ○ ○ ○ ○ ○ ○ ○ ○ ○ ○ ○ ○ ○ ○ ○ ○ ○ ○ ○ ○ ○ ○ ○ ○ ○ ○ ○ ○ ○ ○ ○ ○ ○ ○ ○ ○ Proceed with steps 1 to 5 of the sequence described in “Basic Printmaking”...
- Page 75 Batch Printing ○ ○ ○ ○ ○ ○ ○ ○ ○ ○ ○ ○ ○ ○ ○ ○ ○ ○ ○ ○ ○ ○ ○ ○ ○ ○ ○ ○ ○ ○ ○ ○ ○ ENTER THE SHT/SET Use the key pad to enter the number of sets. Example: 3 sets × 3SET 1: 25SHT 3SET...
-
Page 76: Sequental Batch Printing (Changing Print Quantity Per Document)
Batch Printing Sequental Batch Printing You can change the number of prints made from each document. You can separate the number of prints for up to 15 documents. IMPORTANT • “Batch Printing” can be selected after platemaking. • Set selection of “Batch Printing“ and “Sequental Batch Printing” at Special Functions. (p.99) The default setting is “Batch Printing”. - Page 77 Batch Printing ENTER THE SHT/SET × 1SET 1: 25SHT 1SET 0SHT 0SET 0SHT 0SET 0SHT 0SET 0SHT 0SET 0SHT 0SET 0SHT 0SET 0SHT 0SET 0SHT 0SET 0SHT 0SET 0SHT 0SET 0SHT 0SET 0SHT 0SET 0SHT 0SET 0SHT 0SET SEQ. BATCH PRINT ○...
- Page 78 Batch Printing ○ ○ ○ ○ ○ ○ ○ ○ ○ ○ ○ ○ ○ ○ ○ ○ ○ ○ ○ ○ ○ ○ ○ ○ ○ ○ ○ ○ ○ ○ ○ ○ ○ Press (PLATE MAKING) key. Platemaking starts. IMPORTANT •...
-
Page 79: Dividing Sections With Tape [Available Only With Tape Cluster Device]
Batch Printing Dividing Sections with Tape Available only with Tape Cluster Device Only the specified number of sets is printed with the specified number of prints taken as one set. Paper tape is inserted when printing of each set is completed. You can enter up to 15 groups of number of prints x number of sets. - Page 80 Batch Printing ○ ○ ○ ○ ○ ○ ○ ○ ○ ○ ○ ○ ○ ○ ○ ○ ○ ○ ○ ○ ○ ○ ○ ○ ○ ○ ○ ○ ○ ○ ○ ○ ○ Leave end of tape approximately 1 cm out. ○...
-
Page 81: Collating Prints [Available Only With Sorter Installed]
Collating Prints Available only with Sorter Installed The machine will automatically collate and separate prints in one of three modes: Sort, Group, and Non-sort. Sort Mode (a a a a a page 80) The prints of the document pages are collated and output as sets matching the original document into bins. Documents Sorted prints Group Mode (a a a a a page 82) -
Page 82: Non-Sort Mode
Collating Prints ○ ○ ○ ○ ○ ○ ○ ○ ○ ○ ○ ○ ○ ○ ○ ○ ○ ○ ○ ○ ○ ○ ○ ○ ○ ○ ○ ○ ○ ○ ○ ○ ○ Press (SORTER) key. A list of the sorter setting is displayed on the LCD panel. ○... -
Page 83: Group Mode
Collating Prints ○ ○ ○ ○ ○ ○ ○ ○ ○ ○ ○ ○ ○ ○ ○ ○ ○ ○ ○ ○ ○ ○ ○ ○ ○ ○ ○ ○ ○ ○ ○ ○ ○ Press (SORTER) key. SELECT AN ITEM WITH AND PRESS Press “CURSOR”... - Page 84 Collating Prints ○ ○ ○ ○ ○ ○ ○ ○ ○ ○ ○ ○ ○ ○ ○ ○ ○ ○ ○ ○ ○ ○ ○ ○ ○ ○ ○ ○ ○ ○ ○ ○ ○ ○ ○ ○ ○ ○ ○ ○ ○ ○ ○ ○ ○ ○ ○ ○ ○ ○ ○ ○ ○ ○ ○ ○ ○ ○ ○ ○ ○ Proceed with steps 1 to 3 of the sequence described in “Basic Printmaking”...
- Page 86 Chapter Miscellaneous Functions This chapter describes miscellaneous functions such as the confidential safeguard function, and the print speed and print position adjustments. ○ ○ ○ ○ ○ ○ ○ ○ ○ ○ ○ ○ ○ ○ ○ ○ ○ ○ ○ ○ ○ ○ ○ ○ ○ ○ ○ ○ ○ ○ ○ ○ ○ ○ ○ ○ ○ ○ ○ ○ ○ ○ ○ ○ ○ ○ Confidential Safeguard Function ..............
-
Page 87: Confidential Safeguard Function
Confidential Safeguard Function The confidential safeguard function, which prevents printing unless platemaking has been completed, is a simple means of prohibiting others from printing sensitive documents. IMPORTANT • When the Confidential Safeguard function is ON, printing cannot be performed with (PRINT) or (TEST PRINT) keys. -
Page 88: Total Counter Display Function
Total Counter Display Function This function displays the total numbers of prints and plates on the LCD panel. ○ ○ ○ ○ ○ ○ ○ ○ ○ ○ ○ ○ ○ ○ ○ ○ ○ ○ ○ ○ ○ ○ ○ ○ ○ ○ ○ ○ ○ ○ ○ ○ ○ ○ ○ ○ ○ ○ ○ ○ ○ ○ ○ ○ ○ ○ ○ ○ ○ ○ ○ ○ ○ ○ ○ ○ ○ ○ Check that the machine is not printing. -
Page 89: Print Speed Adjustment Function
Print Speed Adjustment Function The print speed can be adjusted in 5 steps between 45 pages per minute and 120 pages per minute. The default setting when the power is turned ON is about 80 pages per minute. However, that when initial settings have been changed in user settings, the print speed becomes the currently set print speed. -
Page 90: Printing Position Adjustment Function
Printing Position Adjustment Function After platemaking has finished, you can fine-tune the position of the printed image (±1.5cm in the vertical direction and ±1.0cm in the horizontal direction). This position adjustment can be performed in one of two ways: on the print position screen and on the main screen. -
Page 91: Position Reset
Printing Position Adjustment Function Position Reset ○ ○ ○ ○ ○ ○ ○ ○ ○ ○ ○ ○ ○ ○ ○ ○ ○ ○ ○ ○ ○ ○ ○ ○ ○ ○ ○ ○ ○ ○ ○ ○ ○ Press (PRINT POSITION) key. -
Page 92: Edit Functions
Edit Function This function is for rotating documents on the digital scan image. ○ ○ ○ ○ ○ ○ ○ ○ ○ ○ ○ ○ ○ ○ ○ ○ ○ ○ ○ ○ ○ ○ ○ ○ ○ ○ ○ ○ ○ ○ ○ ○ ○ ○ ○ ○ ○ ○ ○ ○ ○ ○ ○ ○ ○ ○ ○ ○ ○ ○ ○ ○ ○ ○ ○ ○ ○ ○ Open the panel cover. -
Page 93: Special Functions
Special Functions Fine Start “Startup Time Setting” This function allows you to specify whether or not fine-start mode is used (The default setting is “OFF”). The Fine Start Mode automatically checks the time elapsed since the printer was last used and the room temperature, and then selects the optimal operational settings to ensure the first page is printed clearly and vividly. - Page 94 Special Functions ○ ○ ○ ○ ○ ○ ○ ○ ○ ○ ○ ○ ○ ○ ○ ○ ○ ○ ○ ○ ○ ○ ○ ○ ○ ○ ○ ○ ○ ○ ○ ○ ○ SELECT AN ITEM WITH Press “CURSOR” keys to select “FINE AND PRESS START”, and then press (OK) key.
-
Page 95: Fine Start "Operation At Next Platemaking
Special Functions Fine Start “Operation at Next Platemaking” This setting forces the machine to operate once under maximum conditions the first time a plate is made after the drum is replaced, regardless of the elapsed time. ○ ○ ○ ○ ○ ○ ○ ○ ○ ○ ○ ○ ○ ○ ○ ○ ○ ○ ○ ○ ○ ○ ○ ○ ○ ○ ○ ○ ○ ○ ○ ○ ○ ○ ○ ○ ○ ○ ○ ○ ○ ○ ○ ○ ○ ○ ○ ○ ○ ○ ○ ○ ○ ○ ○ ○ ○ ○ Open the panel cover. - Page 96 Special Functions ○ ○ ○ ○ ○ ○ ○ ○ ○ ○ ○ ○ ○ ○ ○ ○ ○ ○ ○ ○ ○ ○ ○ ○ ○ ○ ○ ○ ○ ○ ○ ○ ○ Press “CURSOR” keys to select one item, and SELECT AN ITEM WITH AND PRESS then press...
-
Page 97: Auto Clear
Special Functions Auto Clear This function automatically clears the display (settings) on the control panel when the machine is not operated for a specified period of time. The specified time period can be set for 5 minutes, 10 minutes, 15 minutes, or OFF. -
Page 98: Preprint
Special Functions The “AUTO CLEAR” setting in the “SPECIAL FUNCTION SELECT AN ITEM WITH Screen” changes to "5 MIN" (when 5 minutes is set). AND PRESS SPECIAL FUNCTION 1.FINE START AUTO 2.AUTO CLEAR 5 MIN 3.PRE-PRINT 0 PRINTS 4.BATCH PRINT BATCH 5.AUTO POWER OFF 6.AUTO LCD OFF... - Page 99 Special Functions ○ ○ ○ ○ ○ ○ ○ ○ ○ ○ ○ ○ ○ ○ ○ ○ ○ ○ ○ ○ ○ ○ ○ ○ ○ ○ ○ ○ ○ ○ ○ ○ ○ Press “CURSOR” keys to select “PRE- SELECT AN ITEM WITH AND PRESS PRINT”, and then press...
-
Page 100: Batch Print Mode
Special Functions Batch Print Mode This function switches from the normal “Batch Print Mode” to the “Sequental Batch Print Mode.” The default settings is “Batch Print Mode.” The Batch Print Mode prints out all sets input (number of pages x number of groups) as a single document. The Sequental Batch Print Mode handles each set as a single document. -
Page 101: Auto Power Off
Special Functions The “BATCH PRINT” setting in the “SPECIAL FUNCTION SELECT AN ITEM WITH Screen” changes to "SEQUENTAL BATCH PRINT " (when AND PRESS sequental batch print is set). SPECIAL FUNCTION 1.FINE START AUTO 2.AUTO CLEAR 5 MIN 3.PRE-PRINT 3 PRINTS 4.BATCH PRINT SEQ.BATCH 5.AUTO POWER OFF... - Page 102 Special Functions ○ ○ ○ ○ ○ ○ ○ ○ ○ ○ ○ ○ ○ ○ ○ ○ ○ ○ ○ ○ ○ ○ ○ ○ ○ ○ ○ ○ ○ ○ ○ ○ ○ Press “CURSOR” keys to select “AUTO SELECT AN ITEM WITH AND PRESS POWER OFF”, and then press...
-
Page 103: Auto Lcd Off
Special Functions Auto LCD Off This function automatically turn off the LCD panel when the LCD panel is not operated for a specified period of time. The specified time period can be set for 5 minutes, 10 minutes, 30 minutes, 60 minutes, or OFF. (The default setting is “OFF”.) ○... -
Page 104: Long Mode [Available Only With Long Paper]
Special Functions The “AUTO LCD OFF” setting in the “SPECIAL SELECT AN ITEM WITH FUNCTION Screen” changes to "10 MIN" (when 10 minutes AND PRESS is set). SPECIAL FUNCTION 1.FINE START AUTO 2.AUTO CLEAR 5 MIN 3.PRE-PRINT 3 PRINTS 4.BATCH PRINT SEQ.BATCH 5.AUTO POWER OFF 10 MIN... - Page 105 Special Functions ○ ○ ○ ○ ○ ○ ○ ○ ○ ○ ○ ○ ○ ○ ○ ○ ○ ○ ○ ○ ○ ○ ○ ○ ○ ○ ○ ○ ○ ○ ○ ○ ○ Press “CURSOR” keys to select “LONG SELECT AN ITEM WITH AND PRESS MODE”, and then press...
-
Page 106: Ink Circulation
Special Functions Ink Circulation This mode enables forced supply of ink when ink discharge is poor or when a new ink tank is installed. ○ ○ ○ ○ ○ ○ ○ ○ ○ ○ ○ ○ ○ ○ ○ ○ ○ ○ ○ ○ ○ ○ ○ ○ ○ ○ ○ ○ ○ ○ ○ ○ ○ ○ ○ ○ ○ ○ ○ ○ ○ ○ ○ ○ ○ ○ ○ ○ ○ ○ ○ ○ ○ ○ ○ ○ ○ ○ Open the panel cover. -
Page 107: Tape Cluster Mode [Available Only With Tape Cluster Unit]
Special Functions The “CIRCULATING INK PLEASE WAIT” is displayed SELECT AN ITEM WITH during circulating ink. AND PRESS INK CIRCULATION CIRCULATING INK PLEASE WAIT ○ ○ ○ ○ ○ ○ ○ ○ ○ ○ ○ ○ ○ ○ ○ ○ ○ ○ ○ ○ ○ ○ ○ ○ ○ ○ ○ ○ ○ ○ ○ ○ ○ SELECT AN ITEM WITH Press “CURSOR”... - Page 108 Special Functions ○ ○ ○ ○ ○ ○ ○ ○ ○ ○ ○ ○ ○ ○ ○ ○ ○ ○ ○ ○ ○ ○ ○ ○ ○ ○ ○ ○ ○ ○ ○ ○ ○ SELECT AN ITEM WITH Press “CURSOR” keys to select “TAPE AND PRESS CLUSTER”, and then press (OK) key.
-
Page 109: Double Feed Detection
Special Functions Double Feed Detection This mode stops printer operation when double feeding of paper is detected. Check the paper feed state, and resume paper feed by pressing the “PRINT” key. Double feeding is sometimes detected when the following paper is feed: •... -
Page 110: Drum Size Mode [Available Only With A3/A4 Drum]
Special Functions ○ ○ ○ ○ ○ ○ ○ ○ ○ ○ ○ ○ ○ ○ ○ ○ ○ ○ ○ ○ ○ ○ ○ ○ ○ ○ ○ ○ ○ ○ ○ ○ ○ SELECT AN ITEM WITH Press “CURSOR” keys to select “12. END”, and AND PRESS then press (OK) key. - Page 111 Special Functions ○ ○ ○ ○ ○ ○ ○ ○ ○ ○ ○ ○ ○ ○ ○ ○ ○ ○ ○ ○ ○ ○ ○ ○ ○ ○ ○ ○ ○ ○ ○ ○ ○ SELECT AN ITEM WITH Press “CURSOR” keys to select “A3 DRUM” or AND PRESS “A3 DRUM”...
-
Page 112: User Setting Functions
User Setting Function For details on functions that can be set by the user, see "Job Setting Memory Function" under user setup functions on page 68. Initial Setting Mode Defaults are as follows: • Print speed : Standard • Print size : A3 •... -
Page 113: Optimize Print Mode
User Setting Functions ○ ○ ○ ○ ○ ○ ○ ○ ○ ○ ○ ○ ○ ○ ○ ○ ○ ○ ○ ○ ○ ○ ○ ○ ○ ○ ○ ○ ○ ○ ○ ○ ○ SELECT/SET AN ITEM WITH Press “CURSOR”... -
Page 114: Document Memory Mode
User Setting Functions ○ ○ ○ ○ ○ ○ ○ ○ ○ ○ ○ ○ ○ ○ ○ ○ ○ ○ ○ ○ ○ ○ ○ ○ ○ ○ ○ ○ ○ ○ ○ ○ ○ SELECT AN ITEM WITH Press “CURSOR”... -
Page 115: Document Density Detection
User Setting Functions ○ ○ ○ ○ ○ ○ ○ ○ ○ ○ ○ ○ ○ ○ ○ ○ ○ ○ ○ ○ ○ ○ ○ ○ ○ ○ ○ ○ ○ ○ ○ ○ ○ SELECT AN ITEM WITH Press “CURSOR”... -
Page 116: Feed Heavy Weight Paper
User Setting Functions ○ ○ ○ ○ ○ ○ ○ ○ ○ ○ ○ ○ ○ ○ ○ ○ ○ ○ ○ ○ ○ ○ ○ ○ ○ ○ ○ ○ ○ ○ ○ ○ ○ SELECT AN ITEM WITH Press “CURSOR”... - Page 117 User Setting Functions ○ ○ ○ ○ ○ ○ ○ ○ ○ ○ ○ ○ ○ ○ ○ ○ ○ ○ ○ ○ ○ ○ ○ ○ ○ ○ ○ ○ ○ ○ ○ ○ ○ Press “CURSOR” keys to select “STANDARD” SELECT AN ITEM WITH AND PRESS or “HEAVY WEIGHT”, and then press...
-
Page 118: Current Setting Functions
Current Setting Function Each of the items set to keys inside the panel cover can be confirmed. ○ ○ ○ ○ ○ ○ ○ ○ ○ ○ ○ ○ ○ ○ ○ ○ ○ ○ ○ ○ ○ ○ ○ ○ ○ ○ ○ ○ ○ ○ ○ ○ ○ ○ ○ ○ ○ ○ ○ ○ ○ ○ ○ ○ ○ ○ ○ ○ ○ ○ ○ ○ ○ ○ ○ ○ ○ ○ Open the panel cover. -
Page 119: On-Line Print Function [Available Only With Interface Kit Installed]
On-Line Print Function Available Only With Interface Kit Installed This function allows you to make prints of documents directly from on-line data from personal computers. IMPORTANT • For details on connections and settings, and refer to the Printer Driver Operation Manual. ○... - Page 120 On-Line Print Function ○ ○ ○ ○ ○ ○ ○ ○ ○ ○ ○ ○ ○ ○ ○ ○ ○ ○ ○ ○ ○ ○ ○ ○ ○ ○ ○ ○ ○ ○ ○ ○ ○ Firmly fasten the locks on both sides of the connector.
- Page 122 Chapter Replacing Consumables This chapter describes how to supply paper, ink pack, and other consumables. ○ ○ ○ ○ ○ ○ ○ ○ ○ ○ ○ ○ ○ ○ ○ ○ ○ ○ ○ ○ ○ ○ ○ ○ ○ ○ ○ ○ ○ ○ ○ ○ ○ ○ ○ ○ ○ ○ ○ ○ ○ ○ ○ ○ ○ ○ Replacing the Ink Pack ..................
-
Page 123: Replacing The Ink Pack
Replacing the Ink Pack The message “CHANGE INK” is displayed on the LCD panel when the remaining ink is low. Replace the ink pack using the following procedure. IMPORTANT • Only use ink packs designed for this machine. ○ ○ ○ ○ ○ ○ ○ ○ ○ ○ ○ ○ ○ ○ ○ ○ ○ ○ ○ ○ ○ ○ ○ ○ ○ ○ ○ ○ ○ ○ ○ ○ ○ Open the front cover. - Page 124 Replacing the Ink Pack ○ ○ ○ ○ ○ ○ ○ ○ ○ ○ ○ ○ ○ ○ ○ ○ ○ ○ ○ ○ ○ ○ ○ ○ ○ ○ ○ ○ ○ ○ ○ ○ ○ Insert the ink pack so that the groove on the lip fits onto the “U”...
-
Page 125: Replacing The Master Roll
Replacing the Master Roll The message “CHANGE MASTER” is displayed on the LCD panel when the master roll is used up. Replace the master roll using the following procedure. IMPORTANT • Only use a master roll designed for use in this machine. ○... - Page 126 Replacing the Master Roll ○ ○ ○ ○ ○ ○ ○ ○ ○ ○ ○ ○ ○ ○ ○ ○ ○ ○ ○ ○ ○ ○ ○ ○ ○ ○ ○ ○ ○ ○ ○ ○ ○ Insert the master roll in the direction shown in the figure on the right.
- Page 127 Replacing the Master Roll ○ ○ ○ ○ ○ ○ ○ ○ ○ ○ ○ ○ ○ ○ ○ ○ ○ ○ ○ ○ ○ ○ ○ ○ ○ ○ ○ ○ ○ ○ ○ ○ ○ Master cut lever If the leading edge of the master is damaged, press the master cut bar.
-
Page 128: How To Dispose Of Used Master
How to Dispose of Used Masters The message “CHANGE MASTER EJECTION CORE” is displayed on the LCD panel when the master ejection core is full.Dispose of used masters wound on to the ejection core by the following procedure. IMPORTANT • Use only a master ejection core designed for use in this machine. ○... - Page 129 How to Dispose of Used Masters ○ ○ ○ ○ ○ ○ ○ ○ ○ ○ ○ ○ ○ ○ ○ ○ ○ ○ ○ ○ ○ ○ ○ ○ ○ ○ ○ ○ ○ ○ ○ ○ ○ Holding the edges of the master ejection core, and pull out and peel off the master ejection core over a trash bag to remove the used master.
-
Page 130: Replacing The Drum Unit
Replacing the Drum Unit Removing the Drum Unit WARNING • Avoid pressing and damaging the drum surface with fingers etc. It can stain your clothes, and the warp in the drum surface may cause bad prints. • Always place the drum unit on flat and stable surface. Otherwise, the drum surface may be damaged or warped and may cause bad prints. -
Page 131: Installing The Drum Unit
Replacing the Drum Unit ○ ○ ○ ○ ○ ○ ○ ○ ○ ○ ○ ○ ○ ○ ○ ○ ○ ○ ○ ○ ○ ○ ○ ○ ○ ○ ○ ○ ○ ○ ○ ○ ○ Drum handle Hold the drum stay, and pull out the drum towards you while slightly lifting the front end of the drum. - Page 132 Replacing the Drum Unit ○ ○ ○ ○ ○ ○ ○ ○ ○ ○ ○ ○ ○ ○ ○ ○ ○ ○ ○ ○ ○ ○ ○ ○ ○ ○ ○ ○ ○ ○ ○ ○ ○ Lift the drum securing lever toward you while Lever pressing the drum in.
- Page 134 Chapter Troubleshooting This chapter describes how to remove paper jams and what to do when error messages are displayed. ○ ○ ○ ○ ○ ○ ○ ○ ○ ○ ○ ○ ○ ○ ○ ○ ○ ○ ○ ○ ○ ○ ○ ○ ○ ○ ○ ○ ○ ○ ○ ○ ○ ○ ○ ○ ○ ○ ○ ○ ○ ○ ○ ○ ○ ○ Power Does Not Turn ON .................
-
Page 135: Power Does Not Turn On
Power Does Not Turn ON If the power does not turn ON, check the following. THE MACHINE DOESN'T TURN ON. IS POWER PLUG INSERTED? Insert the power plug securely. IS POWER SWITCH ON? Turn the power switch ON. Please contact your service person. -
Page 136: Platemaking/Printing Is Not Possible
Platemaking/Printing is Not Possible If platemaking/printing is not possible, check the following. IS THERE A MESSAGE DISPLAYED ON ERROR DISPLAY PANEL? See "Error Messages" on page 136. Please contact your service person. -
Page 137: Error Messages
Error Messages Error messages are displayed in one of two ways, either by text or by number. Message Countermeasure There is no paper in the feed tray. Load the feed tray with ADD PAPER printing paper. There is no ink. Replace the old ink pack with a new one. CHANGE INK (a For details, see page 122, “Replacing the Ink Pack”.) There is no master. - Page 138 Error Messages Message Countermeasure The printer is not ready. Please wait with the power “ON”. PLEASE WAIT If the message remains after a few minutes, turn the power “OFF” and “ON” again. If the message still remains after a few minutes, turn the power “OFF”...
-
Page 139: Supplying Or Changing Paper While Printing
Supplying or Changing Paper While Printing If Paper Runs Out During Printing If paper runs out during printing, printing stops and the feed tray is lowered automatically. And, “ADD PAPER”message displays on the LCD panel. ○ ○ ○ ○ ○ ○ ○ ○ ○ ○ ○ ○ ○ ○ ○ ○ ○ ○ ○ ○ ○ ○ ○ ○ ○ ○ ○ ○ ○ ○ ○ ○ ○ ○ ○ ○ ○ ○ ○ ○ ○ ○ ○ ○ ○ ○ ○ ○ ○ ○ ○ ○ ○ ○ ○ ○ ○ ○ Load paper when feed tray stop. -
Page 140: Changing Paper Selection
Supplying or Changing Paper While Printing IMPORTANT Roller ring • If the sheet is still in the feed roller ring, pull it out and align it with the stack. ○ ○ ○ ○ ○ ○ ○ ○ ○ ○ ○ ○ ○ ○ ○ ○ ○ ○ ○ ○ ○ ○ ○ ○ ○ ○ ○ ○ ○ ○ ○ ○ ○ Align the stack to be added and place it on top of the existing stack. - Page 141 Supplying or Changing Paper While Printing ○ ○ ○ ○ ○ ○ ○ ○ ○ ○ ○ ○ ○ ○ ○ ○ ○ ○ ○ ○ ○ ○ ○ ○ ○ ○ ○ ○ ○ ○ ○ ○ ○ Press the feed tray descend switch continuously. Feed tray Release the switch when the paper tray is at the descend...
-
Page 142: Paper Jams
Paper Jams When “PAPER JAM ON THE FEEDER SIDE” is displayed (Feed Tray Side) When a paper jam occurs in the feed tray side, the message “PAPER JAM ON THE FEEDER SIDE” is displayed on the LCD. Follow the procedure below to remove the jammed paper. ○... -
Page 143: When "Paper Jam On The Ejection Side" Is Displayed (Print Tray Side)
Paper Jams When “PAPER JAM ON THE EJECTION SIDE” is displayed (Print Tray Side) When a paper jams in the print tray side, “PAPER JAM ON THE EJECTION SIDE” is displayed on the LCD panel. Follow the procedure below to remove the jammed paper. ○... - Page 144 Paper Jams Paper Adhering to Drum If paper has adhered to the drum, follow the procedure below to remove it. ○ ○ ○ ○ ○ ○ ○ ○ ○ ○ ○ ○ ○ ○ ○ ○ ○ ○ ○ ○ ○ ○ ○ ○ ○ ○ ○ ○ ○ ○ ○ ○ ○ Pull up the cover to the upper.
- Page 145 When “PLATE EJECTION ERROR” is Displayed ○ ○ ○ ○ ○ ○ ○ ○ ○ ○ ○ ○ ○ ○ ○ ○ ○ ○ ○ ○ ○ ○ ○ ○ ○ ○ ○ ○ ○ ○ ○ ○ ○ Pull the paper toward the ejection side while pressing the JOG switch to peel the paper off.
-
Page 146: When "Plate Ejection Error" Is Displayed
When “PLATE EJECTION ERROR” is Displayed When and old master remains on the drum, “PLATE EJECTION ERROR” is displayed on the LCD panel. Remove it by following the procedure below. WARNING • Do not press the surface of the drum unit with your fingers or scratch it. Doing so will not only dirty your fingers or clothing but will also indent the drum unit surface, preventing normal printing. - Page 147 When “PLATE EJECTION ERROR” is Displayed ○ ○ ○ ○ ○ ○ ○ ○ ○ ○ ○ ○ ○ ○ ○ ○ ○ ○ ○ ○ ○ ○ ○ ○ ○ ○ ○ ○ ○ ○ ○ ○ ○ Lift up the drum stopper, and turn the drum by hand to set the lever in c to an easily operable position.
- Page 148 When “PLATE EJECTION ERROR” is Displayed ○ ○ ○ ○ ○ ○ ○ ○ ○ ○ ○ ○ ○ ○ ○ ○ ○ ○ ○ ○ ○ ○ ○ ○ ○ ○ ○ ○ ○ ○ ○ ○ ○ ○ ○ ○ ○ ○ ○ ○ ○ ○ ○ ○ ○ ○ ○ ○ ○ ○ ○ ○ ○ ○ ○ ○ ○ ○ Hold the drum in horizontal, and push the drum comes to a stop.
-
Page 149: When "Master Setting Error" Is Displayed
When “MASTER SETTING ERROR” is Displayed The message "SET MASTER AGAIN" is displayed on the LCD panel. ○ ○ ○ ○ ○ ○ ○ ○ ○ ○ ○ ○ ○ ○ ○ ○ ○ ○ ○ ○ ○ ○ ○ ○ ○ ○ ○ ○ ○ ○ ○ ○ ○ ○ ○ ○ ○ ○ ○ ○ ○ ○ ○ ○ ○ ○ ○ ○ ○ ○ ○ ○ ○ ○ ○ ○ ○ ○ ○ ○ ○ Repeat steps 1 to 2 and 6 to 8 of “Replacing the Drum Unit”. -
Page 150: Chapter 7 Specifications And Maintenance
Chapter Specifications and Maintenance This chapter lists the machine specifications and describes maintenance, etc. ○ ○ ○ ○ ○ ○ ○ ○ ○ ○ ○ ○ ○ ○ ○ ○ ○ ○ ○ ○ ○ ○ ○ ○ ○ ○ ○ ○ ○ ○ ○ ○ ○ ○ ○ ○ ○ ○ ○ ○ ○ ○ ○ ○ ○ ○ Specifications .................... -
Page 151: Specifications
Specifications Product name/model No. Duprinter DP-440 Duprinter DP-430 Model Floor model Platemaking method Thermal digital master making Platemaking time 21 seconds (A4, same size) 31 seconds (A4, same size) Resolution 400dpi 300dpi x 600dpi Scanning method Flat bed scanner Printing method... - Page 152 Specifications Product name/model No. Duprinter DP-440 Duprinter DP-430 Other functions Image rotation function (90 & 180 degree) Color separation function (function installed in on-line printer driver) Sorter mode setting (non-sort, sort, group) Auto-scanning of document size Multi exposure (2, 4, 18, 16)
- Page 153 Specifications Product name/model No. Duprinter DP-440 Duprinter DP-430 On-line specification 1IEEE1284 (Compatibility mode, Nibble mode) standard compliant Bi-directional parallel interface (provided as standard) Printer driver for PC operating sysytem • Windows95/98/Me, Windows NT4.0/2000 USB, SCSI interface (option)* Printer driver for PC operating sysytem •...
- Page 154 N5-Y1011 2001.12...
Need help?
Do you have a question about the DP-440 and is the answer not in the manual?
Questions and answers