Levolor InMotion Manual
Hide thumbs
Also See for InMotion:
- User manual (16 pages) ,
- Installation and reference manual (28 pages) ,
- Quick start manual (2 pages)

Related Manuals for Levolor InMotion


Summary of Contents for Levolor InMotion
- Page 1 Remote Control Guide Spanish: Guía del control remoto French: Guide de la télécommande © LEVOLOR 2022 ®...
-
Page 2: Table Of Contents
Table of Contents Thank you for choosing LEVOLOR InMotion motorized ® ™ window coverings. This product has been custom built for you from the highest quality materials. To avoid errors and save valuable time, please read these instructions to ensure you are properly programming your new remote. -
Page 3: Product Overview
Product Overview Cellular, Natural and Roman Shades Programming Programming button, charging port and indicator light are located in the shade’s right headrail end cap. Programming button does not act as a manual control and the shade will not move when the button is pressed. During setup, the shade will confirm programming by jogging, with a slight down and up movement. -
Page 4: Banded, Roller And Sheer Shades
Product Overview Banded, Roller and Sheer Shades Programming Programming button, charging port and indicator light are located on the right-side of the shade headrail. Programming button acts as a manual control and the shade will move when the button is pressed. During setup, the shade will confirm programming by beeping and jogging, with a slight down and up movement. -
Page 5: Wood Blinds
Product Overview Wood Blinds Programming Programming button is located inside the headrail on the left corner of the motor and a paperclip or similar tool must be used to activate. The programming button is not accessible when mounted. Programming button acts as a manual control and the blind will move when the button is activated. -
Page 6: Positioning
Product Overview Positioning Each blind or shade comes with predefined position limits that can be adjusted as needed. Upper Limit This is the highest position available which provides the best view and protects product from damage. Lower Limit This is the lowest position available which fully covers the window and matches the length requested at time of order. -
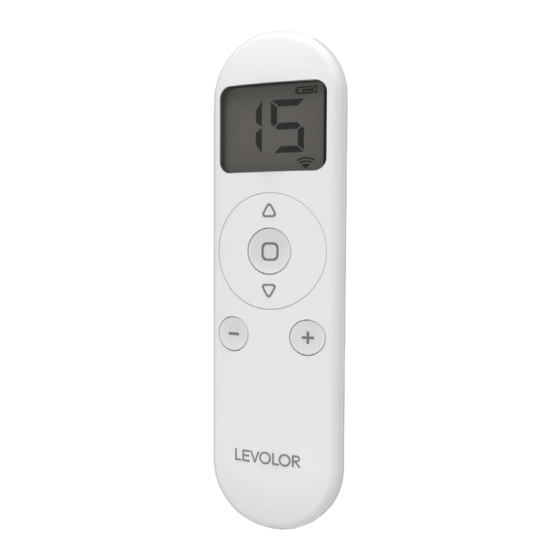
Page 7: Remote Control
Remote Overview Remote Control The LEVOLOR InMotion remote has 15 available channels and each channel can control up to 20 shades at once. This remote is designed to control bottom-up shades and tilt-only wood blinds. Front View LCD Display Stop... -
Page 8: Battery Installation
Remote Overview Battery Installation Gently press down on cover and slide to remove. Install 2 AAA batteries (included). Align batteries as shown below. Program your remote, replace the back cover and install closure screw. Remove Back Cover Install (2) AAA Batteries As Shown Replace... -
Page 9: Wall Holder
Remote Overview Wall Holder Provide a home for LEVOLOR remotes with the remote holder. Tools Needed to Mount Remote Holder • Power drill • 3⁄32” drill bit • Phillips screwdriver • Pencil Remote Holder Mounting Instructions Choose location and mark wall plate placement. -
Page 10: Programming
Programming Getting Started During programming, all blinds and shades will jog by moving slightly down and up. Banded, roller and sheer shades will both jog and provide an audible beep. Certain programming functions will affect all blinds and shades on the selected channel such as – favorite position, travel limits, operating mode and motor speed. -
Page 11: Favorite Position
Programming Pair Remote to Blind or Shade and + buttons to select the channel to pair. Use the Press and hold the programming button on the motor (about 2 seconds) until the motor jogs x 1 and/or beeps x 1. In the next 10 seconds, press and hold the ... -
Page 12: Operating Mode
Programming Operating Mode This procedure will set the operating mode on all blinds and shades assigned to a specific channel. All blind and shade motors can be set to two different operating modes. Continuous Mode (Default setting) Recommended for cellular, natural, roller and roman shades. -
Page 13: Motor Speed
Programming Motor Speed This procedure will set the motor speed on all blinds and shades assigned to a channel. All motors have 3 speeds available and are set to the slowest speed by default. Set to Faster Speed Press one P2 button in the battery compartment of the remote until motor jogs x 1 and/or beeps x 1. -
Page 14: Travel Limits
Programming Travel Limits This procedure will adjust the travel limits on all blinds and shades assigned to a channel. Upper and lower travel limits are set at the factory during production to your order specification. Upon installation, adjustment of these limits may be necessary to better suit your needs. -
Page 15: Add Or Remove Additional Remote
Programming Disable Limit Setting After all programming is complete, lock the remote to prevent accidental or unintended changes to motor direction, travel limits and operating mode. Remove cover from back of remote and locate the lock switch between the P2 buttons above batteries. Move the switch to the left to lock. -
Page 16: Operation
Operation Operating Instructions Cellular, Natural, Roller and Roman Shades Once your shade has been paired with the remote, use the up and down buttons to raise and lower the shade. Press and hold the stop button to send to Favorite Position. -
Page 17: Additional Information
Place all other motors to same channel. respond). sleep. See page 8 for more information. Warranty Visit LEVOLOR.com/warranty or call customer service at 1-800-LEVOLOR for more information. Customer Service To contact customer service with an questions or 1-800-LEVOLOR concerns, you may reach us at... -
Page 18: Specifications
Additional Information Specifications Voltage ................3V Radio Frequency ......433.92 MHz Bi-directional Transmitting Power ........... 10 milliwatt Operating Temperature ..14°F to 122°F (-10°C to 50°C) RF Modulation ..............FSK Lock Function ..............Yes IP Rating ................IP20 Transmission Distance ......up to 200m (outdoor) Declarations U.S. - Page 19 Additional Information ISED RSS Warning This device complies with Innovation, Science and Economic Development Canada licence-exempt RSS standard(s). Operation is subject to the following two conditions: (1) this device may not cause interference, and (2) this device must accept any interference, including interference that may cause undesired operation of the device.
- Page 20 Guía del control remoto English: Remote Control Guide French: Guide de la télécommande © LEVOLOR 2022 ®...
- Page 21 Índice Gracias por elegir la decoración de ventanas motorizadas LEVOLOR InMotion . Este producto se fabricó a la ® ™ medida para usted con materiales de la más alta calidad. Lea estas instrucciones para evitar errores, ahorrar tiempo valioso y asegurarse de que está programando correctamente su nuevo control remoto.
-
Page 22: Resumen Del Producto
Resumen del producto Persianas celulares, naturales y romanas Programación El botón de programación, el puerto de carga y la luz indicadora se encuentran en la tapa del extremo del cortinero derecho de la persiana. El botón de programación no actúa como un y la persiana no se moverá cuando se presione el botón. -
Page 23: Persianas Con Bandas, Enrollables Y Traslúcidas
Resumen del producto Persianas con bandas, enrollables y traslúcidas Programación El botón de programación, el puerto de carga y la luz indicadora se encuentran en el lado derecho del cortinero de la persiana. El botón de programación actúa como un control manual y la persiana se moverá... -
Page 24: Persianas De Madera
Product Overview Persianas de madera Programación El botón de programación está ubicado dentro del cortinero a la esquina izquierda del motor y se debe usar un clip o una herramienta similar para activarlo. El botón de programación no es de fácil acceso cuando está... -
Page 25: Colocación
Resumen del producto Colocación Cada persiana o pantalla viene con límites de posición predefinidos que se pueden ajustar según sea necesario. Límite superior Esta es la posición más alta disponible que proporciona la mejor vista y protege el producto de daños. Límite inferior Esta es la posición más baja disponible que cubre por completo la ventana y coincide con la longitud solicitada en... -
Page 26: Control Remoto
Resumen del control remoto Control remoto El control remoto LEVOLOR InMotion tiene 15 canales disponibles y cada canal puede controlar hasta 20 persianas a la vez. Este control remoto está diseñado para controlar persianas de abajo hacia arriba y persianas de madera inclinables únicamente. -
Page 27: Instalación De La Batería
Resumen del control remoto Instalación de la batería Presione suavemente la cubierta y deslice para quitar. Instale 2 baterías AAA (incluidas). Alinee las baterías como se muestra a continuación. Programe su control remoto, reemplace la cubierta trasera e instale el tornillo de cierre. Retire la cubierta posterior. -
Page 28: Soporte De Pared
Resumen del control remoto Soporte de pared Proporcione un hogar para los controles remotos LEVOLOR con el soporte para control remoto. Proporcione un hogar para los controles remotos LEVOLOR con el soporte para control remoto. • Taladro eléctrico • Broca para taladro de 3/32”... -
Page 29: Programación
Programación Inicio Durante la programación, todas las persianas y pantallas se moverán ligeramente hacia arriba y hacia abajo. Las persianas con bandas, enrollables y traslúcidas se moverán y emitirán un pitido audible. Ciertas funciones de programación afectarán a todas las persianas y pantallas en el canal seleccionado, tales como la posición favorita, los límites de recorrido, el modo de operación y la velocidad del motor. -
Page 30: Posición Favorita
Programación Empareje el control remoto a la persiana o pantalla. y + para seleccionar el canal para Utilice los botones emparejar. Mantenga presionado un botón de programación en el motor (durante, aproximadamente, 2 segundos) hasta que el motor se mueva x 1 o emita un pitido x 1. En los próximos 10 segundos, mantenga presionado el ... -
Page 31: Modos De Funcionamiento
Programación Establezca su posición favorita Utilice los botones arriba y abajo para mover la persiana o pantalla hasta la posición deseada. Presione un botón P2 en el compartimiento de la batería del control remoto hasta que el motor avance x 1 o emita pitidos x 2. -
Page 32: Velocidad Del Motor
Programación Modo intermitente Recomendado para persianas con bandas, persianas translúcidas y persianas de madera. En motor se mueve un poco después de presionar brevemente los botones arriba o después de mantener presionados los botones arriba o abajo, hasta que ... -
Page 33: Límites De Desplazamiento
Programación Límites de desplazamiento Este procedimiento ajustará los límites de recorrido para todas las persianas y pantallas asignadas a un canal. Los límites superior e inferior se establecen en la fábrica durante la fabricación según su especificación de compra. Después de la instalación, es posible que necesite ajustar estos límites para satisfacer mejor sus necesidades. -
Page 34: Agregue O Quite Control Remoto Adicional
Programación Desactivar la configuración de los límites Una vez completada toda la programación, bloquee el control remoto para evitar cambios accidentales o no intencionados en la dirección del motor, los límites de desplazamiento y el modo de funcionamiento. Retire la cubierta de la parte posterior del control remoto y localice el interruptor de bloqueo entre los botones P2 sobre las baterías. -
Page 35: Operación
Operación Instrucciones de funcionamiento Persianas celulares, naturales, enrollables y romanas Una vez que haya emparejado su persiana con un control remoto, utilice los botones arriba y abajo para elevar y bajar la persiana. Mantenga presionado el botón de detención para enviar a la posición favorita. -
Page 36: Información Adicional
8 para obtener más información. Garantía Visite LEVOLOR.com/warranty o llame al servicio de atención al cliente al 1-800-LEVOLOR para obtener más información. Servicio al cliente Para ponerse en contacto con el servicio de atención al... -
Page 37: Especificaciones
Información adicional Especificaciones Voltaje ................. 3V Frecuencia de radio .....433.92 MHz bidireccional Potencia de transmisión........10 milivatios Temperatura de funcionamiento ........... Entre 14 °F y 122 °F (entre -10 °C y 50 °C) 14°F to 122°F (-10°C to 50°C) Modulación de RF ............FSK Función de bloqueo ............ - Page 38 Información adicional ADVERTENCIA ISED RSS: Este dispositivo cumple con los estándares RSS exentos de licencia de Innovación, Ciencia y Desarrollo Económico de Canadá. El funcionamiento está sujeto a las siguientes dos condiciones: (1) este dispositivo no debe causar una interferencia y (2) este dispositivo deberá...
- Page 39 Guide de la télécommande English: Remote Control Guide Spanish: Guía del control remoto © LEVOLOR 2022 ®...
- Page 40 Table des matières Merci d’avoir choisi les habillages de fenêtre motorisés InMotion de LEVOLOR . Cet article a été fabriqué sur ™ ® mesure pour vous avec des matériaux de la plus haute qualité. Pour éviter les erreurs et gagner un temps précieux, veuillez lire ces instructions pour vous assurer de...
-
Page 41: Aperçu De L'article
Aperçu de l’article Stores cellulaires, naturels et romains Programmation Le bouton de programmation, le port de recharge et le voyant lumineux sont situés dans l’embout du caisson du store. Le bouton de programmation ne fait pas office de commande manuelle, et le store ne se déplace pas lorsque le bouton est enfoncé. -
Page 42: Stores À Bandes, À Enroulement Automatique Et Diaphanes
Aperçu de l’article Stores à bandes, à enroulement automatique et diaphanes Programmation Le bouton de programmation, le port de recharge et le voyant lumineux sont situés sur le côté droit du caisson du store. Le bouton de programmation agit en tant que commande manuelle et le store se déplace lorsque le bouton est enfoncé. -
Page 43: Stores En Bois
Aperçu de l’article Stores en bois Programmation Le bouton de programmation est situé à l’intérieur du caisson, dans le coin gauche du moteur, et un trombone ou un objet similaire doit être utilisé pour l’activer. Le bouton de programmation n’est pas accessible une fois le store installé. -
Page 44: Positionnement
Aperçu de l’article Positionnement Chaque store est livré avec des limites de position prédéfinies qui peuvent être ajustées en fonction des besoins. Limite supérieure Il s’agit de la position la plus haute disponible, qui offre la meilleure vue et protège l’article des dommages. Limite inférieure Il s’agit de la position la plus basse disponible, qui couvre entièrement la fenêtre et correspond à... -
Page 45: Télécommande
Aperçu de la télécommande Télécommande La télécommande InMotion de LEVOLOR dispose de 15 canaux disponibles, chacun pouvant contrôler jusqu’à 20 stores à la fois. Cette télécommande est conçue pour contrôler les stores avec ouverture du bas vers le haut et les stores en bois inclinables. -
Page 46: Mise En Place Des Piles
Aperçu de la télécommande Mise en place des piles Appuyez doucement sur le couvercle et faites-le glisser pour le retirer. Insérez 2 piles AAA (incluses). Placer les piles comme indiqué ci-dessous. Programmez votre télécommande, replacez le couvercle arrière et installez la vis de fermeture. Retirez le couvercle arrière... -
Page 47: Support Mural
Aperçu de la télécommande Support mural Rangez les télécommandes LEVOLOR grâce au support de télécommande. Outils nécessaires pour fixer le support de télécommande • Perceuse électrique • Foret de 3/32 po • Tournevis cruciforme • Crayon Instructions pour fixer le support de télécommande Choisissez l’emplacement et marquez le... -
Page 48: Programmation
Programmation Pour commencer Durant la programmation, tous les stores se déplacent légèrement vers le bas et vers le haut. Les stores à bandes, les stores à enroulement automatique et les stores diaphanes se déplacent et émettent un signal sonore. Certaines fonctions de programmation touchent tous les stores du canal sélectionné, comme la position préférée, les limites de course, le mode de fonctionnement et la vitesse du moteur. -
Page 49: Position Préférée
Programmation Jumelage du store et de la télécommande et + pour sélectionner le canal Utilisez les boutons auquel vous souhaitez jumeler le store. Appuyez sur le bouton de programmation sur le moteur (pendant environ 2 secondes) jusqu’à ce que le moteur tourne une fois ou émette un bip. Dans les 10 secondes qui suivent, appuyez sur le bouton d’arrêt ... -
Page 50: Mode De Fonctionnement
Programmation Réglage d’une position préférée Utilisez les boutons de la flèche vers le haut et de la flèche vers le bas pour déplacer le store à la position souhaitée. Appuyez sur un bouton P2 situé dans le compartiment à... -
Page 51: Vitesse Du Moteur
Programmation Mode intermittent Recommandé pour les stores à bandes, les stores diaphanes et les stores en bois. Le moteur se déplace légèrement après une courte pression des boutons de la flèche vers le haut ou de la flèche vers le bas et continue de se déplacer après une longue pression des boutons de la flèche vers le haut ... -
Page 52: Limites De Course
Programmation Limites de course Cette procédure ajuste les limites de course de tous les stores assignés à un canal. Les limites de course supérieures et inférieures sont réglées en usine pendant la fabrication à la longueur indiquée dans votre commande. Lors de l’installation, l’ajustement de ces limites peut être nécessaire pour mieux répondre à... -
Page 53: Ajout Ou Suppression D'une Autre Télécommande
Programmation Désactivation du réglage de limite Une fois la programmation terminée, verrouillez la télécommande pour éviter toute modification accidentelle ou involontaire de la direction du moteur, des limites de course et du mode de fonctionnement. Retirez le couvercle à l’arrière de la télécommande et localisez l’interrupteur de verrouillage entre les boutons P2 au-dessus des piles. -
Page 54: Fonctionnement
Fonctionnement Mode d’emploi Stores cellulaires, naturels, à enroulement automatique et romains Une fois que votre store est jumelé à la télécommande, utilisez les boutons de la flèche vers le haut et de la flèche vers le bas pour lever et baisser le store. Appuyez sur le bouton d’arrêt ... -
Page 55: Renseignements Supplémentaires
8 pour obtenir de plus amples renseignements. Garantie Pour obtenir de plus amples renseignements, visitez le site LEVOLOR.com/warranty ou appelez le service à la clientèle au 1-800-LEVOLOR. Service à la clientèle Si vous avez des questions ou des préoccupations, communiquez avec le service à... -
Page 56: Caractéristiques Techniques
Renseignements supplémentaires Caractéristiques techniques Tension ................3V Fréquence radio ......433,92 MHz bidirectionnel Puissance d’émission ........10 milliwatts Température de fonctionnement ..-10 °C à 50 °C (14 °F à 122 °F) Modulation RF ..............FSK Fonction de verrouillage ........... Oui Indice de protection ............IP20 Distance de transmission... - Page 57 L’exploitation est autorisée aux deux conditions suivantes: (1) l’appareil ne doit pas produire de brouillage, et (2) l’utilisateur de l’appareil doit accepter tout brouillage radioélectrique subi, même si le brouillage est susceptible d’en compromettre le fonctionnement. LEVOLOR 2022 © 20-0048-200 Guide de la télécommande page d’accueil...
Need help?
Do you have a question about the InMotion and is the answer not in the manual?
Questions and answers
How do you charge the motor?
To charge the motor for Levolor InMotion, use the included charger. You can charge it in two ways:
1. Magnetic Charging: Attach the magnetic charging adapter to the micro-USB charging cable and power adapter, then connect it to the headrail.
2. Standard Charging: Remove the magnetic charging insert from the headrail and use the micro-USB charging cable and power adapter.
The indicator light will flash red when the battery is low, flash green during charging, and stay green when fully charged. It is recommended to fully charge the shade before installation.
This answer is automatically generated