
Related Manuals for Whispbar K576W


Summary of Contents for Whispbar K576W
- Page 1 K576W Fitting Kit Fitting Instructions for Basic Carrier Instrukcja systemu montażu Revision No: 2C...
- Page 2 Fitting Kit K576W MAX kgs (lbs) Ford Flex , 5dr MPV 08-+ 60 kgs (132 lbs) 60 kgs (132 lbs)
-
Page 3: First Time Installation
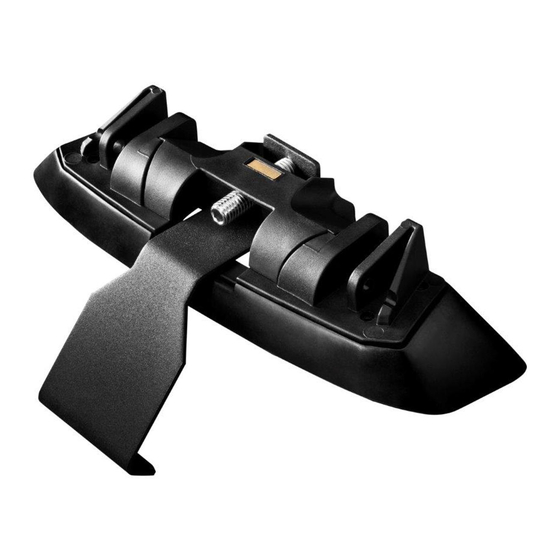
Fitting Kit K576W First Time Installation Remove parts from inside the package and check. Contact your dealer if any parts are missing or damaged. This kit fits type A, B, C and D. These instructions show type A crossbar fitted. They also apply to type B, C and D. - Page 4 Fitting Kit K576W Use keys to remove covers. Use hex screwdriver to reverse adjusting screw 10 turns. Press adjusting screw and pull crossbar legs out. Refer to the crossbar instructions for crossbar adjustment method. Ensure each end of the crossbar is...
- Page 5 Fitting Kit K576W Remove locking screw. Apply protective strip as shown. Trim if required. It is important to put the clamps in the correct position on the vehicle. Letters refer to the part numbers stamped on clamps. Clamp Part Number:...
- Page 6 Fitting Kit K576W Attach clamp to each leg. NOTE; clamps may have labels showing their positions on the vehicle (For example; "Front Right"). Refit locking screw so that it goes through the hole in the clamp. Do not begin to tighten the locking screw.
- Page 7 Fitting Kit K576W Fit rubber pads (supplied with fitting kit) to foot. Pad may vary in shape to that shown. Make sure the pad fits into the holes underneath the foot. Fitment Clamps directly to edge of roof under the...
- Page 8 Fitting Kit K576W Adjust the legs on the crossbar so that they are positioned equally from the ends of the crossbar, and the clamps engage firmly on the body work of the vehicle. Tighten adjusting screw to 5 Nm (3.7 ft lb) hand tight.
- Page 9 Fitting Kit K576W Check crossbar is securely attached to the vehicle. Use keys to fit and lock covers CAUTION: Recheck all fasteners immediately after a load is applied to the crossbars. Regularly check screws are tight.
-
Page 10: Maintenance
Fitting Kit K576W Maintenance Clean the car roof and surfaces of the product that will be in contact with the car roof. Follow the fitting instructions for fitting the product to your vehicle. Make sure all steps are carried out in order. - Page 11 Fitting Kit K576W Check and replace worn out or defective parts. Keep the product clean and maintained. Never drive into a car wash with the roof rack system fitted. Lubricate locks and adjusting screws at regular intervals. Remove the products from the vehicle when not in use.
- Page 12 Fitting Kit K576W Pierwszy montaż Sprawdź zawartość opakowania i upewnij się, czy zawiera wszystkie części znajdujące się na liście. Jeśli nie, skontaktuj się z odpowiednim sklepem. Kit pasuje do belek typu A, B, C oraz D. Instrukcja opisuje sposób montażu belek typu A.
- Page 13 Fitting Kit K576W Odkręć osłony za pomocą klucza. Zdejmij osłony za pomocą klucza. Przyciśnij i usuń blokadę. Zamontuj stopy. Sprawdź czy oba końce belek mają taką samą długość.
- Page 14 Fitting Kit K576W Odręć śrubę zabezpieczającą. Nałożyć pasek ochronny, jak pokazano. Zabezpiecz tśmą. Bardzo ważne jest aby umieścić łapy w odpowiednich miejscach na dachu samochodu Litery odnoszą się do oznakowań na łapkach Numer łapy: A = 805A B = 806A...
- Page 15 Fitting Kit K576W Doczep łapki do kitu. Uwaga: Na łapkach umieszczona jest informacja odnośnie ich rozmieszczenia. ( Np. Prawy przód) Umieść śrubę w otworze łapki. Nie dokręcaj śruby zbyt mocno. Zobacz numer pod spodem łapki.
- Page 16 Fitting Kit K576W Nałóż gumowe podkładki na stopę. Podkładki mogą różnić się kształtem. Upewnij się, czy dobrałeś odpowiednią podkładkę. Montaż Zamocuj łapy na samym brzegu dachu tuż pod drzwiami Na końcu instrukcji znajdziesz specyfikacje dla twojego samochodu. Umieść belki na dachu. Zalecana odległość...
- Page 17 Fitting Kit K576W Zamontuj stopy w tych samych miejscach na obu końcach belki.Zamontuj łapki. Dokręć z siłą 5 Nm / 3.7 ft lb. Dokręć śruby na każdej stopie.
- Page 18 Fitting Kit K576W Upewnij się, czy belka została poprawnie zamontowana Zamknij osłony za pomocą klucza. UWAGA: Sprawdź czy dokładnie dokręciłeś śruby...
-
Page 19: Zasady Użytkowania
Fitting Kit K576W Zasady użytkowania Przed zamontowaniem belek oczyść powierzchnię dachu samochodu. Postępuj zgodnie z instrukcją montażu danego zestawu. Sprawdź czy nie pominąłęś żadnego punktu. Jeżeli nie pisze inaczej, ustaw belki w odległości min. 700mm. Jest to szczególnie istotne przy przewożeniu długich przedmiotów. - Page 20 Fitting Kit K576W Regularnie naoliwiaj zamki i zawiasy. Zdemotuj bagażnik dachowy jeśli go nie używasz. Yakima Products, Inc. 15025 SW Koll Pkwy. Beaverton, OR 97006-6056 www.whispbar.pl...
- Page 21 Fitting Kit K576W Flex, 5dr MPV 08-+ (US) -230mm 470mm 1070mm 1020mm -9 -1/16ths" 18 1/2ths" 42 1/8ths" 40 3/16ths"...
-
Page 22: Limited Lifetime Warranty
Yakima will issue to the original retail purchaser, at Yakima’s option, either a refund equal to the purchase price paid for the product, or a credit to be used toward the purchase of new Whispbar products or rack components. - Page 23 Make a claim as soon as practicable by contacting the Whispbar dealer from whom you purchased the product, who will give you instructions on how to proceed. If you are unable to contact the Whispbar dealer, or the dealer is not able to remedy the defect, you should contact Yakima as soon as practicable at: Call: 0800 4776 722 (NZ) or 1800 143 548 (AU) Email: warranty@yakima.co.nz or warranty@yakima.com.au...
- Page 24 Yakima or the Whispbar dealer will be borne by you. Following receipt of the product and purchase invoice or receipt, Yakima or the Whispbar dealer must inspect the product to determine whether the claim falls within the warranty. If: 4.1 the claim falls within the warranty, Yakima will remedy any defects in materials or workmanship becoming apparent during the...
Need help?
Do you have a question about the K576W and is the answer not in the manual?
Questions and answers