
Subscribe to Our Youtube Channel
Related Manuals for Toro 08752


Summary of Contents for Toro 08752
- Page 1 Form No. 3425-994 Rev A Spring Rake Sand Pro ® /Infield Pro ® 3040 and 5040 Traction Units Model No. 08752—Serial No. 403300001 and Up *3425-994* A Register at www.Toro.com. Original Instructions (EN)
-
Page 2: Table Of Contents
Whenever you need service, genuine Toro parts, or additional information, contact an Authorized Service Contents Dealer or Toro Customer Service and have the model and serial numbers of your product ready. Figure 1 identifies the location of the model and serial numbers Safety ............... -
Page 3: Safety
Safety Safety and Instructional Decals Safety decals and instructions are easily visible to the operator and are located near any area of potential danger. Replace any decal that is damaged or missing. decal106-5517 106-5517 1. Warning—do not touch the hot surface. -
Page 4: Setup
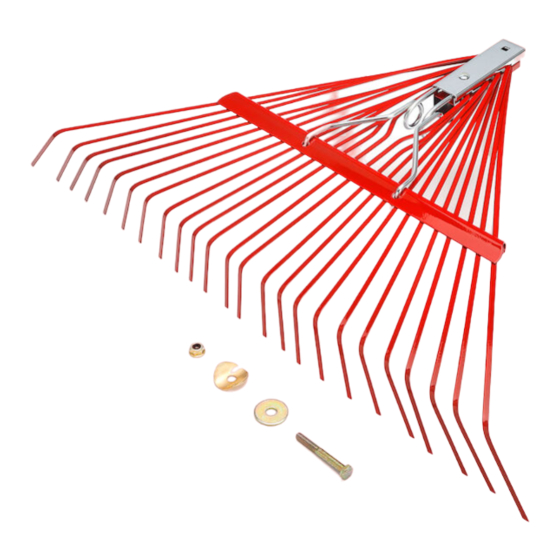
Setup Loose Parts Use the chart below to verify that all parts have been shipped. Description Qty. Spring rake assembly Shoulder bolt Flat washer (17/32 x 1-1/16 inch) Bolt (7/16-14 x 1-3/5 inch) Flat washer (15/32 x 59/64 inch) Nut (7/16 inch) Curved pivot bracket Ball hitch assembly Flat washer (3/8 x 7/8 inch) -
Page 5: Installing The Spring Rake
Installing the Spring Rake Secure the transport chains to the lift arm using one of the following procedures: Mount 2 hooks to the back of the lift arm Installing the Spring Rake on a with 2 nuts (3/8 inch) (Figure 5). - Page 6 g265963 Figure 8 1. Clevis pin 4. Attachment adapter 2. Washer (17/32 x 1-1/16 5. Latch mechanism g003430 Figure 6 inch) 3. Bracket stop plate 6. Cotter pin 1. Bolt (3/8 x 2-1/2 inches) 4. Tooth rake transport chain 2. Washer (3/8 x 7/8 inch) 5.
- Page 7 CAUTION Fingers can be pinched between the attachment and traction unit adapters. Lift and move the attachment using the handle on the back of the attachment adapter. Pivot the locking lever to the right to lock the adapters together. Secure the third link of each chain to the outside of the lift arm (Figure 10) using a bolt (3/8 x 2-1/2...
-
Page 8: Product Overview
Product Overview Operation Read this section on raking before raking a trap. There are many conditions that determine the adjustments to the tooth-rake attachment. The texture and depth of the sand, moisture content, weeds, and the amount of compaction all can vary from course to course, or even from trap to trap at the same course. -
Page 9: Entering And Leaving The Trap
Setting the Least Amount of Tine Engagement g262217 Figure 14 1. Flat on top 3. Rake g003409 Figure 13 2. Drawbar 1. Enter a trap straight into 2. Exit a trap at a right angle the long dimension in a in a level area. -
Page 10: Setting The Transport Position
Setting the Transport Position Complete the following procedure to increase the height of the rake when transporting: Lower the rake and lift assembly as low as possible. Disconnect the chains from the lift arms and reconnect them higher. Note: To ensure proper operation of rake, return the chains to the original slack position before operating the rake. -
Page 11: Maintenance
Maintenance Greasing the Attachment Adapter Inspecting and Cleaning If the locking lever on the attachment adapter does the Rake and Traction Unit not pivot freely and easily, apply a light coat of grease to the area shown in Figure After raking, clean the machine thoroughly. Because you use this machine primarily in sand and sand is extremely abrasive, wash off the sand after each use.
Need help?
Do you have a question about the 08752 and is the answer not in the manual?
Questions and answers