
Related Manuals for emmeti MIRAI SMI 4.0


Summary of Contents for emmeti MIRAI SMI 4.0
- Page 1 MIRAI - SMI 4.0 System Manager Integrated EH0618DC / EH1018DC / EH1218DC / EH1618DC / EH1718D3 MANUALE INSTALLAZIONE ED USO INSTALLATION AND USE MANUAL Rev. G - 03.2022...
- Page 2 ® Tutti i diritti sono riservati. Nessuna parte della pubblicazione può essere riprodotta o diffusa senza il permesso scritto da Emmeti.
-
Page 3: Presentazione Del Prodotto
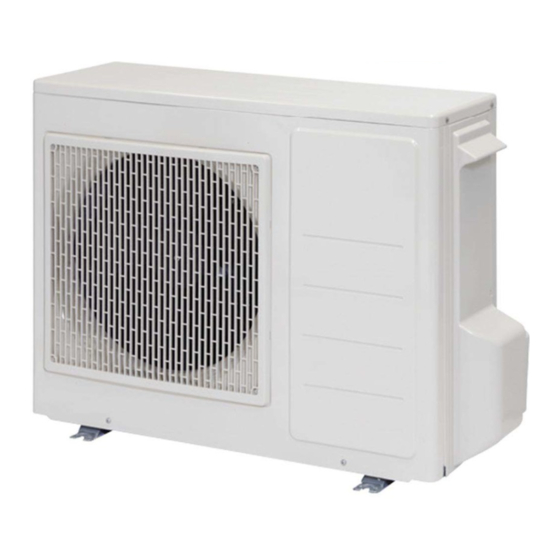
IT IT 1. DESCRIZIONE DEI COMPONENTI 1. PRESENTAZIONE DEL PRODOTTO 1.1 Caratteristiche principali • Sistema elettronico di gestione, dotato di svariati sensori posti in po- sizioni chiave del circuito frigorifero per rilevare elettronicamente lo stato operativo del sistema. Due microregolatori ricevono infatti gli in- •... - Page 4 IT IT IT IT 1. DESCRIZIONE DEI COMPONENTI 1. PRESENTAZIONE DEL PRODOTTO Modello EH1018DC Ingresso aria dalla parte sinistra e posteriore PCB MAIN Valvola Sfiato Aria Morsettiera SMART - MT alimentazione elettrica PCB Terminal block Coperchio quadro Morsettiera elettrico alimentazione elettrica Valvola di sicurezza Compressore Uscita...
- Page 5 IT IT 1. DESCRIZIONE DEI COMPONENTI 1. PRESENTAZIONE DEL PRODOTTO 1.6 Dimensioni dell'unità Modello EH0618DC Modello EH0618DC 15.3 Attacco di ritorno 3/4” Attacco mandata 3/4” 122.5 122.5 Modello EH1018DC Modello EH1018DC Attacco mandata 1” Attacco di ritorno 1” Modello EH1618DC Attacco di mandata 1”...
- Page 6 Attacco mandata 1” IT IT 1. DESCRIZIONE DEI COMPONENTI 1. PRESENTAZIONE DEL PRODOTTO Dimensioni dell'unità Attacco di ritorno 1” Modelli EH1218DC EH1618DC Modello EH1618DC EH1718D3 Attacco di mandata 1” 1/4 1000 Attacco di ritorno 1” 1/4 1.7 Conformità alle direttive europee Direttiva Bassa tensione (LVD): 2014/35/UE Direttiva RoHS: 2011/65/UE Direttiva Compatibilità...
-
Page 7: Dati Tecnici
IT IT 1. DESCRIZIONE DEI COMPONENTI 2. DATI TECNICI Dati tecnici Modelli Rif. u.m. EH0618DC EH1018DC EH1218DC EH1618DC EH1718D3 APPLICAZIONE CON UNITÀ TERMINALI AD ARIA Potenza termica nom (min - max) 5,90 (0,65 - 6,35) 9,60 (1,90 - 10,10) 11,50 (1,40 - 11,50) 15,80 (3,10 - 16,80) 17,10 (6,77 - 17,10) Potenza assorbita nom (min - max) A7 W45 1,76 (0,31 - 1,95) - Page 8 IT IT 1. DESCRIZIONE DEI COMPONENTI 2. DATI TECNICI 2.1 Portata, prevalenza utile e potenza assorbita del circolatore Il circolatore ha 3 livelli di velocità. Il valore predefinito di fabbrica è DISPLAY livello 3. Per modificare l'impostazione selezionare i dip switch 1 e 2 ON 1 2 3 4 del DIP SW3 che si trova sulla PCB .
-
Page 9: Campo Di Funzionamento
IT IT 1. DESCRIZIONE DEI COMPONENTI 2. DATI TECNICI 2.2 Campo di funzionamento RISCALDAMENTO RISCALDAMENTO –25 –20 –15 –10 –5 Temperatura aria esterna (°C) –25 –20 –15 –10 –5 Temperatura aria esterna (°C) Ritorno temperatura acqua in RISCALDAMENTO: Max=55 °C - Min=18 °C Ritorno temperatura acqua in RISCALDAMENTO: Max=55 °C - Min=18 °C RAFFREDDAMENTO [°C]... -
Page 10: Movimentazione E Trasporto
IT IT 1. DESCRIZIONE DEI COMPONENTI 3. MOVIMENTAZIONE E TRASPORTO 3.1 Identificazione dell'imballo Etichetta imballo (es. riferita al modello EH 1618 DC Made in Japan 230V~50Hz i r f Made in Japan Identification code 0724811000001 230V~50Hz i r f Serial number Identification code 0724811000001 0000EH0618DC0000... - Page 11 Via Brigata Osoppo, 166 - Fontanafredda (Pn) - Italy Pompa di calore Aria /Acqua Air To Water Heat Pump Brand EMMETI EH 1618 DC Modello / Model IT IT 1. DESCRIZIONE DEI COMPONENTI 3. MOVIMENTAZIONE E TRASPORTO Alimentazione elettrica 230V...
- Page 12 IT IT 1. DESCRIZIONE DEI COMPONENTI 4. AVVERTENZE 4.1 Estratto della scheda di sicurezza refrigerante R 32 Gas refrigerante Tipo R 32 Denominazione Difluorometano 3.0 H220: Gas altamente infiammabile. Indicazioni dei pericoli H280: Contiene gas sotto pressione; può esplodere se riscaldato. DESCRIZIONE DELLE MISURE DI PRIMO SOCCORSO In alta concentrazione può...
- Page 13 IT IT 1. DESCRIZIONE DEI COMPONENTI 4. AVVERTENZE PROPRIETÀ FISICHE E CHIMICHE Informazioni sulle proprietà fisiche e chimiche fondamentali Forma Forma Gas liquefatto Colore Incolore Odore Odore di etere Punto di ebollizione -51,6 °C (101,325 kPa) Densità relativa 1,1 (Materiale di riferimento: Acqua) Solubilità...
-
Page 14: Significato Dei Simboli
IT IT 4. AVVERTENZE 4.2 Attenzioni e pericoli SIGNIFICATO DEI SIMBOLI ATTENZIONE Indica una condizione di pericolo, prestare la massima attenzione Prima di installare ed utilizzare la pompa di calore leggere attentamente il Indica che l'azione deve essere evitata presente manuale. Il produttore declina ogni responsabilità per eventuali danni derivanti dalla non osservanza delle seguenti avvertenze. - Page 15 UE 517/2014 del Parlamento europeo e del Consiglio, - La lista dei centri assistenza è disponibile nel sito web. i requisiti minimi delle imprese e del personale per quanto www.emmeti.com. rigorosa concerne le apparecchiature fisse di refrigerazione, La corretta installazione della pompa di calore ne garantisce l’efficiente condizionamento d’aria e pompe di calore contenenti taluni gas...
-
Page 16: Installazione
IT IT 1. DESCRIZIONE DEI COMPONENTI 5. INSTALLAZIONE 5.1 Spazi minimi operativi per la manutenzione Per tutti i modelli. Assicurare il rispetto degli spazi minimi operativi per la manutenzione. 5.2 Fissaggio dell'unità 5.3 Tubazioni di scarico condensa Fissare l'unità in maniera sicura con i bulloni (Ø 10 mm) •... -
Page 17: Impianto Idraulico
IT IT 1. DESCRIZIONE DEI COMPONENTI 5. INSTALLAZIONE 5.4 Impianto idraulico Collegamenti idraulici I collegamenti idraulici devono essere eseguiti da personale qualificato e nel rispetto delle normative vigenti nel luogo di installazione dell'unità. Esempio di schema per impianti con sistema di riscaldamento a pavimento e raffredamento con ventilconvettori. - Page 18 IT IT 1. DESCRIZIONE DEI COMPONENTI 5. INSTALLAZIONE AVVERTENZE Per un corretto funzionamento e protezione della pompa di calore si • Non venga tolta l’alimentazione elettrica nel periodo invernale dovrà assicurare che: quando c’è il rischio di formazione di ghiaccio. •...
- Page 19 IT IT 1. DESCRIZIONE DEI COMPONENTI 5. INSTALLAZIONE Procedura di carico dell'acqua e spurgo dell'aria nel circuito idraulico Prima di proseguire col caricamento dell'acqua verificare che: • La pressione di precarica dell’acqua sia circa 1,5 bar. • Siano presenti fornire aperture di spurgo dell'aria in tutti i punti elevati dell’impianto.
-
Page 20: Impianto Elettrico
IT IT 5. INSTALLAZIONE 5.5 Impianto elettrico Prima di effettuare qualsiasi intervento sulle unità accertarsi che sia stata Togliendo il coperchio del quadro elettrico si ha accesso alla morsettiera tolta l'alimentazione elettrica generale. Non toccare mai i componenti di alimentazione elettrica della pompa di calore ed alla PCB-TERMINAL elettrici subito dopo aver tolto l'alimentazione elettrica, attendere sempre BLOCK. - Page 21 IT IT 1. DESCRIZIONE DEI COMPONENTI 5. INSTALLAZIONE Collegamento dei cavi alla morsettiera AVVERTENZE ATTENZIONE Durante il collegamento del cavo di alimentazione assicurarsi che Per le unità monofase (EH0618DC, EH1018DC, EH1218DC, EH1618DC) siano rispettate le polarità. la tensione nominale è di 230V ~ 50 Hz. •...
- Page 22 IT IT 5. INSTALLAZIONE 5.6 Specifiche di connessione Ricetta 1(C400=1) Configurazione di fabbrica CONNESSIONI ELETTRICHE ALLA PCB TERMINAL BLOCK ETIKA EVO R1 out T1 out Consenso riscaldatore addizionale T2 out L1 out Sensore Acqua Calda Sanitaria ACS L2 out Pompa di rilancio Consenso da Termostato Consenso...
- Page 23 IT IT 5. INSTALLAZIONE RICETTA 1 (C400=1) - Configurazione di fabbrica PARAMETRI CONFIGURABILI Valore di Parametro Descrizione default Stato operativo nella condizione di Off: C402 0= Tutte le funzioni/uscite sono in Off ad eccezione della protezione antigelo 1= Rimane attiva la sola produzione ACS e la protezione antigelo C403 Non utilizzato Attivazione del circolatore di rilancio Pump2:...
- Page 24 IT IT 1. DESCRIZIONE DEI COMPONENTI 5. INSTALLAZIONE 5.7 Specifiche di connessione Ricetta 2(C400=2) Configurazione per la connessione all'ECO HYDRO KIT CONNESSIONI ELETTRICHE ALLA PCB TERMINAL BLOCK Consenso riscaldatore elettrico di integrazione ACS R1 out ETIKA EVO T1 out T2 out Consenso riscaldatore L1 out addizionale...
- Page 25 IT IT 5. INSTALLAZIONE RICETTA 2 (C400=2) PARAMETRI CONFIGURABILI Valore di Parametro Descrizione default Stato operativo nella condizione di Off: C402 0= Tutte le funzioni/uscite sono in Off ad eccezione della protezione antigelo 1= Rimane attiva la sola produzione ACS e la protezione antigelo C403 Non utilizzato Attivazione del circolatore di rilancio Pump2:...
- Page 26 IT IT 5. INSTALLAZIONE 5.8 Specifiche di connessione Ricetta 3(C400=3) Configurazione per la connessione ai Recupera URC CONNESSIONI ELETTRICHE ALLA PCB TERMINAL BLOCK MORSETTIERA RECUPERA URC R1 out T1 out T2 out L1 out L2 out M1 out M2 out Segnalazione PdC in allarme P2 out On / Off...
- Page 27 IT IT 5. INSTALLAZIONE RICETTA 3 (C400=3) PARAMETRI CONFIGURABILI Valore di Parametro Descrizione default C402 Non utilizzato C403 Non utilizzato C404 Non utilizzato C405 Non utilizzato C406 Non utilizzato C407 Non utilizzato C408 Non utilizzato C409 Non utilizzato C410 Non utilizzato SPECIFICHE DI CONNESSIONE ALLA PCB TERMINAL BLOCK Parame- Valore...
- Page 28 IT IT 5. INSTALLAZIONE 5.9 Specifiche di connessione Ricetta 10 (C400=10) Configurazione disponibilie solo su Febos-Crono Master CONNESSIONI ELETTRICHE ALLA PCB TERMINAL BLOCK ETIKA EVO Consenso riscaldatore addizionale R1 out Fase L in Estate T1 out T2 out Fase L in Inverno L1 out Sensore ACS L2 out...
- Page 29 IT IT 5. INSTALLAZIONE RICETTA 10 (C400=10 configurabile solo da Febos-Crono Master) PARAMETRI CONFIGURABILI Valore di Parametro Descrizione default Stato operativo nella condizione di Off: C402 0= Tutte le funzioni/uscite sono in Off ad eccezione della protezione antigelo 1= Rimane attiva la sola produzione ACS e la protezione antigelo Potenza di riferimento per la limitazione del compressore: C403 0= Potenza prelevata dalla rete...
- Page 30 IT IT 5. INSTALLAZIONE 5.10 Specifiche di connessione Ricetta 13 (C400=13) - Dalla versione SW 4.11 Configurazione per la connessione all'ECO HYDRO KIT (disponible solo su Febos-Crono Master) CONNESSIONI ELETTRICHE ALLA PCB TERMINAL BLOCK Consenso riscaldatore elettrico di integrazione R1 out T1 out Consenso T2 out...
- Page 31 IT IT 5. INSTALLAZIONE RICETTA 13 (C400=13 configurabile solo da Febos-Crono Master) PARAMETRI CONFIGURABILI Valore di Parametro Descrizione default Stato operativo nella condizione di Off: C402 0= Tutte le funzioni/uscite sono in Off ad eccezione della protezione antigelo 1= Rimane attiva la sola produzione ACS e la protezione antigelo Potenza di riferimento per la limitazione del compressore: C403 0= Potenza prelevata dalla rete...
- Page 32 IT IT 6. TIPOLOGIE DI INSTALLAZIONE 6.1 SCHEMA 1 COLLEGAMENTO IDRAULICO Sistema radiante + Fancoil + Eco Hot Water Ricetta 1: C400=1 Par 407=0 Legenda 1 Eco Hot Water 2 Consenso termostato ambiente 3 Mirai Smi 4 Interruttore Estate / Inverno 5 Consenso Fan Coil 6 Relè...
- Page 33 IT IT 1. DESCRIZIONE DEI COMPONENTI 6. TIPOLOGIE DI INSTALLAZIONE SCHEMA 1 COLLEGAMENTO ELETTRICO Sistema radiante + Fancoil + Eco Hot Water Ricetta 1: C400=1 Par. 407=0...
- Page 34 IT IT 1. DESCRIZIONE DEI COMPONENTI 6. TIPOLOGIE DI INSTALLAZIONE 6.2 SCHEMA 2 COLLEGAMENTO IDRAULICO Sistema radiante + Fancoil + Bollitore x ACS (Euro HPV) Ricetta 1: C400=1 Par C407=1 Legenda 1 Bollitore per ACS (Euro HPV) 2 Consenso termostato ambiente 3 Interruttore On / Off ATTENZIONE: 4 Interruttore Limitazione di Frequenza...
- Page 35 IT IT 6. TIPOLOGIE DI INSTALLAZIONE SCHEMA 2 COLLEGAMENTO ELETTRICO Sistema radiante + Fancoil + Bollitore x ACS (Euro HPV) Ricetta 1: C400=1 Par C407=1 Consenso da µ Sensore Termostato Ambiente Acqua Calda Sanitaria ACS MORSETTIERA ELETTRICA POMPA DI CALORE "TERMINAL BLOCK"...
- Page 36 IT IT 6. TIPOLOGIE DI INSTALLAZIONE 6.3 SCHEMA 3 COLLEGAMENTO IDRAULICO Sistema radiante+ Fancoil + ECO HYDRO KIT + Caldaia in Integrazione Ricetta 2: C400=2 C903=-20.0 C906=1.00 Legenda 1 MIRA��SMI 2 ECO HYDRO KIT ATTENZIONE: 3 Consenso termostato ambiente L'impianto deve essere realizzato in confor- 4 Interruttore Limitazione di Frequenza mità...
- Page 37 IT IT 6. TIPOLOGIE DI INSTALLAZIONE SCHEMA 3 COLLEGAMENTO ELETTRICO Sistema radiante+ Fancoil + ECO HYDRO KIT + Caldaia in Integrazione MORSETTIERA ITM-200 Ricetta 2: C400=2 C903=-20.0 Brown C906=1.00 Sonda ACS Brown Brown Black Blue White Contatore d’acqua (*) Blue Blue Brown Consenso da...
- Page 38 IT IT 6. TIPOLOGIE DI INSTALLAZIONE 6.4 SCHEMA 4 COLLEGAMENTO IDRAULICO Sistema radiante + FANCOIL + ECO HYDRO KIT + Caldaia in Integrazione + FEBOS-CRONO + DEUMIDIFICATORE Ricetta 10: Par. C407=1, C903=-20.0, C906=1.00 Legenda 1 MIRA��SMI 2 ECO HYDRO KIT 3 FEBOS-CRONO 4 FEBOS-ENERGY 5 Contatore energia elettrica MIRAI-SMI...
- Page 39 IT IT 6. TIPOLOGIE DI INSTALLAZIONE SCHEMA 4 COLLEGAMENTO ELETTRICO Sistema radiante + Fancoil + ECO HYDRO KIT + Caldaia in Integrazione + FEBOS-CRONO + DEUMIDIFICATORE MORSETTIERA ITM-200 Ricetta 10: Brown Sonda ACS Par. C407=1, Brown C903=-20.0, Brown C906=1.00 Black Blue White Contatore d’acqua (*)
- Page 40 IT IT 1. DESCRIZIONE DEI COMPONENTI 7. TERMOREGOLATORE "SMART MT" SMART-MT è il regolatore per la gestione integrata della pompa di calore e dell’impianto termico. Di seguito sono riportate le principali funzionalità dello stesso e le modalità di accesso ai singoli parametri. Essi permettono la personalizzazione del funzionamento con diverse tipologie impiantistiche e/o di utilizzo dell’impianto.
- Page 41 IT IT 7. TERMOREGOLATORE "SMART MT" Funzione dei tastri nella schermata principale dello Smart-MT Pressione breve Per uscire dal menù Per scorrere la lettura di: Orologio, Temp. uscita acqua o Step compressore Per entrare nel menù Free Per entrare nel menù Par Per entrare nel menù...
- Page 42 IT IT 1. DESCRIZIONE DEI COMPONENTI 7. TERMOREGOLATORE "SMART MT" 7.2 Liste parametri - Menù "Set" Accesso e modifica dei parametri del menù Set: C901 Premere il tasto set per accedere al parametro visualizzato su o giù Premere i tasti su o giù...
- Page 43 IT IT 1. DESCRIZIONE DEI COMPONENTI 7. TERMOREGOLATORE "SMART MT" Impostazione dell’orario dello SMART-MT Per garantire il corretto funzionamento della MIRAI-SMI-F, nella gestione delle varie programmazioni orarie, è fondamentale impostare correttamente la data e l’ora dello SMART-MT. Impostare l’orario come di seguito descritto: Sulla schermata principale premere assieme i tasti giù...
- Page 44 IT IT 1. DESCRIZIONE DEI COMPONENTI 7. TERMOREGOLATORE "SMART MT" LISTA PARAMETRI SEZIONE SERVICE Versione software 4.11 Range Register Menù Descrizione U. m. Default label (Base 0) L101 NON DISPONIBILE Lettura L102 NON DISPONIBILE Lettura L103 NON DISPONIBILE Lettura L104 NON DISPONIBILE Lettura L105...
- Page 45 IT IT 1. DESCRIZIONE DEI COMPONENTI 7. TERMOREGOLATORE "SMART MT" LISTA PARAMETRI SEZIONE SERVICE Versione software 4.11 Range Register Menù Descrizione U. m. Default label (Base 0) L164 Temperatura acqua calda sanitaria °C Lettura 8989 C164 Offset temperatura acqua calda sanitaria °C -5.0 16395...
- Page 46 IT IT 7. TERMOREGOLATORE "SMART MT" LISTA PARAMETRI SEZIONE SERVICE Versione software 4.11 Range Menù Register Descrizione U. m. Default label (Base 0) Stato operativo della Pompa di Calore – Attivazione funzioni/uscite Funzione di Protezione antigelo di 1°livello (il circolatore si attiva per 30 sec L241 Lettura 9078...
- Page 47 IT IT 1. DESCRIZIONE DEI COMPONENTI 7. TERMOREGOLATORE "SMART MT" LISTA PARAMETRI SEZIONE SERVICE Versione software 4.11 Range Menù Register Descrizione U. m. Default label (Base 0) Attivazione curva climatica Set Point 2: C405 Off= Disattiva 16432 On= Attiva Attivazione del deumidificatore: 0= Solo in Raffreddamento + attivazione circolatore PdC (deumidifica- tore idraulicamente connesso alla PdC)
- Page 48 IT IT 7. TERMOREGOLATORE "SMART MT" LISTA PARAMETRI SEZIONE SERVICE Versione software 4.11 Range Register Menù Descrizione U. m. Default label (Base 0) Impostazioni della temperatura dell’acqua per la regolazione della frequenza del compressore "Impostazione Set P1 in Riscaldamento, temperatura del massetto di S501 °C 14.0...
- Page 49 IT IT 1. DESCRIZIONE DEI COMPONENTI 7. TERMOREGOLATORE "SMART MT" LISTA PARAMETRI SEZIONE SERVICE Versione software 4.11 Range Menù Register Descrizione U. m. Default label (Base 0) C533 Impostazione curva climatica estiva, massima correzione °C 15.0 16471 Impostazione temperatura massima dell’acqua calda all’impianto C541 °C 20.0...
- Page 50 IT IT 7. TERMOREGOLATORE "SMART MT" LISTA PARAMETRI SEZIONE SERVICE Versione software 4.11 Range Register Menù Descrizione U. m. Default label (Base 0) Impostazioni della produzione di acqua calda sanitaria ACS H701 Impostazione orario della prima richiesta ACS h:min H702 7:00 16493 S701...
- Page 51 IT IT 1. DESCRIZIONE DEI COMPONENTI 7. TERMOREGOLATORE "SMART MT" LISTA PARAMETRI SEZIONE SERVICE Versione software 4.11 Range Register Menù Descrizione U. m. Default label (Base 0) Storico degli allarmi CAL0 Selezione della posizione cronologica nello storico degli allarmi. 9110 LAL0 Codice dell’allarme Lettura...
- Page 52 IT IT 8. SEZIONE UTENTE: FUNZIONAMENTO Segnalazione PdC in allarme R1 out T1 out 8.1 ON/OFF della Pompa di Calore 8.2 Modalità di funzionamento (Riscaldamento / T2 out Raffrescamento) Ricette Febos-Crono L1 out Istruzioni sul manuale del Febos-Crono Master Ricette Febos-Crono L2 out Ricette 1 e 3 Istruzioni sul manuale del Febos-Crono...
- Page 53 IT IT 8. SEZIONE UTENTE: FUNZIONAMENTO 8.4 Impostazione temperatura di Set dell’acqua e 8.5 Consenso e impostazione Set Point 2 Curve climatiche. Ricette 1, 2, 10 e 13 L’ingresso 105 (H+ / H-) della PCB TERMINAL BLOCK è configurato come Ricette Febos-Crono Consenso Set Point 2 Istruzioni sul manuale del Febos-Crono...
- Page 54 IT IT 8. SEZIONE UTENTE: FUNZIONAMENTO 8.7 Modulazione del compressore della PdC 8.9 Riscaldamento dell’Acqua Calda Sanitaria (ACS) Ricette Febos-Crono Istruzioni sul manuale del Febos-Crono Ricette 1,2, 10 e 13 Ricette 1 e 2 L’ingresso 100 (C+ / C-) della PCB TERMINAL BLOCK è configurato per con- nettervi un sensore di temperatura 10 kΩ...
- Page 55 IT IT 1. DESCRIZIONE DEI COMPONENTI 8. SEZIONE UTENTE: FUNZIONAMENTO 8.9.1 Riscaldamento ACS con l’Eco Hot Water (C407=0) 8.9.3 Riscaldamento ACS con l’Eco Hot Water + integrazione con la PdC (C407=2) Ricette 1 e 10 Ricetta 10 ELECTRONIC ANODE Se si vuole utilizzare l’Eco Hot Water per riscaldare l’ACS configurare il PROTEZIONE ANODO ELETTRONICO Nel caso in cui si utilizzi un Eco Hot Water dotato di scambiatore integra- parametro C407=0.
- Page 56 IT IT 1. DESCRIZIONE DEI COMPONENTI 8. SEZIONE UTENTE: FUNZIONAMENTO 8.11 Riscaldatore addizionale 8.10 Circolatore di rilancio La PdC è in grado di gestire il consenso ad un riscaldatore addizionale che Ricetta 1 possa intervenire a supporto della stessa. L’uscita in tensione P1 della PCB TERMINAL BLOCK è predisposta per alimen- Lo stato del consenso al riscaldatore addizionale è...
- Page 57 IT IT 8. SEZIONE UTENTE: FUNZIONAMENTO 8.11.1 Funzionamento parallelo Nel dettaglio: La pompa di calore non viene disattivata al raggiungimento della tempe- - Attivazione caldaia: ratura bivalente e viene attivato il generatore di integrazione che fornisce Quando la temperatura esterna scende sotto la temperatura di Bivalenza la quota residua di potenza termica.
-
Page 58: Protezione Antigelo
IT IT 8. SEZIONE UTENTE: FUNZIONAMENTO 8.12 Protezione antigelo 8.13 Sensore temperatura aria esterna Tutte le ricette Tutte le ricette Di fabbrica è attiva la protezione antigelo interna alla PdC, come illu- Per una corretta regolazione della temperatura dell’acqua in uscita dalla strato nel cap. - Page 59 IT IT 1. DESCRIZIONE DEI COMPONENTI 8. SEZIONE UTENTE: FUNZIONAMENTO 8.15 Potenze elettriche 8.16 Deumidificatore Ricette 10 e 13 Ricetta 10 e 13 Le istruzioni riguardanti la configurazione e la gestione delle potenze L’uscita in tensione 205 (U1) della PCB TERMINAL BLOCK è configurata elettriche viene demandata ai manuali del Febos-Crono e del Febos- per alimentare (fase L) il consenso ad un deumidificatore.
- Page 60 IT IT IT IT 1. DESCRIZIONE DEI COMPONENTI 8. SEZIONE UTENTE: FUNZIONAMENTO 8.17 Allarmi attivi 8.19 Ingresso Allarme alta temperatura impianto radiante In caso di allarme compare l'icona sullo SMART-MT. Accedere al menù AL per visualizzare gli allarmi attivi. Ricette 13 Ricette 1 e 3 L'ingresso 103 (F+ / F-) della PCB TERINAL BLOCK è...
-
Page 61: Risoluzione Dei Problemi
IT IT IT IT 1. DESCRIZIONE DEI COMPONENTI 9. CODICI DI ALLARME SU SMART-MT 9.1 Risoluzione dei problemi Se l'apparecchio funziona in modo errato a causa di un temporale o interferenze radio, togliere l'alimentazione elettrica ATTENZIONE agendo sull'interruttore. Attendere circa 3 minuti, quindi accendere l'interruttore. Attenzione - Prima di richiedere assistenza, eseguire i seguenti controlli: PROBLEMI CONDIZIONE O PUNTI DI CONTROLLO... -
Page 62: Terminal Block
IT IT 9. CODICI DI ALLARME SU SMART-MT 9.2 Codici di allarme su SMART-MT In caso di allarme compare l'icona sullo SMART-MT Premere il tasto per accedere alla lista dei menù, quindi selezionare AL per accedere alla lista degli allarmi attivi. Codice Descrizione Soluzione... - Page 63 IT IT 1. DESCRIZIONE DEI COMPONENTI 10. CODICI DI ALLARME SU PCB DISPLAY PCB DISPLAY 10.1 Codici di allarme sul PCB Display Codice Errore Descrizione Unità Parte interessata Metodo di verifica Risoluzione del problema Controllare l'alimenta- Assicurarsi che l'alimentazione Alimentazione elettrica zione.
- Page 64 IT IT 1. DESCRIZIONE DEI COMPONENTI 10. CODICI DI ALLARME SU PCB DISPLAY Codice Errore Descrizione Unità Parte interessata Metodo di verifica Risoluzione del problema SENSORE TEMP. DI Controllare la resistenza SENSORE TEMP. DI SCARICO SCARICO con un tester [tabelle]. deve essere sostituito.
- Page 65 IT IT 1. DESCRIZIONE DEI COMPONENTI 10. CODICI DI ALLARME SU PCB DISPLAY Codice Errore Descrizione Unità Parte interessata Metodo di verifica Risoluzione del problema Correggere la posizione di installazione per evitare l'ostru- zione dell'aspirazione e uscita Controllare il luogo di dell'aria.
- Page 66 IT IT 1. DESCRIZIONE DEI COMPONENTI 10. CODICI DI ALLARME SU PCB DISPLAY Codice Errore Descrizione Unità Parte interessata Metodo di verifica Risoluzione del problema Controllare la con- Se il fusibile CF7 (CF6 per EH1218DC FUSIBILE CF7 tinuità elettrica del EH1718D3) è...
- Page 67 IT IT 1. DESCRIZIONE DEI COMPONENTI 10. CODICI DI ALLARME SU PCB DISPLAY Codice Errore Descrizione Unità Parte interessata Metodo di verifica Risoluzione del problema Controllare la connessione dei Connessioni errate Controllare le connes- cablaggi e il contatto errato, (PCB TERMINAL BLOCK sioni.
- Page 68 IT IT 1. DESCRIZIONE DEI COMPONENTI 10. CODICI DI ALLARME SU PCB DISPLAY Codice Errore Descrizione Unità Parte interessata Metodo di verifica Risoluzione del problema Fusibile CF2 EH0618DC :250V EH0618DC T3.15A Controllare la continui- EH1018DC Se il fusibile CF2 è EH1018DC : 250V tà...
-
Page 69: Assistenza E Manutenzione
IT IT 1. DESCRIZIONE DEI COMPONENTI 11. ASSISTENZA E MANUTENZIONE Metodo di controllo Tensione, Resistenza, Continuità Continuità dei Fusibili di corrente nelle schede Fig. 1 PCB MAN Continuità dei fusibili di corrente Controllare i seguenti passaggi sulla PCB MAIN: nelle schede PCB MAIN EH0618DC: Fusibile CF1-CF6 (250V T 15A) EH1018DC: Fusibile CF1-CF6 (250V T 25A) Fusibile CF3-CF4 (250V T 3A) - Page 70 IT IT 1. DESCRIZIONE DEI COMPONENTI 11. ASSISTENZA E MANUTENZIONE Tensione del MOTORE VENTILATORE Continuità dei fusibili di corrente Fig. 1 sulla PCB MAIN nelle schede PCB MAIN Fig. 2 Modelli EH0618DC Fusibile CF2 EH1018DC (250V T3,15A) Modelli EH0618DC MOTORE VENTILATORE EH1018DC PCB MAIN BL Y W B...
- Page 71 IT IT 1. DESCRIZIONE DEI COMPONENTI 11. ASSISTENZA E MANUTENZIONE Tensione del motore del ventilatore Fig. 2 Tensione della POMPA sulla PCB MAIN Fig. 3 sul PCB (Main) Modelli EH0618DC Modelli - EH1218DC EH1018DC EH1618DC MOTORE VENTILATORE INFERIORE Misurare la tensione tra i pin Fusibile InferioreCF6 del connettore .
- Page 72 PCB MAIN IT IT 1. DESCRIZIONE DEI COMPONENTI 11. ASSISTENZA E MANUTENZIONE Bobina della valvola 4 vie Bobina della valvola 4 vie Resistenza della bobina della VALVOLA A 4 VIE - Fig. 4 Resistenza del RISCALDATORE SBRINAMENTO - Fig. 5 Modelli EH1018DC Modelli EH0618DC EH1018DC...
- Page 73 IT IT 1. DESCRIZIONE DEI COMPONENTI 11. ASSISTENZA E MANUTENZIONE Caratteristiche elettriche dei sensori di temperatura Visualizzazione storico degli errori sul PCB DISPLAY Metodo di visualizzazione [tabella 1] Sensore temp. esterna: Premere e tenere premuti PUMP SW. e RESET SW. contemporaneamente Mod.
- Page 74 IT IT IT IT 1. DESCRIZIONE DEI COMPONENTI 12. PULIZIA 12.1 Pulizia della pompa di calore Non utilizzare i seguenti prodotti per la pulizia. ATTENZIONE DIVIETO • Prima di eseguire qualsiasi intervento di manutenzione assicurarsi di aver tolto l'alimentazione elettrica agendo sull'apposito interruttore. •...
-
Page 75: Schemi Elettrici
IT IT IT IT 1. DESCRIZIONE DEI COMPONENTI 1. DESCRIZIONE DEI COMPONENTI 14. SCHEMI ELETTRICI Mod. EH0618DC... - Page 76 IT IT 14. SCHEMI ELETTRICI Mod. EH1018DC...
- Page 77 IT IT 14. SCHEMI ELETTRICI 1. DESCRIZIONE DEI COMPONENTI Mod. EH1218DC...
- Page 78 IT IT 1. DESCRIZIONE DEI COMPONENTI 14. SCHEMI ELETTRICI Mod. EH1618DC...
- Page 79 IT IT 14. SCHEMI ELETTRICI Mod. EH1718D3...
- Page 80 IT IT 14. SCHEMI ELETTRICI Legenda GB Legenda IT TERMINAL BLOCK Morsettiera BL = BLU Colore blu B = BLACK Colore nero BR = BROWN Colore marrone R = RED Colore rosso GR = GRAY Colore grigio W = WHITE Colore bianco OR = ORANGE Colore arancione...
- Page 81 Dichiara inoltre di aver preso visione della Informativa sui dati personali disponibile anche sul sito internet di Emmeti S.p.A. EMMETI spa - Via brigata Osoppo, 166 - 33074 Vigonovo frazione di Fontanafredda (PN) - Italia - Tel.0434567911 - Fax 0434567901 - www.emmeti.com...
- Page 82 INDEX 7. THERMAL ADJUSTMENT SMART MT .. 120 1. Product introduction ....83 7.1 Display and Keys 1.1 Features 7.2 Parameters list - "Set" menu 1.2 Advanced Technology 1.3 Easy installation and service 8. USER SECTION: OPERATION ..132 1.4 Accessories 8.1 Heat Pump ON/OFF 1.5 Principal components 8.2 Operating mode (Heating / Cooling)
-
Page 83: Product Introduction
1. DESCRIZIONE DEI COMPONENTI 1. PRODUCT INTRODUCTION 1.1 Features in key positions of the refrigeration circuit for electronically detect the operational state of the system. Two microregulators fact receive in- puts from those sensors and manage them using particularly advanced •... - Page 84 1. DESCRIZIONE DEI COMPONENTI 1. PRODUCT INTRODUCTION Model EH1018DC Ingresso aria dalla parte sinistra Air intake on the left side and back e posteriore PCB MAIN PCB MAIN Valvola Sfiato Aria Air Valve Terminal block Morsettiera SMART - MT SMART - MT power supply alimentazione elettrica PCB Terminal block...
- Page 85 1. DESCRIZIONE DEI COMPONENTI 1. PRODUCT INTRODUCTION 1.6 Unit dimensions Model EH0618DC Modello EH0618DC 15.3 Attacco di ritorno 3/4” Return connection 3/4” Delivery connection 3/4” Attacco mandata 3/4” 122.5 122.5 Model EH1018DC Modello EH1018DC Delivery connection 1” Attacco mandata 1” Attacco di ritorno 1”...
-
Page 86: Unit Dimensions
1. DESCRIZIONE DEI COMPONENTI 1. PRODUCT INTRODUCTION Unit dimensions Attacco di ritorno 1” Models EH1218DC EH1618DC Modello EH1618DC EH1718D3 Attacco di mandata 1” 1/4 Delivery connection 1” 1/4 1000 Attacco Return connection 1” 1/4 di ritorno 1” 1/4 1.7 Conformity to European Directives Directive ROhs: 2011/65/EU Directive low voltage (LVD): 2014/35/EU Directive WEEE: 2012/19/EU... -
Page 87: Technical Specifications
1. DESCRIZIONE DEI COMPONENTI 2. TECHNICAL SPECIFICATIONS Technical data Models Rif. u.m. EH0618DC EH1018DC EH1218DC EH1618DC EH1718D3 APPLICATION WITH TERMINAL AIR UNITS Heating capacity nom (min - max) 5,90 (0,65 - 6,35) 9,60 (1,90 - 10,10) 11,50 (1,40 - 11,50) 15,80 (3,10 - 16,80) 17,10 (6,77 - 17,10) Power input nom (min - max) A7 W45 1,76 (0,31 - 1,95) - Page 88 1. DESCRIZIONE DEI COMPONENTI 2. TECHNICAL SPECIFICATIONS 2.1 Flow rate, useful prevalence and absorbed power of the circulator The circulator has 3 speed levels. The factory default is level 3. DISPLAY DISPLAY To change the setting select dip switches 1 and 2 of DIP SW3 on the PCB. DIP switches 1 and 2 on DIP SW3 located on the PCB .
-
Page 89: Operating Range
1. DESCRIZIONE DEI COMPONENTI 2. TECHNICAL SPECIFICATIONS 2.2 Operating range RISCALDAMENTO HEATING RISCALDAMENTO –25 –20 –15 –10 –5 Temperatura aria esterna (°C) –25 –20 –15 –10 –5 Outdoor air temperature (°C) Temperatura aria esterna (°C) Ritorno temperatura acqua in RISCALDAMENTO: Max=55 °C - Min=18 °C Ritorno temperatura acqua in RISCALDAMENTO: Max=55 °C - Min=18 °C COOLING RAFFREDDAMENTO... - Page 90 1. DESCRIZIONE DEI COMPONENTI 3. MOVEMENT AND TRANSPORT 3.1 Packing Packing label (es. EH1618DC) Made in Japan 230V~50Hz i r f Made in Japan Identification code 0724811000001 230V~50Hz i r f Serial number Identification code 0724811000001 0000EH0618DC0000 Serial number 0000EH0618DC0000 KEY TO SYMBOLS ON PACKAGING: Keep in an upright position Do not use straps or harnesses for move-...
- Page 91 1370 Via Brigata Osoppo, 166 - Fontanafredda (Pn) - Italy Pompa di calore Aria /Acqua Air To Water Heat Pump Brand EMMETI 1. DESCRIZIONE DEI COMPONENTI 3. MOVEMENT AND TRANSPORT EH 1618 DC Modello / Model Alimentazione elettrica 230V 50Hz...
-
Page 92: Refrigerant Gas
1. DESCRIZIONE DEI COMPONENTI 4. WARNINGS 4.1 Extract from refrigerant gas R 32 safety data sheet Refrigerant gas R 32 Type Product Name Difluorometano 3.0 H220: Highly flammable gas. Physical hazards H280: It contains gas under pressure; it may explode when heated. FIRST AID MEASURES: In high concentrations, it may cause asphyxiation. - Page 93 1. DESCRIZIONE DEI COMPONENTI 4. WARNINGS PHYSICAL AND CHEMICAL PROPERTIES Information on main physical and chemical properties Form Form Liquefed Gas Colour Colourless Odour Smell of ether Boiling Point -51,6 °C (101,325 kPa) Relative Density 1,1 (Reference) Solubility in water 280 g/l STABILITY AND RECTIVITY Chemical stability...
-
Page 94: Attention And Dangers
4. WARNINGS 4.2 Attention and dangers MEANING OF THE SYMBOLS CAUTION Indicates a hazardous condition, lend maximum attention Before installing or using the air conditioner please read carefully the in- Indicates that the action must be avoided structions manual. Producer decline every responsibility for any damage caused by the non-observing of the following warnings. - Page 95 517/2014 of the European Parliament and of the Council, the - The list of technical support centres is available on the following website: minimum requirements of companies and personnel for stationary www.emmeti.com. Correct installation guarantees efficient use. refrigeration, air conditioning and heat pumps containing certain Therefore, we ask you to carefully abide by the instructions in relation fluorinated greenhouse gases.
-
Page 96: Installation
1. DESCRIZIONE DEI COMPONENTI 5. INSTALLATION 5.1 Minimum operating spaces for maintenance For all models. Ensure compliance with the minimum operating spaces for maintenance. 5.2 Fixing 5.3 Condensate Drainage Pipes Fix the unit securely with the bolts (Ø 10 mm) •... -
Page 97: Hydraulic System
1. DESCRIZIONE DEI COMPONENTI 5. INSTALLATION 5.4 Hydraulic system Hydraulic connections The hydraulic connections must be carried out by qualified personnel and in compliance with the regulations in force in the place of installation of the unit. Example of scheme for systems with underfloor heating and cooling with fan coil units. -
Page 98: Anti-Freeze Protection
1. DESCRIZIONE DEI COMPONENTI 5. INSTALLATION WARNINGS For correct operation and protection of the heat pump, it must be • The electricity supply is not removed during the winter period guaranteed that: when there is the risk of ice formation. •... - Page 99 1. DESCRIZIONE DEI COMPONENTI 5. INSTALLATION Procedure for water charge and air purge in the hydraulic circuit 3) Fill the hydraulic circuit with water until the pressure gauge indicates a pressure of about 1.5 bar. Before continuing with water filling, check the following: 4) Activate the circulator (Pump 1) as follows: •...
-
Page 100: Electrical System
5. INSTALLATION 5.5 Electrical System Make sure that the general power supply has been turned off. Never touch By removing the cover of the electrical panel you have access the electrical components immediately after removing the power supply, to the heat pump terminal board and to the PCB-TERMINAL BLOCK. always wait at least 5 minutes . - Page 101 1. DESCRIZIONE DEI COMPONENTI 5. INSTALLATION How to connect the wiring to the terminal CAUTION WARNINGS For single-phase unit (EH0618DC, EH1018DC, EH1218DC, EH1618DC) When connecting the power cable make sure that the polarities are the nominal voltage is 230V ~ 50 Hz. respected.
- Page 102 5. INSTALLATION 5.6 Connection specifications Recipe 1 (C400 = 1) Factory configuration ELECTRICAL CONNECTIONS TO THE PCB TERMINAL BLOCK ETIKA EVO Consenso riscaldatore Consent to Additional addizionale heater R1 out T1 out T2 out L1 out Sensore DHW Domestic Hot Water Acqua Calda Sanitaria ACS Booster Pump Sensor...
- Page 103 5. INSTALLATION RECIPE 1 (C400=1) - Factory configuration CONFIGURABLE PARAMETERS Default Parameter Description value Operational status in Off condition: C402 0= All functions/outputs are Off except frost protection 1= Only DHW production and frost protection remains active C403 Not Used Pump2relaunch circulator activation: 0= Radiant system only C404...
- Page 104 1. Description DEI COMPONENTI 5. INSTALLATION 5.7 Connection Specifications Recipe 2 (C400=2) Configuration for connection to the ECO HYDRO KIT ELECTRICAL CONNECTIONS ON PCB-TERMINAL BLOCK Consent to DHW inte- ETIKA EVO gration electric heater Consenso riscaldatore elettrico (ECO HYDRO KIT) di integrazione ACS R1 out Additional heater...
- Page 105 5. INSTALLATION RECIPE 2 (C400=2) CONFIGURABLE PARAMETERS Default Parameter Description value Operational status in Off condition: C402 0= All functions/outputs are Off except frost protection 1= Only DHW production and frost protection remains active C403 Not Used Pump2relaunch circulator activation: 0= Radiant system only C404 1= For both the radiant system and SetPoint 2...
- Page 106 5. INSTALLATION 5.8 Connection Specifications Recipe 3(C400=3) Configuration for connection to Recupera URC ELECTRICAL CONNECTIONS ON PCB-TERMINAL BLOCK TERMINAL BLOCK RECUPERA URC R1 out T1 out T2 out L1 out L2 out M1 out M2 out Segnalazione PdC in allarme HP signal in alarm P2 out On / Off...
- Page 107 5. INSTALLATION RECIPE 3 (C400=3) CONFIGURABLE PARAMETERS Default Parameter Description value C402 Not Used C403 Not Used C404 Not Used C405 Not Used C406 Not Used C407 Not Used C407 Not Used C408 Not Used C409 Not Used C410 Not Used TERMINAL BLOCK PCB CONNECTION SPECIFICATIONS Default Electrical cha-...
- Page 108 1. DESCRIZIONE DEI COMPONENTI 1. Description DEI COMPONENTI 5. INSTALLATION 5.9 Connection specifications Recipe 10 (C400 = 10) Configuration available only on Febos-Crono Master ELECTRICAL CONNECTIONS TO THE PCB TERMINAL BLOCK ETIKA EVO Consent Consenso heater riscaldatore additional addizionale R1 out Phase L in Summer Fase L in Estate T1 out...
- Page 109 5. INSTALLATION RECIPE 10 (C400=10 configurable only by Febos-Crono Master) CONFIGURABLE PARAMETERS Default Parameter Description value Operating state in the Off condition: C402 0 = All functions / outputs are in Off with the exception of the antifreeze protection 1 = Only DHW production and antifreeze protection remain active Reference power for compressor limitation: C403 0 = Power taken from the grid...
- Page 110 5. INSTALLATION 5.10 Connection specifications Recipe 13 (C400=13). Version SW 4.11 Configuration for connection to the ECO HYDRO KIT (available only on Febos-Crono Master) ELECTRICAL CONNECTIONS TO THE PCB TERMINAL BLOCK Consent heater Consenso electric riscaldatore to supplement elettrico di integrazione R1 out T1 out Consenso...
- Page 111 5. INSTALLATION RECIPE 13 (C400=13 configurable only by Febos-Crono Master) CONFIGURABLE PARAMETERS Default Parameter Description value Operating state in the Off condition: C402 0 = All functions / outputs are in Off with the exception of the antifreeze protection 1 = Only DHW production and antifreeze protection remain active Reference power for compressor limitation: C403 0 = Power taken from the grid...
-
Page 112: Type Of Installation
6. TYPE OF INSTALLATION 6.1 DIAGRAM 1 HYDRAULIC CONNECTION Radiant system + Fancoil + Eco Hot Water Recipe 1: C400=1 Par 407=0 1 Eco Hot Water 2 Ambient thermostat consent 3 Mirai Smi 4 Summer/Winterswitch 5 Fan Coil Consent 6 Support relay 7 Heads No. - Page 113 1. DESCRIZIONE DEI COMPONENTI 6. TYPE OF INSTALLATION DIAGRAM 1 CELECTRICAL CONNECTION HYDRAULIC CONNECTION Radiant system + Fancoil + Eco Hot Water Recipe 1: C400=1 Par 407=0 Consent of Sensor µ Room thermostat Domestic hot water HEAT PUMP ELECTRICAL TERMINAL BLOCK "TERMINAL BLOCK R1 out T1 out...
- Page 114 1. DESCRIZIONE DEI COMPONENTI 6. TYPE OF INSTALLATION 6.2 SCHEME 2 HYDRAULIC CONNECTION Radiant system + Fancoil + Boiler x DHW (Euro HPV) Recipe 1: C400=1 Par C407=1 1 Boiler for DHW (Euro HPV) 2 Ambient thermostat consent 3 On/Off switch 4 Frequency Limiting Switch 5 Summer/Winter switch 6 3-way valve FC / Radiant...
- Page 115 6. TYPE OF INSTALLATION DIAGRAM 2 ELECTRICAL CONNECTION HYDRAULIC CONNECTION Radiant system + Fancoil + Boiler x DHW (Euro HPV) Recipe 1: C400=1 Par C407=1 Consent from µ Sensor Room thermostat DHW hot water HEAT PUMP ELECTRICAL TERMINAL BLOCK "TERMINAL BLOCK R1 out T1 out T2 out...
- Page 116 6. TYPE OF INSTALLATION 6.3 DIAGRAM 3 HYDRAULIC CONNECTION Radiant system + Fancoil + ECO HYDRO KIT + Boiler in integration. Recipe 2: C400 = 2 C903=-20.0 C906=1.00 Legend 1 MIRA��SMI 2 ECO HYDRO KIT 3 Room thermostat consent 4 Frequency Limitation Switch 5 Summer / Winter switch 6 3-way Radiant / Fan Coil valve 7 Support relay...
- Page 117 6. TYPE OF INSTALLATION DIAGRAM 3 ELECTRICAL CONNECTION Radiant system + Fancoil + ECO HYDRO KIT + Boiler in integration. Recipe 2: C400 = 2 TERMINAL BLOCK ITM-200 C903=-20.0 Brown C906=1.00 Probe ACS Brown Brown Black Blue White Water meter Blue Blue Brown...
- Page 118 6. TYPE OF INSTALLATION 6.4 DIAGRAM 4 HYDRAULIC CONNECTION Radiant system + Fancoil + ECO HYDRO KIT + Boiler in Integration + FEBOS-CHRONO + DEHUMIDIFIER Recipe 10: Par. C407=1, C903=-20.0, C906=1.001 Legenda 1 MIRA SMI 2 ECO HYDRO KIT 3 FEBOS-CRONO 4 FEBOS-ENERGY 5 Electricity meter MIRAI-SMI 6 3-way Radiant / Fan Coil valve...
- Page 119 6. TYPE OF INSTALLATION DIAGRAM 4 ELECTRICAL CONNECTION Radiant system + Fancoil + ECO HYDRO KIT + Boiler in Integration + FEBOS-CHRONO + DEHUMIDIFIER TERMINAL BLOCK ITM-200 Recipe 10: Par. C407=1 Brown Probe ACS C903=-20.0 Brown C906=1.001 Brown Black Blue White Water meter Blue...
-
Page 120: Display And Keys
1. DESCRIZIONE DEI COMPONENTI 7. THERMAL ADJUSTMENT "SMART MT" SMART-MT is the controller for the integrated management of the heat pump and the thermal system. Below are the main features of the same and the methods of access to the individual parameters. They allow the customisation of the operation with different types of systems and/or use of the system. - Page 121 7. THERMAL ADJUSTMENT "SMART MT" Function of the keys in the main screen of the Smart-MT Short pressing To scroll reading of the Water Outlet To exit the menu Temperature or of the Clock. To access the Prg menu To access the Free menu To scroll reading of the Water Outlet To access the Set menu Temperature or of the Clock.
- Page 122 1. DESCRIZIONE DEI COMPONENTI 7. THERMAL ADJUSTMENT "SMART MT" 7.2 Parameter lists - "Set" menu Accessing and changing the parameters of the Set menu: C901 Press the set key to access the displayed Parameter up or down Press the keys to up or down Press the keys to...
- Page 123 1. DESCRIZIONE DEI COMPONENTI 7. THERMAL ADJUSTMENT "SMART MT" SMART-MT Time setting To ensure the correct operation of the MIRAI-SMI-F in the management of the various time schedules, it is essential to correctly set the date and time of the SMART-MT.
-
Page 124: Software Version
1. DESCRIZIONE DEI COMPONENTI 7. THERMAL ADJUSTMENT "SMART MT" SERVICE SECTION PARAMETER LIST Software version 4.11 Range Register Menù Description U. m. Default label (Base 0) L101 NOT AVAILABLE L102 NOT AVAILABLE L103 NOT AVAILABLE L104 NOT AVAILABLE L105 NOT AVAILABLE L106 NOT AVAILABLE L111... - Page 125 1. DESCRIZIONE DEI COMPONENTI 7. THERMAL ADJUSTMENT "SMART MT" SERVICE SECTION PARAMETER LIST Software version 4.11 Range Register Menù Description U. m. Default label (Base 0) L164 Domestic hot water temperature °C Reading 8989 C164 Domestic hot water temperature offset °C -5.0 16395...
- Page 126 7. THERMAL ADJUSTMENT "SMART MT" SERVICE SECTION PARAMETER LIST Software version 4.11 Range Register Menù Description U. m. Default label (Base 0) Heat Pump operational status - Functions/outputs activation 1st level frost protection function (circulator is activated for 30 sec L241 Reading 9078...
-
Page 127: Not Available
1. DESCRIZIONE DEI COMPONENTI 7. THERMAL ADJUSTMENT "SMART MT" SERVICE SECTION PARAMETER LIST Software version 4.11 Range Register Menù Description U. m. Default label (Base 0) Set Point 2 climate curve activation: C405 Off= Disable 16432 On= Activate Dehumidifier activation: 0= Only in Cooling + PdC circulator activation (dehumidifier hydraulically connected to the PdC) C406... - Page 128 7. THERMAL ADJUSTMENT "SMART MT" SERVICE SECTION PARAMETER LIST Software version 4.11 Range Menù Register Description U. m. Default label (Base 0) Water temperature settings for compressor frequency adjustment “Setting of Set P1 in Heating, night maintenance screed temperature. (Start time S501 °C 14.0...
- Page 129 1. DESCRIZIONE DEI COMPONENTI 7. THERMAL ADJUSTMENT "SMART MT" SERVICE SECTION PARAMETER LIST Software version 4.11 Range Menù Register Description U. m. Default label (Base 0) C533 Summer climate curve setting, maximum correction °C 15.0 16471 C541 Maximum hot water temperature setting at the radiant system °C 20.0 60.0...
- Page 130 7. THERMAL ADJUSTMENT "SMART MT" SERVICE SECTION PARAMETER LIST Software version 4.11 Range Register Menù Description U. m. Default label (Base 0) DHW Domestic hot water production settings H701 Setting the time of the first DHW request h:min H702 07:00 16493 C701 Setting of set temperature of the first DHW request...
- Page 131 1. DESCRIZIONE DEI COMPONENTI 7. THERMAL ADJUSTMENT "SMART MT" SERVICE SECTION PARAMETER LIST Software version 4.11 Range Menù Register Description U. m. Default label (Base 0) Alarm history CAL0 Selection of the chronological position in the alarm history. 9110 LAL0 Alarm code Reading 9111...
- Page 132 8. USER SECTION: OPERATION Segnalazione PdC in allarme R1 out T1 out 8.1 Heat Pump ON/OFF 8.2 Operating mode (Heating / Cooling) T2 out Febos-Crono recipes Febos-Crono recipes L1 out Instructions on the Febos-Crono Instructions on the Febos-Crono Master manual L2 out Recipes 1, 2, and 3 On / Off...
- Page 133 8. USER SECTION: OPERATION 8.4 Temperature setting of water Set and climate 8.5 Consent and Set Point 2 setting Curves. Febos-Crono recipes Recipes 1,2, 10 and 13 Instructions on the Febos-Crono manual The input 105 (H+ / H-) of the TERMINAL BLOCK PCB is configured as Set Point 2Consent.
- Page 134 8. USER SECTION: OPERATION 8.7 Modulation of the PdC compressor 8.9 Heating of domestic hot water (DHW) Febos-Crono recipes Recipes 1, 2, 4, 10 and 13 Instructions on the Febos-Crono manual The input 100 (C+ / C-) of the TERMINAL BLOCK PCB is configured to con- nect one temperature sensor 10 kΩ...
- Page 135 1. DESCRIZIONE DEI COMPONENTI 8. USER SECTION: OPERATION 8.9.1 DHW heating with Eco Hot Water (C407=0) 8.9.3 DHW heating with Eco Hot Water + addition with PdC (C407=2) Recipes 1 and 10 Recipes 10 If you want to use the Eco Hot Water to heat the DHW, configure the Parameter C407=0.
-
Page 136: Additional Heater
1. DESCRIZIONE DEI COMPONENTI 8. USER SECTION: OPERATION 8.10 Relaunch circulator 8.11 Additional heater The PdC is able to manage the consent to an additional heater that can Recipe 1 intervene to support it. The voltage output P1 of the TERMINAL BLOCK PCB is arranged to supply The status of the additional heater consent is visible on Parameter L245. - Page 137 8. USER SECTION: OPERATION 8.11.1 Parallel operation In detail: The heat pump is not deactivated when the bivalent temperature is rea- - Boiler activation: ched and the additional generator that provides the residual thermal power When the external temperature drops below the Bivalence temperature quota is activated.
-
Page 138: Frost Protection
8. USER SECTION: OPERATION 8.12 Frost protection 8.13 External air temperature sensor All recipes All recipes The frost protection inside the PdC is activated at the factory, as shown in For a correct adjustment of the temperature of the water leaving the ch. - Page 139 1. DESCRIZIONE DEI COMPONENTI 8. USER SECTION: OPERATION 8.15 Electrical powers 8.16 Dehumidifier Recipes 10 and 13 Recipes 10 e 13 The voltage output 205 (U1) of the TERMINAL BLOCK PCB is configured to Instructions regarding the configuration and management of electrical power (phase L) the consent to a dehumidifier.
-
Page 140: Active Alarms
1. DESCRIZIONE DEI COMPONENTI 8. USER SECTION: OPERATION 8.17 Active alarms 8.19 High temperature radiant system alarm input In the event of an alarm, the icon on the SMART-MT appears. Access the AL menu to view the active alarms Recipe 13 Recipes 1 and 3 Input 103 (F + / F-) of the TERMINAL BLOCK PCB is configured as a radiant The voltage output 203 (P2) of the TERMINAL BLOCK PCB is set up to... -
Page 141: Troubleshooting
9. ALARM CODES ON SMART-MT 9.1 Troubleshooting If the appliance malfunctions due to a thunderstorm or radio interference, turn off the power supply by means of the ATTENTION switch. Wait about 3 minutes, then turn on the switch. Attenzione - Prima di richiedere assistenza, eseguire i seguenti controlli: CONDITIONS CAUSES OR CHECK POINTS This is for protection of the system. -
Page 142: Terminal Block
9. ALARM CODES ON SMART-MT 9.2 Alarm codes on SMART-MT In case of an alarm, the icon appears on the SMART-MT Press the button to access the menu list, then select AL to access the list of active alarms. Code Description Solution AL00... - Page 143 1. DESCRIZIONE DEI COMPONENTI 10. CODES AND ALARMS ON PCB DISPLAY PCB DISPLAY 10.1 Alarm codes on PCB Display Error Code Description Unit Interested party Verification method Troubleshooting Make sure the power supply is Electrical supply Check the power supply. correct.
-
Page 144: Inverter Pcb
1. DESCRIZIONE DEI COMPONENTI 10. CODES AND ALARMS ON PCB DISPLAY Error Code Description Unit Interested party Verification method Troubleshooting DISCHARGE TEMP. Check the resistance DISCHARGE TEMP. SENSOR SENSOR with a tester [tables]. must be replaced. Discharge temperature Gas leakage Check the service Recover the refrigerant, then error... - Page 145 1. DESCRIZIONE DEI COMPONENTI 10. CODES AND ALARMS ON PCB DISPLAY Error Code Description Unit Interested party Verification method Troubleshooting Correct the INSTALLATION posi- tion to avoid obstruction of air intake and outlet. Check the INSTALLA- TION site (air intake Operation not adjust- and outlet obstruction).
- Page 146 1. DESCRIZIONE DEI COMPONENTI 10. CODES AND ALARMS ON PCB DISPLAY Error Code Description Unit Interested party Verification method Troubleshooting Check the electrical fuse (CF6 EH1218DC FUSE CF7 continuity of the CF7 EH1718D3) blown, EH1618DC (250V T3.15A) FUSE with a tester place FAN MOTOR and fuse.
- Page 147 1. DESCRIZIONE DEI COMPONENTI 10. CODES AND ALARMS ON PCB DISPLAY Error Code Description Unit Interested party Verification method Troubleshooting Incorrect connections Check the wiring connection and (PCB TERMINAL BLOCK Check connections. incorrect contact, then restart - SMART-MT) the device. Check the correct INSTALLATION Ground cable -------...
-
Page 148: Way Valve
1. DESCRIZIONE DEI COMPONENTI 10. CODES AND ALARMS ON PCB DISPLAY Error Code Description Unit Interested party Verification method Troubleshooting Fuse CF2 EH0618DC :250V EH0618DC T3.15A Check the electrical EH1018DC If the fuse CF2 has blown, EH1018DC : 250V continuity with EH1218DC replace the MAIN PCB. -
Page 149: Service And Maintenance
1. DESCRIZIONE DEI COMPONENTI 11. SERVICE AND MAINTENANCE Voltage, Resistance, Continuity control method Continuityof the current fuses in the boards Fig. 1 PCB MAN Check the following steps on the MAIN PCB: EH0618DC: Fuse CF1-CF6 (250V T 15A) EH1018DC: Fuse CF1-CF6 (250V T 25A) Fuse CF3-CF4 (250V T 3A) Mod. - Page 150 1. DESCRIZIONE DEI COMPONENTI 11. SERVICE AND MAINTENANCE Continuity of current fuses FAN MOTOR voltage Fig. 1 on MAIN PCB boards on the MAIN PCB Fig. 2 Models EH0618DC Models EH0618DC EH1018DC EH1018DC Fuse CF2 (250V T3,15A) FAN MOTOR MOTORE VENTILATORE BL Y W B PCB MAIN + + +...
- Page 151 (250V T30A) 1. DESCRIZIONE DEI COMPONENTI 11. SERVICE AND MAINTENANCE Fan motor voltage Fig. 2 PUMP voltage on the MAIN PCB Fig. 3 on the PCB (Main) EH0618DC Mod. EH1218DC EH1018DC EH1618DC LOWER FAN MOTOR Measuring the voltage between the connector pins . LOWER: MOTORE VENTILATORE Fuse CF6...
- Page 152 PCB MAIN 1. DESCRIZIONE DEI COMPONENTI 11. SERVICE AND MAINTENANCE Bobina della valvola 4 vie Bobina della valvola 4 vie 4-WAY VALVE coil resistance - Fig. 4 DEFROST HEATER resistance - Fig. 5 Mod EH1018DC Mod. EH0618DC EH1018DC EH1018DC 1.4k PCB MAIN ...
- Page 153 1. DESCRIZIONE DEI COMPONENTI 11. SERVICE AND MAINTENANCE Electrical characteristics of temperature sensors History display errors on PCB DISPLAY [table 1] External temp sensor: Display method Mod. EH0618DC, EH1018DC, EH1218DC, EH1618DC, Press and hold PUMP SW. and RESET SW. simultaneously for five sec- EH1718D3 onds to display the sequential codes and numbers of previous errors.
- Page 154 1. DESCRIZIONE DEI COMPONENTI 12. CLEANING 12.2 Water Condensate Drainage Check 12.1 Cleaning the heat pump Winter in the use of the heat pump check the proper drainage of conden- WARNING sation water- - Check out the water outlet dall'estreintà the condensate drain pipe after Before performing any maintenance make sure you have removed the 1 hour of operation.
- Page 155 1. DESCRIZIONE DEI COMPONENTI 1. Description DEI COMPONENTI 14. WIRING DIAGRAMS Mod. EH0618DC...
-
Page 156: Wiring Diagrams
14. WIRING DIAGRAMS Mod. EH1018DC... - Page 157 14. WIRING DIAGRAMS 1. DESCRIZIONE DEI COMPONENTI Mod. EH1218DC...
- Page 158 1. DESCRIZIONE DEI COMPONENTI 14. WIRING DIAGRAMS Mod. EH1618DC...
- Page 159 14. WIRING DIAGRAMS Mod. EH1718D3...
- Page 160 IT IT 15. SCHEDA PRODOTTO / PRODUCT FICHE 1. DESCRIZIONE DEI COMPONENTI Modello / Model EH0618DC + ITM-200 B Parametri dichiarati per il riscaldamento dell’acqua calda sanitaria Parameters declared for domestic hot water heating Profilo di carico dichiarato Declated load profile Classe di efficienza energetica di riscaldamento dell’acqua Water heating energy efficiency class Condizioni climatiche...
- Page 161 IT IT 15. SCHEDA PRODOTTO / PRODUCT FICHE 1. DESCRIZIONE DEI COMPONENTI Modello / Model EH1018DC + ITM-200 B Parametri dichiarati per il riscaldamento dell’acqua calda sanitaria Parameters declared for domestic hot water heating Profilo di carico dichiarato Declated load profile Classe di efficienza energetica di riscaldamento dell’acqua Water heating energy efficiency class Condizioni climatiche...
- Page 162 IT IT 15. SCHEDA PRODOTTO / PRODUCT FICHE 1. DESCRIZIONE DEI COMPONENTI Modello / Model EH1218DC + ITM-200 B Parametri dichiarati per il riscaldamento dell’acqua calda sanitaria Parameters declared for domestic hot water heating Profilo di carico dichiarato Declated load profile Classe di efficienza energetica di riscaldamento dell’acqua Water heating energy efficiency class Condizioni climatiche...
- Page 163 IT IT 15. SCHEDA PRODOTTO / PRODUCT FICHE 1. DESCRIZIONE DEI COMPONENTI Modello / Model EH1618DC + ITM-200 B Parametri dichiarati per il riscaldamento dell’acqua calda sanitaria Parameters declared for domestic hot water heating Profilo di carico dichiarato Declated load profile Classe di efficienza energetica di riscaldamento dell’acqua Water heating energy efficiency class Condizioni climatiche...
- Page 164 IT IT 15. SCHEDA PRODOTTO / PRODUCT FICHE 1. DESCRIZIONE DEI COMPONENTI Modello / Model EH1718D3 + ITM-200 B Parametri dichiarati per il riscaldamento dell’acqua calda sanitaria Parameters declared for domestic hot water heating Profilo di carico dichiarato Declated load profile Classe di efficienza energetica di riscaldamento dell’acqua Water heating energy efficiency class Condizioni climatiche...
-
Page 165: General Terms Of Warranty
8 days of their discovery, unless otherwise agreed in writing and confirmed by both the parties. EMMETI spa Via brigata Osoppo, 166 - 33074 Vigonovo frazione di Fontanafredda (PN) - Italia - Tel.0434567911 - Fax0434567901 - www.emmeti.com... - Page 166 Note...
- Page 167 Note...
- Page 168 Rispetta l’ambiente! Per il corretto smaltimento, i diversi materiali devono essere separati e conferiti secondo la normativa vigente. Respect the environment! For a correct disposal, the different materials must be divided and collected according to the regulations in force. PAP 22 CARTA/PAPIER...
Need help?
Do you have a question about the MIRAI SMI 4.0 and is the answer not in the manual?
Questions and answers