Advertisement
- 1 Precautions to Know Before Flying a Drone
- 2 Basic Component Guide
- 3 Name by Drone Part
- 4 Pilot Guidance
- 5 Insert Controller Battery
- 6 Connecting Drone
- 7 Pilot Main Function Guidance
- 8 How to operate a drone (Mode2)
- 9 Motor Start/Stop
- 10 Emergency stop
- 11 Headless Mode
- 12 Change Mode
- 13 Rotate 360 degrees (Mode)
- 14 Propeller Repacement
- 15 To Charge
- 16 Guides and caveats for first-time users
- 17 Troubleshooting
- 18 Initial Defect and Warranty
- 19 Videos
- 20 Documents / Resources
Precautions to Know Before Flying a Drone
- It is recommended that you use the product for users over the age of 8. It is recommended that first-time users be familiar with the manual and use it with sufficient practice.
- The drone's propeller is so fast that it always requires attention and can cause physical and property damage.
For your safety, always maintain a certain distance from the drone. - Manufacturers and vendors are not responsible for accidents due to poor operation.
- Fly in normal weather conditions with temperatures between 50 ℉ and 122 ℉.
- For operational and repair inquiries, please contact your place of purchase.
Before flying a drone, note
- Before flying drones, always look around.
- Fly within the user's vision.
- The child should fly the drone from where the parents are looking.
- When using multiple drones at the same time, be careful with the frequency.

- Be sure to check all items regularly before flying. Replace, repair and operate after damage.
- Recharge using the charger provided.
- Be sure to turn off and remove the power when removing dust from the product.
- Do not randomly change the structure of this product.
- Recyculate battery or battery packs or dispose of them correctly according to waste disposal methods.
- Be sure to turn off and store the power of the drones and the controls when storing.
- Do not throw or drop drones and controls.
- Read and familiarize yourself with the handling manual.
Do not fly drones in the following circumstances

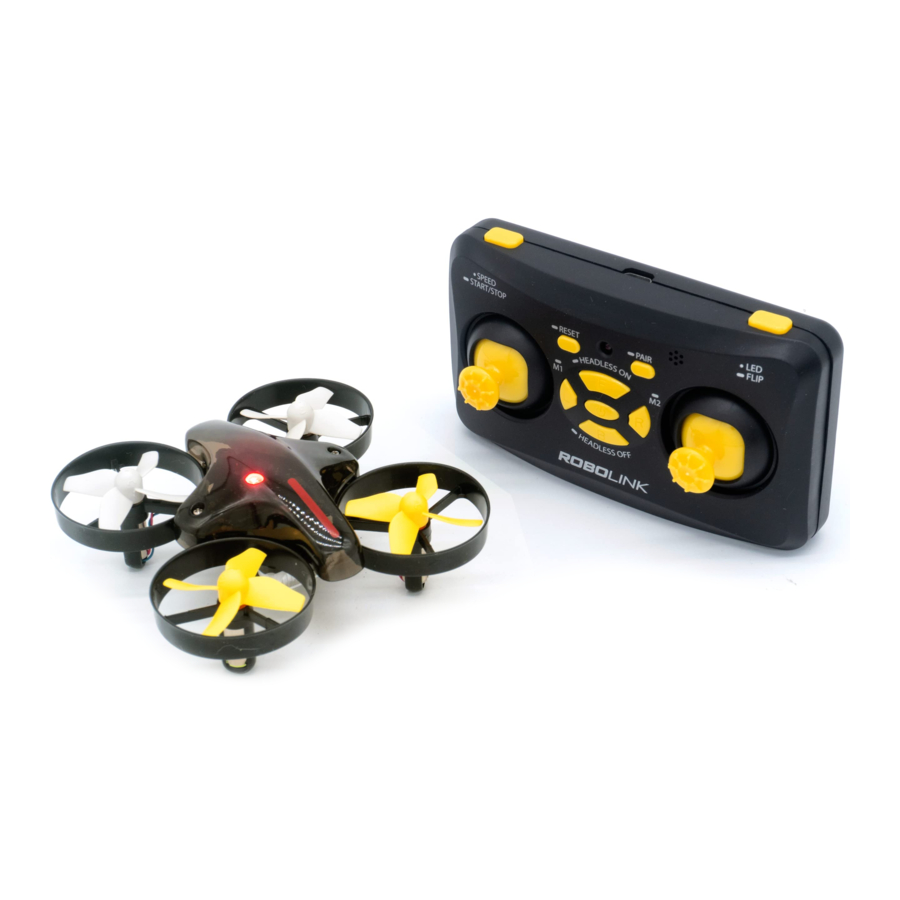
Basic Component Guide

Name by Drone Part

| № | Name | Quantity |
| 1 | CCW Propeller (B) | 2 |
| 2 | CW Propeller (A) | 2 |
| 3 | Housing | 1 |
| 4 | Frame | 1 |
| 5 | CCW Motor | 2 |
| 6 | CW Motor | 2 |
| 7 | Lithium Battery | 1 |
| 8 | Main Board | 1 |
| 9 | Rubber Damper | 4 |
Pilot Guidance
 When Pressed Briefly
  When Pressed Briefly

- If the drone does not have a battery, the buzzer sounds on the controller and the LED on the drone flashes.

Insert Controller Battery
*Open the battery cover.
Insert battery for polarity (+/-) indication.
Close the battery cover.

- Make sure the battery is inserted to the polarity mark.
- Remove discharged batteries and do not use batteries of different types.
Connecting Drone
Plain Floor

- Connecting the Controller to the Drone
When the drone's battery is connected, the drone's LED flashes.
Put the drone down on a flat floor and turn the controller on.
A beep will be heard and paired automatically.
* Important: The controller and the drone are basically paired.
A swing of more than 10 times faster

Pressing for more than 3 seconds

- New Connecting the Controller to the Drone
If no drones and controls are connected, or if a new control and connection is required, new drone pairing is carried out.- Within 20 seconds of connecting the drone's battery, hold the drone in your hand and shake it quickly to enter pairing mode. (The LED flashes red/blue quickly when in pairing mode)
- Put the drone in pairing mode on the floor and turn on the controller.
- Pair the drone by pressing the PAIR button on the controller for more than 3 seconds.
- When 4 drones are connected, a beep is heard and the LED color is fixed.
The pairing mode can only be entered within 20 seconds of the battery connection and after 20 seconds the drone's battery must be reconnected.
Pilot Main Function Guidance
- Power On/Off / Reset Sensor
Press and hold the power button in the middle of the controller for more than 3 seconds to turn it on and off.
With the drone connected, press and hold the reset button to reset the sensor for the drone. - Throttle Lever & Directional Lever
Once the drone is connected to the controller, it can begin to operate the drone
For instructions on how to control each lever, see How to control a drone. - Trim Adjustment (F/B/L/R Button) & Mode 1/2 Change
To stabilize a drone during flight if it is tilted in either front/rear/left/right direction:
Press the F (front)/B (back)/L (left)/R (right) trim button to operate.
You can change the mode using the L (left) and R (right) buttons when you are not in the flight - Speed · Start/Stop (SPEED · START / STOP)
Press the button briefly to change the speed of the drone. (Step 1: Beep 1 / Step 2: Step 3)
Press and hold the button for more than 3 seconds to automatically take off and land the drone. - Headless mode · pairing (HEADLESS · PAIR)
When not in flight, press and hold the F button to activate the headless mode; press and hold B button to release.
You can perform pairing by pressing and holding the PAIR button for more than 3 seconds when it is not in flight. - LED · Flip (LED · FLIP)
Press the button briefly to change the LED on the drone to the desired color.
During flight, when the LED · Flip button is pressed and the directional lever is moved, the drone rotates 360 degrees. - Status Indication
When the drone is disconnected, the LEDs on the drone and the controller flash and beep.
If the drone's battery is low, only the LEDs on the drone will flash and the controller will beep.
|
How to operate a drone (Mode2)
Be sure to familiarize yourself with the following methods before operating the drone.
Poor steering requires a lot of practice because it can cause damage and injury.
- Set the front and rear sides of the drone apart and place it on a flat.
- Press the controller's automatic take-off/landing button for more than 3 seconds to initiate drone flight.
| Throttle UP |  |
|
| Rotation
|  |
|
| Forward and backward movement
|  |
|
| Right and Left movements
|  |
|


Motor Start/Stop
You can start/stop the motor when it is not in flight.
Push both levers simultaneously as shown in the image and hold for at least 2 seconds.

Emergency stop
In the event of an emergency situation during flight, the emergency stop function can be used to stop the motor of the drone.
Press and hold the speed start/stop button and press the throttle lever down to make an emergency stop.
If the emergency stop function is used, the motor will stop and fall in the air, so the drone may be damaged.
Only operate the function in an emergency.
Headless Mode
Activate the 'headless mode' for beginners.
The 'headless mode' is fixed in the direction of the drone's operation, regardless of the direction of the drone's front or rear.
"Headless mode' On when the LED on the controller flashes by pressing and holding the F button while landing
'Headless mode' off when the controller's LED illuminates brightly by pressing and holding the B button while landing.
'Headless mode' on/off can only be changed when landing; it cannot be changed during flight. When the headless mode is turned on by pressing the button, the direction the drone is facing is fixed forward.
Change Mode
Settings allow you to change to mode1 or mode2.
Pressing and holding the Ltrim button for more than 3 seconds while landing mode1 Pressing and holding the RTRIM button for more than 3 seconds while landing mode2
The default state is set to mode2 and if you change the mode, Be sure to familiarize yourself with the operation of that mode before flying.

Rotate 360 degrees (Mode)
When the start button is pressed and held, the controller will continuously beep. | Rotate Forward: up the rudder. Rotate Back: Turn the Directional Levers Down Left Rotation: The rudder is left. Right Rotation: The directional lever to the right |  |
Propeller Repacement
Periodically check the propeller status of the drones and replace them with new ones if damaged/damaged.
- The drone has four propellers. Among them, yellow represents the front.
- Refer to the image and make sure that the direction of rotation is the matching propeller.
- IMPORTANT: Normal flight is not possible if the propeller is not in the correct direction.


To Charge
- Disconnect the battery out of the drone. The included charging via the charger usb.
- charging, the charging is completed, and indicators illuminated indicator will extinguish.
A continuous beep sound from the controller during flight indicates that the drone's battery is running low. Charge the battery after landing.

Drone Battery: Please comply with the regulations for the use of lithium batteries.
Controller Battery: The controller requires two "AAA" batteries.
Please read the precautions below carefully.
- Do not use any other type of battery.
- Do not use with a discharged battery.
- Do not charge disposable batteries.
- Take care when charging the battery.
- View the polarity indicator (+/-) and insert correctly.
- Do not heat the battery or put the battery in the fire.
| LED Display information | |
LED Off  | LED ON  |
| Charge Complete | Charging |
| Charging specification | ||
| Input | Charging current | Maximum Voltage |
| 5V | 420~450 mA | 4.2 0.03V 0.03V |
| Battery Capacity and Charging Specifications | |||
| Battery Type | Battery Capacity | Time of Use | Charging time |
| Lithium Battery | 3.7V 220mAh | Maximum flight time of 5 minutes | 40 Minutes (approximately 0.5 Amps) |
Guides and caveats for first-time users
- Make sure the battery is fully charged.
- Make sure the propeller is correctly installed.
- Make sure that the control and the drones are connected as normal.
- Make sure there are no obstructions in the area.
- Practice the drones first for take-off and landing and emergency stop functions.
- Use a distance of more than 2 meters from the drone.
- To practice take-off and landing
- Place the drone on a flat surface and prepare for flight.
- Press the automatic take-off/landing button of the controller for more than 3 seconds to take off.
- The drone hovers.
- During flight, press and hold the automatic take-off/landing button on the controller for more than 3 seconds to land. Please also be familiar with the emergency stop function in case of emergency.
![]()

- To practice throttle lever
- Place the drone on a flat surface and prepare for flight.
- Press the automatic take-off/landing button of the controller for more than 3 seconds to take off.
- The drone hovers.
- During flight, press and hold the automatic take-off/landing button on the controller for more than 3 seconds to land.
Please also be familiar with the emergency stop function in case of emergency.
![]()

- To practice directional control (Mode2)
- Use the right-hand lever to slowly push forward/backward to practice front/backward control in the air.
- Practice pushing the levers slowly to the left and right, as shown above.
![]()

- Practice of rotation (Mode 2)
- Slowly raise the left throttle lever to maintain altitude in the air.
- Adjust the throttle lever to maintain constant altitude and slowly slide the throttle lever to the left or right to rotate.
If not in headless mode, the drone rotates and changes direction, so be aware of your flight.
- Precision Control Exercise
Once you are familiar with the preceding "practicing, " practice your flight with a combination of fine-tuning and fine-tuning the various commandments in the air.
![]()

- Trim
Take off the drone in a windless environment to see if it is flowing in the air.- Forward/Reverse Moving Trim: When a drone flows forward in the air without any operation Press the B button on the controller to adjust the trim. Conversely, if it flows backwards in midair without any control, press the F button on the controller to open the trim. Adjust it.
- Left/Right Trim: When a drone flows from the air to the left without any operation Press the R button on the controller to adjust the trim. Conversely, if you're moving in midair to the right, press the L button on the controller. Adjust the trim.
![warning]()
NOTE: The controller will beep whenever the trim button is pressed. Once the maximum value of the trim setting is reached, there will be no more beeps. If normal flight is difficult even with trim setting, reset the drone sensor. (Press the drone on a level surface and briefly press the controller's power button to reset the sensor.)
![]()


- Rotate 360 degrees (Mode2)
- Make sure you have enough free space before turning 360 degrees.
Press and hold the LED/FLIP button on the right side of the detector to hear a beep.
Push the right-hand lever in the desired direction and the drone rotates 360 degrees in that direction.
![]()

- Sensor Reset
If the drone is tilted to one side after the trim setting, or the drone does not fly normally, proceed to reset the sensor. With the drone and the controller connected, place the drone on a flat floor and press and hold the controller reset button to proceed with sensor reset.
Drone during the sensor reset led starts blinking, reset is complete, the brightly lit again.
Troubleshooting
| Problem | Cause | Solution method | |
| 1 | I plugged in the drone's battery and it just blinks and becomes unresponsive | The drone and the controller are out of pairing | Refer to the manual and cycle power to both the drone and the controller and try new pairing |
| 2 | There is no response when connecting the drone's battery | The battery is running low | Please charge the battery of the drone |
| 3 | The motor won't stop when I lower the lever to land | I didn't know if the drone was on the floor | Please raise it up again and try to land Lower and hold the throttle lever for at least 2 seconds after the drone hits the floor |
| 4 | Only the propeller turns and the drone does not take off |
|
|
| 5 | The drone rotates in place even after the trim is set |
|
|
| 6 | The drone doesn't fly after the crash | I plugged in the drone's battery and it just blinks and becomes unresponsive |
|
Initial Defect and Warranty
Supports the following initial defect and warranty exchange policies:
- Within 7 days of receipt of the new product
- If problem symptoms are found within 5 minutes of the cumulative flight time after opening the product;
If a problem occurs with a product that meets all of the above conditions, it will be judged to be an initial defect and you will be able to exchange the product.
Any other user negligence and damage other than initial defect will result in paid repair, so please note. Please contact your place of purchase for further product repair and support.
- Drone simulator, Rocket Brick for Cordonrobolinksw.com
- Check the website later for coding manual. (robolink.co.kr )


VideosHow to fly your drone with remote Video
Review of Robolink's CoDrone Mini Video
Documents / ResourcesDownload manual
Here you can download full pdf version of manual, it may contain additional safety instructions, warranty information, FCC rules, etc.
Advertisement


Need help?
Do you have a question about the CoDrone Mini and is the answer not in the manual?
Questions and answers