Table of Contents
Advertisement
Quick Links
Advertisement
Table of Contents

Related Manuals for Spot X Underwater Vision SQUID

Summary of Contents for Spot X Underwater Vision SQUID
- Page 1 SQUID USER MANUAL V 3.4...
- Page 2 The Squid can live stream up to 100 m deep, be trolled at up to 10 knots, and directly supplies power to your camera, all while recording amazing high definition footage on your camera.
- Page 3 What will we do to correct problems? Spot X Underwater Vision will either repair the product at no charge, or replace the product at no charge. How long does the coverage last? The Warranty Period for Physical Goods purchased from Spot X Underwater Vision is one year from the date of purchase.
-
Page 4: Table Of Contents
CONTENTS Setup.........................1 General Setup....................1 Squid Modes.....................5 Drift mode.....................5 Trolling Mode....................8 Deployment....................9 O-ring Care......................10 Safety and General Care..................10 Troubleshooting....................12 Get in Touch!....................12... -
Page 5: Setup
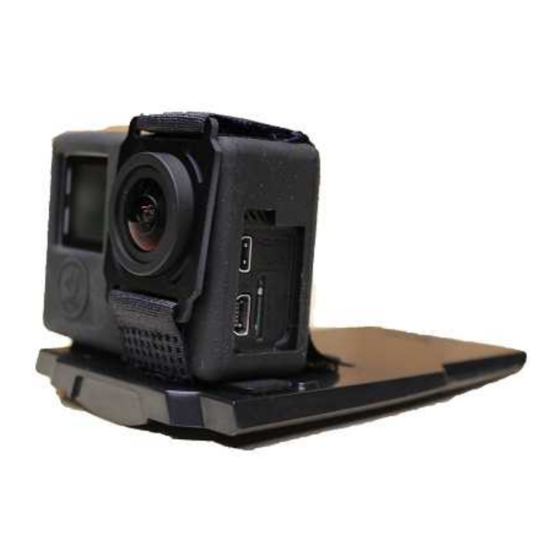
Therefore, for first time users, we recommend you skip to Step 11, and install the o-ring and lens and test the Squid in a shallow tub of water prior to installing the camera. Once you are satisfied that the system is watertight, and you are familiar with seating the o-ring correctly, you can proceed with full setup as described below. - Page 6 INSTALL THE CAMERA ONTO THE CAMERA TRAY Figure 2 6. Slide the camera tray along the rails into the Squid, and push until the tray is completely inside the housing FOR CUSTOMERS USING THE TOPSIDE CONSOLE, STEPS 7 AND 8 ARE NOT APPLICABLE;...
- Page 7 12 volt DC power source (if you do not use the supplied lead, please ensure any lead you use includes a 2 amp fuse. Note, all Squid power connections are centre pin positive, and use a 5.5 x 2.1 mm barrel connector).
- Page 8 See section “O-Ring Care” for further information on o-rings. 12. Lightly grease the inside of the Squid lens where the lens will mate with the o-ring; this will ensure a smooth installation. Attach the Squid lens and screw clockwise as far as possible so that the lens meets the body of the Squid.
-
Page 9: Squid Modes
Drift mode sets the camera to look forward and can be used at slow speeds. To operate in this mode, attach the tail (Figure 5) to the rear of the Squid using the supplied bolt and nut and the 2.5 mm Allen key. The tail will keep the unit facing into the current and stabilise the unit. - Page 10 Before deployment, a tethering system must be installed to reduce strain on the cable connections. Using the supplied nut and bolt, attach the supplied short tether (“DROP TETHER”-Figure 5) at the appropriate Squid hole for desired viewing angle. Hole 1 (closest to lens) will give you an upwards view, hole 4 (closest to cable) will give you a slightly downwards view.
- Page 11 For high speed towing, or when additional weight is added to the Squid, an additional long tow line (not supplied) should be installed to reduce heaving strain on the main cable. If you need to use a tow line, before closing the shackle, thread the eyelet end of the tow line onto the shackle (Figure 6).
-
Page 12: Trolling Mode
4 (closest to the video cable) of the Squid (Figure 8). You will also need to attach an additional long tow line to the shackle; this tethering system ensures you are towing the Squid by the tow line and not by the video cable. -
Page 13: Deployment
Squid keel with a small downrigger bomb (eg 5 lbs). Figure 8 The Squid will troll close to the surface at speeds up to approximately 8 knots. Depth in the water will depend on the speed of the vessel, the amount of cable payed out, and also whether any additional weight or depressor wing is used. -
Page 14: O-Ring Care
o-rings are undamaged without any nicks, cuts or wear; o-rings are seated in the groove of the Squid (not in the threads for the lens); and o-rings are suitably lubricated with silicone grease provided. - Page 15 The exterior of the Squid body and cable should be thoroughly rinsed in freshwater after use, avoiding any water near the topside box, and power/video connectors. Keep the Squid sealed to prevent any water getting inside. Allow to dry in a shaded area and once dried, store with the lens removed in a cool location, away from direct sunlight.
-
Page 16: Troubleshooting
Reflections on video Ensure camera LEDs are switched off Use included black silicone camera case to mask the GoPro GET IN TOUCH! If you have any queries about your Squid or want to connect with other Squid users: info@spotx.com.au...
Need help?
Do you have a question about the SQUID and is the answer not in the manual?
Questions and answers