Table of Contents
Advertisement
Quick Links
Advertisement
Table of Contents

Related Manuals for PowerTec WB-LS20


Summary of Contents for PowerTec WB-LS20
- Page 6 Glue...
- Page 10 Utility Workbench - Part No. 45 Important Note: All Parts have a pre-fix part number of 45 All Unmarked Washers and Nuts are 45.25 and 45.26...
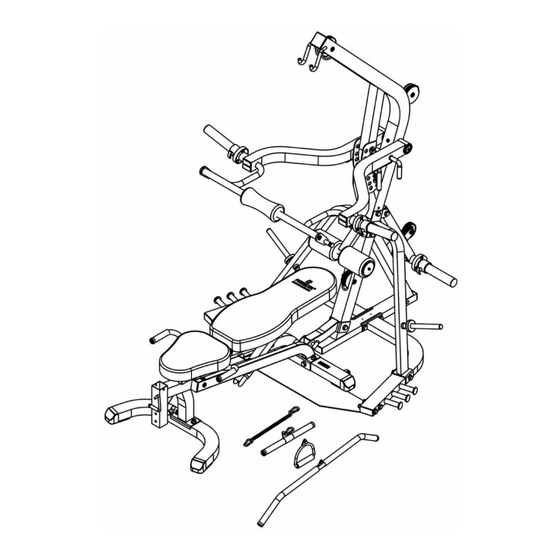
- Page 11 ASSEMBLY ONE Step 1 Install Base Tubes No. 2 and No. 3 onto Lower Up-Right Tube No. 1 Use Bolts No. 37, Washers No. 41 and Nuts No. 43 Step 2 Install Foot Plate No. 19 to Base Tubes No. 2 and No. 3 Use Bolts No.
- Page 13 Step 1 Install Weight Rotating Tube No. 10 to Up-Right Tube No. 6 Using Bolts No. 33, Washers No. 41 and Nut No. 43 Install Weight Horns No. 18 to Weight Rotating Tube No. 10 Using Bolts No. 28 and Nuts No. 42 Step 2 Place Pulley Wheel No.
- Page 14 Step 1 Install Safety Spotter Bar No. 16 onto Up-Right No. 6 Install Press Arms No. 7 and No. 8 onto Steel Axis No. 44 Secure Press Arms to Steel Axis using Washers No. 40 and Bolts No. 29 Step 2 Install Weight Horns No.
- Page 16 ASSEMBLY SIX Utility Workbench - Part No. 45 All parts mentioned on this assembly have a pre-fix Part No. 45 Step1 Install T Handle Spring Pin Part No. 7.2 to Center Main Frame Part No. 3 Step 2 Install Center Main Bench Frame No. 3 to Rear Base Tube No. 1 and to Front Base Tube No.
- Page 21 POWERTEC IS NOT LIABLE IF THE TRAINER SHOULD INJURE THEMSELVES WHILE USING POWERTEC EQUIPMENT OR WHILE PERFORMING THE TRAINING ROUTINE COMMITTED TO STRONGER LIVES POWERTEC INC. POWERTEC EUROPE 2 rue d'Aquitaine 6301 Alondra Blvd., 68390 Sausheim – France Paramount, CA 90723...
Need help?
Do you have a question about the WB-LS20 and is the answer not in the manual?
Questions and answers