Advertisement
- 1 OVERVIEW
- 2 INTRODUCTION
- 3 BEFORE YOUR BEGIN
- 4 HOW TO SELECT THE 12- AND 24-HOUR CLOCK DISPLAY FORMATS
- 5 HOW TO SELECT THE U.S. AND EUROPEAN DATE DISPLAY FORMATS
- 6 HOW TO SET THE CLOCK, TIME AND DATE
- 7 HOW TO USE THE ALARM CLOCK AND ITS SNOOZE FUNCTION
- 8 HOW TO SET A TIMER
- 9 HOW TO START A TIMER
- 10 HOW TO STOP/RESUME A TIMER
- 11 HOW TO CLEAR A TIMER
- 12 HOW TO RECALL THE PREVIOUS SETTING OF A TIMER
- 13 HOW TO REPLACE THE BATTERY
- 14 HOW TO USE THE CLIP, FOLDAWAY STAND LEG AND MAGNET
- 15 MAINTENANCE
- 16 ABOUT OREGON SCIENTIFIC
- 17 Documents / Resources
OVERVIEW

INTRODUCTION
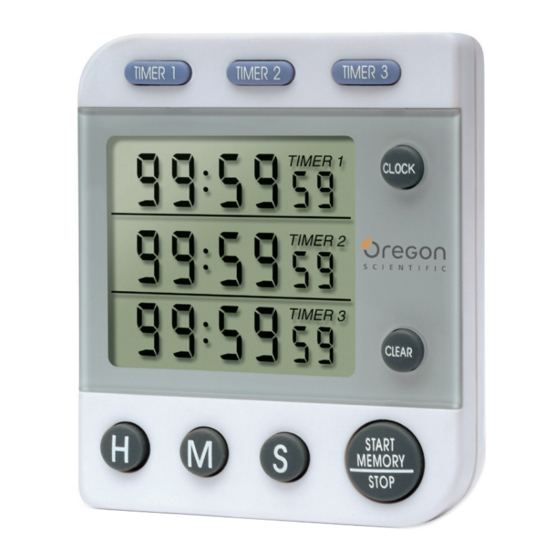
The unit is a handy three-channel timer/calendar alarm clock with the following functions:
- Three separate, jumbo LCD display screens for timer 1, timer 2, and timer 3 or clock, alarm and date
- Six-digit display for showing timer and clock
- Automatic count-up/count-down functions for individual timers
- Memory recall function for preset timers
- Different beeps for easy recognition of different timers
- Selectable 12- and 24-hour clock display modes
- Selectable U.S. and European date display modes
- Audible key tone to indicate successful key entry
- Automatic snooze function for alarm clock
- Mounting clip for pocket or belt
- Foldaway stand leg
- Magnet for attaching onto metallic surfaces
BEFORE YOUR BEGIN
The unit operates on a 1.5V, G-13 battery which has already been installed. The battery is insulated by a red tape to provide the product with a maximum shelf life. So before you begin, remember to remove the insulation tape by gently pulling it out from inside the battery compartment. Once that is done, the display on the screens will reset to normal CLOCK mode.
The unit has two operating modes: CLOCK and TIMER. CLOCK mode allows you to display and set the clock, alarm and date; whereas the TIMER mode allows you to start and set the timers. To change from one mode to another, simply press CLOCK while in normal mode.
The LCD display for the operating modes are as follows:

HOW TO SELECT THE 12- AND 24-HOUR CLOCK DISPLAY FORMATS
The clock display can be changed from 12-hour format to 24-hour format and vice-versa by pressing H at any time in normal CLOCK operating mode. The AM or PM indicator will be displayed to indicate the hour of the day when the 12-hour clock display mode is selected.
Note: If nothing is selected, the 12-hour format will be selected automatically.
HOW TO SELECT THE U.S. AND EUROPEAN DATE DISPLAY FORMATS
The U.S. and European date display formats can be changed from one to another by pressing START MEMORY/STOP when setting the date.
For the U.S. format, the month will be displayed prior to the day; whereas the opposite will be displayed for the European format.
Note: If nothing is selected, the U.S. format will be selected automatically.
HOW TO SET THE CLOCK, TIME AND DATE
- Press and hold CLOCK for two seconds to enter the setting mode. A beep will be emitted and all digits of the clock will flash.
- Press H and M to change the setting for the hour and minute. The display of the clock depends on which display format was selected prior to the setting of the clock.
- Press S to set the seconds, which will be reset to zero if the previous setting was 29 or less. If the previous setting was 30 or above, the minute value will be advanced automatically.
- When finished, press CLOCK to confirm the setting. All digits of the clock will stop flashing, and those of the alarm clock will start to flash.
- Press H and M to change the setting for the hour and minute of the alarm clock.
- Press START MEMORY/STOP to enable or disable the alarm clock. When the alarm clock is enabled, the
![]() indicator will be displayed on the screen.
indicator will be displayed on the screen. - When finished, press CLOCK to confirm the setting. All digits of the alarm clock will stop flashing, and those of the date will start to flash.
- Press H and M to change the setting for the month and day of the calendar.
- Press START MEMORY/STOP to change from U.S. to European date display format and viceoversa.
- When finished press CLOCK to confirm. All digits will stop flashing.
 indicator will be displayed on the screen.
Note
- If you do not confirm the setting by pressing CLOCK after changing the values of the clock, alarm or date, the setting mode will be exited automatically after two minutes with the last entered values.
- If you want to skip from one setting procedure to another, such as from clock to alarm, or alarm to date, simply press CLOCK once when in setting mode.
- Holding H or M while in setting mode will advance the digits in faster increments.
HOW TO USE THE ALARM CLOCK AND ITS SNOOZE FUNCTION
The alarm clock will go off at exactly the time that it is preset to. The alarm will sound for one minute if unattended.
To disable the alarm, simply press any button, or let it expire on its own after one minute. If CLEAR is pressed in between, it will trigger the snooze function.
The snooze function will enable the alarm to go off again after eight minutes. The alarm can then be disabled in the same way. However, if CLEAR is pressed again, the snooze function will be triggered again.
The snooze function will repeat if the alarm is disabled by pressing CLEAR every time.
HOW TO SET A TIMER
- Select TIMER mode by pressing CLOCK once while in normal CLOCK mode. The LCD display will switch to indicate the current settings of all three timers.
- Select the timer to set by pressing and holding TIMER 1, TIMER 2 or TIMER 3 for two seconds. The display for the selected timer will flash.
- Press CLEAR to reset the setting to zero, or press H, M and S to change the setting for the hour, minute and second, respectively. Holding the buttons will advance the corresponding digits in faster increments. You can set a timer up to 99 hours, 59 minutes and 59 seconds.
- When finished, press the corresponding timer button again to confirm the setting. All digits of that particular timer will stop flashing.
HOW TO START A TIMER
Simply press the corresponding timer button once. For instance, to start timer 1, press TIMER 1 once. To start timer 2, press TIMER 2 instead. To start all timers press START MEMORY/ STOP.
Note:
- When a timer with a preset value other than zero is activated, it will start counting down. If undisturbed, it will emit a beeping alarm for one minute after reaching down to zero and start counting up again.
- If a timer is preset to zero when it is activated, it will start counting up immediately.
- The alarm beeps of the timers are different for your easy recognition. If a second timer expires when the alarm for another one is going off, the alarm for the second timer will take over and replace the first one.
- Whenever a timer is counting up, the "TIME'S UP" indicator will be displayed and flash.
HOW TO STOP/RESUME A TIMER
You can stop the timer at any time by pressing the corresponding timer button. Pressing START MEMORY/STOP will stop all timers. To resume, simply press the TIMER 1, TIMER 2, TIMER 3 or START MEMORY/STOP button again.
Note:
- If the timer is counting down when it is stopped, it will continue to count down.
- If the timer is at zero when it is stopped, it will start to count up.
- If the timer is already counting up when it is stopped, it will continued to do so.
HOW TO CLEAR A TIMER
Press CLEAR while the timer/timers is/are deactivated. The timer/timers will be reset to zero. The operating status of other activated timer/timers will not be affected.
HOW TO RECALL THE PREVIOUS SETTING OF A TIMER
Recalling the previous setting of a timer is easy. Simply press the corresponding timer button or START MEMORY/STOP after the timer is cleared and reset to zero.
HOW TO REPLACE THE BATTERY
Under normal operating circumstances, the battery which is included with the product can keep it running for more than a year. Should you need to replace the battery, simply uncover the battery compartment cover and insert a new 1.5V LR44 battery (with positive (+) side facing up) into the compartment. Replace the compartment cover.
Note:
The unit may not work if the battery is not properly inserted. Try to reinsert the battery once again.
HOW TO USE THE CLIP, FOLDAWAY STAND LEG AND MAGNET
A clip can be found on the back of the product for you to clip the clock onto a pocket or belt. A stand leg can also be flipped open easily to form a stand with the clip. You can also attach the clock to any metallic surface by making use of the magnet.
MAINTENANCE
When handled properly, this unit is engineered to give you years of satisfactory service. Here are a few product care instructions:
- Do not immerse the unit in water. If the unit comes in contact with water, dry it immediately with a soft lint-free cloth.
- Do not clean the unit with alcohol containing detergent, abrasive or corrosive materials. Abrasive cleaning agents may scratch the plastic parts and corrode the electronic circuit.
- Do not subject the unit to excessive: force, shock, dust, temperature, or humidity. Such treatment may result in malfunction, a shorter electronic life span, damaged batteries, or distorted parts.
- Do not tamper with the unit's internal components. Doing so will terminate the unit's warranty and may cause damage. The unit contains no userserviceable parts.
- Only use new batteries as specified in this instruction manual. Do not mix new and old batteries as the old batteries may leak.
- Read this instruction manual thoroughly before operating the unit.
- The contents of this manual and the product specifications are subject to change without further notice.
ABOUT OREGON SCIENTIFIC
Visit our website (www.oregonscientific.com) to learn more about Oregon Scientific products such as digital cameras; MP3 players; children's electronic learning products and games; projection clocks; health and fitness gear; weather stations; and digital and conference phones. The website also includes contact information for our Customer Care department in case you need to reach us, as well as frequently asked questions and customer downloads.
We hope you will find all the information you need on our website, however if you're in the US and would like to contact the Oregon Scientific Customer Care department directly, please visit: www2.oregonscientific.com/service/support OR Call 1-800-853-8883.
For international inquiries, please visit: www2.oregonscientific.com/about/international/defaul.asp

Documents / ResourcesDownload manual
Here you can download full pdf version of manual, it may contain additional safety instructions, warranty information, FCC rules, etc.
Download Oregon WB388 - 3-Channel Jumbo Display Clock Timer Manual
Advertisement


Need help?
Do you have a question about the WB388 and is the answer not in the manual?
Questions and answers