Table of Contents
Advertisement
Quick Links
All manuals and user guides at all-guides.com
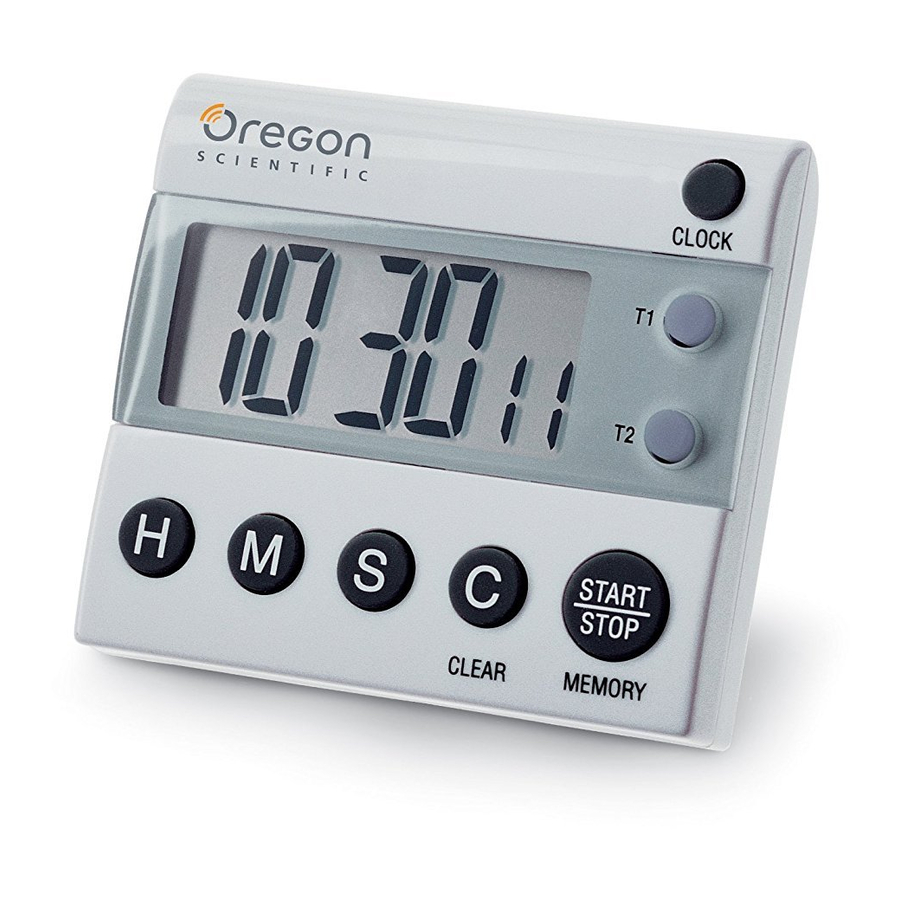
2 CHANNEL
JUMBO DISPLAY CLOCK TIMER
MODEL : TR118
USER'S MANUAL
T1 T2
MEMORY
BATTERY
COVER
ENGLISH
TIMER FEATURES
1. 2 Channel LCD Count-down and Count up Timer together with Clock.
2. 6 digits display showing HOUR, MINUTE, and SECOND for both
Timers and Clock.
3. Automatic count-up after Timer counts down to zero.
4. Count-down timer : Maximum setting is 99 hours, 59 minutes and
59 seconds at 1 second resolution. Count-up timer : Maximum count-
up range is 99 hours, 59 minutes and 59 seconds at 1 second resolution.
5. Buzzer alarm sounds for 1 minute when timer counts to zero.
6. Timer memory recall for each count-down timer.
7. Individual buttons for HOUR, MINUTE and SECOND setting.
NORMAL TIME SETTING
1. Press the Clock button down for approximately 3 seconds. The digits
and colon will flash in display.
2. Press the Hour button to advance to the correct hour. Hold button down
for approximately 2 seconds for fast setting.
3. A "P" will appear in the display below the colon for PM. There is no
symbol for AM indication.
4. Press MIN button to advance to the correct minute. Hold button down
for approximately 2 seconds for fast setting.
5. Press the SEC button to reset second digit to zero when the second
digits are within the 00-29 second range; pressing SEC button in 30-59
second range advances minute setting by 1 minute and resets second
digits to zero.
6. Press the Clock button to start clock. The colon will flash in clock
mode.
7. The Clock operates independently of the timing channels. Whenever
the clock button is pressed, the time of day will appear in the display. If
timers are operating, respective T1 or T2 will flash in display.
12/24 HOUR FORMAT SELECTION
1. To activate 24 hour format, in Clock Mode hold START/STOP button
down for approximately 3 seconds, beep tone will indicate format
change.
2. To change back to 12 hour format, repeat stop 1 above.
COUNT-DOWN TIMER SETTING (SEE FIG.1)
1. Press either T1 or T2 button for desired timing channel. The selected
channel, T1 or T2, will appear in the display. The colon does not flash
in the timer mode.
2. Press CLEAR to reset timer to zero.
3. Press individual HOUR, MIN & SEC buttons to program desired time.
The numbers can be fast forwarded by holding the individual buttons
down for 2 seconds.
4. If error is made in programming, hold individual HOUR MIN & SEC
button down first, then press the clear button to zero the digit. Then
reprogram as explained above.
5. Follow the same procedure above for programming the other timer
channel.
TIMER START/STOP
1. After time setting is ready, press START/STOP button once to activate
timer. Steady T1 or T2 indicator on screen shows active channel on
display.
2. When timer is counting, press START/STOP button once and displayed
timer channel will pause.
3. Press START/STOP button once and timer will resume counting.
4. Both timing channels can be used at the same time. When using both
timer channels, simply press the T1 or T2 button to note count down
time remaining. Non-flashing (T1 or T2) indicates the count down time
of the channel being displayed.
TIMER BUZZER ALARM
1. When timer counts to 00H, 00M and 00S, timer buzzer alarm will sound
and timer will begin to count up in seconds with respective non-fleshing
timer channel indicator appearing in display.
2. Timer buzzer will be stopped by pressing any button.
3. Buzzer will automatically turn off in 60 seconds. Count-up timer
continues to operate until stopped.
4. Count-up timer in alarm mode can be stopped by pressing any button.
5. Press Clear button to reset display to zero.
6. If both channels are counting down, when time expires in both channels
within a minute of each other and the alarm has not been turned off, the
alarm for the just expired timer will sound with the other timer channel
flashing in the display. Turn off by pressing the START/STOP button.
7. The other channel alarm will sound at the completion of cycle, and the
indicator will count up.
MAGNET
8. Press START/STOP button to turn off.
TIMER MEMORY RECALL
PLASTIC
1. After timer buzzer alarm stops, press START/STOP button once to
CLIP
recall preset timer time.
2. Press START/STOP button again to start timer.
COUNT-UP/STOPWATCH TIMER
1. Press desired timer channel button.
2. Press CLEAR button to clear display.
3. Press START/STOP button and time will begin to count-up in 1 second
resolution.
4. Press START/STOP to stop count-up timer.
5. If you wish to restart timing process, press START/STOP button again.
6. To turn timer off, press START/STOP button and then Clear button.
7. If count up/stopwatch timer is not turned off when it reaches 99 hours,
59 minutes, 59 seconds, it will start counting over again at 1 second
resolution from 00H, 00M, 00S.
BATTERY REPLACEMENT
To replace exhausted battery, slide push the battery cover on back side in
direction of arrow. Set cover aside and remove battery. Insert a now 1.5V
'AAA' battery as indicated by the polarity symbols (+ & -) marked and
close battery cover.
Sometimes the timer may not activate after installing a new battery. If this
happens, simply remove battery from the battery compartment and reinstall
again. The Clock will resume normal operation.
CLIP ATTACHMENT
The timer can clip on thin board, belt or shirt pocket using the plastic clip
on the backside of timer.
MAGNETIC ATTACHMENT
The timer can attach to iron or steel surface, using the magnet attached to
clip on backside of timer.
TABLE TOP USE
Use the clip and metal stand bar together to stand clock/timer at an angle
on any flat surface.
PRECAUTION
When handled properly, this unit is engineered to give you years of satisfactory
service. Here are a few product care instructions:
1.
Do not immerse the unit in water. If the unit comes in contact with water,
dry it immediately with a soft lint-free cloth.
2.
Do not clean the unit with alcohol containing detergent, abrasive or corrosive
materials. Abrasive cleaning agents may scratch the plastic parts and corrode
the electronic circuit.
3.
Do not subject the unit to excessive: force, shock, dust, temperature, or
humidity. Such treatment may result in malfunction, a shorter electronic life
span, damaged batteries, or distorted parts.
4.
Do not tamper with the unit's internal components. Doing so will terminate
the unit's warranty and may cause damage. The unit contains no user-
serviceable parts.
5.
Only use new batteries as specified in this instruction manual. Do not mix
new and old batteries as the old batteries may leak.
6.
Read this instruction manual thoroughly before operating the unit.
- The content of this manual and the product specifications are subject to
change without further notice.
- The technical specifications of this product are subject to change without
notice.
- Due to printing limitation, the displays shown in this manual may differ
from the actual display.
- The contents of this manual may not be reproduced without the
permission of the manufacturer.
CAUTION
Advertisement
Table of Contents

Related Manuals for Oregon Scientific TR118


Summary of Contents for Oregon Scientific TR118
- Page 1 TIMER BUZZER ALARM JUMBO DISPLAY CLOCK TIMER 1. When timer counts to 00H, 00M and 00S, timer buzzer alarm will sound MODEL : TR118 and timer will begin to count up in seconds with respective non-fleshing timer channel indicator appearing in display.
- Page 2 All manuals and user guides at all-guides.com T1 T2 MEMORY 086-001626-17...
Need help?
Do you have a question about the TR118 and is the answer not in the manual?
Questions and answers