Table of Contents
Advertisement
Available languages
Available languages
Quick Links
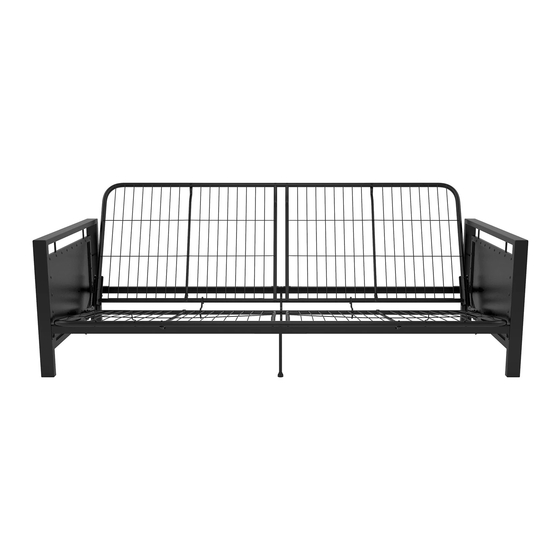
Weight Limit: 600 Lb / 272 Kg
DO NOT RETURN TO THE STORE !
If parts are missing or damaged, we will gladly ship your
replacement parts free of charge.
Date of Purchase
THIS INSTRUCTION BOOKLET CONTAINS IMPORTANT SAFETY
INFORMATION. PLEASE READ AND KEEP FOR FUTURE REFERENCE.
Metal Futon Frame
Lot Number
Black
1
Advertisement
Table of Contents

Related Manuals for DHP 2185059


Summary of Contents for DHP 2185059
- Page 1 Metal Futon Frame Black Weight Limit: 600 Lb / 272 Kg DO NOT RETURN TO THE STORE ! If parts are missing or damaged, we will gladly ship your replacement parts free of charge. Date of Purchase Lot Number THIS INSTRUCTION BOOKLET CONTAINS IMPORTANT SAFETY INFORMATION.
- Page 2 Warranty Information Read Before Beginning Assembly ● Call our toll free number if you need assistance. ● Work in a spacious area and near where the unit will be used, preferably on a carpet, or use a piece of the cardboard packaging to protect your floor and product. ●...
- Page 4 Parts All in 1 big box! There are inner box(es) that include components required to complete this assembly. Middle Leg Before you throw the package, please use the Stretcher Stretcher Connector Check Box to identify the parts and ensure that you have all the parts needed for the assembly.
- Page 5 Hardware Pack 1/4" X 18 5/16'' 1/4" X 3/4" 1/4" X 1 1/16'' 1/4" X 1 5/16'' X 14 5/16" x 2 7/16'' #8 X 9/16'' X 20 Please do not completely tighten all the hardware, until the entire assembly is complete, unless otherwise indicated in the step-by-step instructions.
- Page 6 Step 1 Attach L to A with The top of Mechanism L may look different due to the movable joints. Please determine the orientation based on their bottom sides. Mechanism L should be attached on the inside of Arm A that without nail heads.
- Page 7 Step 2 Attach R to B with The top of Mechanism R may look different due to the movable joints. Please determine the orientation based on their bottom sides. Mechanism R should be attached on the inside of Arm B that without nail heads. Nail heads on Arm B towards outside.
- Page 8 Step 3 Insert H into G x 2 with Repeat the same actions to join another Rail.
- Page 9 Step 4 Attach D X 2 to H X 2 with...
- Page 10 Step 5 Attach sub-assembly G/H x 2 from previous step to A and B with Attach to G and H in the locations shown.
-
Page 11: Seat Frame
Step 6 6.1 Join panel O & P with E X 2 and 6.2 Attach Q to O & P with SEAT FRAME! -
Page 12: Back Frame
Step 7 7.1 Join panel O & P with E X 2 and 7.2 Attach one end of Q to O & P with 7.3 Attach the other end of Q to O & P with ⓫ ⓬... - Page 13 Step 8 Attach O to L then P to R with SEAT FRAME!
- Page 14 Step 9 Lift the Seat Frame to the Position as shown.
- Page 15 Step 10 Attach O to R then P to L with BACK FRAME!
- Page 16 Step 11 Hook O with P using T X 3.
- Page 17 Step 12 Attach S X 2 to O & P on the seat frame, with as illustrated.
- Page 18 Step 13 You can switch the status of your futon as shown.
-
Page 19: Helpful Hints
● Move your new furniture carefully, with two people lifting and carrying the unit to its new location. ● Your DHP furniture can be disassembled and reassembled to move. ● Some parts have been pre-assembled for this item. They are illustrated on this page and available for replacement. - Page 20 NO LO REGRESE A LA TIENDA ! Si le faltan piezas o las que se incluyen están dañadas, con mucho gusto le enviaremos sus piezas de reemplazo sin cargo extra. Metal Futon Frame ESTE INSTRUCTIVO CONTIENE INFORMACION IMPORTANTE DE Fecha de compra Número de lote SEGURIDAD.
- Page 21 Lea antes de comenzar a ensamblar Partes ● Llame a nuestro número gratuito si necesita asistencia. ● Trabaje en un área espaciosa y cerca de donde su producto será utilizado, preferiblemente sobre una alfombra o utilice el cartón del empaque para proteger su piso y su producto.
-
Page 22: Consejos Útiles
● Mueva sus muebles nuevos con cuidado, con dos personas levantando y llevando el aparato a su nueva ubicación. Una R con B usando ● Sus muebles DHP se pueden desmontar y volver a ensamblar en caso de Paso 3 mudanza. Inserte H con G X 2 usando ●... - Page 23 CE FEUILLET CONTIENT DES INFORMATIONS DE SÉCURITÉ IMPORTANTES. S'IL VOUS PLAÎT LIRE ET CONSERVER POUR RÉFÉRENCE ULTÉRIEURE. Garantie Merci d'avoir acheté un produit de DHP ! Enregistrez votre produit et participez pour gagner! En enregistrant votre produit chez nous, vous êtes automatiquement inscrit dans notre concours trimestriel avec la chance de gagner des prix incroyables.
-
Page 24: Avant De Commencer L'assemblage
Avant de commencer l'assemblage Pièces ● Si vous avez besoin d'aide, appelez notre service à la clientèle sans frais. ● Travailler dans un endroit spacieux et près du lieu où l'unité sera utilisée, préférablement sur un tapis, ou sur un morceau de l'emballage pour protéger le plancher et le produit. -
Page 25: Conseils Utiles
Attacher R à B avec personnes pour soulever et transporter le mobilier vers son nouvel emplacement. Étape 3 ● Votre mobilier DHP peut être démonté et reassemblé pour faciliter les Insérer H à G X 2 avec déménagements.
Need help?
Do you have a question about the 2185059 and is the answer not in the manual?
Questions and answers