Table of Contents
Advertisement
Servlce Hotline: 18820958861
Email: services@portkeys.com
website: www.portkeys.com
Company Address: 1406, 14th Floor, Block D, Building 3,
Cloud Park, Longgang District, Shenzhen, Guangdong, China
Factory Address: 2nd Floor, Building A, Jingjiang Industrial Park,
NO.101, Shangwei Road, Longhua District, Shenzhen,Guangdong, China
Advertisement
Table of Contents

Related Manuals for PortKeys LH5P II


Summary of Contents for PortKeys LH5P II
- Page 1 Servlce Hotline: 18820958861 Email: services@portkeys.com website: www.portkeys.com Company Address: 1406, 14th Floor, Block D, Building 3, Cloud Park, Longgang District, Shenzhen, Guangdong, China Factory Address: 2nd Floor, Building A, Jingjiang Industrial Park, NO.101, Shangwei Road, Longhua District, Shenzhen,Guangdong, China...
-
Page 2: Table Of Contents
Contents Product Information Product Introduction Packing List Basic Parameters Signal Specifications Function Interface Function Interface Gesture Switching Function Setting Custom Function Settings Basic Operation Settings Interface Set Interface Gesture Switching Image Settings Image and Menu Flip Settings Customize +/-key Setting System Settings LUT Settings Volume Settings... -
Page 3: Product Information
Product Information Product Introduction 5.5” 90MM 144 MM Feature Selection 30.8MM MENU EXIT / Long press for Custom Function Keys 3 seconds to switch the Power Switch state of touch control Silicone Pad Antenna HDMI Input Audio Headphone Output HDMI Output Battery Plate Lock Camera Control USB-A... -
Page 4: Packing List
Product Information Packing List LH5PII Monitor X1 U Disk X1 Power Cord (Aviation Safety Box X1 Port to DC) X1 Warm Prompt Card X1 2.4G Straight Head Antenna X1 After Sales Service Card X1... -
Page 5: Basic Parameters
Product Information Basic Parameters Size: 5.5" Dimension: 144x90x30.8mm 178°H/178°V Viewing Angle: Brightness: 2200nit Resolution: 1920x1080 Contrast Ratio: 1000:1 285g Weight: 10bit(8+2 FRC) Color Depth: Material: Aluminum Alloy+Toughened Glass Input Voltage: DC 7~24V Maximum Power: Video Signal Input: 4K HDMI、HDMI Video Signal Output: 4K HDMI、HDMI Upgrade Firmware / Load 3D LUT USB-A:... -
Page 6: Signal Specifications
Product Information Signal Specifications Supported input resolution and frame rate HDMI Signal 4096×2160p@24Hz 3840×2160p@23.97Hz,24Hz,25Hz,29.97Hz,30Hz 1920×1080p@23.97Hz,24Hz,25Hz,29.97Hz,30Hz,50Hz,59.94Hz,60Hz 1920×1080psf@23.97Hz,24Hz,25Hz,29.97Hz,30Hz 1920×1080i@50Hz,59.94Hz,60Hz 1280×720p@50Hz,59.94Hz,60Hz 720×576p@50Hz 720×576i@50Hz 720×480p@50Hz,59.94Hz,60Hz 720×480i@50Hz,59.94Hz,60Hz Supported output resolution and frame rate HDMI Signal 4096×2160p@24Hz 3840×2160p@23.97Hz,24Hz,25Hz,29.97Hz,30Hz 1920×1080p@23.97Hz,24Hz,25Hz,29.97Hz,30Hz,50Hz,59.94Hz,60Hz 1920×1080psf@23.97Hz,24Hz,25Hz,29.97Hz,30Hz 1920×1080i@50Hz,59.94Hz,60Hz 1280×720p@50Hz,59.94Hz,60Hz 720×576p@50Hz 720×576i@50Hz 720×480p@50Hz,59.94Hz,60Hz 720×480i@50Hz,59.94Hz,60Hz... -
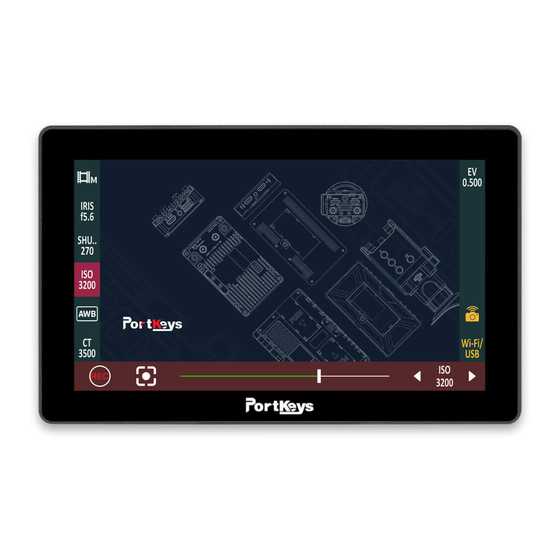
Page 7: Function Interface
Function Interface Brightness Contrast Chroma Sharpness Tint [Function interface gesture switching] Swipe right on any interface to toggle to the function setting interface. Before 8.1V Off HDMI (the function setting interface) -
Page 8: Function Setting
Function Interface Before 8.1V Off HDMI [Function Setting] 1.Software features; 2.HDMI signal; 3.Loading 3D LUT before and after data; 4.3D LUT ON/OFF; 5.Screen brightness (1-10); 6.Fan strength (Low / High); 7.Battery level; 8.Quickly enter the software function list; 9.Quickly enter the software debugging;... -
Page 9: Custom Function Settings
Function Interface Peaking False Color Luma Guides Cross Hair Grids Waveform Check Zebra Luma Audio 3D LUT Field Histogram Waveform Meters Rectangle HDR(HLG) Camera Crop Record ( Picture 1 ) [Custom Function Settings] 1. Click “ ” add shortcut functions to the left and right sides; If the function icons on the left and right have been added (Picture 2);can swipe down in the shortcut function title... -
Page 10: Basic Operation
Function Interface [Basic Operation] Long press “ ” , the function parameter setting shows at the bottom(Picture Original Style Sensitivity Peaking ( Picture 5 ) Swipe the icon “ ” to the right and enter the function menu, you could replace or delete functions(Picture HDMI Off... -
Page 11: Settings Interface
Setting Interface Before 8.1V Off HDMI [Set interface gesture switching] Swipe left on any interface to toggle to the system settings interface. Brightness Contrast Chroma Sharpness Tint ( the system settings interface) -
Page 12: Image Settings
Setting Interface Brightness Contrast Chroma Sharpness Tint 1.00X 6500K Anamorphic Backlight Color Temperature [Image Settings] 1. Click “ ” . Parameter setting information. Parameter setting information(Next page). Display the number of the page of Image parameter setting. Swipe left and right in the bottom information area to switch pages. -
Page 13: Image And Menu Flip Settings
Setting Interface Manual Display Flip Mode H Flip V Flip Osd Flip Mode H Flip V Flip [Image and Menu Flip Settings] 1. Click “ ” ; Image and menu flip setting information;... -
Page 14: Customize +/-Key Setting
Setting Interface Backlight + - Key [Customize +/-key Setting] 1. Click “ ” ; +/- key customization Settings information;... - Page 15 Setting Interface English Bypass OSD-Language OSD-Transparancy System Reset Display Gamut Black Level Gesture Zooming [System Setting] 1. Click “ ” . System parameter setting information. System parameter setting information(Next page).
- Page 16 Setting Interface Stored from USB USB Looks Reset LUT 3D LUT [LUT Setting] 1. Click “ ” . LUT setting information.
- Page 17 Setting Interface Volume [Volume Setting] 1. Click “ ” ; Volume information;...
-
Page 18: Version Settings
Setting Interface LH5P-V3.03.02.C19.B25 Version Information Update ( USB) [Version Setting] 1. Click “ ” . View version information and upgrades. -
Page 19: Camera Control Interface
Camera Control Interface Before 8.1V Off HDMI [Camera control interface gesture switching] Swipe down on any interface can be toggle to the camera control settings interface. CxxxLong10toRec.. Wi-Fi / USB Z CAM E2(LANC) BMPCC(BLE) BMPCC(LANC) Canon(LANC) (the camera control settings interface) -
Page 20: Camera Model Settings
Camera Control Interface CxxxLong10toRec.. Wi-Fi / USB Z CAM E2(LANC) BMPCC(BLE) BMPCC(LANC) Canon(LANC) [Camera Model Setting] 1. Click “ ” . Camera model options: Wi-Fi/USB、 Z CAM E2(LANC)、 BMPCC4K(BLE)、 BMPCC(LANC)、 Canon(LANC)、 Sony(MUTI)、 Sony(LANC)、 Panasonic ( Remote) . Currently selected “Wi-Fi/USB” Display the number of the page of camera brands ,Swipe left and right in the bottom information area to switch pages. -
Page 21: Bluetooth Connection
Camera Control Interface 4K DCI 4096×2160 Bmpcc My device Add new device Disconnect [Bluetooth Connection] 1.Select “ BMPCC4K(BLE)” 2.Click “ ” . 3.Select “ ” , Make bluetooth connection( Successfully My device connected bluetooth record). 4.Select “ ” ,turn on the BMPCC4K/6K Bluetooth function Add new device and record the passcode (picture 1),enter the passcode on the monitor(Picture 2 and 3),... -
Page 22: Function Use
Camera Control Interface 4K DCI 4096×2160 Bmpcc FOCUS [Function Use] 1. Click “ ” . Adjust the parameter on the progress bar. Record. -
Page 23: Wirelessly Connect Sony A7M Iii To Monitor
Camera Control Interface [Wirelessly Connect Sony A7M iii to Monitor] 1.Turn the camera ON, select the "MENU" tab. 2.Go to the Network settings, select (Network 1) > 【Ctrl w/ Smartphone 】 (Picture Network 1 Toe!up!Tnsuqio!Gvod Tfoe!up!Dpnqvufs GUQ!Usbotgfs!Gvod Wjfx!po!UW Dusm!x0!Tnbsuqipof Bjsqmbof!Npef NFOV (Picture 3.Turn... -
Page 24: Motor Control Interface
Motor Control Interface Before 8.1V Off HDMI [Motor control interface gesture switching] Swipe up on any interface can be adjusted the motor control settings interface. NO: 1 NO: 2 NO: 3 (the motor control settings interface) -
Page 25: Motor Control
Motor Control Interface NO: 1 NO: 2 NO: 3 [Motor Control] 1. Click to select channel options “ ” . 2.Select the channel option to set the channel parameters. Record. Adjust the motor stroke. -
Page 26: Warnings
Warnings Warning: Changes or modifications not expressly approved by the party responsible for compliance could void the user’ s authority to operate the equipment. This device complies with Part 15 of the FCC Rules. Operation is subject to the following two conditions: (1) this device may not cause harmful interference, and (2) this device must accept any interference received, including interference that may cause undesired operation.
Need help?
Do you have a question about the LH5P II and is the answer not in the manual?
Questions and answers