Advertisement
- 1 Introduction
- 2 Safety Information
- 3 Technical specification
- 4 Button functions
- 5 LCD Icon Description
- 6 DT600 Thermostat Terminals Description
- 7 DTRX6 Receiver Terminals Description
- 8 DT600RF Thermostat Wiring Diagram
- 9 DT600 Thermostat Wiring Diagram
- 10 Power Up and Configuration
- 11 OpenTherm - Hot Water
- 12 Programming - Automatic Mode
- 13 Temporary Override Mode
- 14 Holiday Mode
- 15 Setting the CONTROL
- 16 Optimize function
- 17 Landlord Settings
- 18 Hourly temperature Override Mode (+Hr)
- 19 Manual Mode and setting setpoint temperature
- 20 Thermostat Pairing with the Receiver
- 21 Factory Reset
- 22 Product compliance
- 23 Videos
- 24 Documents / Resources
Introduction
The DT600 product is an intelligent temperature controller with built-in OpenTherm (OT) circuit, which can be used for indoor ambient temperature regulation in home and office. The user can connect the receiver through the thermostat to control the temperature of the specific environment of the home or office, so as to meet the user's intelligent needs for the product.
Safety Information
Use in accordance to national and EU regulations. Use the device as intended, keeping it in dry condition. Product for indoor use only. Installation must be carried out by a qualified person in accordance to national and EU regulations.
Technical specification
| DT600 Thermostat | DT600RF Thermostat | |
| Thermostat supply | 2 x AA alkaline batteries | 2 x AA alkaline batteries |
| Thermostat rating max | 5 (3) A | - |
| OpenTherm terminals | A / B | - |
| Outputs | Voltage free NC / NO / COM terminals | - |
| Temperature range | 5°C – 35°C | 5°C – 35°C |
| Temperature accuracy | 0.1°C or 0.5°C | 0.1°C or 0.5°C |
| Control algorithm | ITLC SPAN ± 0.25°C or ± 0.5°C OpenTherm | ITLC SPAN ± 0.25°C or ± 0.5°C OpenTherm |
| Radio frequency | - | 868 MHz |
| Dimension [mm] | 120 x 90 x 29 | 120 x 90 x 29 |
| DTRX6 Receiver | ||
| Receiver supply | 230 V AC | |
| Receiver rating max | 3 (1) A | |
| OpenTherm terminals | A / B | |
| Outputs | Voltage free NO / COM terminals | |
| Radio frequency | 868 MHz | |
| Dimension [mm] | 98 x 98 x 25.2 | |
Button functions

- MENU - enter the menu options, press and hold for 3sec to return to main screen or to deactivate Boost Mode.
- BOOST - activate Boost Mode.
- MANUAL - activate / deactivate Manual Mode.
- UP - increase the temperature and move through menus.
- OK - confirm changes and enter menus.
- DOWN - decrease the temperature and move through the menus.
- When in manual mode, ON will turn the boiler on
When in manual mode, OFF will turn the boiler off - Receiver operates in automatic mode according to the thermostat/Receiver output is controlled by the On/Off slide switch.
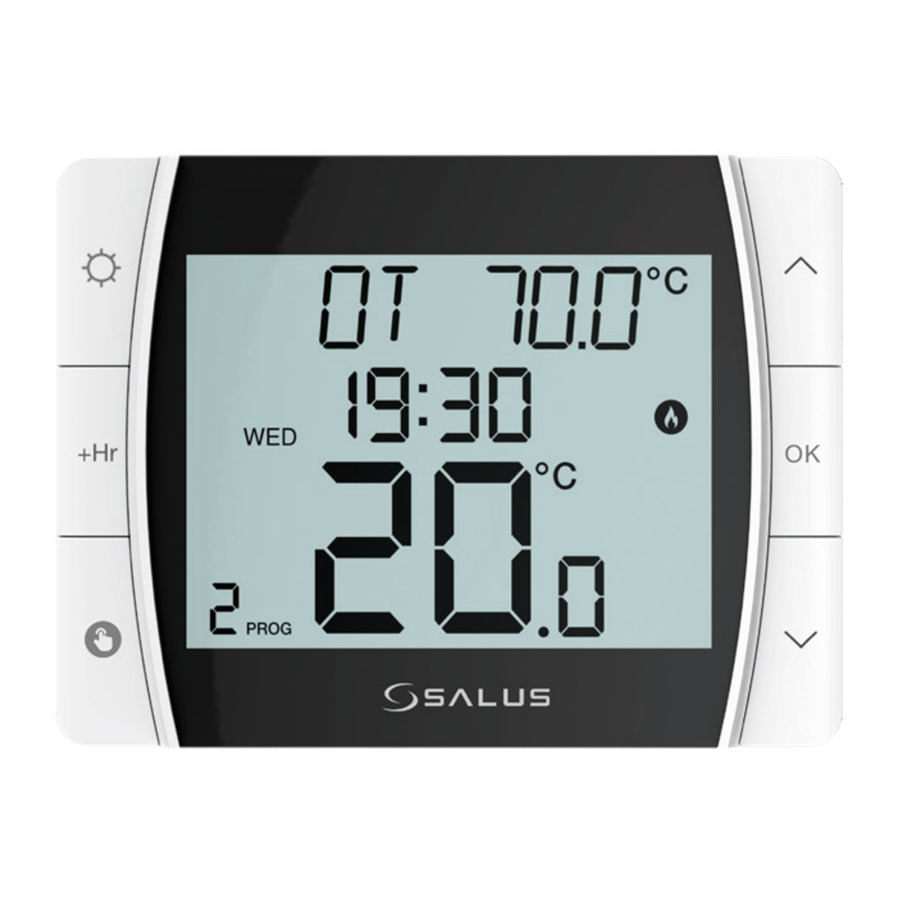
LCD Icon Description
![]()
- Day of the week
- Program number
- Program indicator
- Temperature measured/set
- Boost function
- Invalid icon
- Invalid icon
- Manual Mode On
- Landlord Mode On
- Holiday Mode On
- Low battery status
- Frost Protection Mode On
- Wireless connection with the receiver (Only for RF thermostat)
- Heating Mode On
- Temperature unit
- AM / PM
- Clock
- Text bar
DT600 Thermostat Terminals Description

| Terminal | Description |
| COM | Common Terminal |
| NO | Switched Live ON |
| NC | Switched Live OF |
| A / B | OpenTherm Communication Wire |
DTRX6 Receiver Terminals Description

| Terminal | Description |
| B / A | OpenTherm Communication Wire |
| NO | Switch Terminal |
| COM | Common Switch Terminal |
| L, N | Power Supply (230 V AC) |
DT600RF Thermostat Wiring Diagram
 Note: If you are using the DT600RF pack, the pairing between the thermostat and the receiver is already done.
OpenTherm

TPI & SPAN

DT600 Thermostat Wiring Diagram
OpenTherm

TPI & SPAN

Power Up and Configuration
 Please make the receiver connections and power the receiver before inserting the batteries into the thermostat.


- After inserting the batteries, the thermostat will power up.
- Using UP or DOWN, choose the time format.
- Press OK to confirm.
- Using UP or DOWN, set the hour and then press OK.
- Using UP or DOWN, set the minutes and then press OK.
- Using UP or DOWN, set the year and then press OK.
- Using UP or DOWN, set the month and then press OK.
- Using UP or DOWN, set the day and then press OK.
- Using UP or DOWN, select the week format.
- Press OK to confirm.
- Using UP or DOWN, enable or disable DST (Daylight Saving Time).
- Press OK to confirm.
- Press OK to confirm.
- Using UP or DOWN, select your temperature accuracy.
- Press OK to confirm.
- If you have chosen the OpenTherm electrical connection (A / B), the device software will automatically adjust to the OpenTherm settings.
![information]() OpenTherm Modulating Control is a method of control used by modern heating systems. Instead of switching a boiler on and off at intervals, modulating control allows the amount of heat provided by the boiler to be controlled to match the varying demand from the thermostat. This means the customer has greater system efficiency, energy saving and room comfort from our heating controls.
OpenTherm Modulating Control is a method of control used by modern heating systems. Instead of switching a boiler on and off at intervals, modulating control allows the amount of heat provided by the boiler to be controlled to match the varying demand from the thermostat. This means the customer has greater system efficiency, energy saving and room comfort from our heating controls.
![information]() If you have chosen the TPI or SPAN electrical connection (NO/COM contacts), using UP or DOWN, choose one of the two heating control algorithms, TPI or SPAN.
If you have chosen the TPI or SPAN electrical connection (NO/COM contacts), using UP or DOWN, choose one of the two heating control algorithms, TPI or SPAN.
![warning]() To define the chosen TPI or SPAN algorithm, follow the steps in the chapter Setting the CONTROL, starting with step 2.
To define the chosen TPI or SPAN algorithm, follow the steps in the chapter Setting the CONTROL, starting with step 2.
OpenTherm - Hot Water

- Press MENU.
- Using UP or DOWN, navigate to Hot Water submenu and press OK.
- Using UP or DOWN, adjust the temperature and then press OK.
- The thermostat will return to the main screen. Press any button.
- The text bar indicates that hot water is in operation.
Max boiler temperature settings
To set the max temperature for the connected boiler, follow the below steps:

- Press MENU.
- --
- Using UP or DOWN, navigate to CH MAX submenu and press OK.
- --
- Using UP or DOWN, set MAX temperature for boiler and then press OK to confirm.
- The thermostat will return to the main screen. Press any button.
Programming - Automatic Mode
The schedule has 6 time intervals for which different temperatures can be adjusted. You can set 2, 3 or up to 6 temperatures per day. You must define all time periods. Here is an example of setting a certain time with a certain temperature.


- Press MENU.
- Using UP or DOWN adjust the PROGRAM and then press OK.
- Using UP or DOWN, select the program type between: 5
- +2 (schedule for the working days and for the weekend)
- All (set one schedule for the entire week)
- Individual (set a daily schedule). Press OK to confirm.
- Using UP or DOWN, set the hour and then press SELECT.
- Using UP or DOWN, set the minutes and then press OK.
- Using UP or DOWN, set the temperature and then press OK.
Repeat the process for all time periods.
If you do not want to use the 6 temperature intervals / day (ex: 1 eco, 2 comfort), please see below how to delete one or more intervals.

Press the UP arrow on the interval at which you want to remove the temperature, until lines appear

When lines appear, press OK to confirm the removal of that specific interval
Please see below an example for your weekly schedule.
High temperature should be used for the ON times and low temperature for the OFF times.
| TIME: | 06.00 | 10.00 | 12.00 | 14.00 | 18.00 | 21.00 |
| 6 temp / day - eco - | 21°C | 14°C | 21°C | 14°C | 21°C | 14°C |
| 2 temp / day - comfort - | 21°C | - | - | - | - | 14°C |
Temporary Override Mode
This function is available only in automatic mode (Schedule). If a new setpoint temperature will be set during the schedule - it will be maintained until next time interval starts according to programmed schedule.

- Using UP or DOWN, set new setpoint temperature
- After new setpoint temperature set, thermostat will return to the main screen.
Temporary Override mode will be disabled when new schedule will be set.
Holiday Mode

In this mode the "frost protection" temperature is maintained for a specific number of days.

- Press MENU. Using UP or DOWN adjust the HOLIDAY and then press OK.
- Using UP or DOWN, set the year and then press OK.
- Using UP or DOWN, set the month and then press OK.
- Using UP or DOWN, set the day and then press OK.
- Using UP or DOWN, set the hour and then press OK.
- Using UP or DOWN, set the minutes and then press OK.
- Now do the same steps to set holiday mode's final day.
- Using UP or DOWN, set the temperature which should be maintained during holiday mode and then press OK.
- According to set period of time the Holiday icon will appear on the main screen and thermostat is working in holiday mode.
Setting the CONTROL
- Press MENU. Using UP or DOWN adjust the CONTROL and then press OK.

![warning]() From the two algorithms below, you can select only one of the algorithms, TPI or SPAN.
From the two algorithms below, you can select only one of the algorithms, TPI or SPAN. - Press OK.

TPI (Time Proportional & Integral) is a self-learning, time proportional algorithm. TPI type of regulation ensures economical system operation through more accurate temperature maintenance during controlling process and limits overload conditions. In addition to the exact and stable room temperature, the advantage of this system is the minimization of energy consumption and significant savings. The product offers 3 types of TPI control: 1. for radiator (6CPH); 2. for underfloor heating (3CPH); 3. for electric heating (9CPH).
Using UP or DOWN, select the TPI type you want to use. Press OK to confirm.

- Span is the temperature difference, between which thermostat operates and keeps setpoint temperature. For example, if you set setpoint temperature to 20°C and if the hysteresis is ± 0.5°C, heating will be turned on when the room temperature drops to 19.5°C and turned off when the room temperature reaches 20.5°C.

Press OK.
Using UP or DOWN, select the Span value.
Press OK to confirm.


Optimize function
Optimum Start is a selectable function which, depending on the ambient room temperature, will start the boiler operation at the optimum time to achieve the set-point temperature. It saves energy by only firing the boiler for the minimum required time.
- Press OK.

Using UP or DOWN, select Optimum START or Optimum STOP.

Optimum Stop calculates how long the house will take to cool down, then turns off the boiler at the earliest possible moment, this means the system is not running when it's not actually necessary. If there is a sudden heat loss during this period, then Optimum Stop will be overridden to regain comfort conditions.
Press OK to confirm.

- Using UP or DOWN, select ON or OFF

- Press OK to confirm.


Landlord Settings
Landlord settings is a pin code protected feature that allows the landlord to set a service reminder on the thermostat that will warn the tenant when the boiler is due its annual service.
The first time when you want to use Landlord Mode, you will have to set the pin code. Once the PIN code has been set, you can use the Landlord settings.


- Press MENU.
- Using UP or DOWN, navigate to Landlord submenu and press OK.
- Using UP or DOWN, enter the PIN code number. Press OK to confirm every digit.
- Press OK.
- Using UP or DOWN, select ON and press OK.
- Using UP or DOWN, select the due date and then press OK.
- Using UP or DOWN, select the warning period and then press OK.
- Using UP or DOWN, select the due date and then press OK.
- Press OK.
- Using UP or DOWN, enter the phone number. Press OK to confirm every digit.
- Now you can check your settings. If you want to make a change, press UP or DOWN on the relevant screen.
Once service mode has become active, the device will lock the set point temperature as set by the installer/landlord. To unlock this device, the landlord needs to be contacted and the boiler serviced.
Hourly temperature Override Mode (+Hr)
This function is available in Automatic and Manual Mode. It is used to change the setpoint temperature for a specified number of hours (up to 9 hours). Once that time is over, thermostat returns to previous mode.

- Press + Hr button to set number of hours for temperature override (e.g. to set up override for 3 hours, press the button 3 times)
- Using UP or DOWN, set a new setpoint temperature of override
- Press OK to confirm.
- After new setpoint temperature set, thermostat will return to the main screen.
To turn off Boost mode, press and hold the + Hr button until the override time disappears, or press the + Hr button repeatedly until "+0" appears.
Manual Mode and setting setpoint temperature

In this mode thermostat does not Work according to the programmed schedule but it will maintain selected temperature.


- Press HAND button to activate the Manual Mode.
- ---
- Using UP or DOWN, set new setpoint temperature
- Press OK to confirm.
- After new setpoint temperature set, thermostat will return to the main screen.
Thermostat will maintain the temperature until manual change or manual mode exit. To turn off the Manual Mode press HAND button. Once the manual mode is off, the HAND icon on the thermostat will disappear.
Thermostat Pairing with the Receiver
Note: If you are using the DT600RF pack, the pairing between the thermostat and the receiver is already done. During the pairing process, please make sure the thermostat and the receiver are at least 1 meter from each other.
Important note: The communication radius of the thermostat with the receiver is of maximum 100m, in open space. In built space, with various obstacles (eg walls, floors, metal structures, furniture elements), the communication radius will be significantly reduced. RF communication can be disrupted by local factors, such as GSM antennas, radio frequency devices or toys, or other equipment that produces electromagnetic interference. Receivers for the boiler must be powered from a stable voltage source, without frequent interruptions or voltage fluctuations (outside the standard tolerance). The manufacturer is not responsible for identifying or combating the effects of local disturbances.
If you want to re-pair the devices with each other, follow the steps below:

- Make sure that the receiver is disconnected from the power supply and the switches on it are in the AUTO and ON positions. Then connect the receiver to the power supply and wait for the green LED to glow continuously.
- Move the left switch to the OFF position with a quick motion and back to the ON position
- The green LED will start blinking, which will confirm that the receiver has entered the pairing mode.
- Press MENU.
- Using UP or DOWN, navigate to Pairing submenu and press OK.
- Using UP or DOWN, select PAIR and press OK.
- The pairing process takes up to 10 minutes. Once devices are successfully paired, LED on the receiver will go solid green.
Thermostat Pairing with the Receiver

- Press MENU. Using UP or DOWN, select TEST and press OK.
- The testing process takes up to 10 minutes.
- The green LED and the yellow LED on the receiver will begin to flash.
Factory Reset

- To reset the thermostat, press +Hr, DOWN and UP buttons simultaneously for 5 seconds.
- The device will be reset and will start up automatically.
Landlord settings will not be reset.
Product compliance
This product complies with the essential requirements and other relevant provisions of Directives EMC 2014/30/EU, LVD 2014/35/EU, RED 2014/53/EU and RoHS 2011/65/EU. The full text of the EU Declaration of Conformity is available at the following internet address: www.saluslegal.com
SALUS Controls
Units 8-10, Northfield Business Park
Forge Way, Parkgate,
Rotherham, S60 1SD
Email: sales@salus-tech.com

SALUS Controls is a member of the Computime Group.
Maintaining a policy of continuous product development SALUS Controls plc reserve the right to change specification, design and materials of products listed in this brochure without prior notice.

Issue Date: May 2022
V08

VideosHow To Wire Salus Thermostat Video
How To Reset Salus DT600RF
Documents / Resources
References
Download manual
Here you can download full pdf version of manual, it may contain additional safety instructions, warranty information, FCC rules, etc.
Download Salus Controls DT600, DT600RF - Intelligent Temperature Controller Quick Guide
Advertisement


Need help?
Do you have a question about the DT600 and is the answer not in the manual?
Questions and answers