Advertisement
Advertisement
Table of Contents

Subscribe to Our Youtube Channel
Related Manuals for zewa 11110


Summary of Contents for zewa 11110
- Page 1 Getting Started Infrared Thermometer...
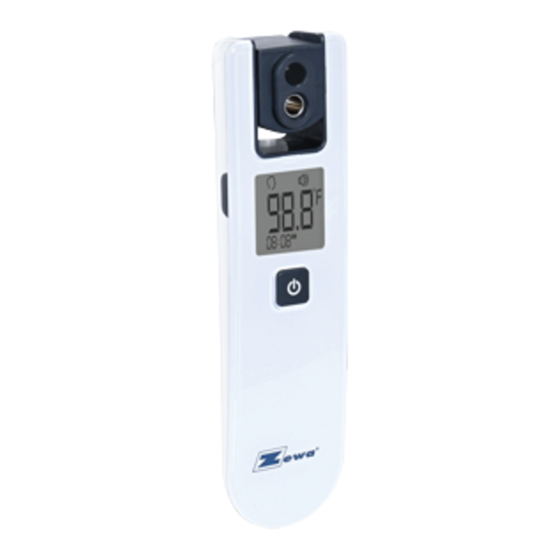
- Page 2 STEP 1 Device Setup Insert 2 x AAA batteries into bottom of the unit. Part Descriptions: 1. Temperature Sensor 2. Start Button 3. Setting Button 4. Batteries Pg. 1...
- Page 3 STEP 2 Program Date and Time After installing the batteries, the temperature unit is ashing. Follow these steps to program the thermometer. Press the Start button to change the temperature unit and the Setting button to continue. The time format is ashing (12H or 24H format).
- Page 4 The minutes are ashing. Press the Start button to change or the Setting button to continue. The year is ashing. Press the Start button to change or the Setting button to continue. The month is ashing. Press the Start button to change or the Setting button to continue.
- Page 5 STEP 3 4 Position Rotating Temperature Sensor This unique temperature sensor allows it to turn in 4 directions. Towards the user for self measurement. Towards another person to take their measurement. Straight up to take a measurement for another person or an object (if in object mode).
- Page 6 STEP 4 Take a measurement. 1. Rotate the temperature sensor to the appropriate position, the display will turn 2. Aim the thermometer at the center of the forehead with a distance of less than 2" but do NOT touch the forehead. 3.
- Page 7 Make sure you are not touching your forehead when taking a measurement. My device does not turn ON. Change the batteries (use a brand new set of batteries). Rotate the temperature sensor to an ON position. For additional FAQ’s, please visit our website at www.zewa.com Pg. 6...
- Page 8 Warranty Registration To register your warranty, visit us online at: www.zewa.com For a detailed description of your warranty, please refer to the instruction manual. Zewa Inc. 12960 Commerce Lakes Dr. # 29 Fort Myers, FL 33913 Toll Free: 888-993-3592 www.zewa.com...
Need help?
Do you have a question about the 11110 and is the answer not in the manual?
Questions and answers