Advertisement
Quick Links
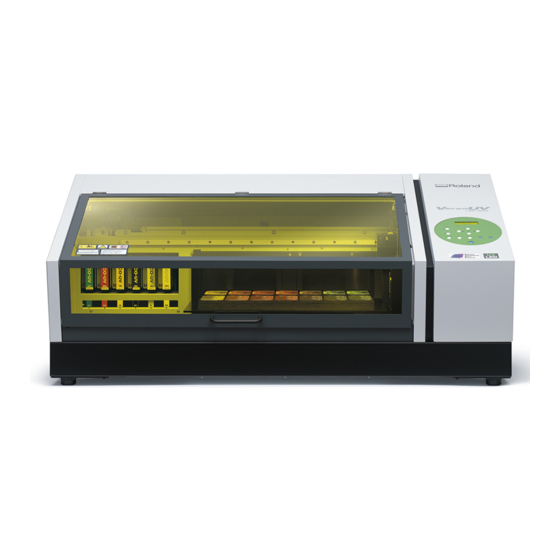
ROLAND UV FLATBED PRINTER
Tutorial
Roland VersaUV FlatBed Lef-200 Printer
File types
.EPS, .PDF, .JPG, .JPEG, .PS, .TIF, TIFF, .RVW
Max/Min Dimensions
Maximum Printing Width & Printing Length : 20 x 13 in. (508 x 330 mm)
Max acceptable media:
Width : 21.2 inches (538 mm)
Length : 14.2 inches (360 mm)
Height : 3.94 inches (100 mm)
Weight : 11 lbs (5 kg)
Materials
Can print virtually on any material (considering media constraints above)
PVC + Plastics + Acrylic
Leather + Fabric
Metal
Wood
Paper + Cardboard + Acetate
You can print on dark surfaces layering with White Ink
You can create Gloss + Matte Varnish + Emboss finishes.
Safety
Make sure to turn on BOFA Filter that is attached to the UV FlatBed when using.
Make sure to have the cover closed at all times because the machine uses UV light
to cure the ink.
Inform staff for any ink spills.
User Fees
$10 per ml of ink.
Advertisement

Related Manuals for Roland VersaUV LEF-200


Summary of Contents for Roland VersaUV LEF-200
- Page 1 ROLAND UV FLATBED PRINTER Tutorial Roland VersaUV FlatBed Lef-200 Printer File types .EPS, .PDF, .JPG, .JPEG, .PS, .TIF, TIFF, .RVW Max/Min Dimensions Maximum Printing Width & Printing Length : 20 x 13 in. (508 x 330 mm) Max acceptable media: Width : 21.2 inches (538 mm)
- Page 2 Printing Process with UV FlatBed...
- Page 3 IMPORTANT!! STOP! BEFORE ANYTHING ELSE, TURN BOFA FILTER OF UV PRINTER ON!
- Page 4 1. SETUP MEDIA at UV Flatbed Printer 1.1 Getting New Setup Media Screen : Hold SETUP key down. The screen will read NOW PROCESSING, then SETUP MEDIA. If you don’t see this on the LCD Screen you can’t do new media setup.
- Page 5 1.2 Press SETUP Key once when LCD screen says SETUP MEDIA This will start the media setup process. In this process you will manually input 3 pieces of information about your material : Height : Refers to the Height of the flat bed. You have to adjust it so the distance between the print head and your material is around 1mm.
- Page 6 1.3 Adjusting the Height : Place your material aligning it with the right lower corner of the flatbed. Press [IN] key to push the flatbed into the Head Gap Sensor, aligning your material right under it so you can see the distance between them.
- Page 7 When you are happy with the distance, quickly press [ENTER] key (if you don’t do this quickly, the machine will go back to it’s previous settings and you have to start all over) Congrats you set up the Height!
- Page 8 1.4 Adjusting Scan & Feed : Close the front cover and continue the process. The LCD screen will read SCAN/FEED with numbers next to it. This is the starting point of your printing area. If you placed your material at that (0,0) corner of the flatbed you don’t have to adjust these numbers.
- Page 9 1.5 Adjusting Width & Length : The LCD Screen will read WIDTH/LENGTH, press any cursor key to activate printing head. It will travel to the previous settings shining the laser on flatbed. By pressing Cursor keys, move the laser to the left up corner of your printing area (or material). You will see the numbers changing on the LCD screen reading your print area size.
- Page 10 Congrats you set up the Width & Length! Next the machine will home Flatbed and the Printing Head prepping for the print. The LCD screen will read NOW PROCESSING. Your media setup will be done once you see the LCD screen showing your printing area...
- Page 11 2. SETUP VISUAL at ILLUSTRATOR FOR PRINTING AREA SIZE This step will allow you to print an accurate size visual on your material even your original is much bigger than your printing area. This step will also help you to crop or adjust the ratio of your visual to get a good result on your printing area/material.
- Page 12 2.3 Save your visual using the artboard number, VERY IMPORTANT to keep the size of your print accurate. This way the visual you are saving will be inside the borders of your artboard from illustrator. •...
- Page 13 3. PREPARE PRINT SETTINGS at VERSAWORKS SOFTWARE This is the last set of settings that you will be putting into the software to print. You have to make sure that your printing area and your visual is matching. You will be able to adjust the orientation of your print,...
- Page 14 Click Get Media Width to get the Setup Media information form the machine to the software. Once you click that button your visual and your printing area will match up better. Check Fit to Media Size, because even the machine is pretty accurate on width and length information it still doesn’t show all the decimals, so there is always some little size difference that is...
- Page 15 IMPORTANT : Print orientation is tricky because the top of your visual at the preview window will be printed at the bottom of your material. Meaning the (0,0) of your visual is at the top left corner in the preview window, but (0,0) of the flatbed is at the right lower corner.
- Page 16 4. Print : Settings Window will close after you click OK to save your printing settings. All you have to do at this point to make sure that the printer is Ready to Print. Click Print Icon. Software will RIP your visual first then start printing.
Need help?
Do you have a question about the VersaUV LEF-200 and is the answer not in the manual?
Questions and answers