
Related Manuals for Comfort Products OneSpace 50-100505


Summary of Contents for Comfort Products OneSpace 50-100505
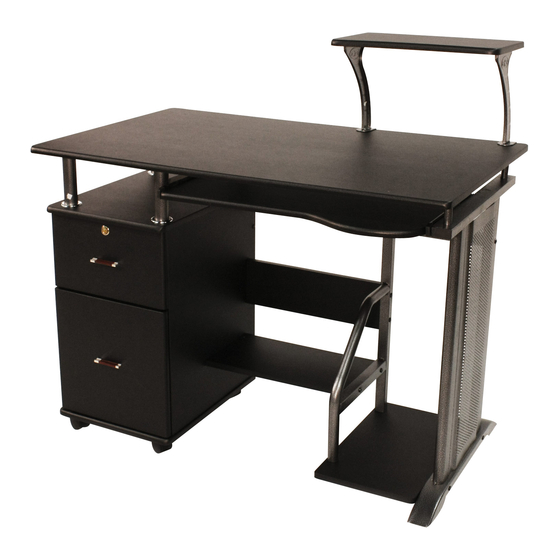
- Page 1 ™ OneSpace is a Trademark of Comfort Products, Inc. ASSEMBLY INSTRUCTIONS SUPPLIER CODE - HMOF...
-
Page 2: Parts List
PARTS LIST PAGE 1 OF 2 ITEMS ARE NOT SHOWN TO SCALE. PART DESCRIPTION FRONT BACK STOCK # QTY. Desk Top 51-100505DT Keyboard Tray 51-100505KT Printer Shelf 51-100505PS Bottom Shelf 51-100505BS Back Board 51-100505BB Book Shelf 51-100505KS Cabinet Top 51-100505CBT Cabinet Base 51-100505CBS Cabinet Wall 9... - Page 3 PARTS LIST PAGE 2 OF 2 ITEMS ARE NOT SHOWN TO SCALE. PART DESCRIPTION FRONT BACK STOCK # QTY. BACK Small Drawer 51-100505SDF Front Small Drawer 51-100505SDL Left Small Drawer 51-100505SDR Right Small Drawer 51-100505SDB Back Drawer 51-100505DB Bot tom Large Drawer 51-100505LDF Front...
-
Page 4: Hardware Parts List
HARDWARE PARTS LIST PARTS LIST (CONT’D) EXTRA HARDWARE IS INCLUDED FOR YOUR CONVENIENCE HARDWARE KIT STOCK # 51-1005HA PART DESCRIPTION PART DESCRIPTION STOCK# QTY. Right Stand 51-100505RS Cam Lock M5 x 60MM Rear Bar 51-100505RB M5 x 70MM M6 x 30MM Brace 51-100505BRC M6 x 40MM... - Page 5 DO NOT TIGHTEN SCREWS UNTIL COMPLETELY ASSEMBLED STEP 1 Separate each of the four rollers (34) into its two parts (34a) and (34b) as shown. STEP 2 Attach rollers (34b) to panels (13), (14), (18) and (19) using screws (I). Each roller should be placed on the side opposite to the groove.
- Page 6 DO NOT TIGHTEN SCREWS UNTIL COMPLETELY ASSEMBLED STEP 3 Insert the cam locks (B) into panels (13), (14), (18) and (19). Make sure the cam lock opening is facing the outer holes. B x 8 STEP 4 Insert the cams (A) into panels (17) and (12). Make sure all cams are screwed in securely.
- Page 7 DO NOT TIGHTEN SCREWS UNTIL COMPLETELY ASSEMBLED STEP 6 Insert drawer bottom (16) into the grooves of small drawer. Attach drawer back (15) using screws (H). Insert drawer bottom (16) into grooves of large drawer. Insert hangers (27) as shown. Attach drawer back (20) using screws (H).
- Page 8 DO NOT TIGHTEN SCREWS UNTIL COMPLETELY ASSEMBLED STEP 9 STEP 10 Attach casters (28) to bottom of cabinet base (8) using screws Insert cam locks (B) into panels (9) and (10) as shown. (I) as shown. Attach (9) and (10) to cabinet base (8) using cams (A) as shown. Attach cam (A) to top of cabinet base (8) Turn cam locks to lock into place.
- Page 9 DO NOT TIGHTEN SCREWS UNTIL COMPLETELY ASSEMBLED STEP 14 STEP 13 Attach rear bar (22) using two screws (F). Attach brace (23) to (4) using screws (E). E x 2 F x 2 STEP 15 Connect back board (5) and book shelf (6) to frame using eight screws (C) and one screw (E).
- Page 10 DO NOT TIGHTEN SCREWS UNTIL COMPLETELY ASSEMBLED STEP 16 STEP 17 Attach cabinet back (11) using four screws (C). Turn desk top (1) upside-down. Attach (24) and (25) using eight screws (K). NOTE: make sure the position of the rollers on part (24) matches the diagram.
- Page 11 DO NOT TIGHTEN SCREWS UNTIL COMPLETELY ASSEMBLED STEP 20 Insert cam locks (B) into cabinet walls (9) and (10). Insert extenders (26) into right stand (21). Carefully place desktop (1) onto desk frame. Tighten cam locks (B) and attach two screws (J). 26 x 2 B x 4 J x 2...
- Page 12 DO NOT TIGHTEN SCREWS UNTIL COMPLETELY ASSEMBLED STEP 23 Install assembled cabinet drawers. STEP 24 Attach keyboard tray (2) using four screws (I). I x 4...
-
Page 13: Safety And Maintenance
This warranty applies under conditions of normal use and is not subject to defects caused by improper of transportation or labor. In no event shall Comfort Products be liable in either tort or contract for any loss or direct, special, incidental, consequential or exemplary damages. This Limited Warranty is NOT applicable to end-user customers who use Comfort Products for rental purposes.
Need help?
Do you have a question about the OneSpace 50-100505 and is the answer not in the manual?
Questions and answers