Table of Contents
Advertisement
Available languages
Available languages
Quick Links
Advertisement
Chapters
Table of Contents

Related Manuals for GF Piping Systems TM 160 ECO


Summary of Contents for GF Piping Systems TM 160 ECO
- Page 1 GF Piping Systems Instruction manual TM 160/250/315 ECO Butt Fusion Machine...
- Page 2 All rights reserved, in particular the rights of duplication and distribution as well as translation. Duplication and reproduction in any form (print, photocopy, microfilm or electronic) require the written permission of Georg Fischer Omicron S.r.l..
-
Page 3: Table Of Contents
Operating instructions TM 160/250/315 ECO Table of contents Table of contents Page 1 About this manual 1.1 Warning notice 1.2 Other symbols and notices 1.3 Abbreviations 2 Safety instructions 2.1 Proper use 2.2 General safety measures 2.3 Working with safety in mind 2.4 ... - Page 4 Table of contents Operating instructions TM 160/250/315 ECO 10.1 Replacement of worn parts 10.2 Hydraulic system 10.3 Hydraulic unit 11 Customer Service...
-
Page 5: About This Manual
1 About this manual About this manual This manual is valid for TM 160 ECO, TM 250 ECO and TM 315 ECO butt- fusion machines (hereinafter referred to as TM 160/250/315 ECO). The warning notices, symbols and their meanings as used in this manual are explained below to help you quickly understand the format of this instruction manual and how to use the machine safely. -
Page 6: Other Symbols And Notices
1 About this manual Operating instructions TM 160/250/315 ECO Other symbols and notices Symbol Meaning Attention Mandatory: you must observe this regulation Advice Suggest: This notice contains especially important information Abbreviations Abbr. Meaning TM 160 Butt fusion machine d 40–160 mm TM 250 Butt fusion machine d 75–250 mm TM 315... -
Page 7: Safety Instructions
Operating instructions TM 160/250/315 ECO 2 Safety instructions Safety instructions The TM 160/250/315 Butt Fusion Machines are designed according to the latest standards of technology. Using it for purposes other than those described in this manual may cause injury to the operator or to others. It may also cause damage to the machine or other equipment. -
Page 8: Working With Safety In Mind
2 Safety instructions Operating instructions TM 160/250/315 ECO Working with safety in mind “Make your contribution to safety in the workplace." Report any deviations from normal operation immediately to the person in charge. Always keep safety in mind while working. For your own personal safety as well as for the safe and optimal handling of the machine, the TM 160/250/315 must be installed correctly. -
Page 9: Disposal
Operating instructions TM 160/250/315 ECO 2 Safety instructions Disposal Shavings and used hydraulic oil should be disposed of properly. Observe all the regulations, standards and guidelines applicable in your country. Separate collection of electronic and electrical waste (from the equipment) has to be ensured through appropriate systems. note: The here below symbol indicating separate collection for electrical and electronic equipment according to 2002/96/CE WEEE directive (Waste... -
Page 10: General
Should problems nevertheless arise, please contact directly Georg Fischer Omicron s.r.l. or the nearest service representative. This manual applies only to the TM 160 ECO, TM 250 ECO and TM 315 ECO butt-fusion machines (hereinafter referred to as TM 160/250/315 ECO). -
Page 11: Copyright
Operating instructions TM 160/250/315 ECO 3 General Copyright The copyright for this instruction manual is held by Georg Fischer Omicron S.r.l.. This instruction manual is intended for assembly, operation and maintenance personnel. No part of the technical regulations or illustrations contained herein may be reproduced or distributed in any form, used illicitly for competitive purposes or passed on to others. -
Page 12: Product Identification And Description
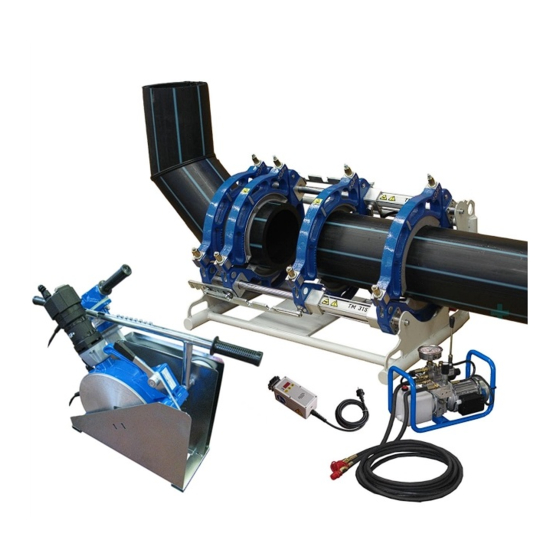
4 Product identification and description Operating instructions TM 160/250/315 ECO Product identification description Product identification According the directives for machines an identification tag is added to the base machine, showing the following information: Manufacturer Type of machine Serial number Piston area Pipes range Year of manufacture Wheight... - Page 13 Operating instructions TM 160/250/315 ECO 4 Product identification and description protective caps . Heating element PTFE-coating Power multi-cord with integrated temperature sensor probe Thermometer integrated Electric planer Torque transmission robust worm-gear device Self locking device against accidental unhooking (1) ...
-
Page 14: Technical Specifications
5 Technical specifications Operating instructions TM 160/250/315 ECO Technical specifications Machine Butt-fusion machine to weld thermoplastic description pipes PE, PP Type TM 160 TM 250 TM 315 Serial No........Total piston 353 mm 510 mm 510 mm area Max. -
Page 15: Transport And Assembly
Operating instructions TM 160/250/315 ECO 6 Transport and assembly Transport and assembly Packaging A decisive factor in the choice of packaging is the means of transport. Usually the machine and all the accessories are delivered in a cardboard box on a pallet or wooden case upon request. Sensitivity Special care must be taken when transporting the machine in order to prevent damage from impact or improper loading and unloading. -
Page 16: Fusion Preparation
7 Fusion preparation Operating instructions TM 160/250/315 ECO Fusion preparation General information The Fusion Process described in the following chapters is based on the instruction sheets and guidelines issued by the DVS 2207. The fusion area should be protected against the influences of weather (humidity, ambient temperature <+ 5 °C, extreme direct exposure to sun) with such measures as pre-warming the fusion materials, tents, heating. - Page 17 Operating instructions TM 160/250/315 ECO 7 Fusion preparation In order to weld pipes and/or fittings with an outer diameter smaller than the clamp of the base machine, insert matching clamping half shells and fasten them with the screws. Clamp the components to be jointed in that way, that the pipe/fitting ends reach out at least 30 mm from the clamps in order to perform a proper weld.
-
Page 18: Heating Element Temperature Regulator
7 Fusion preparation Operating instructions TM 160/250/315 ECO 7.2.1 Heating Element Temperature Regulator 1. Connect Heating element to the temperature regulator. Caution Check the voltage! The generator has to be started before connecting the consumer and must supply a constant output tension! Any sudden changes could compromise the correct welding result and/or damage the control. -
Page 19: Heating Element Temperature Adjustment
Operating instructions TM 160/250/315 ECO 7 Fusion preparation 7.2.3 Heating element temperature adjustment After the heating element is connected and the temperature regulator is supplied with power, push the button "ON SET" (3) for about 5-6 seconds. The LED 2 starts flashing, indicating that the programming mode is activated, the display indicates the last adjusted set point. -
Page 20: Error Messages
7 Fusion preparation Operating instructions TM 160/250/315 ECO 7.2.5 Error messages The temperature regulator controls different possible errors or difficulties concerning the connections and the power supply. As soon as an error occurs the ERC is providing the corresponding error message on the display. -
Page 21: Fusion
Operating instructions TM 160/250/315 ECO 8 Fusion Fusion The basics of butt fusion For butt fusion with a heating element, the parts to be joined (pipe/pipe, pipe/fitting fitting/fitting) heated fusion temperature in the fusion area and are fused under pressure without the use of additional materials. -
Page 22: The Fusion Process
8 Fusion Operating instructions TM 160/250/315 ECO The fusion process 8.2.1 Calculating drag pressure Danger of crushing hands! Machine slide moves! Danger of injury in the moving machine slide! Warning When moving to the end positions do not reach into the machine. The machine drag pressure must be calculated before each new fusion! 1. - Page 23 Operating instructions TM 160/250/315 ECO 8 Fusion Caution Constant high pressure when facing (15-20 bar over dragging pressure), can cause damage on the drive and/or the motor of the facer. 5. Release the pressure to Zero by pulling the control lever half way between 0 position and open “<>”.
-
Page 24: Calculating Of The Fusion Pressure
8 Fusion Operating instructions TM 160/250/315 ECO 8.2.3 Calculating of the fusion pressure Attention The fusion pressure is the sum of the “table value + movement pressure” (e.g. 31 bar* 6 bar = 37 bar) * for TM 315 and TM 250 HD–PE d 200 mm, SDR 11 see pressure tables 8.2.4 Adjusting of the fusion pressure 15. -
Page 25: Fusion Process
Operating instructions TM 160/250/315 ECO 8 Fusion 8.2.5 Fusion process The PTFE coating of the heating element must be protected from mechanical damage and/or dirt. Heating elements with damaged PTFE-covering has to be replaced. Non-observance affects the quality of the joining. Danger of burning! The heater is hot (220 °C)! Danger of burning hands on the hot heater. - Page 26 8 Fusion Operating instructions TM 160/250/315 ECO RELEASE (reduction of equalization pressure after formation of the fusion bead) 1. After formation of the equalization bead around the entire pipe circumference (see corresponding welding table), move control lever towards “open <>“ (lever position: halfway between neutral and fully open) until pressure on manometer shows nearly 0.
-
Page 27: Visual Check Of Welding Bead
Operating instructions TM 160/250/315 ECO 8 Fusion COOLING (the fusion joint) Attention The cooling time in the base machine under fusion pressure must always be observed. The use of cooling agents is not permitted during cooling. During the cooling time the fusion pressure has to be supervised by the operator and if necessary readjusted! RELEASING (the hydraulic system) Danger of bruising! -
Page 28: Example Tm
8 Fusion Operating instructions TM 160/250/315 ECO Example TM 315/250 Pipe/fitting Heater temperature 220 °C Pipe outer diameter 200 mm Drag resistance 6 bar Pressure rating SDR 11 Table value 31 bar Wall thickness 18.2 mm Adjustment value on 37 bar hydraulic unit All pressure, time and temperature values to be taken out from the corresponding welding tables! -
Page 29: Failure Analysis
Operating instructions TM 160/250/315 ECO 9 Failure analysis Failure analysis Feature Description Evaluation group External state of joint Cracks running length-wise or cross-wise to weld. They may Permissible Permissible Permissible be located: In the weld In base material In heat affected zone ... - Page 30 9 Failure analysis Operating instructions TM 160/250/315 ECO Feature Description Evaluation group External state of joint Welding flash too wide or too pg.14 pg.14 pg.14 narrow over part or all of weld DVS 2202-1 DVS 2202-1 DVS 2202-1 length, caused by, for example: guidelines guidelines guidelines...
- Page 31 Operating instructions TM 160/250/315 ECO 10 Maintenance 10 Maintenance The TM 160/250/315 should be checked and cleaned periodically. Normal care of the machine is limited to periodic cleaning of the outside. Every 3200 hours of use or after 2 years the complete machine with all components should be maintained and calibrated at a Georg Fischer certified service station.
- Page 32 10 Maintenance Operating instructions TM 160/250/315 ECO 10.3 Hydraulic unit Oil level check Check the hydraulic oil level regularly. If necessary, refill the hydraulic oil according to chapter 4 after . Changing the hydraulic oil After 3200 operating hours hydraulic oil need to be changed. To replace the hydraulic oil, proceed as follows: 1.
- Page 33 Operating instructions TM 160/250/315 ECO 10 Maintenance We recommend having a service booklet to record maintenance work for each TM 160/250/315 machine. example: Date Service Repair Comments 15.09.2008 Georg Everything OK Fischer Omicron 25.10.2008 Georg Heating element Cable replaced Fischer Omicron...
- Page 34 11 Customer Service Operating instructions TM 160/250/315 ECO 11 Customer Service There is a separate spare parts list for ordering replacement parts. If repairs are necessary, please contact your local representative. Please indicate the following information: Customer name. Product description ...
- Page 36 GF Piping Systems Worldwide at home Our sales companies and representatives ensure local customer support in over 100 countries www.gfps.com Argentina / Southern South America Finland Mexico / Northern Latin America Singapore Georg Fischer Central Plastics Georg Fischer AB Georg Fischer S.A. de C.V.
- Page 37 GF Piping Systems Betriebsanleitung TM 160/250/315 ECO Stumpfschweissmaschine...
- Page 38 Alle Rechte, insbesondere das Recht der Vervielfältigung und Verbreitung sowie der Übersetzung, vorbehalten.Vervielfältigungen oder Reproduktionen in jeglicher Form (Druck, Fotokopie, Mikrofilm oder Datenerfassung) bedürfen derschriftlichen Genehmigung durch die Georg Fischer Omicron S.r.l..
- Page 39 Betriebsanleitung TM 160/250/315 ECO Inhaltsverzeichnis Inhaltsverzeichnis Seite 1 Zu dieser Anleitung 1.1 Warnhinweise 1.2 Weitere Symbole und Auszeichnungen 1.3 Abkürzungen 2 Sicherheitshinweise 2.1 Bestimmungsgemässe Verwendung 2.2 Sicherheitsvorschriften 2.3 Sicherheitsbewusst arbeiten 2.4 Entsorgung 3 Allgemeines 3.1 Einleitung 3.2 Anwendungsbereich 3.3 Urheberrecht 4 ...
- Page 40 Inhaltsverzeichnis Betriebsanleitung TM 160/250/315 ECO 10.1 Auswechseln von Verschleissteilen 10.2 Hydrauliksystem 10.3 Hydraulikaggregat 11 Service/Kundendienst...
-
Page 41: Zu Dieser Anleitung
Betriebsanleitung TM 160/250/315 ECO 1 Zu dieser Anleitung Zu dieser Anleitung Für das schnelle Erfassen dieser Anleitung und das sichere Umgehen mit der Maschine werden Ihnen hier die in der Anleitung verwendeten Warnhinweise, Hinweise Symbole sowie deren Bedeutung vorgestellt. Warnhinweise In dieser Anleitung werden Warnhinweise verwendet, um Sie vor Verletzungen oder vor Sachschäden zu warnen. -
Page 42: Weitere Symbole Und Auszeichnungen
1 Zu dieser Anleitung Betriebsanleitung TM 160/250/315 ECO Weitere Symbole und Auszeichnungen Symbol Bedeutung Hinweise: Enthalten besonders wichtige Informationen Wichtig, zum Verständnis. Hinweis Gebot: Dieses Symbol müssen Sie beachten. Handlungsaufforderung in einer Handlungsabfolge: Hier müssen Sie etwas tun. Allein stehende Handlungsaufforderung: Hier müssen Sie etwas tun. -
Page 43: Sicherheitshinweise
Betriebsanleitung TM 160/250/315 ECO 2 Sicherheitshinweise Sicherheitshinweise 160/250/315 Stumpfschweissmaschinen (hier weiter 160/250/315 genannt) sind nach dem Stand der Technik gebaut. Ein anderer Einsatz als der in dieser Anleitung beschriebene, kann zu Personenschäden des Benutzers oder Dritter führen. Ferner können die Maschine oder andere Gegenstände beschädigt werden. -
Page 44: Sicherheitsbewusst Arbeiten
2 Sicherheitshinweise Betriebsanleitung TM 160/250/315 ECO Sicherheitsbewusst arbeiten "Leisten auch Sie Ihren Beitrag zur Sicherheit am Arbeitsplatz." Abweichungen vom Betriebsverhalten sofort dem Verantwortlichen melden. Alle Arbeiten sicherheitsbewusst durchführen. Zu Ihrer persönlichen Sicherheit sowie als Voraussetzung für einen sicheren und bezüglich Handhabung optimalen Betrieb ist eine praxisgerechte Installation der TM 160/250/315 unumgänglich. -
Page 45: Entsorgung
Betriebsanleitung TM 160/250/315 ECO 2 Sicherheitshinweise Entsorgung Hobelspäne und Hydrauliköl vorschriftsgemäss entsorgen. Länderspezifische Vorschriften, Normen und Richtlinien beachten. Getrennte Sammlung von Elektronik- und Elektrik - Abfall muss durch geeignete Systeme sichergestellt sein. Bemerkung: Das unten abgebildete Symbol zeigt die separate Sammlung von Elektronik- und Elektrik - Abfall entsprechend der 2002/96/CE WEEE Anweisung an (Waste Electrical and Electronic Equipment). -
Page 46: Allgemeines
Georg Fischer Verkaufsgesellschaft. Diese Betriebsanleitung bezieht sich nur auf die Stumpfschweiss – Maschinen des Typs TM 160 ECO, TM 250 ECO und TM 315 ECO (hier weiterhin als TM 160/250/315 ECO bezeichnet). Gegenüber Darstellungen und Angaben in dieser Betriebsanleitung bleiben technische Änderungen, die zur Verbesserung der Maschine... -
Page 47: Urheberrecht
Betriebsanleitung TM 160/250/315 ECO 3 Allgemeines Urheberrecht Urheberrecht für diese Betriebsanleitung liegt Georg Fischer Omicron S.r.l.. Diese Betriebsanleitung ist für das Montage-, Bedienungs- und Überwachungspersonal bestimmt. enthält Vorschriften Zeichnungen technischer Art, die weder vollständig noch teilweise vervielfältigt, verbreitet oder zu Zwecken des Wettbewerbs unbefugt verwendet oder anderen mitgeteilt werden dürfen. -
Page 48: Aufbau Des Produkts, Ausrüstung
4 Aufbau des Produkts, Ausrüstung Betriebsanleitung TM 160/250/315 ECO Aufbau des Produkts, Ausrüstung Produkt Kennzeichnung Entsprechend der Richtlinien zur Maschinenkennzeichnung ist an der Grundmaschine ein Typenschild angebracht. Folgende Angaben sind enthalten: Hersteller Maschinentyp Seriennummer Gesamt Kolbenfläche Rohrdimensionen Baujahr Maschinengewicht Barcode Standard –... - Page 49 Betriebsanleitung TM 160/250/315 ECO 4 Aufbau des Produkts, Ausrüstung Heizelement Hochwertige antihaft PTFE- Beschichtung Versorgungskabel mit Knickschutz (4 m) Eingebauter Thermometer schnellen Temperaturprüfung Hobeleinheit Kraftübertragung mittels robustem Schneckenradantrieb Hobelsicherung mit Selbstarretierung (1) Hobelmesser doppelseitig geschliffen (2) ...
-
Page 50: Technische Daten
5 Technische Daten Betriebsanleitung TM 160/250/315 ECO Technische Daten Stumpfschweiss–Maschinen zum Verbinden von thermoplastischen Kunststoffen PE, PP TM 160 TM 250 TM 315 Serien Nr........Kolbenfläche (gesamt) 353 mm 510 mm 510 mm Druck (max.) 100 bar 160 bar 160 bar Hydraulik Öl... -
Page 51: Transport Und Montage
Betriebsanleitung TM 160/250/315 ECO 6 Transport und Montage Transport und Montage Verpackung Mitentscheidend für die Verpackungsart ist der Transportweg. Im Normalfall wird die Maschine und Zubehör auf einer Palette mit Kartonbox geliefert. Empfindlichkeit Beim Transport der TM 160/250/315 ist besonders vorsichtig zu verfahren, um Schäden durch Gewalteinwirkung oder unvorsichtiges Be- und Entladen zu vermeiden. -
Page 52: Schweissvorbereitung
7 Schweissvorbereitung Betriebsanleitung TM 160/250/315 ECO Schweissvorbereitung Allgemeine Hinweise nachfolgenden Erläuterungen Anweisungen Schweissvorbereitung und des Schweissvorgang basieren auf den Definitionen der Merkblätter und Richtlinien des DVS. Schweissbereich ungünstigen Witterungseinflüssen (Feuchtigkeit, Umgebungstemperatur <+ °C, extreme direkte Sonneneinstrahlung) durch Massnahmen Vorwärmen Schweissgutes, Einzelten, Beheizen zu schützen. Ausschlaggebend für ein optimales Arbeiten mit der TM 160/250/315 ist Einsatz geschultem... - Page 53 Betriebsanleitung TM 160/250/315 ECO 7 Schweissvorbereitung Falls die Hydraulikschläuche nicht benutzt werden verschliesse stets die Schnellkupplungen mit den Schutzkappen. Schutzkappen vorgängig reinigen. Ersetze das Heizelement falls die PTFE - Beschichtung Schäden aufweist, fehlerhafte Beschichtung kann die Schweissqualität beeinflussen. Um Rohre/Formstücke mit kleinerem Aussendurchmesser als der Nenndurchmesser der Grundmaschine verarbeiten zu können, werden Reduktionseinsätze eingesetzt und mit einer Schraube gesichert.
-
Page 54: Heizelement Regelung
7 Schweissvorbereitung Betriebsanleitung TM 160/250/315 ECO 7.2.1 Heizelement Regelung 1. Vor Anschluss des Netzkabels an die Spannungsversorgung, stelle sicher, dass das Heizelement am Temperaturregler angeschlossen ist. Warnung Prüfe die Spannung! Der Generator muss vor Anschluss der Verbraucher gestartet werden muss eine konstante Ausgangsspannung... -
Page 55: Heizelement Temperatureinstellung
Betriebsanleitung TM 160/250/315 ECO 7 Schweissvorbereitung 7.2.3 Heizelement Temperatureinstellung Nach Anschluss des Heizelementkabels und der Spannungsversorgung an den Regler, halte den Taster (3) "ON SET" für 5 – 6 Sekunden lang gedrückt. Die LED (2) startet zu blinken und zeigt an, dass der Programmiermodus aktiviert ist. -
Page 56: Fehlermeldungen
7 Schweissvorbereitung Betriebsanleitung TM 160/250/315 ECO 7.2.5 Fehlermeldungen Das Temperaturregler zeigt verschiedene Fehlermeldung in Bezug auf den Anschluss der Komponenten und der Spannungsversorgung an. Sobald ein Fehler festgestellt wird, ertönt ein akustisches Signal und der entsprechende Fehlermeldung wird angezeigt. Um Fehlermeldungen quittieren zu können, muss das ERC Aus –... -
Page 57: Schweissvorgang
Betriebsanleitung TM 160/250/315 ECO 8 Schweissvorgang Schweissvorgang Grundlagen zum Stumpfschweissen Beim Heizelement-Stumpfschweissen werden die zu verbindenden Teile (Rohr/Rohr, Rohr/Fitting oder Fitting/Fitting) im Schweissbereich auf Schweisstemperatur erwärmt und unter Druck ohne Verwendung von Zusatzwerkstoffen verschweisst. Heizelement-Stumpfschweissverbindung erfolgt einem kontrollierbaren Angleichdruck. Es können nur gleiche Werkstoffe verschweisst werden. Hinweis Die Wanddicken im Schweissbereich müssen gleich dick sein. -
Page 58: Schweissablauf
8 Schweissvorgang Betriebsanleitung TM 160/250/315 ECO Schweissablauf 8.2.1 Ermitteln des Bewegungsdrucks Quetschgefahr an den Händen! Beweglicher Maschinenschlitten! Quetschgefahr durch sich bewegenden Maschinenschlitten! Warnung Beim Anfahren der Endpositionen nicht in die Maschine fassen. Hinweis Der Maschinen-Bewegungsdruck muss vor jedem Schweissvorgang neu ermittelt werden. - Page 59 Betriebsanleitung TM 160/250/315 ECO 8 Schweissvorgang Vorsicht Langfristig zu hoher Hobeldruck führt zu einer Beschädigung des Hobelantriebes oder Hobelmotors. Zur einwandfreien Kontrolle der Spaltbreite und des Wandversatzes müssen immer beide Seiten gehobelt werden! 5. Ablassen des Hobeldrucks auf Null bar, durch Positionieren des 0,5 mm Steuerhebels in die Mittelposition zwischen Neutral und „Öffnen“...
-
Page 60: Berechnen Des Fügedrucks
8 Schweissvorgang Betriebsanleitung TM 160/250/315 ECO 8.2.3 Berechnen des Fügedrucks Hinweis Der Fügedruck resultiert aus dem "Tabellenwert + Bewegungsdruck" (z. B. 31 bar * 6 bar = 37 bar) * für TM 315 und TM 250 HD–PE d 200 mm, SDR 11 siehe Schweisstabelle 8.2.4 Einstellen des Fügedrucks 1. - Page 61 Betriebsanleitung TM 160/250/315 ECO 8 Schweissvorgang 3. Bis der voreingestellte Druck aufgebaut ist, auf dieser Position bleiben und 15 s halten. 4. Steuerhebel langsam in 0 -Position zurückführen. Hinweis Angleichdruck = Fügedruck Der Angleichdruck muss vom Bediener am Manometer überwacht und gegebenenfalls nachgeregelt werden.
- Page 62 8 Schweissvorgang Betriebsanleitung TM 160/250/315 ECO Fügen (Schweissvorgang) Steuerhebel in Richtung "Schliessen" drücken bis Rohre sich berühren und der voreingestellte Fügedruck aufgebaut ist, auf dieser Position bleiben und 15 s halten. Steuerhebel langsam in 0-Position zurückführen. Die zu fügenden Flächen werden verschweisst. Das Heizelement ohne Beschädigung und Verschmutzung der ...
-
Page 63: Visuelle Prüfung Der Schweissnaht
Betriebsanleitung TM 160/250/315 ECO 8 Schweissvorgang Visuelle Prüfung der Schweissnaht Naht unmittelbar nach dem Ausspannen der Schweissverbindung visuell bezüglich des korrekt ausgebildeten Doppelwulstes und des k -Masses prüfen. Gleichmässiger k > 0 Doppelwulst Beispiel Rohr/Fitting HD–PE Heizelementtemperatur 220°C Rohr- 200 mm Bewegungswiderstand 6 bar Aussendurchmesser... -
Page 64: Fehleranalyse Stumpfschweissen
9 Fehleranalyse Stumpfschweissen Betriebsanleitung TM 160/250/315 ECO Fehleranalyse Stumpfschweissen 1. Auf Risse längs oder quer zur Schweissnaht prüfen – in der Schweissnaht – in der Wärmeflusszone – im Grundwerkstoff 2. Wulstkerben durchgehend oder örtlich in Längsrichtung der Schweissnaht, mit Kerbgrund im Grundwerkstoff durch –... - Page 65 Betriebsanleitung TM 160/250/315 ECO 9 Fehleranalyse Stumpfschweissen 9. Bindefehler an den Fügeflächen, teilweise oder über den gesamten Umfang durch – verschmutzte und/oder oxydierte Fügeflächen – zu lange Umstellzeit – zu tiefe/zu hohe Heizelement-Temperatur 10. Lunker in den Fügeflächen durch – zu wenig Fügedruck –...
- Page 66 10 Wartung Betriebsanleitung TM 160/250/315 ECO 10 Wartung Die TM 160/250/315 ist, einwandfreie Behandlung vorausgesetzt, wartungsfrei. Der normale Unterhalt der TM 160/250/315 beschränkt sich auf regelmässige äussere Reinigung. Alle 3200 Arbeitsstunden oder nach 2 Jahren sollte die gesamte Maschine von einer Georg Fischer Servicestelle gewartet und kalibriert werden 10.1 Auswechseln von Verschleissteilen...
- Page 67 Betriebsanleitung TM 160/250/315 ECO 10 Wartung 10.3 Hydraulikaggregat Ölstandkontrolle Der Hydraulik-Ölstand ist laufend zu kontrollieren. Bei Bedarf Hydrauliköl gemäss nachfolgender Anweisung wechseln. Wechsel des Hydrauliköls Nach ca. 3200 Betriebsstunden Hydrauliköl wechseln. 1. Stelle sicher, daß der Hydraulikdruck komplett auf Null abgelassen ist. 2.
- Page 68 10 Wartung Betriebsanleitung TM 160/250/315 ECO Wir empfehlen, für jede TM 160/250/315 ein Wartungsheft zu führen. Wartungsheft Beispiel: Datum Wartung Reparatur Bemerkung 15.09.2008 alles i. O. 25.10.2009 Heizelement Kabel ersetzt...
- Page 69 Betriebsanleitung TM 160/250/315 ECO 11 Service/Kundendienst 11 Service/Kundendienst Für das Bestellen von Ersatzteilen siehe separate Ersatzteilliste. Für die Behebung von Störungen wenden Sie sich bitte direkt an unsere für Sie zuständige Niederlassung. Geben Sie bitte folgende Daten an: Kunden Name ...
- Page 70 11 Service/Kundendienst Betriebsanleitung TM 160/250/315 ECO...
- Page 72 GF Piping Systems Weltweit für Sie da Unsere Verkaufsgesellschaften und Vertreter vor Ort bieten Ihnen Beratung in über 100 Ländern. www.gfps.com Argentina / Southern South America Finland Mexico / Northern Latin America Singapore Georg Fischer Central Plastics Georg Fischer AB Georg Fischer S.A.
- Page 73 GF Piping Systems Manuale Istruzioni TM 160/250/315 ECO Macchina professionale da cantiere per saldature di testa...
- Page 74 I dati tecnici pubblicati in questo manuale hanno solamente scopo informativo. Ci riserviamo pertanto la facoltà di cambiarli senza preavviso. Nostra condizione generale di vendita.
- Page 75 Manuale Istruzioni TM 160/250/315 ECO Indice Indice Pagina 1 Informazioni sull’uso del manuale 1.1 Informazioni sugli avvertimenti 1.2 Altri simboli e informazioni 1.3 Abbreviazioni 2 Istruzioni sulla sicurezza 2.1 Corretto utilizzo 2.2 Misure di sicurezza generali 2.3 Lavorare con sicurezza 2.4 ...
- Page 76 Indice Manuale Istruzioni TM 160/250/315 ECO 9 Analisi dei difetti di saldatura 10 Manutenzione 10.1 Sostituzione di parti deteriorabili 10.2 Sistema idraulico 10.3 Centralina idraulica 11 Servizio clienti...
-
Page 77: Informazioni Sull'uso Del Manuale
Manuale Istruzioni TM 160/250/315 ECO 1 Informazioni sull’uso del manuale Informazioni sull’uso del manuale Il presente manuale ha lo scopo di illustrare e rendere note le istruzioni e le misure di sicurezza per il corretto utilizzo della macchina. Prima di operare sulla macchina, è obbligatorio istruire il PERSONALE UTILIZZATORE sul contenuto del presente manuale. -
Page 78: Altri Simboli E Informazioni
1 Informazioni sull’uso del manuale Manuale Istruzioni TM 160/250/315 ECO Altri simboli e informazioni Simbolo Significato Attenzione E’ necessario osservare scrupolosamente quanto descritto Suggerimento E’ consigliabile osservare quanto suggerito Abbreviazioni Abbreviazione Significato TM 160 Saldatrice testa a testa d 40–160 mm TM 250 Saldatrice testa a testa d 75–250 mm TM 315... -
Page 79: Istruzioni Sulla Sicurezza
Manuale Istruzioni TM 160/250/315 ECO 2 Istruzioni sulla sicurezza Istruzioni sulla sicurezza Le Saldatrici TM 160/250/315 sono state costruite secondo i più moderni standards tecnologici e presenta un funzionamento sicuro se impiegata correttamente. La macchina può rappresentare un pericolo qualora fosse usata impropriamente o da personale non qualificato. -
Page 80: Lavorare Con Sicurezza
2 Istruzioni sulla sicurezza Manuale Istruzioni TM 160/250/315 ECO Lavorare con sicurezza “Cercare di contribuire per rendere sicuro il posto di lavoro in cui si opera." Segnalare, alle persone responsabili, qualsiasi funzionamento diverso da quello normale. Considerare sempre le misure di sicurezza da adottare mentre si lavora. -
Page 81: Disposizioni
Manuale Istruzioni TM 160/250/315 ECO 2 Istruzioni sulla sicurezza Disposizioni I trucioli di plastica asportati e l’olio idraulico usato devono essere eliminati secondo le normative vigenti. La rottamazione del prodotto con tutti i suoi componenti (elettronica, acciaio, alluminio e plastica) deve avvenire secondo le normative vigenti in materia di smaltimento rifiuti. -
Page 82: Generalità
è stata acquistata o al più vicino centro di assistenza autorizzato. Questo manuale si riferisce esclusivamente alle saldatrici TM 160 ECO, TM 250 ECO e TM 315 ECO e ai suoi componenti. Il costruttore si riserva in qualsiasi momento la facoltà di apportare le modifiche necessarie al miglioramento delle TM 160/250/315 ECO anche se non previste o dichiarate nel presente manuale. -
Page 83: Copyright
Manuale Istruzioni TM 160/250/315 ECO 3 Generalità Copyright Il diritto di proprietà di questo manuale appartiene esclusivamente a Georg Fischer Omicron S.r.l.. Il presente manuale è destinato al personale addetto all’utilizzo e alla manutenzione della macchina saldatrice. Il suo contenuto, consistente in norme e disegni tecnici, non può... -
Page 84: Marcatura E Descrizione Dei Gruppi
4 Marcatura e descrizione dei gruppi Manuale Istruzioni TM 160/250/315 ECO Marcatura e descrizione dei gruppi Marcatura di identificazione Come previsto dalla Direttiva Macchine, sulla macchina è applicata una targhetta di identificazione con indicato: Nome del costruttore Modello della macchina Numero di serie Sezione cilindri idraulici Diametro... - Page 85 Manuale Istruzioni TM 160/250/315 ECO 4 Marcatura e descrizione dei gruppi Termoelemento Rivestimento delle superfici piane in PTFE Multicavo di alimentazione con connettore multipolare (4 m) Termometro di controllo integrato Pialla elettrica Trasmissione tramite vite/corona Lame taglienti su entrambi i lati (1) ...
-
Page 86: Caratteristiche Tecniche
5 Caratteristiche tecniche Manuale Istruzioni TM 160/250/315 ECO Caratteristiche tecniche Descrizione Saldatrice di testa per materiali plastici PE, PP della macchina Tipo TM 160 TM 250 TM 315 macchina Macchina N° ........Sezione dei 353 mm 510 mm 510 mm cilindri idraulici... -
Page 87: Assemblaggio E Trasporto
Manuale Istruzioni TM 160/250/315 ECO 6 Assemblaggio e trasporto Assemblaggio e trasporto Imballo E’ importante sapere, per la scelta dell’imballo, il mezzo di trasporto. Normalmente le macchine vengono consegnate con casse da trasporto in carton pallet o legno su richiesta. Fragilità... -
Page 88: Preparazione Della Saldatura
7 Preparazione della saldatura Manuale Istruzioni TM 160/250/315 ECO Preparazione della saldatura Informazioni generali Nei capitoli successivi si fa riferimento a quanto riportato dalle normative tedesche DVS in merito alle saldature di testa dei materiali plastici considerati. In caso di utilizzo della macchina in ambiente esterno (cantieri, ecc.) è importante, al fine di ottenere un funzionamento ottimale, installare in modo corretto la macchina. - Page 89 Manuale Istruzioni TM 160/250/315 ECO 7 Preparazione della saldatura Quando i tubi idraulici non vengono usati (o alla fine del loro utilizzo) è importante proteggere i relativi innesti antigoccia con le protezioni fornite in dotazione. Pulire le protezioni prima di applicarle ai tubi idraulici.
-
Page 90: Avviamento Della Centralina Idraulica
7 Preparazione della saldatura Manuale Istruzioni TM 160/250/315 ECO Attenzione Una volta posizionati i tubi, è necessario chiudere i carrelli e portare a contatto i tubi stessi, al fine di verificare che i carrelli non siano a fine corsa. Quando i tubi sono in contatto sarà sufficiente controllare che l’indicatore della corsa dei carrelli, infissa sulla testata del cilindro, non sia in posizionata sopra al segnale rosso indicante la posizione di fine corsa. -
Page 91: Funzioni Del Termoregolatore
Manuale Istruzioni TM 160/250/315 ECO 7 Preparazione della saldatura 7.2.2 Funzioni del termoregolatore Quando il LED (1) è acceso permanentemente indica presenza di alimentazione elettrica al termoelemento e visualizza la temperatura reale. Quando lampeggiante indica il raggiungimento del valore di “set point”. -
Page 92: Programmazione Offset Di Temperatura
7 Preparazione della saldatura Manuale Istruzioni TM 160/250/315 ECO 6.2.4 Programmazione offset di temperatura Tale regolazione non è altro che una calibrazione (taratura) della temperatura rilevata dalla sonda del termoelemento. Ciò può essere necessaria per compensare le dissipazioni di calore dal termoelemento, verso l'ambiente, che si hanno in misura crescente al diminuire della temperatura ambiente. -
Page 93: Messaggi Di Errore
Manuale Istruzioni TM 160/250/315 ECO 7 Preparazione della saldatura 6.2.5 Messaggi di errore Il termoregolatore è dotato di alcuni dispositivi che intervengono a segnalare un errore. Per ogni errore riscontrato, l’ERC descriverà sul display il tipo di errore verificatosi. Per il ripristino è sempre necessario riavviare il dispositivo. -
Page 94: Saldatura
8 Saldatura Manuale Istruzioni TM 160/250/315 ECO Saldatura Principio di funzionamento Per Saldatura di testa si intende quella saldatura in cui le parti da saldare tra loro (tubo/tubo, tubo/raccordo o raccordo/raccordo) vengono riscaldate ad una determinata temperatura e unite successivamente senza l’utilizzo di materiale aggiunto. Il riscaldamento avviene attraverso l’utilizzo di un termoelemento con una prima fase di pre-riscaldamento del materiale ad una certa pressione ed una successiva fase di rammollimento con pressione... -
Page 95: Il Processo Di Saldatura
Manuale Istruzioni TM 160/250/315 ECO 8 Saldatura Il processo di saldatura 8.2.1 Calcolo della pressione di trascinamento Pericolo di schiacciamento delle mani! I carrelli della macchina base si muovono! Pericolo di schiacciamento o lesioni durante il movimento dei carrelli della macchina base. Pericolo Non introdurre mai le mani nella zona di saldatura della macchina durante la chiusura o apertura idraulica dei carrelli. - Page 96 8 Saldatura Manuale Istruzioni TM 160/250/315 ECO pressione di trascinamento. Il truciolo di fresatura deve formarsi in modo continuo su entrambi i lembi da saldare. Attenzione Mantenere a lungo una pressione alta (15-20 bar sopra la pressione di trascinamento) durante la fresatura può causare danni irreversibili alla meccanica e/o al motore elettrico.
- Page 97 Manuale Istruzioni TM 160/250/315 ECO 8 Saldatura Attenzione Una volta posizionati i tubi, è necessario chiudere i carrelli e portare a contatto i tubi stessi, al fine di verificare che i carrelli non siano a fine corsa. Quando i tubi sono in contatto sarà sufficiente controllare che l’indicatore della corsa dei carrelli, infissa sulla testata del cilindro, non sia in posizionata sopra al segnale rosso indicante la posizione di fine corsa.
-
Page 98: Calcolo Della Pressione Di Saldatura
8 Saldatura Manuale Istruzioni TM 160/250/315 ECO 8.2.3 Calcolo della pressione di saldatura Attenzione La pressione di saldatura è la somma aritmetica tra il valore rilevato dalle tabelle e la pressione di trascinamento calcolata. Esempio 31 bar* 6 bar = 37 bar * Per TM 315 e TM 250 HD–PE d 200 mm, SDR 11 vedere le tabelle di pressione 8.2.4... -
Page 99: Procedimento Di Saldatura
Manuale Istruzioni TM 160/250/315 ECO 8 Saldatura 8.2.5 Procedimento di saldatura Il rivestimento del termoelemento non deve presentare grosse rigature e ad ogni saldatura deve essere garantita la pulizia da eventuali sporcizie residue. È fondamentale quindi proteggere il termoelemento attraverso l’utilizzo dell’apposito supporto protettivo. - Page 100 8 Saldatura Manuale Istruzioni TM 160/250/315 ECO RILASCIO DELLA PRESSIONE (riduzione della pressione di preriscaldamento dopo la formazione del bordino) 1. Quando le dimensioni del bordino hanno raggiunto le misure richieste (quelle relative ai valori di tabella), spingere lentamente la leva della centralina idraulica in direzione di apertura “<>” per il primo tratto di corsa in modo che la pressione raggiunga il valore prossimo allo 0 (zero).
-
Page 101: Controllo Visivo Del Bordino Di Saldatura
Manuale Istruzioni TM 160/250/315 ECO 8 Saldatura Attenzione Il tempo di raffreddamento in macchina (alla pressione di saldatura) deve essere sempre rispettato. Non è consentito l’utilizzo di alcuna sostanza per forzare il raffreddamento. Durante il raffreddamento, la pressione di saldatura dovrà essere controllata costantemente e se necessario corretta! RIMOZIONE DEL TUBO Pericolo di contusione! -
Page 102: Esempio Di Saldatura Tm
8 Saldatura Manuale Istruzioni TM 160/250/315 ECO Esempio di saldatura TM 315/250 Pipe/fitting Temperatura termoelemento 220 °C Diametro esterno 200 mm Pressione di trascinamento 6 bar Pressione nominale SDR 11 Pressione di saldatura di 31 bar tabella Spessore parete 18.2 mm Pressione di saldatura totale 37 bar Tutti i valori di pressione, tempo e temperatura, sono stati ricavati dalle... -
Page 103: Analisi Dei Difetti Di Saldatura
Manuale Istruzioni TM 160/250/315 ECO 9 Analisi dei difetti di saldatura Analisi dei difetti di saldatura Caratteristica Descrizione Gruppo Esame esterno della saldatura Cricche verso della lunghezza della saldatura. ammesso ammesso ammesso Possono essere localizzate: Nella saldatura Nel materiale (tubo) ... - Page 104 9 Analisi dei difetti di saldatura Manuale Istruzioni TM 160/250/315 ECO Caratteristica Descrizione Gruppo Esame esterno della saldatura Cordone di saldatura troppo Vedere Vedere Vedere largo o troppo stretto su parte diagramma diagramma diagramma o su tutta la zona di saldatura sulle norme sulle norme sulle norme...
-
Page 105: 10 Manutenzione
Manuale Istruzioni TM 160/250/315 ECO 10 Manutenzione 10 Manutenzione La macchina saldatrice TM 160/250/315, se trattata correttamente, non ha bisogno di manutenzione. La normale manutenzione si limita ad una pulizia generale della macchina. Ogni 3200 ore di lavoro, oppure ogni due anni, è preferibile portare a revisione l’intera macchina, completa di tutti i suoi componenti, presso la ditta costruttrice o il rivenditore presso il quale è... -
Page 106: Centralina Idraulica
10 Manutenzione Manuale Istruzioni TM 160/250/315 ECO 10.3 Centralina idraulica Controllo del livello olio idraulico Controllare frequentemente il regolare livello d’olio idraulico nella centralina. Se necessario rabboccare lo stesso. Il livello deve essere sempre superiore alla pompa. Sostituzione completa dell’olio idraulico E’... - Page 107 Manuale Istruzioni TM 160/250/315 ECO 10 Manutenzione Si consiglia di mantenere aggiornato un libro di revisione/manutenzione (simile a quello sotto riportato) per ogni saldatrice TM 160/250/315. esempio: Data Service Riparazione Commenti 15.09.2008 Georg Controllo generale OK Fischer Omicron 25.10.2008 Georg Termoelemento Rifacimento cablaggio Fischer...
-
Page 108: 11 Servizio Clienti
11 Servizio clienti Manuale Istruzioni TM 160/250/315 ECO 11 Servizio clienti Per ordinare un pezzo di ricambio consultare la lista ricambi che viene fornita separatamente. Utilizzare solamente pezzi e accessori di ricambio originali Georg Fischer Omicron. In caso di riparazione necessaria è consigliabile rivolgersi direttamente ad Georg Fischer Omicron s.r.l., al rivenditore presso il quale è... - Page 109 Manuale Istruzioni TM 160/250/315 ECO 11 Servizio clienti...
- Page 112 GF Piping Systems Worldwide at home Our sales companies and representatives ensure local customer support in over 100 countries www.gfps.com Argentina / Southern South America Finland Mexico / Northern Latin America Singapore Georg Fischer Central Plastics Georg Fischer AB Georg Fischer S.A. de C.V.
Need help?
Do you have a question about the TM 160 ECO and is the answer not in the manual?
Questions and answers