Advertisement
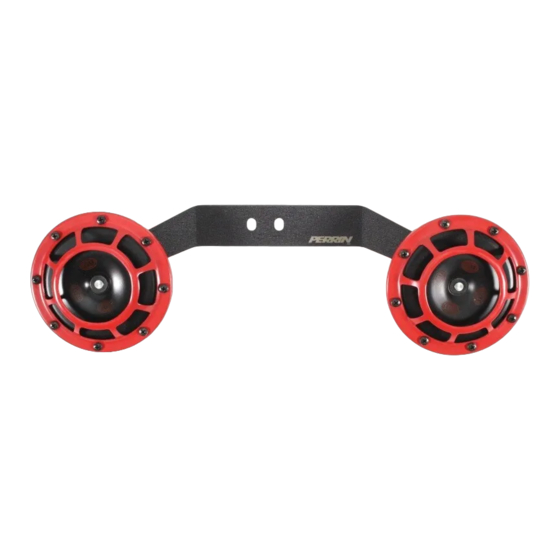
Hella Horn Mount for 2022+ WRX
Thank you for purchasing this PERRIN product for your car! Installation of this product should only be performed by persons experienced with installation of aftermarket performance parts
and proper operation of high performance vehicles. If vehicle needs to be raised off the ground for installation, the installer must use proper jacks, jack-stands and/or a professional vehicle
hoist for safety of the installer and to protect property. If the vehicle is lifted improperly, serious injury or death may occur! Please read through all instructions before performing any
portion of installation. If you have any questions, please contact our tech department prior to starting installation. We can be reached in any of the following methods:
WARNING: This product can expose you to chemicals including Lead which is known to the State of California to cause cancer birth defects or
Parts Included with the PERRIN Hella Horn Mount:
•
(1) PERRIN Horn Bracket
•
(3) M8 Washers
•
(1) M8x16 Button Head Screw
•
(1) M8 Nut
Installation of PERRIN Hella Horn Mount:
1.
Remove from bumper from car. Follow factory service manual for more detailed instructions:
a.
Open hood and locate and remove (6) black 10mm bolts and (5) plastic fasteners holding upper steel bracket to bumper.
b.
Locate and remove (2) plastic push-in fasteners on each side bumper meets fender in wheel well.
c.
Locate and remove (8) plastic fasteners along bottom of bumper.
d.
Pull bumper outward on edges near fender well and work your way across front of car.
e.
If car came equipped with fog lights, before pulling bumper completely off, unplug fog light connectors from chassis side harness.
2.
Using below picture for reference, locate and remove (3) plastic fasteners and (1) M8 nut located on radiator core support.
3.
Disconnect OEM horns located on left and right side of car in front of each wheel well.
4.
Consult Hella Horn instructions to determine how they need to be electrically installed. Note: Do this step before mounting bracket to car as this will
allow for easier way to connect both horns electrically. OEM horn wires can be used to turn on the horns directly.
5.
Remove flat brackets from Hella Horns if they are already installed. The nuts on these may require a vice to hold bracket while loosening.
6.
Install horns onto the PERRIN bracket making sure they are on the with logo on it. Secure using supplied M8 washers and nuts removed in previous step.
7.
Using picture below Install PERRIN Horn bracket to radiator core support and secure with M8 nut (removed in previous step).
8.
Install supplied M8 Button head bolt through remaining hole in PERRIN Bracket and secure with supplied M8 washer and nut.
2022-06-07
Email
Instant Chat off the main page of
Or simply call our tech team at 503-693-1702
other reproductive harm. For more information, go to
PSP-BDY-305
Tech@PERRIN.com
www.PERRIN.com
www.P65Warnings.ca.gov
Advertisement
Table of Contents

Subscribe to Our Youtube Channel
Related Manuals for Perrin PSP-BDY-305


Summary of Contents for Perrin PSP-BDY-305
- Page 1 PSP-BDY-305 Thank you for purchasing this PERRIN product for your car! Installation of this product should only be performed by persons experienced with installation of aftermarket performance parts and proper operation of high performance vehicles. If vehicle needs to be raised off the ground for installation, the installer must use proper jacks, jack-stands and/or a professional vehicle hoist for safety of the installer and to protect property.
- Page 2 11. Test to ensure horns function as desired. 12. Reinstall bumper in the opposite way it was removed, making sure to plug in fog light connections (if car has them installed). Questions, Comments and Suggestions Contact: Tech@PERRIN.com Visit Our Website for Instant Chat Options at www.PERRIN.com...
Need help?
Do you have a question about the PSP-BDY-305 and is the answer not in the manual?
Questions and answers