
Related Manuals for SELVAS Healthcare ACCUNIQ BC380


Summary of Contents for SELVAS Healthcare ACCUNIQ BC380
- Page 2 Obelis s.a. Bd. Général Wahis, 53, B-1030, Brussels, Belgium...
- Page 3 Entering SYSTEM SETUP ............. 28 INTENDED USE ................5 Setup .................... 29 WORD DEFINITIONS ............... 5 CLASSIFICATION AND COMPLIANCE ......6 SAFETY PRECAUTIONS ............6 SAFETY SYMBOLS AND INFORMATION ...... 11 Guidance Electromagnetic compatibility (EMC) .................... 12 Basic Package ................16 Precaution for measurement ..........
- Page 4 Kinds of Error & Repair ............50 Error & Repair ................52 AFTER SERVICE ................ 53 PACKING AND TRANSPORT ..........53...
- Page 6 ...
- Page 7 ...
- Page 8 ...
- Page 9 ...
- Page 11 Waste Electrical and Electronic Equipment (WEEE) The device could be sent back to the manufacturer for recycling or proper disposal after their useful lives. Alternatively the device shall be disposed in accordance with national laws after their useful lives. "OFF" (only for a part of equipment) "ON"...
- Page 12 Do not open. This is for factory only. Alternating current Direct current Date of manufacture Manufacturer Non-ionizing radiation CE mark Serial No. Authorized representative in the European community. Keep dry This way up Fragile Use no hooks For indoor use only RoHS2 Medical Device...
- Page 15 ...
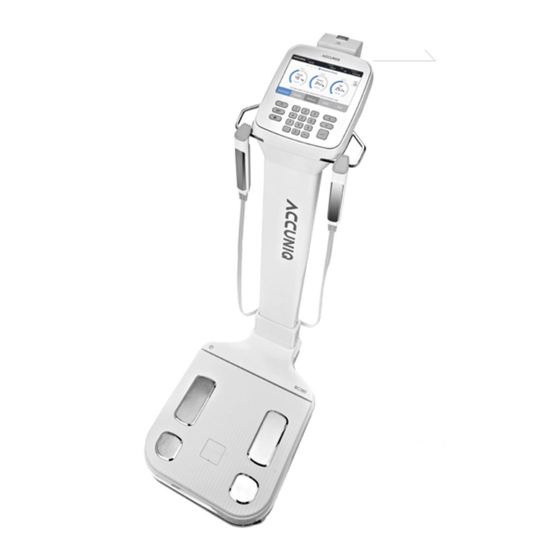
- Page 16 ① ② ③ ④ ⑤ ⑥ ⑦ ⑧ ⑨ ...
- Page 18 ...
- Page 19 Handle Electrode ...
- Page 20 ...
- Page 21 Weight scale: Plate electrode: ...
- Page 27 ...
- Page 29 ∧ ∨ ...
- Page 30 ...
- Page 31 ...
- Page 32 ...
- Page 33 ...
- Page 34 ...
- Page 35 on t...
- Page 36 ...
- Page 37 ...
- Page 38 ...
- Page 39 ...
- Page 40 ...
- Page 44 ...
- Page 45 ...
- Page 47 (10) (11) (12) (13)
- Page 48 ...
- Page 49 ...
- Page 50 ...
- Page 51 Turn the plastic Phillips-head screws clockwise and push the blade back ...
- Page 52 ...
- Page 53 ...
- Page 56 ...
- Page 57 ...
Need help?
Do you have a question about the ACCUNIQ BC380 and is the answer not in the manual?
Questions and answers