Table of Contents
Advertisement
Advertisement
Table of Contents

Related Manuals for SELVAS Healthcare ACCUNIQ BC300


Summary of Contents for SELVAS Healthcare ACCUNIQ BC300
- Page 2 The device bears the CE label in accordance with the provisions of Medical Device Directive 93/42/EEC. THE PERSONS RESPONSIBLE FOR PLACING DEVICES ON THE EC MARKET UNDER MDD 93/42/EEC SELVAS Healthcare, Inc. 29, Gongdan 4-ro, Jillyang-eup, Gyeongsan-si, Gyeongsangbuk-do, 38470 Republic of Korea TEL: 82-53-856-0993, FAX: 82-53-856-0995 VITAKO Sp.
-
Page 3: Table Of Contents
CONTENTS INTRODUCTION ······································································································· 5 1. INTENDED USE........................5 2. WORD DEFINITIONS........................ 5 3. CLASSIFICATION AND COMPLIANCE..................6 4. SAFETY PRECAUTIONS......................6 5. SAFETY SYMBOLS AND INFORMATION................9 6. Guidance for Electromagnetic compatibility(EMC) ..............11 ABOUT BODY COMPOSITION ......................17 TERM AND FUNCTION OF EACH PART ·······································································19 1. - Page 4 MEASUREMENT AND ANALYSIS ·················································································44 1. Precautions for Measurement ·················································································44 2. Correct Posture ··································································································· 46 1) How to Touch Plate Electrodes ············································································46 2) How to Touch Handle Electrodes ··········································································46 3) Measuring Posture ····························································································47 3. Measuring Procedure ···························································································48 1) Basic Analysis ·································································································· 48 2) Analysis Using Blood Pressure Monitor/Software Program ········································54 STORAGE OF DATA USING USB MEMORY ····································································55 RESULT INTERPRETATION ························································································57...
-
Page 5: Introduction
INTRODUCTION We highly appreciate that you chose our company’s product. You are kindly requested to be familiar with these directions before using this product and always keep it together with the product. In case you are not sure about any directions or problems arising while using the product, please contact our service center. -
Page 6: Classification And Compliance
3. CLASSIFICATION AND COMPLIANCE 1) This device is classified as; - Class 1 type-BF against electric shock - Ordinary equipment without protection against ingress of water - Equipment not suitable for use in presence of a flammable anesthetic mixture by standard of EN 60601-1: 2006(Basic safety and essential performance of Medical Electrical Equipment) 2) This device is complied with Class A for Noise-Emission, Level B for Noise-immunity, by standard of IEC 60601-1-2:2007(Electromagnetic Compatibility Requirements). - Page 7 - Where the unit is exposed to spray or splashing water. - Where the unit is exposed to dust. - Where the unit is exposed to water vapor. - Where the unit is exposed to salty atmosphere. - Where the unit is exposed to explosive gas. - Where the unit is exposed to excessive shocks or vibrations.
- Page 8 Incorrect operation or failure of user to maintain the unit spares the Note manufacturer or his agent of the responsibility for system’s non-compliance with specifications or responsibility for any damage or injury. This manual is made for informational purpose and this manual and product are not meant to be a substitute for the advice provided by your own physician or other medical problem.
-
Page 9: Safety Symbols And Information
5. SAFETY SYMBOLS AND INFORMATION The International Electrotechnical Commission (IEC) has established a set of symbols for medical electrical equipment which classifies a connection or warning of any potential hazard. The classifications and symbols are shown below. Save these instructions for your safety. Degree of protection against electric shock: TYPE BF Please observe operating instructions General warning sign... - Page 10 This symbol is used inside system. Identifies the point where the safety ground of the system is fastened to the chassis. Do not open. This is for factory only. Alternating current Direct current Date of manufacture Manufacturer Non-ionizing radiation CE mark Serial No.
-
Page 11: Guidance For Electromagnetic Compatibility(Emc)
1) Guidance and manufacturer’s declaration – electromagnetic emissions The ACCUNIQ BC300 is intended for use in the electromagnetic environment specified below. The customer or the user of the ACCUNIQ BC300 should assure that it is used in such an environment. Emissions test Compliance Electromagnetic environment –... - Page 12 2) Guidance and manufacturer’s declaration – electromagnetic immunity The ACCUNIQ BC300 is intended for use in the electromagnetic environment specified below. The customer or the user of the ACCUNIQ BC300 should assure that it is used in such an environment. IEC 60601 test...
- Page 13 Magnetic field Power frequency magnetic fields commercial should be at levels characteristic frequency 3 A/m 3 A/m of a typical location in a typical (50/60Hz) commercial hospital IEC 61000-4-8 environment. Note UT is the a.c. mains voltage prior to application of the test level.
- Page 14 3) Guidance and manufacturer’s declaration – electromagnetic immunity 2 The ACCUNIQ BC300 is intended for use in the electromagnetic environment specified below. The customer or the user of the ACCUNIQ BC300 should assure that it is used in such an environment. 60601...
- Page 15 To assess the electromagnetic environment due to fixed RF transmitters, an electromagnetic site survey should be considered. If the measured field strength in the location in which the ACCUNIQ BC300 is used exceeds the applicable RF compliance level above, the ACCUNIQ BC300 should be observed to verify normal operation.
- Page 16 4) Recommended separation distances between portable and mobile RF communications equipment and the ACCUNIQ BC300 The ACCUNIQ BC300 is intended for use in an electromagnetic environment in which radiated RF disturbances are controlled. The customer or the user of the ACCUNIQ BC300 can help prevent...
-
Page 17: About Body Composition
ABOUT BODY COMPOSITION 1. Body Composition Human body consists of body fat and lean body. Lean body means non-fat constituents of human body like body water, muscles, bones, etc. Body water is divided into intra- and extra-cellular water and the ratio between them is controlled and maintained within a certain range. - Page 18 5. Abdominal Fatness Body fat is divided into subcutaneous fat and visceral fat. Visceral obesity is considered to be a critical risk factor along with Percent of body fat. Lipoprotein lipase can be easily activated in visceral fat, and it cause visceral fat to be dissolved easily.
-
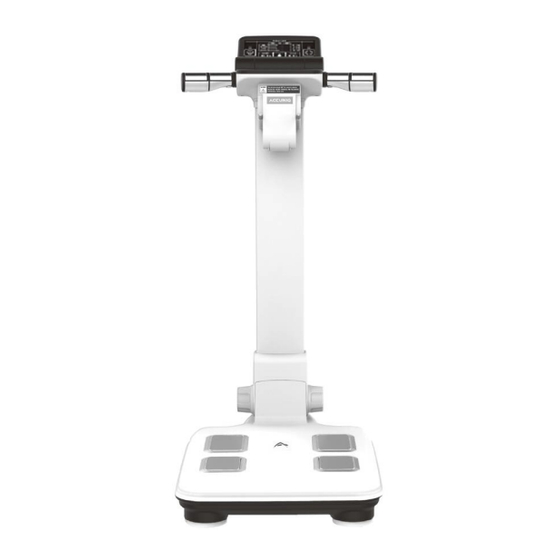
Page 19: Term And Function Of Each Part
TERM AND FUNCTION OF EACH PART 1. Main Body 1) Front Part Color LCD Key Pad Handle Electrode Thermal printer (option) ▪ Color LCD screen It displays the procedure and results. ▪ Handle Electrode Handle Electrode measure the impedance by sending harmless electric current to the body. Hold them with the hands during measurement. - Page 20 Blood Pressure monitor port Computer port ▪ Blood pressure monitor (RS-232C) port: Connecting blood pressure monitor (OPTION) by SELVAS Healthcare, Inc. ▪ Printer (USB(A)) port: Connecting the printer offered with this device. ▪ Computer (USB(B)) port: Connecting a computer. ▪ Adapter port (ADAPTER): Connecting an adapter.
- Page 21 3) Base Part Locking handle Weight scale Plate electrode ▪ Locking handle: When transport is necessary, the column can be folded down by turning the screw counterclockwise. During this process, hold the column with one hand and turn the screw with another hand. ▪...
- Page 22 4) Bottom of the head part ① ① Start button: Start button after input of personal data • Head part is connected to main body by limited-length curl cord. It allows Note measuring people in 100 – 200 cm height. •...
- Page 23 5) Key Pad ▪ button: When you press this button at initial screen, you can search ID and check the recent results of searched ID. Print the result with PRINT button. ▪ button: You can select gender; male or female. ▪...
-
Page 24: Basic Package
2. Basic Package Basic package of this product is composed of ① Main body ② User guide ③ Body composition management program (CD) ④ USB printer ⑤ USB cable ⑥ Printer cart ⑦ Power cable and adapter ② ③ Program (CD) User guide ④... -
Page 25: Options
3. Options 1) Professional health counseling software (CD) Software This program helps managing body composition easily and systematically. It shows the core items needed to control body composition. The items include measured body composition, dietary control plan, exercise plan, etc. If the device is connected to blood pressure monitor, it also indicates the measurer's blood pressure. - Page 26 8) Height Meter Height Meter This is an instrument to measure subject’s height more accurately and quickly. It employs standoff determination method using ultrasonic sensor. Refer to INSTALLATION MANUAL. Caution Optional devices are should be use only from our company.
-
Page 27: Installation
INSTALLATION 1. Installation of product ① Unscrew all screws from the carry bag with screwdriver (attached on the top of the bag). ② "TOP" mark should be indicated on top of the box when you place the carry bag. Unlock the both handles to open the bag. - Page 28 ③ Put your hands as shown in the picture. Hold the device with both hands and take the device out. ④ Place the device on the flat floor. Stand the body part of device with one hand and fix the locking handle by turning it clockwise with another hand.
-
Page 29: Power Supply
⑤ Open LCD and adjust the angle. Connect the power cable. 2. Power Supply Connect the adapter to the adapter jack placed on the rear panel of this device. After the cables are connected to each jack, turn on the power switch placed beside the adapter jack. 1. -
Page 30: Peripheral Device Installation
When connecting adaptor, place the arrow mark of adaptor Caution connection part up and correctly stick it in the socket on the rear of the main body. Wrong connection could be a fire hazard. 3. Peripheral Device Installation 1) Connecting Computer Connect the “USB(B)”... -
Page 31: Connecting Printer
2) Connecting Printer ① Connecting the device and the printer directly Connect A4 printer offered with this device to the “USB(A)” port placed on the rear panel of this device with USB cable. ② Connecting the device, computer, and the printer Connect a computer to the “USB(B)”... -
Page 32: Connecting Blood Pressure Monitor
3) Connecting Blood Pressure Monitor This device is connectable with automatic blood pressure monitor of our company. (Option) Connect a blood pressure monitor to “BLOOD PRESSURE(RS-232C)” port placed on the rear panel of this device with blood pressure monitor cable. -
Page 33: Replacing Thermal Paper (Option)
4) Replacing of thermal paper (Option) Replace thermal paper while the power is on. ① Turn the screws counterclockwise and open the cover as shown in the picture. ② Insert the thermal paper to the direction as shown in the picture. ③... -
Page 34: System Setup
SYSTEM SETUP SYSTEM SETUP allows users to change the setting of operational parameters. Note The contents in SYSTEM SETUP can be changed for improvement. 1. Entering SYSTEM SETUP At the initial screen, press '◀ → 1 → 2 → 3 → 4 → ▶' button in key pad to enter 'SYSTEM SETUP' screen. -
Page 35: Exiting System Setup
4. Exiting SYSTEM SETUP Press NEXT button on SYSTEM SETUP screen. Initial screen will appear. 5. Moving to SYSTEM SETUP Press NEXT button on selected menu screen. SYSTEM SETUP screen will appear. -
Page 36: Setup
6. Setup < DATE / TIME > It is to set date and time (year, month, day, hour, and minute). - Select (DATE / TIME) on SYSTEM SETUP screen ◀ ▶ with ‘ ’ and ‘ ’ but ton and press BACK button in key pad. - Pre-set: The date of the device released from the manufacturer's factory. - Page 37 < PRINT > It selects the printing mode of the A4 printer. ◀ - Select (PRINT) on SYSTEM SETUP screen with ‘ ’ ▶ and ‘ ’ button and press BACK button in key pad. - Pre-set: AUTO ◀ ▶ - Choose one with ‘...
- Page 38 < CLOTHES > It is to subtract the weight of clothes worn by the subjects from measured weight. Calculated value from this setting is used in body composition analysis as subject’s weight. - Select (CLOTHES) on SYSTEM SETUP screen with ◀...
- Page 39 - Press BACK button in key pad to save it. - Return to SYSTEM SETUP screen by pressing NEXT button in key pad. < Communication > Select the connecting method between ACCUNIQ BC300 and a computer. 'CABLE' is for USB cable and 'WIRELESS' is for wireless communication.
- Page 40 < ID usage > It is set to whether to use ID or not. - Select (ID usage) on SYSTEM SETUP screen with ◀ ▶ ‘ ’ and ‘ ’ button and press BACK button in key pad. - Preset: ID usage-NO, SAVE DEVICE-FLASH MEMORY - ID USAGE: Choose ID USAGE by pressing ‘1’...
- Page 41 < Abdominal Circumference > It displays abdominal circumference. - Select (Abdominal Circumference) on SYSTEM ◀ ▶ SETUP screen with ‘ ’ and ‘ ’ button and press BACK button in key pad. - Preset: YES ◀ ▶ - Choose YES or NO with ‘ ’ and ‘ ’ button in key pad.
- Page 42 1. The print format of result sheet Note ① CHILD: No matter what age is set, it prints the result sheet for CHILD. Only the child growth curve is not printed in case of 18 or over 18. ② ADULT: No matter what age is set, it prints the result sheet for ADULT. The child growth percentile is presented on the ADULT result sheet in case of under 18.
-
Page 43: Measurement And Analysis
MEASUREMENT AND ANALYSIS 1. Precautions for Measurement The reliability of the results can be assessed by its accuracy. The "Accuracy" of the device is determined by comparing the actual body composition and the results from Body Composition Analyzer. The "Reproducibility" is determined when the device gives the identical results under the same condition. - Page 44 In order to keep one's health and the balance of body composition, check the changes of body composition through the continuous analysis and compare the results. Make sure that the body composition should be measured under the same physical and environmental conditions. If the condition before the measurement such as volume of a meal, meal time, and activities (exercise, sauna, drinking lots of beverage, urination, etc.) are kept same, the reproducibility of a device is obtained.
-
Page 45: Correct Posture
2. Correct Posture 1) How to Touch Plate Electrodes - Make sure plate electrodes are clean. - Take off socks or stockings and then stand on the plate electrodes. - Remove sweat or foreign matters on the soles. - Fairly place the bare feet on the plate electrodes. Make sure that the clothes are not between the soles and the plate electrodes. -
Page 46: Measuring Posture
3) Measuring Posture < Correct Posture > - Step the scale in the bare feet. Stretch both arms and spread them 30° from the body. - Press start buttons with thumbs for 2 ~ 3 seconds to start the measurement. Once it starts, release the start button and hold the same posture until the measurement is over. -
Page 47: Measuring Procedure
3. Measuring Procedure Available ways to analyze body composition with this device are listed below. ▪ Basic analysis: Body composition analysis is performed by measuring weight and impedance and inputting height, age and gender. ▪ Blood pressure analysis: Blood pressure monitor can be connected to the device. ▪... - Page 48 ③ Personal information Input personal information in the order of ID, height, age, and gender. Confirm the information and press NEXT button. (If ID usage is selected from ’SYSTEM SETUP’, ID screen will be pop-up.) [ID usage: YES] ▪ ID input - The following message appears.
- Page 49 ▪ Input age - “Input your age.” appears. - Input the subject’s age with number buttons in key pad. ▶ - Press ‘ ’ button. ▪ Gender selection - “Select your gender.” appears. - Select MALE or FEMALE with Gender button in key pad.
- Page 50 ▪ Select gender - “Select your gender.” appears. - Select MALE or FEMALE with Gender button in key pad. - Press ‘NEXT’ button. [Measure height] If height meter is selected as an option, height meter measurement screen will appear after measuring weight.
- Page 51 ⑦ During the measurement, the following screen appears. 1. Press both start buttons for 2 seconds. Do not move or bend the arms until Note the measurement is completed. Measuring time is within 1 minute. 2. When the measurement is wrong, - Error message appears on the screen.
- Page 52 ⑨ Printing the results and Restarting - Once the result is displayed on the display, it can be printed out in pre-printed result sheet. - After confirming the analyzed result, press NEXT button to restart. - The device returns to the initial screen after one minute. 1.
-
Page 53: Analysis Using Blood Pressure Monitor/Software Program
2) Analysis Using Blood Pressure Monitor/Software Program The blood pressure monitor from SELVAS Healthcare, Inc. can be connected to the device as an option. In this way, the blood pressure can be monitored together with weight control. It helps to manage the body fat while checking the blood pressure simultaneously. -
Page 54: Storage Of Data Using Usb Memory
Please insert USB MEMORY and measure again. If the message above appears even USB memory stick is inserted, take out the USB MEMORY and insert it again. Please use the USB MEMORY which provided by SELVAS Healthcare, Inc. Note The data can be saved only when ‘ID USAGE’ function is activated in SYSTEM... - Page 55 1. USB memory should be inserted only at the initial screen. Note 2. When there’s no data saved in FLASH MEMORY, the message “No saved data.” will appear. Please insert USB memory after measuring body composition. 3. When the saving format is changed from USB MEMORY to FLASH MEMORY, the data saved in USB MEMORY should be transferred to PC.
-
Page 56: Result Interpretation
RESULT INTERPRETATION Here's the explanation and the criteria of the printed results. 1. Personal Data The subject's name / ID, date, height, weight, age and gender are indicated on the result sheet. 2. Logo The user can input LOGO such as name of hospital, sports center, or obesity clinic, telephone number, address, contact person, etc. - Page 57 2) Body Mass Index (B.M.I., Quetlet’s Index: kg/m ): for adults *EAST ASIA thin normal overweight obese < 18.5 18.5 ~ ≤ 23 23 ~ ≤ 25 over 25 * EU and etc. thin normal overweight obese < 18.5 18.5 ~ ≤ 25 25 ~ ≤...
- Page 58 6. Energy Expenditure 1) B.M.R. (Basal Metabolic Rate) B.M.R. is the calories to maintain human body's basic function such as movement of heart, brain, neural transmission, regulating body temperature and so on. B.M.R. is in proportion to S.L.M. because body fat stores energy while muscle consumes energy. Therefore, even if the weight is same between persons, the person with more muscle has greater B.M.R.
- Page 59 Check to change of weight, body fat, and muscle from previous and present measurement 13. Blood Pressure When the blood pressure monitor supplied from SELVAS Healthcare, Inc. is connected to the device, blood pressure can be measured and the result can be printed out. Systolic blood pressure, diastolic blood pressure, and pulse are printed on result sheet.
-
Page 60: Storage & Maintenance
STORAGE & MAINTENANCE 1) Pay attention to the allowable value to electric current. 2) Avoid direct sunlight, humidity, dust, thick oil and salty or extreme changes in temperature. 3) Do not install or store the device in a place where any chemicals or gas is stored. 4) Do not use the device in any unstable, vibrating, or impact-giving area. -
Page 61: Error & Repair
ERROR & REPAIR 1. Kinds of Error & Repair Error Cause Repair • Clean the measuring parts (the electrodes, When the subject’s body impedance is palms, and soles) and try again. Out of deviated from the limit • Measure again with correct posture. range of - Insufficient touch to electrodes •... -
Page 62: Error & Repair
2. Error & Repair Error Cause Repair - Measure in unstable condition such • Measure again in a stable condition with as right after the exercise, bath, the correct posture. sweat, or drinking lots of water. - Moving or speaking during the •... -
Page 63: After Service
How to contact our company Write us at: SELVAS Healthcare, Inc. 29, Gongdan 4-ro, Jillyang-eup, Gyeongsan-si, Gyeongsangbuk-do, 38470 Republic of Korea TEL: 82-53-856-0993 FAX: 82-53-856-0995 (You can also contact the following representative or your local distributor) 2. -
Page 64: Specification
SPECIFICATION Model ACCUNIQ BC300 Measuring method BIA via tetra-polar electrode method using 8 touch electrodes. Frequency Range 5, 50, 250 kHz Measuring site Whole body and Segmental measurement (arms, legs, and trunk) [Result for Body Composition Analysis] Main items Body Composition Analysis (Weight, LBM, Body fat, SLM, Protein,... - Page 65 Transmitting device USB port Printing device USB port (the printer assigned by our company), thermal printer (option) Dimension 400 × 735 × 890 mm (W × D × H, ± 20 mm) Weight About 10kg (main unit) Measuring range 100 ~ 950 Ω Measuring time Within 1 minute Input height...
-
Page 66: Warranty
WARRANTY Warranty Name of product Body Composition Analyzer Name of model ACCUNIQ BC300 Serial number Period of warranty Within 1 year from the date of purchase Date of purchase Customer Add. Name Tel. Dealer (market) Add. Name Tel. Note - When you receive this warranty, make sure that the name of the dealer and the month, day and year of purchase are all completed. - Page 67 Pass/Fail 4 Measurement Proper measurement Pass/Fail General Judgment Pass/Fail Model ACCUNIQ BC300 Serial No. Installation place Date of purchase Check date Checked by Approved by Copy this sheet for use If repair is required, write down so in the Remarks column.
- Page 68 Pass/Fail Other 1 Clock Present date/time Pass/Fail General Judgment Pass/Fail Model ACCUNIQ BC300 Serial No. Installation place Date of purchase Check date Checked by Approved by Copy this sheet for use If repair is required, write down so in the Remarks column.
- Page 69 EUROPEAN REPRESENTATIVE VITAKO Sp. z o.o. ul. Stanisława Żaryna 7c 02-593 Warszawa, POLAND TEL: +48 22 400 8000 BC300E-20161124 Rev 1.1...
Need help?
Do you have a question about the ACCUNIQ BC300 and is the answer not in the manual?
Questions and answers