Table of Contents
Advertisement
Quick Links
Advertisement
Table of Contents

Related Manuals for Mustek MDC 3000


Summary of Contents for Mustek MDC 3000
-
Page 1: Digital Camera
Multi Functional Digital Camera User Guide... - Page 2 All other brand or product names mentioned in this manual are trademarks or registered trademarks of their respective owners. Digital Camera User Guide...
-
Page 3: Table Of Contents
Menus under LCD-on Mode ... 7 Menus under Playback Mode ... 11 How to... How to record images and short movies? ... 13 How to take burst pictures? ... 14 How to playback images and short movies? ... 14 Digital Camera User Guide... - Page 4 ... 16 onnecting to a Computer Driver Installation ... 17 Getting Connected to the PC and the Mac ... 18 Transferring Images To a PC ... 19 To a Mac ... 21 Specifications ...22 Digital Camera User Guide...
-
Page 5: Getting Started
Mac System Requirements • Mac Driver Support 8.5 OS or later Loading Batteries 1 . Slide the battery cover in the direction indicated by the arrow. Digital Camera User Guide • Strap • Leather bag • Installation CD • User guide •... -
Page 6: Loading The Compactflash™ Card
2. Close the CF card slot cover. Attaching the Strap 1 . Insert the thin end of the strap into the strap holder. 2. Pass the other end of the strap through the loop of thin cord and pull the strap tight. Digital Camera User Guide... -
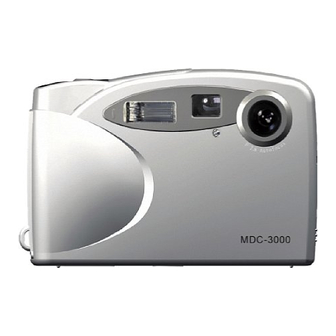
Page 7: Identifying The Parts Front View
Identifying the Parts Shutter Flash Viewfinder Lens Rear View Viewfinder Mode button Control button Digital Camera User Guide Front View Video port USB port Battery cover Power button CF card slot cover Strap holder display... -
Page 8: Lcd Indicators
LCD Indicators 1 . Flash Indicator: Flash is on. 2. Quality Indicator: The best quality setting. 3. Self-Timer Indicator: Timer is off. 4. Battery Indicator: Battery is low. 5 . Pictures remaining. Digital Camera User Guide... -
Page 9: Camera Operating Modes
Control button, the OSD menus appear. To scroll through all the menus, press the the control button to access the horizontal menu topics or press the menu items. (Refer to Page 7~9 for the OSD information.) Digital Camera User Guide to move vertically through... -
Page 10: Playback Mode
OSD information.) LCD-off Mode When capturing images with the LCD display pow- ered off, you will not be able to preview your images on the LCD display. Press the Control button to go to preview mode Digital Camera User Guide... -
Page 11: Osd Menus
Set the resolution to Low for relatively low image quality. Set the resolution to Video for recording movie clips. Set the resolution to Burst for a sequential 10 shots with one press of the Shutter button. Digital Camera User Guide... -
Page 12: Flash Menu
Flash is always enabled. Flash is enabled automatically. Flash is enabled automatically with Pre- Flash to reduce Red-Eye. Zoom Menu This menu contains the following items: Magnify the image by 1 time. Magnify the image by 2 times. Digital Camera User Guide... -
Page 13: Setting Menu
Brightness/Video Out NTSC/Video Out PAL) Quick Review (On/Off) Exposure White Balance (Automatic/Daylight/ Cloudy/Fluorescent/ Tungsten) Digital Camera User Guide Description Changes the brightness setting of the LCD display and the TV. Sets the TV output system. Enables/disables the review function. Adjusts the exposure compensation. - Page 14 Auto Shutdown (1 Minute/2 Minutes/5 Minutes/10 Minutes/Never) Language (English/French/German/ Italian/Spanish/Dutch) Restore Setting Exit Digital Camera User Guide Enables/disables the sound effects. Sets a period of time for the camera to power off automatically. Selects the OSD language. Recovers all the camera settings to the factory presets.
-
Page 15: Menus Under Playback Mode
Displays 9 images (max.) at a time. Delete Menu This menu contains the following items: Current Deletes the current displayed image. Deletes all the images stored in the camera. Format Formats the CF card. Exit Quits the OSD. Digital Camera User Guide... -
Page 16: Information Menu
Print Menu This menu contains the following items: Print Image Selects the image to be printed. Cancel print Deselects the image so it will not be printed. Print all Prints all images. Cancel all Deselects all images. Digital Camera User Guide... -
Page 17: How To
1 . Power on the camera. 2. Set the camera to LCD-on mode. 3. Press the Control button to select VIDEO from the OSD. 4. Press the Shutter button to start recording. To stop recording, press the Shutter again. Digital Camera User Guide... -
Page 18: How To Take Burst Pictures
. * You can choose to review a single image, or up to 9 images at a time. To playback short movies, do the following: On the LCD display 1 . Power on the camera. Digital Camera User Guide... -
Page 19: How To Delete Images And Short Movies On The Camera
Sometimes you may need to delete the captured images or videos to make room for new recordings. To delete images or videos, do the following: 1 . Power on the camera. Digital Camera User Guide icon by and then press the center of... -
Page 20: How To Send Your Images To A Dpof-Compatible Service Or Device
Move to the PRINT menu and then choose the “Print Image” to continue. After specifying the images, you may take the CF card to do the direct printing (by a photo printer or a digital image finishing center). Digital Camera User Guide on the Control button. -
Page 21: Connecting To A Computer
2. Click on Start and then Run. 3. In the Run dialog box, type drive:\run.exe where drive is the location of your CD-ROM drive. Follow the on-screen instructions to complete the driver installation and the included software. Digital Camera User Guide... -
Page 22: Getting Connected To The Pc And The Mac
Getting Connected to the PC and the 1 . Connect one end of the USB cable into the USB port of your computer and the other end into your camera. 2. Power on the camera. Digital Camera User Guide... -
Page 23: Transferring Images
Using the Windows Explorer 1 . Power on the camera. 2. Open the Windows Explorer. 3. A camera folder appears. 4. Drag and drop the images in the folder to other desired locations. Digital Camera User Guide... - Page 24 6. Change the File type to JPG and then click on the Acquire button. 7 . The Viewer’s main window appears. 8. Click on the thumbnail(s) you want, then click the Transfer icon to download your image to the computer. Digital Camera User Guide Transfer icon...
-
Page 25: To A Mac
1 Power on the camera. 2. Launch Viewer program. The Viewer opens and automatically loads your images. 3 Click on the thumbnail(s) you want, then click the Transfer icon to download your image to the com- puter. Digital Camera User Guide Transfer icon... -
Page 26: Specifications
Exposure White Balance Self-timer External Memory Interface Power Dimensions Weight Digital Camera User Guide Sony® SuperHAD™ CCD sensor Fine: 2048 x 1536 by Coach™ technology High: 1600 x 1200 Low: 800 x 600 Single/Burst/AVI Clip 20 fps (320 x 240) ;...