
Related Manuals for F.lli Schiano E-Sky 20 Folding

Summary of Contents for F.lli Schiano E-Sky 20 Folding
- Page 1 ELECTRIC BIKE USER MANUAL An electronic version of the manual is available by scanning the QR code above or on the Amazon product page. You can find our contacts on the last page of this manual.
-
Page 2: Table Of Contents
TABLE OF CONTENTS 1. USER MANUAL………………………………………………………………………………………………………………..………………………1 1.1 Objectives of this user manual……………………………………………………………………………………………………..…….1 1.2 Before the first ride of the e-bike……………………………………………………………………………………………………….1 1.3 Before each ride of the e-bike …………………………………………………………………………………………………………….2 1.4 Using a bike trailer or a child seat……………………………………………………………………………………………………….2 2. TERMINOLOGY………………………………………………………………………………………………………………………………………..3 3. E-BIKE STORAGE………………………………………………………………………………………………………………………………………4 4. -
Page 3: User Manual
Thank you for purchasing this e-bike from F.lli Schiano. We wish you a lot of fun and success riding it. The e- bike you purchased will provide you with two-wheeled entertainment, will be the most practical and economical means of transport in the city, and will also allow you to burn calories to keep in good shape. -
Page 4: Before Each Ride Of The E-Bike
1.3 Before each ride of the e-bike Be sure to check the electrical system every time you ride the e-bike: • Check whether the battery is inserted correctly in the frame bracket/rear rack and whether the battery cable is securely tucked in. •... -
Page 5: Terminology
2. TERMINOLOGY FIGURE 1 1. Battery 2. Battery lock 3. Engine 4. Display FIGURE 2 1. Battery 2. Battery lock 3. Engine 4. Display FIGURE 3 1. Battery 2. Battery lock 3. Engine 4. Display... -
Page 6: E-Bike Storage
3. E-BIKE STORAGE The electric system of your e-bike provides quiet, smooth, pleasant, and – should you wish – powerful drive in any circumstances! The high-quality battery provides a long service life, so you can use your e-bike for long rides. We recommend that you do not ride your bike in the rain. Electronic components such as motor, battery, control unit must not get wet. -
Page 7: Rechargeble Battery
4. RECHARGEABLE BATTERY The battery of your e-bike can be located under the rear rack or in the frame of the bike, depending on the model you choose. The battery of each bicycle is replaceable and rechargeable. 4.1 Removing the battery from the e-bike Battery built into the frame tube To remove the battery from the e-bike frame: 1. -
Page 8: Switching Off The Charger
Recharging battery when removed from the e-bike The battery can also be recharged after removing it from your e-bike. You can remove the battery with the key supplied with your e-bike and remove it. This charging method is convenient when the battery needs recharging and is even preferable if you will not be using the e-bike for an extended period of time. -
Page 9: Battery Maintenance
Disconnect the battery immediately if you notice a malfunction, hear an unusual noise, notice unusual temperature differences, or when there is a leak in the battery case. Do not expose the battery to heat sources or damage the battery. A damaged battery can release toxic gas! The battery should be charged and stored in a room with an ambient temperature above 5°C (41°F). -
Page 10: Display
5. DISPLAY All our displays are compatible with 24V/36V/48V batteries Your e-bike is equipped with one of the following two display types: LED Display D15 or LCD Display D13. For more information on LCD Display D13 please continue to page 10. 5.1 ANANDA LED Display D15 Pas level Plus... - Page 11 Pas level and Walking Assistant Mode In the power-on state, the pas position is 5 segments of LED display. By adding and subtracting keys, the electric vehicle assist gear position is switched, and the motor output power is changed. The instrument output power range is 0-5 oas.
-
Page 12: Ananda Lcd Display D13
Pas 4 & 5 LED both flashin Other error Pas 5 LED flashing Controller Communication Error If the 5-core cable connected to the The main power cord is not connected / the controller is controller and the controller fails, and out of phase. - Page 13 Product Functions D13/U LCD display integrates a 2.4” multi-function screen, which supports 24V / 36V / 48V battery. It also integrates the headlight switch function. The main functions of D13/ U are: • Total Mileage; • Trip Mileage • Current Speed •...
- Page 14 by the display: real-time speed, total mileage (ODO), single-mile (Trip), riding time (Time), maximum speed (MAX SPEED), average speed (AVG SPEED), power-assisted gear, power, error code mode. The current speed display, the speed display unit has two types of display: mile display and kilometer display, which can be set in the settings.
- Page 15 After the password is entered correctly, it will enter the menu selection interface. Short press the key to select the following items in order: maximum gear setting -> wheel diameter setting -> km, mile unit switching -> speed limit function adjustment -> current program Version number ->..->Maximum gear setting.
- Page 16 Communication Error Power bottom Error Walking assistant Error Microprocessor failure, voltage reference faul If the 5-core cable connected to the controller and the controller fails: The meter cannot be turned on, and the LCD screen is not displayed. Possible cause: The main power cord is not connected / the controller is out of phase.
-
Page 17: Electrical Components
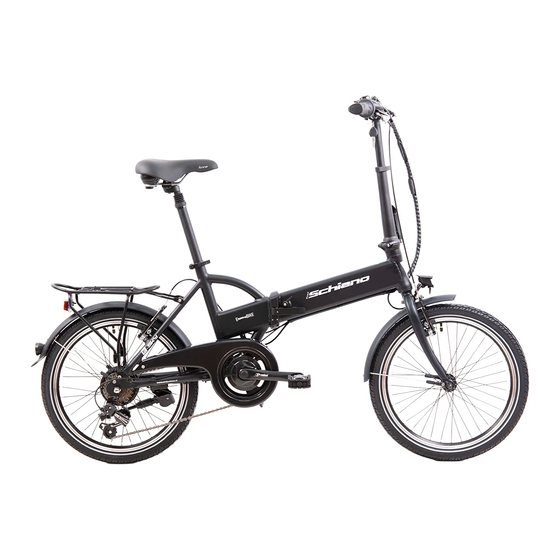
6. ELECTRICAL COMPONENTS Maximum Maximum weight MODEL Display Battery Engine speed supported GREENWAY EF-3, Brushless Rear Motor 120kg (incl. ANANDA LED E-Sky 20" Folding 25(km/h) 36V, 7.8Ah, ANANDA RM M129, cyclists) Display D15 280.8Wh 36V 250W Brushless Front Motor E-Moon 26"/28” 120kg (incl. -
Page 18: Technical Specifications
7. TECHNICAL SPECIFICATIONS 7.1 Wheels Mounting using a quick-release mechanism Release the quick-release lever, slide it into the wheel axle, tighten the adjusting cap located on the opposite end of the axle, and loosen it by one turn. The safety washers must always rest on the fork blades and the quick-release system. -
Page 19: Handlebars
7.3 Handlebars Some models allow you to adjust the handlebars by changing the depth of the stem. Loosen the handlebar screw to select the desired height, then tighten the screw at the top of the stem. Recommended handlebars tightening torque: 17 Nm. Stem screw minimum breaking point: 26 Nm. Note: Some handlebar headsets cannot be adjusted. -
Page 20: Lights
When you sit on the saddle with your knees slightly bent, you should be able to place your heels on the pedals. Do not extend the saddle stem beyond the minimum insertion depth mark indicated on the tube. The insertion depth marking must not be visible. 7.5 Lights If you need to adjust or replace the headlight: place the headlight in the headlight holder on the handlebars or front carrier and adjust it so that the light beam meets the ground at a distance of 10 meters in front of... -
Page 21: Tire Pressure
Disk brakes. Disc brakes are a steel disc located on the bicycle wheel sleeve, usually on the left side, and a device that presses the pads. Disc brakes are distinguished by their excellent braking performance and good resistance to bad weather. They react much more powerfully than V-brakes in wet conditions. -
Page 22: Chain
7.8 Chain Check the chain tension and condition regularly: it must always be clean and lubricated. In the case of bicycles equipped with a derailleur, the chain tension is adjusted automatically. For other bicycles, a sag of 10 - 20 mm is required. HINT! When you go on a long ride, consider picking up tools to repair the chain. -
Page 23: Derailleur
tensioned or loosened by turning the adjusting screw through which the cable passes into the gearshift lever (or grip). 7.10 Derailleur The derailleur is adjusted by means of screws 1, 2, 3, and 4 which act as locks and limit the derailleurs floor. Increase or decrease their motion range by adjusting these screws as you pass through all the gears without the chain falling off the outside or inside of the freewheel or faceplates. -
Page 24: Maintenance Of The E-Bike
8. MAINTENANCE OF THE E-BIKE Lubricate the brake units, levers, chain, and freewheel with liquid paraffin. Lubricate the hubs, cranks, and steering unit once a year. Avoid tires or brake surfaces contact with oil or grease. Do not use a high-pressure cleaning machine. Check the following components regularly: tightening points (wheels, hubs, console, handlebars, saddle, chain), brake pads and tires wear, brakes, and derailleurs adjustment. -
Page 25: Table Of Problems And Solutions
9. TABLE OF PROBLEMS AND SOLUTIONS PROBLEMS POSSIBLE CAUSES SOLUTIONS Gear shifts not working 1. Derailleur cables sticking/stretched/ 1. Lubricate/tighten/replace cables. properly. damaged. 2. Adjust derailleurs. 2. Front or rear derailleur not adjusted 3. Adjust indexing. properly. 3. Indexed shifting not adjusted properly Slipping chain. - Page 26 Wobbling wheel. 1. Axle broken. 1. Replace axle. 2. Wheel out of true. 2. True wheel. 3. Hub comes loose. 3. Adjust hub bearings. 4. Headset binding. 4. Adjust headset. 5. Hub bearings collapsed. 5. Replace bearings. 6. QR mechanism loose. 6.
-
Page 27: Warranty
Charge shows a full charge 1. Faulty charger. 1. Replace charger. in an unusually short 2. Faulty batteries. 2. Replace batteries amount of time. Indicator light on charger 1. Outlet has no power. 1. Check outlet for power. 2. Faulty charger. 2. - Page 28 In the event of damage caused by the quality of the product during normal use, the company will be liable for the limited warranty during the warranty period. The warranty period of the motor is 30 months. The warranty period of the control unit display is 18 months. The warranty shall not cover: •...
-
Page 29: Folding Bikes
11. FOLDING BIKES E-SKY 20” E-bike ready for packaging 1. Handlebars folding • Push the button up to release the lever • Pull the lever in the direction shown in the image below. You can then retract the e-bike handlebars. 2. - Page 30 E-STAR 20” E-bike ready for packaging 1. Handlebars folding • Push the button up to release the lever. Pull the lever in the direction shown in image 2 • Then pull the locking mechanism in the direction shown in image 3 with the red arrow so that the handlebars can be folded (image 4)
- Page 31 2. Frame folding • Release the locking lever by pushing it down as shown in images 1 and 2 • Then turn the locking lever as shown in images 3 and 4. • Turn the locking lever as shown in images 5 and 6. •...
- Page 32 • GALAXY 20” Bicicletta pronta da imballare 1. Handlebars folding • Push the button up to release the lever • Tirare la leva nella direzione indicata nella foto sottostante. Poi si può piegare il manubrio della bicicle 2. Frame folding •...
- Page 33 • Fold the pedals as shown in photo 3 3. To remove the battery from the e-bike frame: • insert the key in the lock and turn left. • Pull the battery out of the rear rack...
- Page 34 The digital version of the instruction booklet can be found on our website https://b2cstore.grupposchiano.it/manuali-pdf/ or on the product site on Amazon. For more information or any question, please contact us by e-mail: customerservice@redaldigital.com or contact the us by filling in our customer service form by scanning the QR code.
Need help?
Do you have a question about the E-Sky 20 Folding and is the answer not in the manual?
Questions and answers