
Subscribe to Our Youtube Channel
Related Manuals for Teka CM 45


Summary of Contents for Teka CM 45
- Page 1 Service Manual CM 45 / CML 45 Coffee Maker Service Manual: MS-CM-0002-01-1109 CM 45 / CML 45 Coffee Maker Service Manual (January 2010) Service Manual: SM-CM-0002-01-1109 - 1 - Technical Training Department...
-
Page 2: Table Of Contents
Service Manual CM 45 / CML 45 Coffee Maker Contents General description and operation instructions ............... - 5 - Product data identification ....................- 7 - Counting the number of coffees ................... - 7 - Installation process ......................- 9 - Step 1: Position the rails on the side of the cabinet ............ - Page 3 Service Manual CM 45 / CML 45 Coffee Maker Water pump ........................- 38 - Flowmeter ........................... - 38 - Heating elements ........................ - 39 - Hot water and coffee heating element: ................- 39 - Steam heating element ....................- 39 - Grinder ..........................
- Page 4 Figure 1 CM 45 built in coffee maker ..................- 5 - Figure 2 Serial number location ....................- 7 - Figure 3 CM 45 dimensions, furniture dimensions and ventilation gap dimensions ....- 9 - Figure 4 Positioning of the side rails ..................- 10 - Figure 5 Fixing the power cable with the clip .................
-
Page 5: General Description And Operation Instructions
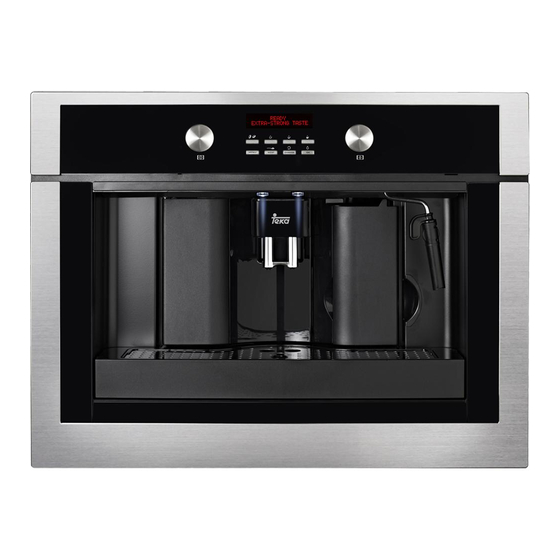
CM 45 / CML 45 Coffee Maker General description and operation instructions The following Service Manual aims to explain the use and how to repair the Coffee Maker CM 45 which has been recently introduced within TEKA range. Figure 1 CM 45 built in coffee maker... - Page 6 Service Manual CM 45 / CML 45 Coffee Maker Automatic descaling function Regulation of coffee intensity (extra light, light, medium, strong and extra strong) Regulation of quantity of coffee Regulation of coffee temperature (low, medium, high) Display with 8 languages...
-
Page 7: Product Data Identification
Service Manual CM 45 / CML 45 Coffee Maker Product data identification In order to ensure the correct treatment of each incidence TEKA product serial number should be provided together with the incidence information. This serial number can be found as indicated in the figures... - Page 8 Service Manual CM 45 / CML 45 Coffee Maker To enter the procedure: Press and Hold: Menu' + CHANGE buttons, then plug the machine On The display will show: Total number of coffees made; Total liters of water used. Pressing the button NEXT, the Display will show: Total number of decaling procedures performed.
-
Page 9: Installation Process
(65°C min) Find below the dimensions of the appliance, kitchen furniture and ventilation gaps: Figure 3 CM 45 dimensions, furniture dimensions and ventilation gap dimensions This appliance can be installed in combination with a built-in oven if the latter is fitted with a cooling fan at the rear (maximum oven power: 3 kW). -
Page 10: Step 1: Position The Rails On The Side Of The Cabinet
Service Manual CM 45 / CML 45 Coffee Maker Step 1: Position the rails on the side of the cabinet Figure 4 Positioning of the side rails Fix with the screws, then extract completely. If the coffee maker is installed over a warmer drawer (500 W max.), use the top surface of this as a reference to position the rails. -
Page 11: Step 3: Position The Coffee Maker On The Rails
Do not use multiple sockets or extensions. Step 3: Position the coffee maker on the rails Figure 6 Positioning the CM 45 in the rails Position the appliance on the rails, making sure the pins are correctly inserted in the housings, then fix it with the screws supplied... -
Page 12: Step 4: Correct Alignment With Spacer If Necessary
Service Manual CM 45 / CML 45 Coffee Maker Step 4: Correct alignment with spacer if necessary Figure 7 Correcting the alignment of the CM45 If necessary, correct alignment of the appliance by positioning the spacers supplied under or at the sides of the support. - Page 13 Service Manual CM 45 / CML 45 Coffee Maker Figure 9 Control panel buttons 3/ After 5 seconds, the appliance displays "FILL TANK". Follow the instruction as per the figure below: Figure 10 Filling the water tank Service Manual: MS-CM-0002-01-1109...
- Page 14 Service Manual CM 45 / CML 45 Coffee Maker 4/ Place a cup under the cappuccino maker.The appliance now displays: "HOT WATER PRESS OK". Press the OK button and after a few seconds a little water comes out of the cappuccino maker. (Delivery stops automatically).
- Page 15 Service Manual CM 45 / CML 45 Coffee Maker • Press the CHANGE button repeatedly until the number coincides with the number of red squares on the test strip (for example, if there are 3 red squares on the test strip, press the button until "WATER HARDNESS 3" is displayed).
-
Page 16: Security And Operation Guide
Service Manual CM 45 / CML 45 Coffee Maker Security and operation guide As with other kitchen appliances, please mind the edges of the metallic plates within the appliance. The use of protective gloves when manipulating the metal plates is highly advisable. -
Page 17: Product Operation
Service Manual CM 45 / CML 45 Coffee Maker Product operation Main functions As the coffee maker is an appliance that requires to introduce the main functions to the costumer, they are described below: Coffee with coffee beams The appliance is preset to make coffee with a standard taste. You can also choose coffee with an extra-light, light, strong or extra strong taste. -
Page 18: Coffee Quantity
Service Manual CM 45 / CML 45 Coffee Maker appliance in, then proceed as described for coffee with coffee beams. N.B.: You can make just one coffee at a time by pressing the (B3), (B4) or (B5) button once only. -
Page 19: Maintenance And Cleaning
Service Manual CM 45 / CML 45 Coffee Maker o Quantity of ground coffee o Cup temperature when pouring the coffee o Amount of water o Grinding size Maintenance and cleaning Before performing any cleaning operations, leave the machine to cool down completely and unplug from the mains power supply. -
Page 20: Cleaning The Coffee Grounds Container
Service Manual CM 45 / CML 45 Coffee Maker Figure 11 Components to be cleaned Cleaning the coffee grounds container When "EMPTY GROUNDS CONTAINER" is displayed, the grounds container must be emptied and cleaned. Until the grounds container has been cleaned, the appliance continues to display the message and coffee cannot be made. -
Page 21: Cleaning The Drip Tray
Service Manual CM 45 / CML 45 Coffee Maker To clean: • Open the service door (A2) on the front of the appliance, extract the drip tray (A14), empty and clean. • Empty the grounds container and clean thoroughly to remove all... -
Page 22: Cleaning The Pre-Ground Coffee Funnel
Service Manual CM 45 / CML 45 Coffee Maker Cleaning the pre-ground coffee funnel Check regularly (about once a month ) that the pre-ground coffee funnel (A21) is not blocked. If necessary, remove coffee deposits with a knife. Cleaning the inside of the coffee maker Check regularly (about once a week) that the inside of the appliance is not dirty. -
Page 23: Cleaning The Cappuccino Nozzle
Service Manual CM 45 / CML 45 Coffee Maker If the infuser is difficult to insert, you must first adapt it to the right dimension by pressing it forcefully from the bottom and top. Once inserted, make sure the two red buttons have snapped out. - Page 24 Service Manual CM 45 / CML 45 Coffee Maker • Press the MENU button (B6) then press the NEXT button (B7) repeatedly until the appliance displays "DESCALE NO". • Press the CHANGE button (B8) and the appliance displays "DESCALE YES".
-
Page 25: Electrical Diagram
Service Manual CM 45 / CML 45 Coffee Maker • When the water tank is empty, the appliance displays the message "RINSING COMPLETE...PRESS OK". • Press the OK button and refill the water tank with clean water. • The descale programme is now terminated and the appliance is ready to make coffee again. - Page 26 Service Manual CM 45 / CML 45 Coffee Maker Service Manual: MS-CM-0002-01-1109 - 26 - Technical Training Department...
- Page 27 Service Manual CM 45 / CML 45 Coffee Maker In order to improve the understanding of the electrical diagram, see the numbered pictures below. The numbers of the picture are indicated in the electrical diagram. Coffe temperature sensor Service Manual: MS-CM-0002-01-1109...
- Page 28 Service Manual CM 45 / CML 45 Coffee Maker In some cases, as in photo 6 the wire in F5, which should be red, it is blue. Therefore, colours might differ, but not the items the wire connect to the PCB (F5 always will connect the PCB with the vapour heating element.
- Page 29 Service Manual CM 45 / CML 45 Coffee Maker Steam heating element Pump Hall sensor. Detects infuser block position Control board Boiler temperature sensor Reed sensor From door Infuser group Flowmeter switch position switches Service Manual: MS-CM-0002-01-1109 - 29 -...
- Page 30 Service Manual CM 45 / CML 45 Coffee Maker Reed switch Flowmeter M2 Switch. It detects bottom position of the infuser M1 Switch. It detects top position of the infuser group In order to understand the electrical diagram we have to understand how the appliance works.
- Page 31 Service Manual CM 45 / CML 45 Coffee Maker Control circuit. It is made of two electronic boards, PCB and interface user board. Both circuits interact. The control circuit is the brain of the system, it works combining two signals: 1/orders from the user interface 2/signals from the control signal circuit (eg: temperature sensors,...)
-
Page 32: Hydraulic Diagram
Service Manual CM 45 / CML 45 Coffee Maker Hydraulic diagram Figure 13 Hydraulic diagram Service Manual: SM-CM-0002-01-1109 - 32 - Technical Training Department... - Page 33 Service Manual CM 45 / CML 45 Coffee Maker Find below figures explaining the hydraulic diagram Water excess to drip tray To steam valve. See figure 15 To coffee boiler. See figure 15 When pump stops working remaining water follow this track...
- Page 34 Service Manual CM 45 / CML 45 Coffee Maker From pump. See To exhaust valve. To hydraulic block. Steam valve To steam/hot figure 14 See figure 14. See figure 16 water dispenser explanation Water excess Infuser group upper position switch...
-
Page 35: How The Coffee Maker Works
Cold water Hot water How the coffee maker works CM 45 works always the same way when making coffee. When choosing different options and coffee tastes, the difference is the time the different components are activated. The machine will perform a rinsing and warming up cycle when started, so that the pipes get warm and the hydraulic cycle is cleaned. - Page 36 Service Manual CM 45 / CML 45 Coffee Maker Hot water from coffee heating element to hydraulic block Water to steam 3 Water excess ways valve to drip tray Water to compacted coffee Figure 16 Coffee Maker hydraulic block 5/ Water passes through the compacted coffee in the infuser, and leaves towards the coffee dispenser.
-
Page 37: When Choosing Hot Water Or Steam The Coffee Maker Works As Indicated Below
Service Manual CM 45 / CML 45 Coffee Maker When choosing hot water or steam the coffee maker works as indicated below: Up to the hydraulic block, the water follows the same circuit. Once in the hydraulic block, water is not sent to the infuser. It is sent to the steam 3 ways valve. -
Page 38: Product Components
Service Manual CM 45 / CML 45 Coffee Maker Product components The core components of the CM45 and its technical data are listed below: Water pump The water pump technical data is shown below: Table 2 Water pump technical data Figure 20 Water pump Water pump works with 220V voltage. -
Page 39: Heating Elements
Service Manual CM 45 / CML 45 Coffee Maker Heating elements There are two heating elements in the coffee maker. One heats water to make coffee and hot water and the other heats water to produce vapour. Hot water and coffee heating element:... -
Page 40: Grinder
Service Manual CM 45 / CML 45 Coffee Maker Steam heating element is also provided with a temperature probe set to 145ºC. In order to verify temperature probe is not damaged its resistance should be 118,2 ohmios when temperature is 21ºC... - Page 41 Service Manual CM 45 / CML 45 Coffee Maker 1/ Remove the coffee beans container, the black finger saver and the knob. 2/ Turn the white shaft clockwise till it stops . Remove the upper part of the grinder by pulling it...
-
Page 42: Infuser Group Kit
Service Manual CM 45 / CML 45 Coffee Maker Change the setting carefully by turning the white ring of one or max two steps (one or two holes) either way as required. 7/ Insert the white shaft, making sure its larger notch is aligned with the one on the grinder. -
Page 43: Infuser Block
Service Manual CM 45 / CML 45 Coffee Maker Electronic board filter Electronic board for 251 Ω Infuser block position Big gear magnets to allow revolution count Figure 25 Infuser group Kit To verify the motor is working properly we should measure the resistance as shown on figure 25. -
Page 44: Fan
Service Manual CM 45 / CML 45 Coffee Maker It is placed in the front of the coffee maker just behind the service door. It is moved up or down by the infuser group kit. It is provided with a microfilter that allows water to flow through in order to prepare coffee. -
Page 45: Water Level
Service Manual CM 45 / CML 45 Coffee Maker To steam heating element From steam To steam heating nozzle element Water excess to drip tray From hydraulic block Figure 28 3 ways and 2 ways steam electrovalves To verify the electro valve is working properly, verify electrical component resistance, it should be 2,5MΩ. -
Page 46: Service Test
Service Manual CM 45 / CML 45 Coffee Maker Service test CM 45 coffee maker is provided with an auto test mode, so that all the electrical components can be tested. Figure 29 CM 45 User interface Components auto test procedure:... -
Page 47: Display Test Procedure
Service Manual CM 45 / CML 45 Coffee Maker Nominal current: 0,700A Rotate knob ON / OFF: Motor UP Nominal current: 0,134A Pressing Button Taste Selector: Motor Down Nominal current: 0,134A Pressing Button Short Coffe: EV 1 ON Nominal current: 0,074A... -
Page 48: Counting Procedure
Service Manual CM 45 / CML 45 Coffee Maker - button 11 and 12 for the right one. Counting procedure To enter the procedure: Press and Hold: Menu' + CHANGE buttons, then plug the machine On . The display will show: Total number of coffees made;... -
Page 49: Troubleshooting Section
Service Manual CM 45 / CML 45 Coffee Maker Troubleshooting section From user symptoms In the following section we will treat the problems the technician might be facing from the symptoms described by the user. Water tank empty“ is not shown... -
Page 50: Coffee Tastes Bitter
Service Manual CM 45 / CML 45 Coffee Maker If the flow volume is reduced the coffee will not flow consistently out of the coffee dispenser. Adjust the grinder setting. On doing so make sure that the grinder is not set too finely since this will make the coffee grounds very compact and reduce the flow. -
Page 51: The Coffee Does Not Have A Good Crema
Service Manual CM 45 / CML 45 Coffee Maker The coffee does not have a good crema? Advise the client that different coffee brands produce different crema. Robusta beans produce more crema than Arabica beans since they contain more oil. This oil produces the crema. -
Page 52: Steam Heating Element
Service Manual CM 45 / CML 45 Coffee Maker 2/ Enter auto test mode and verify coffee heating element Verify coffee heating elements resistance 4/ If the nominal current value when performing the auto test is not the expected value: Verify wiring continuity. -
Page 53: Infuser Group Kit
Service Manual CM 45 / CML 45 Coffee Maker Visual check of the grinder in order to ascertain it is not damaged or blocked Infuser group kit If the infuser block does not reach top or bottom position within 10 seconds of been actuated, the coffee maker will display general error. - Page 54 Service Manual CM 45 / CML 45 Coffee Maker Client manual. Question guide to identify easy-to-solve problems Service Manual: SM-CM-0002-01-1109 - 54 - Technical Training Department...
- Page 55 Service Manual CM 45 / CML 45 Coffee Maker Service Manual: SM-CM-0002-01-1109 - 55 - Technical Training Department...
- Page 56 Version changes Section 2: When repairing a CM 45 it is compulsory to take note of the number of coffees the appliance has supplied. Therefore the text below has been added to section 2 (page 7) in order to emphasize the importance of performing this procedure.
Need help?
Do you have a question about the CM 45 and is the answer not in the manual?
Questions and answers