Table of Contents
Advertisement
Advertisement
Table of Contents

Related Manuals for Holzstar ZSM 405


Summary of Contents for Holzstar ZSM 405
- Page 1 Instruction manual Cylinder sanding machine ZSM 405 ZSM 405...
-
Page 2: Table Of Contents
16 Spare parts ..........26 Subject to technical modifications and error. 16.1 Ordering spare parts........26 16.2 Spare parts drawings ZSM 405 ..... 27 17 Electrical Schematic ........29 18 EC Declaration of Conformity ....30 ZSM 405 | Version 2.08... -
Page 3: Introduction
All information and notes in these operating instructions You have made a good choice by purchasing the Cylin- were summarised taking the applicable standards and der sanding machine made by HOLZSTAR. rules, the state-of-the-art and our long-term knowledge and experiences into consideration. -
Page 4: Obligations Of The Operating Company
- The operator must ensure that the maintenance in- tervals described in this manual are kept. - The operator must have all safety devices checked regularly for their good working order and their in- tegrity. ZSM 405 | Version 2.08... -
Page 5: Qualification Of Personnel
Other personnel is not au- The protective clothes are tight clothes of little tensile thorized to perform these works. Please contact our cus- strength. tomer service for the execution of all arising work. ZSM 405 | Version 2.08... -
Page 6: Safety Signs On The Machine
The machine may only be connected by qualified per- sonnel. Installation errors, including electrical Connec- tion errors are not covered by warranty. Before connec- ting and disconnecting the machine, the power connection must be interrupted. Fig. 3: Work space ZSM 405 | Version 2.08... -
Page 7: General Safety Instructions
Power tools produce sparks that can ignite dust or the fumes. The Cylinder sanding machine ZSM 405 is designed for - Do not expose the machine to rain or wet conditions. surface grinding of workpieces up to 405 mm wide and is - Check power supply at regular intervals. -
Page 8: Foreseeable Misuse
- Ejected workpieces can cause injuries if the work- piece is not properly secured or fed. - Wood chips and sawdust can be hazardous to Fig. 4: Type plate ZSM 405 health. Be sure to wear personal protective equip- ment such as safety glasses and dust mask. Use... -
Page 9: Transport, Packaging, Storage
The cylinder sander must be thoroughly cleaned before Fasten the loads properly. storing in a dry, clean and frost-free environment. Cover the machine with a protective tarpaulin. ZSM 405 | Version 2.08... -
Page 10: Description
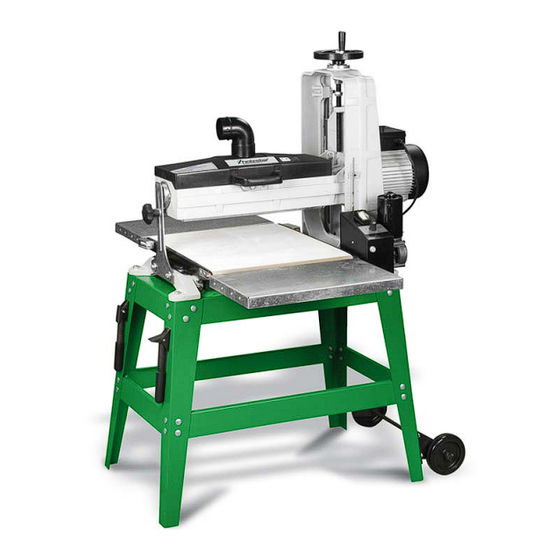
- EU standard according to (CE mark) WARNING! It is not allowed to use profiles exceeding the specifi- cation strength. Use the machine only for the intended Fig. 5: Cylinder sanding machine ZSM 405 purpose. 1 Scale for height adjustment 2 Engine... -
Page 11: Setting Up The Cylinder Sanding Machine
Step 2: Turn the cross struts (B and C, Fig.7) over and fold them rectangularly onto a flat surface. Step 7: Fasten the wheel holder to the two machine feet using 4 screws. ZSM 405 | Version 2.08... - Page 12 Step 12: Mount machine to base using (4) hex bolts and washers. Table connection Fig. 14: Mount table extension Step 14: Mount the handwheel for height adjustment on the machine head using the screw, washer and cap nut. ZSM 405 | Version 2.08...
-
Page 13: Electrical Connection
Wear dust mask! DANGER! All work on the electrical installation must only be car- ried out by a qualified electrician in order to avoid the risk of personal injury due to improperly performed work. ZSM 405 | Version 2.08... -
Page 14: Test Run
- Only work on a workpiece that rests securely on ted by one person. Other persons must keep away the table. from the working area during operation. - Only remove chips and workpiece parts when the machine is at a standstill. ZSM 405 | Version 2.08... -
Page 15: Starting The Machine
Use the height adjust- ment handwheel to set the grinding drum to the desired chip removal rate. Fig. 18: Set feed rate Follow these precautions to ensure a safe grinding process and high-quality results: ZSM 405 | Version 2.08... -
Page 16: Workflow
Scale for height Step 5: Unwind the sandpaper strip from the drum until adjustment you reach the clamping device on the left side. Automatic table feed Clamping device Fig. 20: Workflow Fig. 22: Clamping device left ZSM 405 | Version 2.08... -
Page 17: Sandpaper Cleaning
Do not skip more than one grit level. Grain sizes that are too fine and worn grinding belts can leave burn marks on the workpiece. ZSM 405 | Version 2.08... -
Page 18: Setting The Height Stop
Step 5: Tighten the hex nut and lower the grinding drum un- Step 3: Swing the cover up to include access to the pres- til the adjustment screw touches the frame of the sure roller adjustment screws. holder. ZSM 405 | Version 2.08... -
Page 19: Adjusting The Guide Rails
Step 1: Switch off machine. Step 2: Make sure that the guide pads are set correctly. Step 3: Select a workpiece that has an equal thickness on each side. ZSM 405 | Version 2.08... -
Page 20: Care, Maintenance And Repair
- Switch off the machine before carrying out cleaning dust. and maintenance work and unplug the power cord. - Connections and repairs of electrical equipment may only be performed by a qualified electrician. ZSM 405 | Version 2.08... -
Page 21: Replacing The Feed Belt
Step 2: Set the feed control to the lowest feed setting. Avoid contact with conveyor belt. Step 3: Open the protective cover to expose the grinding drum and belt. Step 4: Use a long cleaning strip to keep hands away from the rotating drum. ZSM 405 | Version 2.08... -
Page 22: Tensioning The Feed Belt
Step 2: Run the belt for a few minutes to make sure it runs properly on the rollers. Repeat this process if necessary until the belt is properly centered. ZSM 405 | Version 2.08... -
Page 23: Disposal, Recycling Of Old Equipment
If necessary, enlist the help of a specialized disposal com- pany for reprocessing. 14.3 Disposal of lubricants The disposal instructions for the lubricants used are pro- vided by the lubricant manufacturer. If necessary, ask for the product-specific data sheets. ZSM 405 | Version 2.08... -
Page 24: Troubleshooting
2. Only process material with a moisture content. moisture content of less than 20%. 3.The correct abrasive paper with the 3. Use the correct abrasive paper. correct grit is not used. 4. Insufficient dust extraction. 4. Connect extraction system. ZSM 405 | Version 2.08... - Page 25 1. Sandpaper incorrectly wound on 1. Rewind the abrasive paper. drum or is loose. the drum. 2. Defective abrasive paper wound 2. Wind on new abrasive paper. 3. Drum slot too large. 3. Reduce the drum slot. ZSM 405 | Version 2.08...
-
Page 26: Spare Parts
Spare parts 16 Spare parts Example The engine for the Cylinder Sanding Machine ZSM 405 DANGER! must be ordered. The engine has the number 81A in the Danger of injury by the use ofwrong spare parts drawing 1. spare parts! -
Page 27: Spare Parts Drawings Zsm 405
Spare parts 16.2 Spare parts drawings ZSM 405 The following drawings is intended to help in case of service, to identify necessary spare parts. To order send a copy of the parts drawing with marked components to your dealer. Spare parts drawing 1 Fig. - Page 28 Spare parts Spare parts drawing 2 Fig. 38: Spare parts drawing 2 ZSM 405 | Version 2.08...
-
Page 29: Electrical Schematic
Electrical Schematic 17 Electrical Schematic Fig. 39: Electrical Schematic ZSM 405 ZSM 405 | Version 2.08... -
Page 30: Ec Declaration Of Conformity
(ISO 12100:2010) DIN EN 60204-1:2014-10 Safety of machinery - Electrical equipment of machines - Part 1: General requirements Responsible for documentation: Kilian Stürmer, Stürmer Maschinen GmbH, Dr.-Robert-Pfleger-Straße 26, D-96103 Hallstadt Hallstadt, 08.12.2020 ______________________ Kilian Stürmer Manager ZSM 405 | Version 2.08... - Page 31 Notes 19 Notes ZSM 405 | Version 2.08...
- Page 32 www.holzstar.de...
Need help?
Do you have a question about the ZSM 405 and is the answer not in the manual?
Questions and answers