Table of Contents
Advertisement
Quick Links
WDC0821
Inverter ACDC TIG/MMA Welder
OPERATORS MANUAL
IMPORTANT: This manual contains important information regarding safety, operation, maintenance and storage of this
product. Before use read carefully and understand all cautions, warnings, instructions and product labels. Failure to do so
could result in serious personal injury and/or property damage.
Advertisement
Table of Contents
Troubleshooting

Subscribe to Our Youtube Channel
Related Manuals for WELDCO WDC0821


Summary of Contents for WELDCO WDC0821
- Page 1 WDC0821 Inverter ACDC TIG/MMA Welder OPERATORS MANUAL IMPORTANT: This manual contains important information regarding safety, operation, maintenance and storage of this product. Before use read carefully and understand all cautions, warnings, instructions and product labels. Failure to do so could result in serious personal injury and/or property damage.
-
Page 2: Table Of Contents
TABLE OF CONTENTS Thank You For your Purchase ..........................3 Unpacking Your New Welder ............................ 3 Welding Hazards and Safety ..........................4 Work Area ................................. 4 Personal Protective Equipment and Clothing (PPE) ....................4 Electromagnetic and Radio Frequencies – “PACEMAKERS” ..................5 Pre-Checks ................................ -
Page 3: Thank You For Your Purchase
Weldco would like to thank you for purchasing the Inverter AC DC TIG and MMA welder. This manual is designed to guide you through using your new machine. Your Weldco inverter welder utilizes the latest in welding technology to ensure you receive excellent results in a variety of applications. -
Page 4: Welding Hazards And Safety
Welding poses a variety of hazards to health and safety. Please ensure you have correct safety equipment for yourself and those within the welding area. Your local distributor will be able to assist you with the correct Weldco protective helmet and gloves. -
Page 5: Electromagnetic And Radio Frequencies - "Pacemakers
ELECTROMAGNETIC AND RADIO FREQUENCIES – “PACEMAKERS” • Avoid contact with the energized work piece. • Always ensure you have adequate protection from electrocution and burns. • Since the welder owns strong electromagnetic and radio frequencies. Persons fitted with “PACEMAKERS” or similar devices MUST consult their doctor before turning on the welder. -
Page 6: Technical Description
TECHNICAL DESCRIPTION COMPLIANCE PLATE DUTY CYCLE The welder’s duty cycle is the number of minutes in a 10-minute period the power source can safety produce the set welding current (actual arc on). If this is exceeded the machine will enter thermal overload, turning the welding current off protecting the welder. -
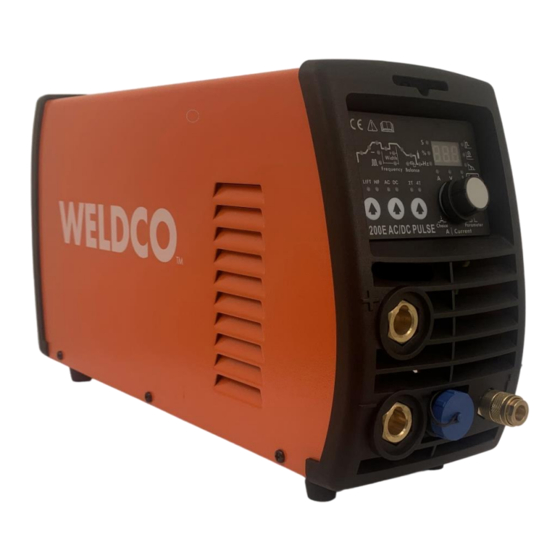
Page 7: Machine Layout
MACHINE LAYOUT Front Panel Control Panel Outlet Gas Quick Connect Fitting Torch/Foot Control Connector Negative Outlet Terminal Positive Outlet Connector Rear Panel Inlet Gas Quick Connect Fitting 7. Cooling Fan 8. Main Power Input Lead with 15-amp Plug. 9. ON/OFF Switch... -
Page 8: Control Panel
CONTROL PANEL LAYOUT Mode Selector • MMA (ARC/Stick) • TIG LIFT – TIG Lift ARC Starting (Contact) • TIG HF – TIG High Frequency ARC Starting (non-contact) Current Style • AC – Alternating Current (Aluminium, Aluminium Alloys, Magnesium, Zinc) • DC –... - Page 9 Multi-function control Knob • Turn clockwise to increase or anti-clockwise to decrease the value displayed on the LED display. • Press down to step through the welding process menu. LED Display and indicator lights 1. MMA (ARC) mode Hot Start Indicator: Adjustment percentage 0 – 100%, Increases current when striking arc excellent for difficult to start electrodes 2.
- Page 10 1. Pre gas Timer: Time in seconds before the arc is ignited 0.0 – 2.0 Seconds 2. Start Current (Amps): (4T ONLY) Set current at the start of the weld DC 10 – 170, AC 10 – 200 3. Upslope Time: Sets the Time in seconds between Start Current and Welding Current 1.0 – 10 seconds 4.
- Page 11 Alternating Current Balance (AC TIG welding only) 13. AC Balance: Adjusts the balance of the AC wave form – setting of 0 gives a 75% penetration / 25% Oxide cleaning (75% Positive / 25% Negative). Increasing the Positive (+) AC balance increases the cleaning time resulting in less weld penetration and more heat towards the tungsten (better for older /contaminated alloys) Increasing the Negative (-) AC Balance decreases the cleaning time resulting in more weld penetration and less heat towards the tungsten (better for newer, cleaner alloys).
-
Page 12: Tig Torch Arc Starting
To finish the weld, release the Torch Trigger as per 2T/4T mode. Foot Control. • The optional Weldco 3m foot control take control a step further giving you ultimate control over welding current (amperage). • Parent/Child relationship between Welder and foot controller, means when you set the Welding Current to 100 amps the foot controller maximum is 100amps, if set to 50 amps the foot controller’s maximum is 50 amps. -
Page 13: Tig Welding Setup
Connect the supplied argon regulator to the Argon bottle (1) and connect the gas hose to the regulator and the Inlet gas quick connect fitting on the back of the power source. We strongly recommend that you check for gas leakage. Weldco and its authorized distributors will not be liable for any loss of gas. •... - Page 14 the machine. The front panel will light up and the cooling fan will start. • Select LIFT TIG or HF by pressing the mode selector button until the preferred options lights up • Select AC or DC by pressing the Current selector •...
-
Page 15: Tig Welding Techniques
TIG WELDING TECHNIQUE TIG Welding Fusion Technique Manual TIG welding is often considered the most difficult of the welding processes. The welder must maintain a short arc length, with great care and skill to prevent contact between the tungsten and the work piece. Like Oxygen Acetylene torch welding (the flame of the oxygen Acetylene torch is replaced with the electrical arc and argon gas purges oxygen from the weld pool), standard TIG welding requires both hands and in most applications require the welder to manually feed a filler wire into the weld pool with one... -
Page 16: Tungsten Electrodes
TUNGSTEN ELECTRODES Tungsten has the highest melting point of any metal, approximately 3400˚C and is why TIG Welding uses Tungsten’s hardness and high temperature resistance is used to carry the welding current to the arc. Although Tungsten electrodes are considered non consumables they slowly melt depending on the tip/ball grinding and are contaminated when dipped into the weld pool. -
Page 17: Tig Welding Trouble Shooting
TIG WELDING TROUBLE SHOOTING The following chart addresses some of the common problems of TIG welding. In all cases of equipment malfunction, the manufacturer‘s recommendations should be strictly adhered to and followed. Trouble Possible Reason Suggested Remedy Incorrect Gas or No Gas Use pure Argon. - Page 18 HF present but Incomplete welding circuit Check earth lead is connected. Check all cable connections. If using a water cooled No welding power torch check that the power cable is separated. HF present but No gas Check the gas is connected and cylinder valve open, check hoses, gas valve and no welding power torches are not restricted set the gas flow between 6 - 15 l/min Tungsten melting into the weld...
-
Page 19: Mma (Stick) Welding Setup
MMA (STICK) WELDING SETUP Please ensure you have all relevant safety equipment and PPE ready. This setup is for the most common electrode positive setting for General purpose rods. Please check your electrode packaging to confirm. • Connect the earth clamp cable into the ̶ NEGATIVE terminal ( 1). Connect the Earth clamp to the work piece. It is important the earth clamp makes strong contact with bare metal –... - Page 20 • Select Current Style (most common mode is DC – specialist electrodes may require AC • Adjust the welding current (4) to the relevant level for the welding electrode type and size, as per the electrode manufacturer by adjusting the Multi-function control knob up or down. •...
-
Page 21: Mma Welding Trouble Shooting
MMA WELDING TROUBLE SHOOTING The following chart addresses some of the common problems of MMA welding. Trouble Possible Reason Suggested Remedy No arc Incomplete welding circuit Check earth lead is connected. Check all cable connections. No power supply Check that the machine is switched on and has a power supply Wrong mode selected Check the MMA selector switch is selected... -
Page 22: Maintenance
During this time should your Weldco power source fail please contact your authorized Weldco distributor. This warranty does not cover freight or goods serviced by un-authorized personnel. Weldco NZ will inspect your power source for faulty material or workmanship and will only be replaced if repair is not possible. -
Page 23: Notes
NOTES... - Page 24 WELDCO NEW ZEALAND Christchurch 8024 New Zealand www.weldco.co.nz Made in China © 2021...
Need help?
Do you have a question about the WDC0821 and is the answer not in the manual?
Questions and answers