Table of Contents
Advertisement
Quick Links
Stages SIC1 Console User Guide
Table Context
• About Console
o Front
o Back
• Safety Information
• Specifications
• Device Care
• Getting Started
o Activating the Console
o Setup
o Console Features
o Display Features
o Using the back light
o Display Definitions
o Power Meter Pairing
o Zero Reset Calibration
o Recoding Ride Data
• Console Settings
o Display Settings
o System Settings
o Custom Console Settings
o Bike Number
o
Default Settings
• Using the Console
o Warm Up Mode
o Stage mode
o Ride Mode
o Auto Pause Mode
o Results Mode
o Sleep Mode
• Compatible Devices
o Heart Rate Sensor
o Mobile Devices
• Firmware
o Upgrading Firmware
o Updating the Bluetooth Module
Advertisement
Table of Contents

Subscribe to Our Youtube Channel
Related Manuals for Stages cycling SIC1

Summary of Contents for Stages cycling SIC1
- Page 1 Stages SIC1 Console User Guide Table Context • About Console o Front o Back • Safety Information • Specifications • Device Care • Getting Started o Activating the Console o Setup o Console Features o Display Features o Using the back light...
- Page 2 Welcome to the user guide for the Stages® SIC1 Console. Within this guide, you will find information to help you configure the console, link compatible wireless devices, and on how to use the console’s various ride modes and features. Shortcuts: Stages Indoor Support: Support for all Stages Indoor products and software.
-
Page 3: About The Console
ABOUT THE CONSOLE... - Page 4 Front Console Backlit LCD Display Backlight/ – /Down STAGE/Enter/Select USB Port LCD Message Banner AVG/END/ + /Up...
- Page 5 Rear Console Batteries (C-cell) Serial Number Battery Compartment USB Port Battery Cover Screw Rechargeable Battery Pack (not included)
-
Page 6: Safety Information
SAFETY INFORMATION WARNING: To reduce the risk of serious injury, read all important precautions and instructions in this manual and all warnings on the product before using your console. 1. Before beginning any exercise program, consult your physician. This is especially important for persons over age 35 or persons with pre-existing health problems. -
Page 7: Specifications
SPECIFICATIONS Dimensions Height: 3.1 in. (80 mm) Length: 6.9 in. (175 mm) Width: 3.3 in. (85 mm) Weight with Batteries 1 lb. (2.2 kg) Batteries Required Three (3) C batteries (LR14) • estimated 200-250hrs with backlight, 800-900hrs without. • – or – Rechargeable Battery Pack (not included) •... -
Page 8: Device Care
DEVICE CARE IMPORTANT: To avoid damage to the console, keep liquids away from the console and keep the console out of direct sunlight. Cleaning: Use a soft, damp, non-abrasive cloth to wipe the console clean. Do not use abrasives or solvents to clean the console. REPLACING THE BATTERIES IMPORTANT: Replace or recharge the batteries as soon as possible when the Low Battery warning appears. - Page 9 high-use environments, such as fitness clubs. Make sure to use low-discharge rechargeable batteries that have at least a 2500mAh capacity. To replace the console batteries: 1. Remove the console from the battery cover and insert the batteries into the battery compartment.
-
Page 10: Getting Started
GETTING STARTED In order to get started using the SIC1 Console, you’ll need to pair the console to a power meter to gather any ride data (see Power Meter Pairing for instructions on how to pair your devices). You should also get acquainted with the console’s buttons, display features, and settings. -
Page 11: Activating The Console
ACTIVATING THE CONSOLE To activate the console: Press any button on the console to activate the console. The displays will then light up and the console will be ready for use. IMPORTANT: If the console has been exposed to cold temperatures, allow it to warm to room temperature before installing batteries and activating the console. - Page 12 SETUP To set up the console: 1. Activate the console by pressing any button. 2. Upon start up, insert a USB drive into the USB port if desired. The display will prompt you to insert a USB drive into the USB port on the console. If you insert a USB drive into the USB port, your ride data will be saved to the USB drive in the RESULTS mode.
- Page 13 Press the STAGE button to exit STARTUP mode and enter WARM UP mode. The console will automatically exit STARTUP mode and enter WARM UP mode in the following conditions: The console will enter WARM UP mode after 10 seconds if no buttons are pressed and the pedals move at a pedaling cadence greater than 20 RPM.
-
Page 14: Console Features
CONSOLE FEATURES Over molded Console Cover To prevent moisture from entering the console, the entire upper surface of the console, including the buttons, is over molded in a thin rubber membrane. This surface can be easily cleaned with a soft, damp, nonabrasive cloth. Backlit LCD Display The console has a backlit LCD display, which features fixed data fields displaying ride data and an active dot matrix banner. -
Page 15: Display Features
DISPLAY FEATURES Displays text messages indicating the current mode or menu option. Examples: WARM UP, STAGE #, Message Banner STAGE AVG, RESULTS, RIDE. Displays the average values for the current stage or the entire ride. In the RESULTS mode and the RIDE mode, displays the maximum values. WATTS Displays power output in watts—instantaneous, average, and maximum. -
Page 16: Using The Backlight
USING THE BACKLIGHT Press the BACKLIGHT button to turn the backlight on. To change the backlight duration, backlight settings. -
Page 17: Display Definitions
DISPLAY DEFINITIONS Warm Up The console has a WARM UP mode designed to allow a user to adjust the exercise bike, warm up, and prepare for an actual ride. In a studio cycling class, users can use this mode to warm up before the class begins. - Page 18 A watt is the international standard unit for power. However, power output is often expressed in horsepower, where 746 watts is equal to 1 horsepower. RPM (Revolutions per Minute) The console will measure and show the user’s pedaling cadence in revolutions per minute (RPM).
- Page 19 The speed value used to produce the distance value is based directly on the amount of power produced by the user (see SPEED above). Thus, the console will produce a realistic distance value that will allow the user to compare the distances traveled on rides of similar duration. KJ (Kilojoules) The console will measure and show the amount of work a user has accomplished during a ride in kilojoules (KJ).
- Page 20 POWER METER PAIRING IMPORTANT: The console must be paired to a power meter. The console cannot pair to more than one power meter at a time. To pair the console: Pairing allows the console to communicate with a power meter mounted to the exercise bike. The pairing process uses ANT+ and Bluetooth Smart wireless technology to link the console to the power meter, with Bluetooth as the priority connection.
- Page 21 3. Activate the console by pressing any button, then access the menu by holding down BACKLIGHT and AVG/END buttons for 5 seconds. From the settings menu, select PAIRING. (See System Settings for how to access the SETTINGS Mode.) 4. View power sensor ANT+ ID number: When PAIRING is displayed on the message banner, press the STAGE button.
- Page 22 ENTER ANT will appear on the message banner. Press the STAGE button. Five digits will appear on the message banner. 6. Enter ANT+ ID number located on the power meter. Use the BACKLIGHT button to select the number. The number will increase from 0-9 and return to 0. Use the AVG/END button to move to the next digit.
- Page 23 power meter and allow the console to link to it. The console will search for the power meter for 30 seconds. 8. Complete the pairing process. If the pairing process is successful, the word PAIRED will appear in the message banner. After several seconds ZERO RESET will appear.
- Page 24 IMPORTANT: The console will attempt to pair to any power meter that is awake and transmitting. Ensure that all other power meters within a close range are not awake and transmitting. If the zero reset process is successful, verify that the correct power meter is paired by riding the bike in the WARM UP mode and pedaling the power meter above 20 RPM.
- Page 25 ZERO RESET CALIBRATION Zero reset (zero offset) calibration is an important feature that resets the zero offset value for the power meter sensors. There are physical and environmental conditions that may affect the zero offset value and there are methods both manual and automatic that will adjust this value to accommodate for the changing physical and environmental condition.
- Page 26 PERFORMING A ZERO RESET 1. Activate the console by pressing any button and go to the Settings menu. 2. Select Zero Reset. To Select ZERO RESET, press and hold both the BACKLIGHT and AVG/END buttons for 5 seconds. ZERO RESET will appear on the message banner.
- Page 27 5. Complete the zero reset process. If the zero reset is successful, the word SUCCESS will appear in the message banner along with a random number below it. The console will then return to the STARTUP mode. Note: The displayed zero reset value will NOT be zero but rather a number that corresponds to the measurement taken by the sensor.
- Page 28 b. Position the power meter vertically (6 o’clock), and ensure that there is no load on the pedals and the bike is stable. c. Activate the console by pressing any button. d. Press the STAGE button to enter the WARM UP mode. e.
- Page 29 RECORDING RIDE DATA Ride data from the console can be recorded onto a USB drive or onto a connected mobile device to allow riders to track their fitness data over time. To save via USB, insert a USB drive during STARTUP mode (see USB Port to enable the port).
-
Page 30: Console Settings
CONSOLE SETTINGS To select the SETTINGS mode, press and hold the BACKLIGHT and AVG/END buttons for 5 seconds. The Settings menu will appear in the message banner. To exit SETTINGS mode, press the AVG/END button until the word BACK appears in the message banner. -
Page 31: Display Settings
DISPLAY SETTINGS To change the Display settings: 1. Activate the console by pressing any button. 2. Press and hold the BACKLIGHT and AVG/END buttons for 5 seconds to access the SETTINGS mode. 3. From the Settings menu, select the DISPLAY menu option. 4. - Page 32 UNITS Select the UNITS menu option and change the unit of measurement if desired. The console can display speed and distance in miles (ENGLISH) or kilometers (METRIC). The currently selected unit of measurement will be displayed with a dark background. Select the desired ENGLISH or METRIC unit of measurement.
- Page 33 KCAL TOGGLE Select the KCAL TOGGLE menu option to change the KCAL/heart rate toggle option if desired. When KCAL toggle is ON: In STAGE mode, when a heart rate sensor is paired to the console, KCAL TOGGLE will flash between the kcal/hr and heart rate values every 5 seconds. The currently selected toggle option will be displayed with a dark background.
-
Page 34: Backlight Settings
BACKLIGHT SETTINGS Select the BACKLIGHT menu option and change the backlight duration if desired. You can change the amount of time the backlight will stay lit after you press the BACKLIGHT button. The console has ON, OFF, and BK LT TIME (backlight time) backlight durations. The currently selected backlight duration will be displayed with a dark background. - Page 35 Note: The default backlight duration is 5 seconds.
-
Page 36: Screen Contrast
SCREEN CONTRAST Select the CONTRAST menu option and change the contrast level of the LCD display if desired. You can adjust the contrast level of the LCD display from 0 to 100 percent. The currently selected contrast level will be shown in one of the right displays. Note: The default contrast level is 100 percent. -
Page 37: System Settings
SYSTEM SETTINGS To change System Settings: Activate the console by pressing any button and then press and hold both BACKLIGHT and AVG/END buttons for 5 seconds. The Settings menu will appear in the message banner. Select SYSTEM from the Settings menu to access the system settings. Once you’ve completed modifying the system settings, exit the system menu by selecting BACK until you return to the startup screen. -
Page 38: Auto Pause
AUTO PAUSE Select the AUTO PAUSE menu option to enable or disable the Auto Pause mode if desired. You can enable (PAUSE ON) or disable (PAUSE OFF) the Auto Pause mode. The currently selected option will be displayed with a dark background. Select the desired PAUSE ON or PAUSE OFF option. - Page 39 USB PORT Select the USB menu option and enable or disable the USB port if desired. You can enable (USB ON) or disable (USB OFF) the USB port on the console. Note: The default option is USB ON. The currently selected USB option will be displayed with a dark background. When the USB OFF option is selected, the USB port cannot be used to save ride data (see Setup) and cannot be used to save or import custom console settings.
- Page 40 STATS Select the STATS menu option and view console usage information if desired. The console keeps track of usage information (STATS) that can be viewed and saved on a USB drive. Note: The USB port must be enabled to save console usage information on a USB drive (see USB Port).
- Page 41 CUSTOM CONSOLE SETTINGS The following custom settings can be saved to a USB drive: Unit of measurement (see Units) • KCAL Toggle • Backlight duration (see Backlight Settings) • Screen Contrast level • Auto Pause setting • USB port setting •...
- Page 42 3. Insert your USB drive into the USB port on the console. 4. Select the IMPRT CFG menu option on the firmware menu. The console will begin importing the custom console settings to the console and the word IMPRT— will appear in the message banner.
- Page 43 BIKE NUMBERS To communicate properly, a paired console and sensor must be mounted to the same exercise bike. To make sure that the correct console stays with the correct sensor and exercise bike, you can assign an identification number to the console that matches the identification number of the exercise bike.
- Page 44 ASSIGN A BIKE NUMBER To assign a Bike Number: 1. Activate the console by pressing any button. 2. Access the SETTINGS mode, then select the BIKE # menu option. (See System Settings.) The bike number will appear in the message banner. 3.
-
Page 45: Default Settings
DEFAULT SETTINGS You can restore the following console settings to the manufacturer’s default settings. The default settings are indicated in parentheses: Unit of measurement (ENGLISH) (see Units) • KCAL Toggle (ON) • Backlight duration (5 SEC) (see Backlight Settings) • Screen Contrast level (100%) •... -
Page 46: Using The Console
To begin riding, activate the console and progress through each of the modes. The SIC1 Console supports several riding modes, including Warm Up, Stage, Ride Mode, Results, and Auto Pause. Each mode records and displays data relevant to that particular setting. -
Page 47: Warm Up Mode
WARM UP MODE 1. Activate the console by pressing any button. 2. When you activate the console it will be in STARTUP mode. If you would like to record your ride data, insert a USB into the console during STARTUP mode. 3. -
Page 48: Stage Mode
STAGE MODE To Use Stage Mode: 1. Activate the console by pressing any button. 2. When you activate the console it will be in STARTUP mode. If you would like to record your ride data, insert a USB into the console during STARTUP mode. 3. - Page 49 The STAGE mode is designed to allow you to divide your ride into specific elements that can be tracked and analyzed. For example, you can divide the high-intensity and low-intensity portions of an interval ride into separate stages. You can also save the data for each stage to a USB drive (see Setup).
- Page 50 7. To view previous STAGE averages: After pressing the STAGE button, the message banner will display STAGE AVG for 5 seconds. During this time, the right displays and distance will show average values from the previous stage, and the left displays will show current instantaneous data.
-
Page 51: Ride Mode
RIDE MODE 1. Select STAGE mode to begin your activity (see STAGE Mode 2. Select RIDE mode. To view the RIDE mode at any time during any stage, press the AVG/END button. The word RIDE will appear in the message banner. 3. -
Page 52: Auto Pause Mode
AUTO PAUSE MODE The console has an Auto Pause function that allows you to stop your ride temporarily and then resume your ride without affecting the average value data shown and saved by the console. The console will enter the AUTO PAUSE mode when your pedaling cadence is less than 20 RPM for 30 or more seconds. - Page 53 Using the Console in AUTO PAUSE OFF Mode The console has an AUTO PAUSE OFF option designed to be used by studio cycling class instructors. Since most studio cycling classes must be completed in a set period of time, instructors may not want the console to pause the time when they stop pedaling or get off their exercise bikes for short periods of time.
-
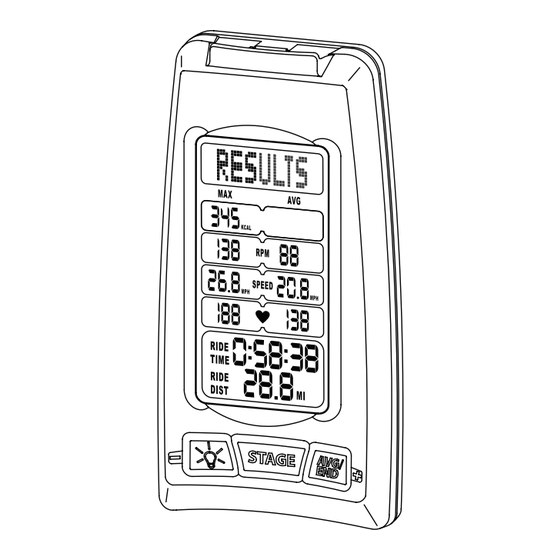
Page 54: Results Mode
RESULTS MODE 1. The RESULTS mode is visible when a rider completes their activity by ending the ride. From the STAGE mode, press and hold the AVG/END button for 3 seconds to end the ride. The word RESULTS will appear in the message banner. 2. - Page 55 3. Enter SLEEP mode. From the RESULTS mode, the console will enter Sleep Mode after 3 minutes of inactivity.
-
Page 56: Sleep Mode
SLEEP MODE To conserve battery power, the console will automatically enter SLEEP Mode in the following conditions: In STARTUP mode: The console will enter SLEEP mode after 45 seconds if the pedals do not move at a pedaling cadence of at least 20 RPM and no buttons are pressed. WARM UP Mode or in STAGE Mode... -
Page 57: Compatible Devices
COMPATIBLE DEVICES The Stages console contains wireless antennas that allow the console to communicate with wireless sensors, as well mobile devices, using ANT+ and Bluetooth Smart wireless technology. To use a heart rate sensor with the console, choose any heart rate sensor utilizing ANT+ or Bluetooth Smart wireless technology. -
Page 58: Heart Rate Sensor
HEART RATE SENSOR To link a heart rate sensor: Follow the manufacturer’s instructions to use your ANT+ or Bluetooth-compatible heart rate sensor. 1. Put on the heart rate sensor and position yourself near the console. You must be within 12 inches (30 centimeters) of the console to link a heart rate sensor. 2. -
Page 59: Mobile Devices
MOBILE DEVICES To record with your mobile device: The Stages SIC1 console can be paired to compatible mobile apps (such as the StagesFlight app) using your device’s Bluetooth LE connection. The console will re-broadcast speed, power, cadence, and heart rate values to your devices, save your ride data, and log it to your preferred fitness tracking application. - Page 60 FIRMWARE Firmware is the programming that allows the console and sensor to function. Using the firmware menu, you can do the following: View information about the console firmware and the power sensor firmware • Import upgraded firmware • Save and import custom console settings •...
-
Page 61: Upgrading Firmware
UPGRADING FIRMWARE IMPORTANT: Upgrading the firmware is an advanced procedure. Make sure to read all instructions before upgrading the firmware. To upgrade console firmware: 1. The manufacturer will provide the upgraded firmware file in a specific xxxx.HEX file format. 2. You must save the file on a USB drive. The file must be in the top level of the drive directory. - Page 62 7. During the firmware upgrade, the LCD display will freeze for approximately 10 seconds and then all the displays will light for a moment. After this occurs, the console is using the upgraded firmware. 8. Select the CNSL V.X menu option on the firmware menu. View and note the upgraded console version number.
- Page 63 UPDATING THE BLUETOOTH MODULE The console also contains a Bluetooth module that may require periodic firmware updates. Unlike the console’s firmware, these updates are performed wirelessly using a compatible mobile device, such as a smart phone or tablet. Some consoles may predate the Bluetooth feature. If you are unsure, check the back of your console to view the part number.
Need help?
Do you have a question about the SIC1 and is the answer not in the manual?
Questions and answers