
Related Manuals for Sincreative KCM218


Summary of Contents for Sincreative KCM218
- Page 1 INSTRUCTION MANUAL love · life Model: KCM218 COFFEE MAKER support@sincreative.com HOUSEHOLD USE ONLY Please read all instructions carefully before using the product Rev 1.0...
-
Page 2: Table Of Contents
Contents IMPORTANT SAFEGUARDS ......................USER MAINTENANCE INSTRUCTIONS ................... POLARIZED PLUG ........................... LINE CORD SAFETY TIPS ....................... UNPACKING ............................ KNOW YOUR COFFEEMAKER ....................SETTING UP YOUR CUP COFFEEMAKER ................PROGRAMMING YOUR CUP COFFEEMAKER ..............SETTING UP YOUR SINGLE SERVE BREWER ............... SINGLE SERVE BREWER CLEANING AND MAINTENANCE .......... -
Page 3: Important Safeguards
Extreme caution must be used when moving an appliance containing hot food, hot oil, water or other hot liquids. Do not use appliance for other than intended use. To disconnect, turn O , then remove plug from wall outlet. support@sincreative.com | 1... - Page 4 The glass container is designed for use with this appliance. It must never be used on a range top. Do not set a hot container on a wet or cold surface. Do not use a cracked container or a container having a loose or weakened handle.
-
Page 5: User Maintenance Instructions
Allow Co ee Maker to cool for 10 minutes; then rinse by filling the water reservoir with clean, cold water, inserting a new filter and allowing water to drip into carafe. Turn Co ee Maker OFF and discard water. Wash and dry carafe and filter basket. When Co ee Maker has cooled, wipe with a dry cloth. support@sincreative.com | 3... -
Page 6: Polarized Plug
TO STORE: Be sure all parts are clean and dry before storing. Store appliance in its box or in a clean, dry place. Never store it while it is hot or wet. Never wrap cord tightly around the appliance; the line cord should be inserted into the cord storage on back of co ee maker. -
Page 7: Line Cord Safety Tips
NEVER IMMERSE THE COFFEE MAKER, CORD OR PLUG IN WATER OR ANY OTHER LIQUID. Place Co ee Maker on a solid, level, heat-resistant surface. Save all packing materials in case you have to ship the machine in the future. KEEP ALL PLASTIC BAGS AWAY FROM CHILDREN. support@sincreative.com | 5... -
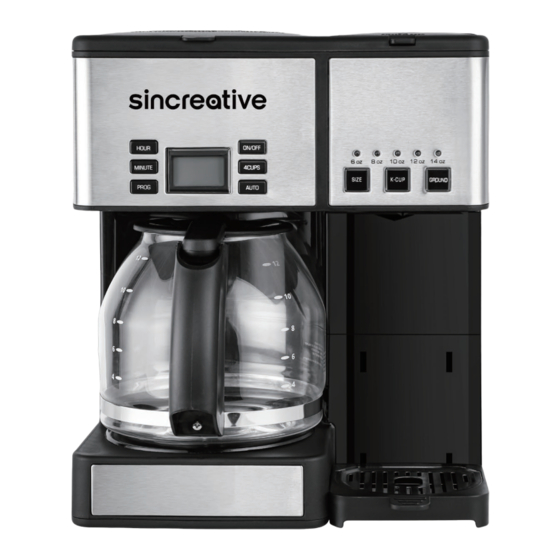
Page 8: Know Your Coffeemaker
KNOW YOUR COFFEEMAKER 1. Co eemaker Reservoir Cover 9. Brew Head 2. Showerhead (not shown) 10. Brewing Chamber 3. Co ee Ground Filter (not shown) 11. Control Panel 4. 60oz Build-in Water Reservoir 12. Removable Filter Basket 5. Control Panel 13. - Page 9 *Displays the Status of ON/OFF, 4CUPS and AUTO. Use to brew with co ee grounds 20. AUTO Button 26. Indicators of Cup Size Use to set Auto on times (6oz, 8oz, 10oz, 12oz, 14oz) 3:23 20 21 22 support@sincreative.com | 7...
-
Page 10: Setting Up Your Cup Coffeemaker
SETTING UP YOUR CUP COFFEEMAKER INITIAL CLEANING We recommend you to perform an initial cleaning before making your first beverage. Follow these instructions, without adding co ee grounds. Fill water reservoir. Make sure carafe is in place. If you haven’t already, plug the power cord into an independent outlet. Press ON/OFF button and allow brew cycle to run. - Page 11 Pressing ON/OFF button will cancel the AUTO-ON program and the Co eemaker will start to brew co ee immediately. Pressing PROG button won’t cancel the AUTO-ON program but reset the clock time. SETTING 4CUPS co ee Press the 4CUPS button. The Co eemaker will just brew 4 cups of co ee then stop. support@sincreative.com | 9...
- Page 12 BREWING COFFEE Follow instructions in Setting Up Your 12-Cup Co eemaker on page 9 . Fill the water reservoir Open the Co eemaker reservoir cover by lifting it up. Pour in the desired amount of water, using the water level indicator located at the side of the Co eemaker. Before brewing Make sure the glass carafe is in position on the heater plate and the top cover is closed.Plug the cord into an electrical outlet.
-
Page 13: Setting Up Your Single Serve Brewer
Light will flash slowly and the hot water will start to dispense momentarily. The one-time cleaning process is complete. Discard hot water. Your brewer is ready to use. NOTE: To achieve the best flavor, it’s recommended to repeat this cycle for several times to clean the brewer. support@sincreative.com | 11... - Page 14 There are two sharp needles in the brew head and capsule holder that puncture the capsule, one above Caution: and one below. To avoid risk of injury, do not put your fingers in the brew head or capsule holder. support@sincreative.com | 15 12 | support@casabrews.com...
- Page 15 To cancel brewing, simply press the GROUND button once again and the brewing process will be stopped. After brewing, raise the handle and remove the capsule holder. Use caution as the capsule holder will be hot. Close the brew head. Your brewer is ready to use again. support@sincreative.com | 13...
-
Page 16: Single Serve Brewer Cleaning And Maintenance
SINGLE SERVE BREWER CLEANING AND MAINTENANCE Cleaning the external parts Always disconnect the Power Cord with Plug from the wall outlet before cleaning. Allow all parts of the appliance to cool down completely. Clean all accessories after each use. Never immerse the Co eemaker in water or other liquids. The housing and other external components may be cleaned with a soapy, damp, nonabrasive cloth. - Page 17 It is recommend to use 1/3 vinegar and 2/3 water together to descaling your co eemaker by running the brew cycle 1-3 times. Then use fresh water in place of vinegar. Other maintenance Any other servicing should be performed by an authorized service representative. support@sincreative.com | 15...
-
Page 18: Trouble Shooting
TROUBLE SHOOTING PROBLEM CAUSE SOLUTION The appliance not plugged in. Insert the plug into the wall outlet. Wall outlet not energized. Check fuses and circut breaker. The appliance is not working. Appliance not switched on. Switch the appliance on by pressing CAPSULE button or GROUND button. - Page 19 Clean the Ground Co ee Holder and refill with coarse ground co ee. Capsule is not suitable. Replace with a suitable capsule. Upper/bottom of the capsule not Switch the appliance o and carefully pierced by the needle. replace the capsule. support@sincreative.com | 17...
- Page 20 Sincreative Brands Inc 20947 Currier Rd, Unit C, Walnut, CA 91789, United States of America support@sincreative.com www.sincreative.com...
Need help?
Do you have a question about the KCM218 and is the answer not in the manual?
Questions and answers