Table of Contents
Advertisement
Quick Links
Advertisement
Table of Contents

Related Manuals for Sincreative CM5700A-UL


Summary of Contents for Sincreative CM5700A-UL
- Page 1 · life Model: CM5700A-UL life style User Manual www.sincreative.com...
-
Page 2: Table Of Contents
Contents Scope of delivery..............1 Device parts................2 Scope of delivery/Device parts..........3 General..................4 Read and keep operating instructions..........4 Explanation of symbols............5 Safety..................6 Intended use..................6 Safety instructions................7 Prior to initial use..............14 Unpacking...................14 Prepare grinding mechanism............16 Flush the water system..............18 About the grinder..............21 About the pressure gauge.............22 Use..................24 Degree of grinding pre-selection..........24 Prepare espresso................25... -
Page 3: Scope Of Delivery
Scope of delivery Scope of delivery... -
Page 4: Device Parts
Scope of delivery Device Parts... -
Page 5: Scope Of Delivery/Device Parts
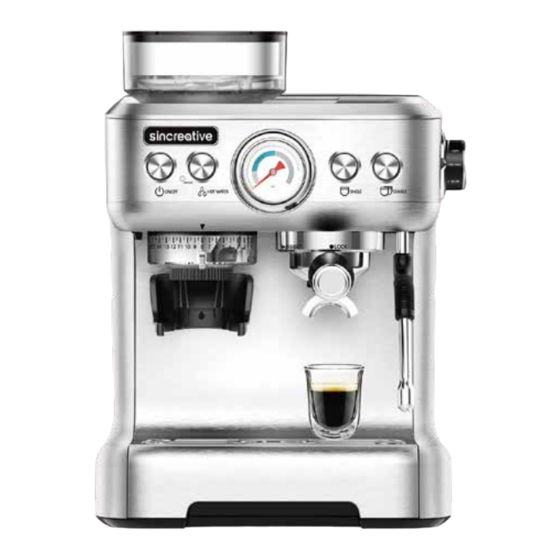
Scope of delivery/Device parts Scope of delivery/ Device parts Grinding mechanism Standby display Coffee bean container with lid ON/OFF button HOT WATER button Water tank Pressure indicator(bar) Tamper Button for single espresso Large brewing filter Button for double espresso Small brewing filter Steam volume regulator Filter holder Filter holder bracket... -
Page 6: General
If you pass the product on to third parties, please also ensure that you pass on these operating instructions. These operating instructions can also be downloaded as a PDF file from our website www.sincreative.com... -
Page 7: Explanation Of Symbols
Explanation of symbols Explanation of symbols The following symbols and signal words are used in these operating instructions, on the product or on the packaging. Indicates a hazard with moderate risk, which can lead to death or severe injury, if it is not avoided. Property damage can occur if not observed. -
Page 8: Safety
Safety Safety Intended use • The espresso machine is exclusively designed for the preparation of household quantities of coffee/espresso and for frothing milk using steam. Only cold still water should be used to fill the water tank. You can also use cold still filtered water to fill the water tank. This is recommended, if the mains water has a high degree of hardness. -
Page 9: Safety Instructions
Safety Safety instructions Hazards for children and persons with impaired physical, sensory or mental capabilities (e.g. partially disabled, elderly persons with impairment to their physical and mental capabilities) or a lack of experience and knowledge (for example, older children). • This espresso machine may be used by persons with reduced physical, sensory or mental abilities or lacking experience and knowledge, if they are under supervision or after receiving instruction on safe use of the espresso machine and have... - Page 10 Safety • Do not leave the espresso machine unattended during operation. • Do not let children play with the packaging film. Children may become caught in it while playing and suffocate. Hazard from electricity Electric shock hazard! The appliance operates with hazardous voltage.
- Page 11 Safety • Do not operate the appliance outdoors and do not expose it to weather influences, such as rain, snow or frost. • Never immerse the appliance or the power cable into water or other fluids. • When using an adapter plug or extension cord, these must comply with the valid safety regulations.
- Page 12 Safety • Remove the power plug from the socket: - if you are not using the appliance, - before cleaning or putting the appliance away, - if an obvious fault occurs during operation, - in a thunder storm. Always pull on the power plug, not on the power cable. •...
- Page 13 Scope of delivery Scope of delivery Injury hazard! The grinding mechanism has sharp edges. Never insert fingers, parts of cutlery or other items into the grinding mechanism. • Always disconnect the appliance from the power supply, if it is unsupervised and prior to assembly, dismantling or cleaning the grinding mechanism.
- Page 14 Safety • Do not release the filter holder while the machine is running: Hot water may spray out. The filter holder must be turned as far as it will • Allow the filter holder to cool off completely before changing the inserted brewing filter.
- Page 15 Safety • Protect the espresso machine from frost: Water residues may freeze at temperatures below 32 °F and damage the heater. • Place the appliance on a sturdy and level surface. In doing so, ensure that there is a sufficient distance to strong heat sources, such as hot plates, heating pipes, inter alia.
-
Page 16: Prior To Initial Use
Prior to initial use Prior to initial use Unpacking Risk of damage! If you open the packaging without due care and attention using a sharp knife or other pointed objects, the appliance may become damaged. 1. Remove the appliance and accessories from the packaging. 2. - Page 17 Prior to initial use Wipe the parts dry and let them dry off completely. Only wipe off the double-wall coffee bean container damply, do not immerse in water. The grinding mechanism does not need to be cleaned separately prior to initial use. After use, also only clean in a dry state, using a brush.
-
Page 18: Prepare Grinding Mechanism
Prior to initial use Prepare grinding mechanism 1. Ensure that the steam controller is switched to OFF and disconnect the power plug, if necessary. The grinding mechanism is removed for transport. Attach the grinding mechanism, as described in the Cleaning the grinding mechanism section, Point 8. - Page 19 Prior to initial use 7. Press the ON/OFF button. The grinding mechanism standby indicator lights up. Initially ignore the buttons lighting up. 8. Turn the degree of grinding pre-selection to the right to level 15 (the setting mark is above the scale from 1 to 15). 9.
-
Page 20: Flush The Water System
Prior to initial use Flush the water system Prior to initial use and after a longer period of disuse of the espresso machine, allow the contents of approx. 2-3 cups of water to run through the machine. This will clean the water circuit and all parts will be heated up. - Page 21 Prior to initial use 8. Press the ON/OFF button . The grinding mechanism standby indicator lights up. The ON/OFF, HOT-WATER , single espresso and the button for double espresso will slowly dim on/off. After approx. 20 seconds, the heating process is completed and the buttons light up constantly.
- Page 22 Scope of delivery Approx.194°F of hot water will now run out of the steam/hot water nozzle into the drip tray . The quantity of hot water is pre-set to approx. 7 OZ. To stop the HOT-WATER function, please press the button again. 11.
-
Page 23: About The Grinder
About the grinder For a new user, we suggest to use settings 7-10 initially, and then make corresponding adjustments according to the coffee extraction situation and the pressure shown by the pressure gauge. Why is it slow to dispense ground coffee at settings 1-3? This is a normal phenomenon, because the burr and body are... -
Page 24: About The Pressure Gauge
About the pressure gauge - If the pressure gauge shows a pressure at the range of 0-5bar, it means that the pressure is not enough, and the following measures can be taken. (1) Check if the (2) You can increase the (3) Select a finer grind coffee beans used force for tamping the... - Page 25 About the pressure gauge Scope of delivery - If the pressure gauge shows a pressure at range of 12-20bar, it means that the pressure is too high, and the following measures can be taken. (1) Check if the (2) You can reduce the (3) Select a coarser filter is blocked.
-
Page 26: Use
Only grind roasted coffee beans in this appli- ance. Do not process any other foods, such as nuts, spices or liquids, to avoid damaging the appliance. Please do not operate the appliance when it is empty, i.e. without coffee beans. We recommend always grinding coffee beans fresh, shortly prior to use, not for stock. -
Page 27: Prepare Espresso
Prepare espresso Scalding hazard! If you remove the filter holder while dispensing coffee, hot water droplets will spray from the espresso machine. You may scald yourself. Always make sure that the brewing filters and filter holders are clean and do not contain any coffee residues. Before brewing espresso for the first time, we basically recommend rinsing through the brewing unit once together with the filter holder and the respective filter (... - Page 28 With the large brewing filter, two single espressos can also be prepared, if you place two cups next to one another under the filter holder. The MAX marks in both of the brewing filters are intended to assist in identifying the correct quantity of compressed, ground coffee more easily.
- Page 29 10. Let the grinding process run until the required coffee quantity is ground. Afterwards, pull the filter holder out of the bracket. The grinding process can be interrupted at any time. For this, pull the filter holder back slightly in the filter holder bracket. For a single espresso, you need approx.13-15g, and for a double espresso, approx.
- Page 30 12. For this, align the filter holder to the left with the handle at the front to INSERT, then move it horizontally upwards into the filter holder bracket and turn it to the right as far as it will go to LOCK.
-
Page 31: Empty Brewing Filter
Empty brewing filter Scalding hazard! The metal parts of the filter holder and the brewing filter used become hot during use. 1. Swing the filter holder to the left and remove it from the filter holder bracket Avoid releasing the filter holder with too much force. Prepare yourself for the weight already before releasing it and use slight upward pressure, so that the filter holder does not fall out of the bayonet bracket. - Page 32 It is recommended to use a small, hygienic stainless steel jug.You can also use your hand easily to estimate the temperature on the outside. The frothed milk should not be hotter than approx. 140.℉ At this temperature, the container can still just be held in the hand. Allow the frothed milk to stand for approx.
- Page 33 9. You will hear hissing, pleas make sure that the milk whirls around. The volume of the milk will increase over time. Move the container gradually downwards, so that the nozzle is held on the surface. As soon as the container heats up, hold the nozzle in the milk and just let the milk foam roll.
-
Page 34: Hot Water Function
Hot water function Scalding hazard! The water discharged from the steam nozzle/hot water nozzle is very hot. You may scald yourself. 1. Connect the power plug to a socket. A beep tone sounds. 2. Press the ON/OFF button. The grinding mechanism standby indicator lights up and the HOT-WATER buttons , the button for single espresso... -
Page 35: Change Water Quantity For Coffee Preparation
Change water quantity for coffee preparation You can adapt the quantity of water and thereby adapt the quantity of espresso for the single or double espresso. A minor discrepancy of the quantity is possible later on during preparation (due to different pressure): 1. -
Page 36: Water Tank Empty
Water tank empty If the water tank is empty or if it is emptied during preparation, a beep tone will sound three times and the buttons will light up red. In this case, fill water into the water tank. Please note the MAX mark. Switch off... -
Page 37: Cleaning
Cleaning Cleaning Electric shock hazard! Incorrect handling of the article can cause an electric shock. • Do not immerse the product or the power cable or the power plug into water or other liquids. • Remove the power plug from the socket before cleaning the product. -
Page 38: Cleaning The Grinding Mechanism
Cleaning Cleaning the grinding mechanism The grinding mechanism must be removed from the espresso machine for cleaning. 1. Always switch the espresso machine off and remove the power plug. Allow it to cool off completely. 2. Take the coffee bean container off... - Page 39 Cleaning Risk of damage! The grinding mechanism must not be cleaned with a damp cloth. Never use hard objects to clean the grinding mechanism. 5. Turn the grinding mechanism upside-down and rotate the coffee distributor clockwise( ), to release it from the grinding mechanism via the locking position and remove it.
-
Page 40: Clean Brewing Filter
Cleaning - Now, turn the grinding mechanism clockwise (seen form the top) to let it engage. 9. Insert the coffee bean container 1, also see under prepare grinding mechanism. Clean brewing filter Empty the used brewing filter after each use and rinse it out thoroughly with water before refilling it. -
Page 41: Descale Espresso Machine
Descale espresso machine Descale espresso machine With the constant use of hard water, limescale deposit will accumulate at an early stage. These residues must be removed on a regular basis, as the limescale impairs the flavour of many internal functional components, the water flow, the brewing temperature and the performance of the espresso machine. - Page 42 Descale espresso machine 1. Empty the water out of the water tank and fill it with the prepared descaler up to the MAX mark. 2. Place an appropriate container(filling quantity the same as the water tank) on the draining rack under the filter holder and under the steam nozzle/hot water nozzle.
-
Page 43: About Descaling/About Exsiccosis
About descaling/About exsiccosis About descaling If four indicators flash red twice like racing horse lamp when the machine is turned on, it means that the machine has been running for 1000 working cycles, the machine is reminding user of descaling. This reminder does not affect normal work, and will be cancelled only after a descaling cycle is completed,... -
Page 44: Storage
Storage 1. Empty the water out of the water tank and fill it with the prepared descaler up to the MAX mark. 2. Place an appropriate container (filling quantity the same as the water tank) on the draining rack under the filter holder and under the steam nozzle/hot water nozzle. -
Page 45: Faults And Rectification
Faults and rectification Faults and rectification Fault Possible cause and rectification No function - No power. Insert the power plug into a live socket. No steam, no coffee flow. - Too little water in the water tank, the pump cannot suck. Check whether the water tank is filled and correctly attached. - Page 46 Faults and rectification Espresso not strong Reduce the level of the degree of grinding pre-selection or compress enough. the ground coffee more forcefully in the brewing filter. Espresso not hot enough. Rinse through the brewing unit once without the filter holder. To do this, place a wide coffee cup under the filter holder bracket and press the button for single espresso...
- Page 47 Faults and rectification Grinding mechanism not The grinding mechanism has a temperature protection device. functioning, the standby Please switch the appliance off, as indicator for the grinding soon as the grinding mechanism has mechanism is flashing red. become too hot and the standby indicator for the grinding mechanism is flashing red.
-
Page 48: Technical Data
That is why electrical devices are identified with the symbol shown above. Contact us Our friendly customer service team will work hard to put a smile back on your face. Here’s how we can contact. support@sincreative.com... - Page 49 Sincreative Brands Inc 20947 Currier Rd, Unit C, Walnut, CA 91789, United States of America support@sincreative.com www.sincreative.com...
Need help?
Do you have a question about the CM5700A-UL and is the answer not in the manual?
Questions and answers
How to descale the espresso machine 5700
To descale the Sincreative CM5700A-UL espresso machine:
1. Empty the water tank and fill it with prepared descaler (citric acid) up to the MAX mark.
2. Place a container (same capacity as the water tank) on the draining rack under the filter holder and steam/hot water nozzle.
3. Switch the machine on, if it’s not already on.
4. Press and hold the HOT-WATER button for 5 seconds, then turn the steam volume controller to STEAM. The hot water button will turn off, and the single and double espresso buttons will flash. The descaling process begins and takes about 15 minutes.
5. Repeat the process using clear water to fully rinse out the descaler.
This answer is automatically generated
Grinder is ok and works. The water does not work. Pre heating does not work. Red flashes on single and double
If the water and preheating functions are not working and the red light is flashing on the single and double espresso settings, it could indicate that the water system has not been flushed or the machine is not properly filled with water. Ensure the water tank is filled with cold, preferably filtered water up to the MAX line and locked firmly in place. Also, confirm that the machine has completed the heating process and is in STANDBY mode before proceeding.
This answer is automatically generated