Table of Contents
Advertisement
Available languages
Available languages
Quick Links
Advertisement
Table of Contents

Subscribe to Our Youtube Channel
Related Manuals for TQ Display V01

Summary of Contents for TQ Display V01
- Page 1 D I S P L AY M A N U A L...
- Page 2 Display V01 & Remote V01 User Manual...
-
Page 3: Hazard Classification
Safety This instruction contains information that you must observe for your personal safety and to prevent personal injury and damage to property. They are highlighted by warning triangles and shown below according to the degree of danger. ► Read the instructions completely before start-up and use. This will help you to avoid hazards and errors. -
Page 4: Intended Use
Intended Use The Display V01 and the Remote V01 of the drive system are intended exclu- sively for Displaying information and operating your e-bike and must not be used for other purposes. Any other use or use that goes beyond this is considered improper and will result in the loss of the warranty. - Page 5 Riding safety instructions Observe the following points to avoid injuries due to a fall when starting with high torque: — We recommend that you wear a suitable helmet and protective clothing every time you ride. Please observe the regulations of your country. —...
- Page 6 This device complies with Part 15 of the FCC Rules. Operation is subject to the following two conditions: (1) This device may not cause harmful interference, and (2) This device must accept any interference received, including interference that may cause undesired operation. No changes shall be made to the equipment without the manufacturer’s permission as this may void the user’s authority to operate the equipment.
-
Page 7: Technical Data
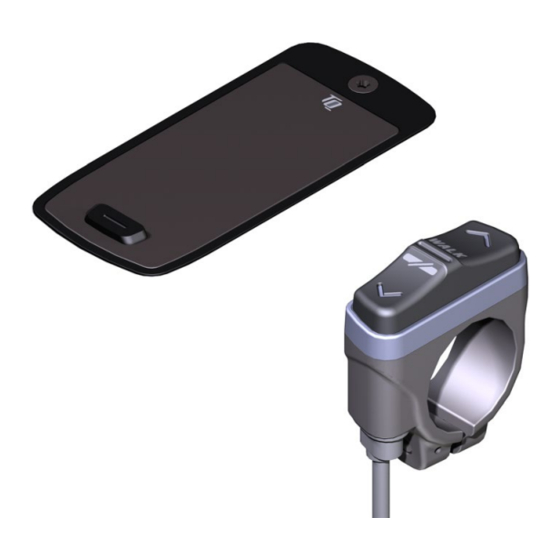
Operating temperature -5 °C to +40 °C / 23 °F to 104 °F Storage temperature 0 °C to +40 °C / 32 °F to 140 °F Tab. 1: Technical data – Display V01 Remote Protection class IP66 Weight with cable... - Page 8 Operation and indication components Overview Display Pos. in Description Fig. 1 State of charge Battery (max. 10 bars, 1 bar corresponds 10 %) State of charge range extender (max. 5 bars, 1 bar corresponds 20 %) Display panel for different screen views with riding informa- tion (see section 6 auf Seite 9)
-
Page 9: Operation
Operation ► Make sure that the Battery is sufficiently charged before operation. Switch on drive system: ► Switch on the drive unit by shortly pressing the button (see Fig. 3) on the Display. Switch off drive system: ► Switch off the drive unit by long pressing the button (see Fig. - Page 10 Setup-Mode Setup-Mode activate ► Switch off the drive system. ► Press and hold the button on the Display (pos. 5 in Fig. 1) and the DOWN button on the Remote (pos. 2 in Fig. 2) for at least 5 seconds. ►...
- Page 11 Riding information At the bottom of the display, driving information can be shown in 4 different views. Regardless of the currently selected view, the charging status of the battery and optional range extender is displayed in the center and the selected assistance level is shown at the top.
- Page 12 Screen view Riding information — Current rider power in watt (163 W in this example). — Current drive unit power in watts (203 W in this example). — Current speed (24 km/h in this example) in kilometers per hour (KPH) or miles per hour (MPH).
- Page 13 DOWN button at the same time. Depending on wheter the e-bike is equipped with light and TQ smartbox (please see the smartbox manual for more information). — Deactivated light (LIGHT OFF) — Switch off the light by pressing the UP button and DOWN button at the same time.
- Page 14 Select assist mode You can choose between 3 assist modes or switch off the assist from the drive unit. The selected assist mode I, II or III is shown on the Display with the corresponding number of bars (see pos. 1 in Fig. 5). —...
- Page 15 Set connections Connection e-bike to smartphone NOTE — You can download the TQ E-Bike app from the Appstore for IOS and the Google Play Store for Android. — Download the TQ E-Bike app. — Select your bike (you only need to pair your smartphone the first time).
- Page 16 Connection e-bike to bicycle computers NOTE — To make a connection with the bicycle computer, the e-bike and bicycle computer must be within radio range (maximum distance approx. 10 meters). — Pair your bicycle computer (Bluetooth or ANT+). — Select at least one of the three shown sensors (see Fig.
-
Page 17: Walk Assist
Walk assist The walk assist makes it easier to push the e-bike, e.g. off-road. NOTE — The availability and characteristics of the walk assist are subject to coun- try-specific laws and regulations. For example, the assistance provided by the push assist is limited to a speed of max. 6 km/h in Europe. —... -
Page 18: Reset To Factory Settings
Reset to factory settings ► Switch on the drive system. ► Press and hold the button on the Display and the DOWN button on the Remote for at least 10 s, the Setup-Mode is indicated first and RESET is followed (see Fig. 10). ►... -
Page 19: Gear Shift
General riding notes 11.1 Functionality of the drive system The drive system supports you when riding up to a speed limit permitted by law which may vary depending on your country. The precondition for Drive Unit assistance is that the rider pedals. At speeds above the permitted speed limit, the drive system turns off the assistance until the speed is back within the permitted range. -
Page 20: Maintenance And Service
— Clean the Display and the Remote only with a soft, damp cloth. Maintenance and Service All service, repair or maintenance work performed by a TQ authorized bicycle dealer. Your bicycle dealer can also help you with questions about bicycle use, service, repair or maintenance. -
Page 21: Error Codes
ERR 401 DRV SW General software error ERR 403 DRV COMM Peripheral communication Restart the system. Contact error your TQ dealer if the error still ERR 405 DISP COMM Walk assist communica- occurs. tion error ERR 407 DRV SW Drive Unit electronic error... - Page 22 Cause Corrective measures ERR 453 DRV SW Drive Unit initalization Restart the system. Contact error your TQ dealer if the error still occurs. ERR 457 BATT CONN Drive Unit voltage error ERR 458 BATT CONN Drive Unit overvoltage Replace the Charger and use error only original Charger.
- Page 23 ERR 486 DRV SW ERR 487 DRV SW ERR 488 DRV SW ERR 489 DRV SW Restart the system. Contact your TQ dealer if the error still ERR 48A DRV SW Software runtime error occurs. ERR 48B DRV SW ERR 48C DRV SW...
- Page 24 Restart the system and avoid ERR 49D DRV SENS Torquesensor error unintended use. Contact your ERR 49E DRV SENS TQ dealer if the error still occurs. ERR 49F DRV SENS ERR 4A0 DRV COMM Check the charging port for CAN-Bus communication dirt.
- Page 25 Corrective measures WRN 601 SPD SENS Speedsensor problem Check the distance between magnet and Speedsensor. Restart the system. Contact your TQ dealer if the error still occurs. WRN 602 DRV HOT Drive Unit overtempera- Permissible operating tempera- ture ture exceeded. Switch off the drive unit to allow it to cool down.
- Page 26 NOTE For more information and TQ product manuals in various language, please visit www.tq-group.com/ebike/downloads or scan this QR-Code. We have checked the contents of this publication for conformity with the product described. However, deviations cannot be ruled out so that we cannot accept any liability for complete conformity and correctness.
- Page 27 Display V01 & Remote V01 Benutzerhandbuch...
- Page 28 Sicherheit Diese Anleitung enthält Hinweise, die Sie zu Ihrer persönlichen Sicherheit sowie zur Vermeidung von Personen- und Sachschäden beachten müssen. Sie sind durch Warndreiecke hervorgehoben und je nach Gefährdungsgrad im Folgenden dargestellt. ► Lesen Sie vor der Inbetriebnahme und Gebrauch die Anleitung vollständig durch.
-
Page 29: Bestimmungsgemäßer Gebrauch
Bestimmungsgemäßer Gebrauch Das Display V01 und die Remote V01 des Antriebssystems sind ausschließlich zur Anzeige von Informationen und zur Bedienung Ihres E-Bikes vorgesehen und dürfen nicht für andere Zwecke verwendet werden. Eine andere oder darüber hinaus gehende Benutzung gilt als nicht bestim- mungsgemäß... - Page 30 Sicherheitshinweise zum Fahren Beachten Sie folgende Punkte, um Verletzungen durch einen Sturz beim Anfahren mit hohem Drehmoment zu vermeiden: — Wir empfehlen, grundsätzlich bei jeder Fahrt einen geeigneten Helm und Schutzkleidung zu tragen. Beachten Sie dazu die Vorschriften Ihres Landes. —...
-
Page 31: Technische Daten
Betriebstemperatur -5 °C bis +40 °C / 23 °F bis 104 °F Lagertemperatur 0°C bis +40 °C / 32 °F bis 104 °F Tab. 1: Technische Daten – Display V01 Remote Schutzart IP66 Gewicht mit Kabel 25 g / 0,88 oz Betriebstemperatur -5 °C bis +40 °C / 23 °F bis 104 °F... -
Page 32: Bedien- Und Anzeigeelemente
Bedien- und Anzeigeelemente Übersicht Display Pos. in Beschreibung Abb. 1 Ladezustand Battery (max. 10 Striche, 1 Strich entspricht 10 %) Ladezustand Range Extender (max. 5 Striche, 1 Strich entspricht 20 %) Anzeigefeld für unter- schiedliche Bild- schirmansichten mit Fahrinformationen (siehe Abschnitt 6 auf Seite 9) Abb. - Page 33 Inbetriebnahme ► Stellen Sie vor der Inbetriebnahme sicher, dass die Battery ausreichend geladen ist. Antriebssystem einschalten: ► Schalten Sie die Drive Unit mit einem kurzen Druck auf die Bedientaste am Display (siehe Abb. 3) ein. Antriebssystem ausschalten: ► Schalten Sie die Drive Unit mit einem langen Druck (>3 s) auf die Bedientaste am Display (siehe Abb.
-
Page 34: Setup-Modus
Setup-Modus Setup-Modus aktivieren ► Schalten Sie das Antriebssystem aus. ► Halten Sie die Bedientaste am Display (Pos. 5 in Abb. 1) und die Bedientaste UNTEN an der Remote (Pos. 2 in Abb. 2) für mindestens >5 s 5 s gedrückt. ►... - Page 35 Fahrinformationen Unten im Display lassen sich auf 4 unterschiedlichen Bildschirmansichten Fahrinformationen darstellen. Unabhängig von der aktuell gewählten Ansicht wird in der Mitte der Ladezustand der Battery und optionalem Range Extender sowie am oberen Rand die gewählte Unterstützungsstufe angezeigt. ► Mit einem Doppelklick auf die Bedientaste am Display (Pos. 5 in Abb. 1) wechseln Sie zur nächsten Bildschirmansicht.
- Page 36 Bildschirmansicht Fahrinformationen — Aktuelle Fahrerleistung in Watt (in diesem Beispiel 163 W) — Aktuelle Antriebsleistung in Watt (in diesem Beispiel 203 W) — Aktuelle Geschwindigkeit (in diesem Beispiel 24 km/h) in Kilometer pro Stunde (KMH) oder Meilen pro Stunde (MPH) —...
- Page 37 — Das Licht wird durch gleichzeitiges betätigen der Bedientaste OBEN und der Bedientaste UNTEN eingeschaltet. Abhängig davon, ob das E-Bike mit Licht und TQ Smartbox ausgestattet ist. (Weitere Informationen finden Sie in der Smartbox- Anleitung) — Deaktiviertes Licht (LIGHT OFF) —...
- Page 38 Unterstützungsstufe wählen Sie können zwischen 3 Unter- stützungsstufen wählen oder die Unterstützung durch die Drive Unit ausschalten. Die gewählte Unterstüt- zungsstufe I, II oder III wird am Display mit der entsprechenden Anzahl an Balken visualisiert (siehe Pos. 1 in Abb. 5). —...
- Page 39 Verbindungen einstellen Verbindung E-Bike zum Smartphone HINWEIS — Die TQ E-Bike App können Sie im für IOS im Appstore und für Android im Google Play Store herunterladen. — Laden Sie die TQ E-Bike App runter. — Wählen Sie Ihr E-Bike aus (Sie müssen Ihr Smartphone nur beim...
- Page 40 Verbindung E-Bike zu Fahrradcomputern HINWEIS — Um eine Verbindung mit dem Fahrradcomputer herzustellen, müssen sich das E-Bike und Fahrradcomputer in Funkreichweite (maximal ca. 10 m Entfernung) befinden — Koppeln Sie Ihren Fahrradcomputer (Bluetooth oder ANT+). — Wählen Sie mindestens einen der drei dargestellten Sensoren (siehe Abb.
- Page 41 Schiebehilfe Die Schiebehilfe erleichtert das Schieben des E-Bikes, z. B. im Gelände. HINWEIS — Die Verfügbarkeit und die Eigenschaften der Schiebehilfe unterliegen länderspezifischen Gesetzen und Regelungen. Beispielsweise ist die Unterstützung durch die Schiebehilfe in Europa auf eine Geschwindigkeit von max. 6 km/h begrenzt. —...
-
Page 42: Rücksetzen Auf Werkseinstellungen
Rücksetzen auf Werkseinstellungen ► Schalten Sie das Antriebssystem ein. ► Halten Sie die Bedientaste am Display und die Bedientaste UNTEN an der Remote für mindes- tens 10 s gedrückt, es wird zuerst der Setup-Modus und anschlie- ßend RESET angezeigt (siehe Abb. - Page 43 Allgemeine Hinweise zum Fahren 11.1 Funktionsweise des Antriebssystems Das Antriebssystem unterstützt Sie beim Fahren bis zu einer vom Gesetz- geber zugelassenen Geschwindigkeitsgrenze, die je nach Land variieren kann. Voraussetzung für die Motorunterstützung ist, dass der Fahrer in die Pedale tritt. Bei Geschwindigkeiten über der zugelassenen Geschwindigkeitsgrenze schaltet das Antriebssystem die Unterstützung ab, bis die Geschwindigkeit wieder im zulässigen Bereich liegt.
-
Page 44: Wartung Und Service
— Reinigen Sie das Display und die Remote nur mit einem weichen, feuchten Tuch. Wartung und Service Lassen Sie alle Service-, Reparatur- oder Wartungs arbeiten von einem durch TQ autorisierten Fahrradhändler durchführen. Ihr Fahrradhändler kann Ihnen auch bei Fragen zu E-Bike-Nutzung, Service, Reparatur oder Wartung weiter- helfen. Umweltfreundliche Entsorgung Die Komponenten des Antriebssystems und die Akkus dürfen nicht... - Page 45 Allgemeiner Soft- warefehler Starten Sie das System ERR 403 DRV COMM Peripherie Kommunikati- neu. Kontaktieren Sie Ihren onsfehler TQ-Händler, falls der Fehler ERR 405 DISP COMM Schiebehilfe Kommunikati- weiterhin auftritt. onsfehler ERR 407 DRV SW Elektronikfehler Drive Unit ERR 408 DRV HW Drive Unit Überstrom-...
- Page 46 ERR 458 BATT CONN Motor Überspannungs- Ersetzen Sie das Ladegerät und fehler verwenden Sie nur originales Ladegerät. Kontaktieren Sie Ihren TQ Händler, falls der Fehler weiterhin auftritt. ERR 45D BATT GEN Allgemeiner Batteriefehler ERR 465 BATT COMM Batterie Kommunikations- fehler Timeout...
- Page 47 Schalten Sie die Drive Unit aus um ihn ggf. abkühlen zu lassen. Starten Sie das System neu. Kontaktieren Sie Ihren TQ Händler, falls der Fehler weiterhin auftritt. ERR 480 DRV SENS Drive Unit Unterstützungs- Starten Sie das System neu und...
- Page 48 ERR 489 DRV SW Starten Sie das System ERR 48A DRV SW neu. Kontaktieren Sie Ihren Software Laufzeitfehler TQ-Händler, falls der Fehler ERR 48B DRV SW weiterhin auftritt. ERR 48C DRV SW ERR 48D DRV SW ERR 48E DRV SW...
- Page 49 ERR 4A0 DRV COMM Ladeport auf Verschmutzung überprüfen. Starten Sie das ERR 4A1 DRV COMM CAN-Bus Kommunikations- System neu. Kontaktieren Sie fehler Ihren TQ-Händler, falls der Fehler weiterhin auftritt. ERR 4A2 DRV COMM Elektronikfehler Mikrocon- troller ERR 4A3 DRV SW Fehler Trittfrequenzsensor...
- Page 50 ERR 4B0 DRV HW Drive Unit Mechanikfehler Überprüfen Sie, ob etwas im Kettenblatt verklemmt oder verkeilt ist. Kontaktieren Sie Ihren TQ-Händler, falls der Fehler weiterhin auftritt. ERR 4C8 DRV SW ERR 4C9 DRV SW Starten Sie das System Allgemeiner Soft- neu.
- Page 51 Drücken der Oben-Taste (Walk) der Remote, bis Walk auf Display erscheint. Den Taster dann direkt loslassen und wieder betätigen, um die Schiebehilfe zu nutzen. Kontaktieren Sie Ihren TQ-Händler, falls der Fehler weiterhin auftritt. Tab. 5: Fehlercodes DE - 25...
- Page 52 HINWEIS Für weitere Informationen und TQ-Bedienungsanleitungen in verschiedenen Sprachen, besuchen Sie bitte www.tq-group.com/ebike/downloads oder scannen Sie diesen QR-Code. Wir haben den Inhalt der Druckschrift auf Übereinstimmung mit dem beschriebenen Produkt geprüft. Dennoch können Abweichungen nicht ausgeschlossen werden, sodass wir für die vollständige Übereinstimmung und Richtigkeit keine Gewähr übernehmen.
- Page 53 Display V01 & Remote V01 Manual de usuario...
- Page 54 Seguridad Estas instrucciones contienen información que debe observar para su seguridad personal y para evitar daños personales y materiales. Se destacan con triángulos de advertencia y se mues- tran a continuación en función del grado de riesgo. ► Lea completamente las instrucciones antes de la puesta en servicio y el uso.
-
Page 55: Utilización Prevista
Utilización prevista La Display V01 y el Remote V01 del sistema de accionamiento están desti- nados exclusivamente a la visualización de información y al manejo de su e-bike y no deben utilizarse para otros fines. Cualquier otro uso o que vaya más allá se considera inadecuado y dará lugar a la pérdida de la garantía. - Page 56 — Cuando se active la ayuda al empuje, asegúrese de que sus piernas están a una distancia segura de los pedales. De lo contrario, existe el riesgo de que se produzcan lesiones por la rotación de los pedales. Instrucciones de seguridad al volante Tenga en cuenta los siguientes puntos para evitar lesiones por caída al arrancar con un par elevado: —...
-
Page 57: Datos Técnicos
-5 °C a +40 °C / 23 °F a 104 °F miento Temperatura de almacena- 0°C a +40 °C / 32 °F a 104 °F miento Tab. 1: Datos técnicos - Display V01 Remote Clase de protección IP66 Peso con cable 25 g / 0,88 oz Temperatura de funciona- -5 °C a +40 °C / 23 °F a 104 °F... - Page 58 Elementos de manejo y visualización Resumen de la Display Pos. en Descripción Fig. 1 Estado de carga de la Battery (máx. 10 lineas, 1 linea corresponde a 10 %) Estado de carga del Range Extender (máx. 5 lineas, 1 linea corres- ponde a 20 %) Panel de visualización para diferentes vistas...
-
Page 59: Puesta En Funcionamiento
Puesta en funcionamiento ► Asegúrate de que la Battery está suficientemente cargada antes de usarla. Conectar el sistema de accionamiento: ► Conecte el accionamiento pulsando brevemente el botón de funcionamiento de la Display (véase Fig. 3). Desconecte el sistema de accionamiento: ►... -
Page 60: Modo De Configuración
Modo de configuración Activar el modo de configuración ► Desconecte el sistema de acciona- miento. ► Mantenga pulsado el botón de control del Display (Pos. 5 en Fig. 1) y el botón de control ABAJO >5 s Remote (Pos. 2 en Fig. 2) durante al menos 5 s. - Page 61 Información de conducción En la parte inferior de la pantalla, la información de conducción puede mostrarse en 4 vistas diferentes. Independientemente de la vista seleccio- nada, el estado de carga de la batería y el extensor de autonomía opcional se muestran en el centro y el nivel de asistencia seleccionado se muestra en la parte superior.
- Page 62 Vista de Display Información de conducción — Potencia actual del ciclista en vatios (en este ejemplo 163 W) — Potencia de accionamiento actual en vatios (en este ejemplo 203 W) — Velocidad actual (en este ejemplo 24 km/h) en kilómetros por hora (KPH) o millas por hora (MPH) —...
- Page 63 — La luz se enciende pulsando simultanea- mente los botones de control ARRIBA y ABAJO. Dependiendo de si la e-bike está equipada con luces y TQ Smartbox. (Para más infor- mación, consulte las instrucciones de la Smartbox) — Luz desactivada ( Luz OFF) —...
- Page 64 Seleccione el nivel de soporte Puedes elegir entre 3 niveles de soporte o desactivar el soporte a través de la unidad. El nivel de soporte I, II o III seleccionado se visua- liza en la Display con el número de barras correspondiente (véase Pos.
-
Page 65: Establecer Conexiones
Establecer conexiones Conexión de la e-bike al smartphone NOTA — Puedes descargar la aplicación TQ E-Bike desde la Appstore para IOS y la Google Play Store para Android. — Descarga la aplicación TQ E-Bike. — Selecciona tu e-bike (sólo tienes que emparejar tu smartphone la primera vez). - Page 66 Conexión de la e-bike a los computadores de la bicicleta NOTA — Para establecer una conexión con el computador de la bicicleta, la e-bike y el computador de la bicicleta deben estar dentro del rango de radio (distancia máxima aprox. 10 m). —...
- Page 67 Ayuda al empuje La ayuda para empujar facilita el empuje de la e-bike, p. ej. en el campo. NOTA — La disponibilidad y las características de la asistencia para empujar están sujetas a las leyes y normativas específicas de cada país. Por ejemplo, en Europa, la asistencia proporcionada por el push-assist está...
-
Page 68: Restablecer La Configuración De Fábrica
Restablecer la configuración de fábrica ► Activar el sistema de acciona- miento. ► Mantenga pulsado el botón de control en la Display y el botón de control ABAJO en el mando a distancia durante al menos 10s, primero aparece el modo de confi- gruacion y luego RESET (véase Fig. -
Page 69: Cambio De Marchas
Instrucciones generales de conducción 11.1 Funcionalidad del sistema de accionamiento El sistema de accionamiento le ayuda a circular hasta el límite de velocidad permitido por el legislador, que puede variar según el país. El requisito previo para la asistencia Drive Unitizada es que el ciclista pedalee. A velocidades superiores al límite de velocidad permitido, el sistema de accionamiento desconecta la asistencia hasta que la velocidad vuelve a estar dentro del rango permitido. -
Page 70: Mantenimiento Y Servicio
Mantenimiento y servicio Haga que todos los trabajos de servicio, reparación o mantenimiento sean realizados por un distribuidor de bicicletas autorizado por TQ. Su distribuidor de bicicletas también puede ayudarle con preguntas sobre el uso, el servicio, la reparación o el mantenimiento de las bicicletas eléctricas. -
Page 71: Códigos De Error
Error general de software ERR 403 DRV COMM Error de comunicación de la periferia Reinicia el sistema. Póngase en contacto con su distribuidor TQ ERR 405 DISP COMM Error de comunicación de si el error persiste. la ayuda al deslizamiento ERR 407 DRV SW Error electrónico en el... - Page 72 Apague el accionamiento para dejar que se enfríe si es necesario. Reinicia el sistema. Póngase en contacto con su distribuidor TQ si el error persiste. ERR 453 DRV SW Error de inicialización del Reinicia el sistema. Póngase en...
- Page 73 ERR 480 DRV SENS Error de soporte del Drive Reinicie el sistema y evite un Unit uso inadecuado. Póngase en contacto con su distribuidor TQ si el error persiste. ERR 481 BATT COMM Error de comunicación de la Battery ERR 482 DRV SW Error de configuración del...
- Page 74 Reinicia el ERR 4A1 DRV COMM Error de comunicación del sistema. Póngase en contacto bus CAN con su distribuidor TQ si el error persiste. ERR 4A2 DRV COMM Error electrónico micro- controlador ERR 4A3 DRV SW Error del sensor de Reinicia el sistema.
- Page 75 Drive Unit de funcionamiento permitida. Apague el accionamiento para que se enfríe. Reinicia el sistema. Póngase en contacto con su distribuidor TQ si el error persiste. WRN 603 DRV COMM Problema de comunica- Comprueba que el puerto de ción del bus CAN carga no esté...
- Page 76 Walk en el Display. A continuación, suelte el botón directamente y vuelva a pulsarlo para utilizar la ayuda de empuje. Póngase en contacto con su distribuidor TQ si el error persiste. Tab. 5: Códigos de error ES - 24...
- Page 77 ES - 25...
- Page 78 NOTA Para obtener más información y las instrucciones de uso de TQ en varios idiomas, visite www.tq-group.com/ebike/downloads o escanee este código QR. Hemos comprobado la conformidad del contenido de esta publicación con el producto descrito. No obstante, no se pueden descartar desviaciones, por lo que no podemos aceptar ninguna responsabilidad por la completa conformidad y corrección.
-
Page 79: Manuel D'utilisation
Display V01 & Remote V01 Manuel d’utilisation... - Page 80 Sécurité Ce manuel contient des instructions que vous devez respecter pour votre sécurité personnelle et pour éviter des dommages corporels et matériels. Elles sont mises en évidence par des triangles d‘avertissement et sont représentées ci-dessous en fonction du niveau de risque. ►...
-
Page 81: Utilisation Prévue
Utilisation prévue Display V01 et la Remote V01 du système d’entraînement sont exclusivement destinés à l’affichage d’informations et à la commande de votre E-Bike et ne doivent pas être utilisés à d’autres fins. Toute autre utilisation ou toute utilisation dépassant ce cadre est considérée comme non conforme et entraîne la perte de la garantie. - Page 82 Consignes de sécurité pour la conduite Respectez les points suivants afin d’éviter les blessures dues à une chute lors d’un démarrage avec un couple élevé : — Nous recommandons de porter un casque et des vêtements de protection adaptés à chaque sortie. Respectez à cet effet les prescriptions de votre pays.
- Page 83 ISED Le présent appareil est conforme aux CNR d’ ISED applicables aux appareils radio exempts de licence. L’exploitation est autorisée aux deux conditions suivantes: (1) le dispositif ne doit pas produire de brouillage préjudiciable, et (2) ce dispositif doit accepter tout brouillage reçu, y compris un brouillage susceptible de provoquer un fonctionnement indésirable.
-
Page 84: Données Techniques
-5 °C à +40 °C / 23 °F à 104 °F ment 0°C à +40 °C / 32 °F à 104 °F Température de stockage Tab. 1: Caractéristiques techniques - Display V01 Remote Indice de protection IP66 Poids avec câble 25 g / 0,88 oz Température de fonctionne-... -
Page 85: Eléments De Commande Et D'affichage
Eléments de commande et d’affichage Aperçu de Display Pos. Description dans Fig. 1 Niveau de charge de la Battery (max. 10 traits, 1 trait correspond à 10 %) État de charge du Range Extender (max. 5 traits, 1 trait correspond à 20 %) Zone d’affichage des informations relatives à... -
Page 86: Mise En Service
Mise en service ► Assurez-vous que la Battery est suffisamment chargée avant toute utilisa- tion. Mettre en marche le système d’entraînement : ► Allumez le Drive Unit en appuyant brièvement sur le bouton de commande de Display (voir Fig. 3). Éteindre le système d’entraînement : ►... -
Page 87: Mode Configuration
Mode configuration Activer le mode configuration ► Éteignez le système d’entraîne- ment. ► Maintenir la touche de commande sur Display (élément 5 Fig. 1) et la touche de commande BAS sur la Remote (élément 2 Fig. 2) enfoncées pendant au moins 5 secondes. - Page 88 Informations sur la conduite En bas de l’écran, quatre vues différentes permettent d’afficher des informa- tions sur la conduite. Indépendamment de la vue actuellement sélectionnée, l’état de charge de la batterie et du prolongateur d’autonomie en option est affiché au centre et le niveau d’assistance sélectionné est indiqué sur le bord supérieur.
- Page 89 Affichage de Display Informations sur la conduite — Puissance actuelle du conducteur en watts (dans cet exemple 163 W) — Puissance d’entraînement actuelle en watts (dans cet exemple 203 W) — Compteur de vitesse en kilomètres par heure (KPH) ou en miles par heure (MPH). (Dans cet exemple 24 km/h) —...
- Page 90 HAUT et BAS. Selon que le E-Bike est équipé ou non d’un éclairage et d’une TQ Smartbox. (Pour plus d’informations, voir le guide Smartbox) — Lumière désactivée (LIGHT OFF) — La lumière s’éteint en appuyant simulta- nément sur les boutons de commande...
- Page 91 Sélection du niveau d’assistance Vous pouvez choisir entre 3 niveaux d’assistance ou désactiver l’assis- tance. Le niveau d’assistance sélec- tionné I, II ou III est visualisé sur Display par le nombre de barres correspondant (voir élément 1 Fig. 5). — En appuyant brièvement sur le bouton de commande HAUT de la Remote (voir Fig.
-
Page 92: Configuration Des Connexions
Configuration des connexions Connexion du vélo au smartphone REMARQUE — Vous pouvez télécharger l’application TQ E-Bike dans l’Appstore pour IOS et dans le Google Play Store pour Android. — Téléchargez l’application TQ E-Bike. — Sélectionnez votre E-Bike (vous ne devez coupler votre smartphone que la première fois). - Page 93 Connexion entre le E-Bike et les compteurs vélo REMARQUE — Pour établir une connexion avec le compteur vélo, le E-Bike et le comp- teur vélo doivent se trouver à portée radio (distance maximale d’environ 10 m). — Couplez votre compteur vélo (Blue- tooth ou ANT+).
- Page 94 Assistance à la poussée L’assistance à la poussée facilite la poussée du E-Bike. REMARQUE — La disponibilité et les caractéristiques de l’assistance à la poussée sont soumises aux lois et réglementations spécifiques à chaque pays. Par exemple, en Europe, l’assistance à la poussée est limitée à une vitesse de 6 km/h maximum.
-
Page 95: Réinitialisation Des Paramètres D'usine
Réinitialisation des paramètres d’usine ► Allumez le système d’entraîne- ment. ► Maintenez la touche de commande sur Display et la touche de commande BAS sur la Remote enfoncées pendant au moins 10 s, le mode de configuration s’affiche d’abord, puis RESET. (voir Fig. 10). ►... -
Page 96: Changement De Vitesse
Conseils généraux pour la conduite 11.1 Fonctionnement du système d’entraînement Le système d’entraînement vous aide à rouler jusqu’à la limite de vitesse auto- risée par le législateur, qui peut varier selon le pays. Pour bénéficier de l’assis- tance du Drive Unit, le conducteur doit pédaler. Si la vitesse dépasse la limite de vitesse autorisée, le système d’entraînement coupe l’assistance jusqu’à... -
Page 97: Maintenance Et Service
Maintenance et service Faites effectuer tous les travaux de service, de réparation ou d’entretien par un vendeur de vélos agréé par TQ. Votre vendeur de vélos peut également vous aider pour toute question concernant l’utilisation du véhicule, le service, la réparation ou l’entretien. -
Page 98: Codes D'erreur
ERR 401 DRV SW Erreur générale de logiciel ERR 403 DRV COMM Périphérique Erreur de communication Redémarrez le système. Contactez votre revendeur TQ si ERR 405 DISP COMM Aide à la poussée Erreur l’erreur persiste. de communication ERR 407 DRV SW Erreur électronique du... - Page 99 ERR 452 DRV HOT non atteinte. Éteignez l’unité Surchauffe du Drive Unit d’entraînement pour le laisser refroidir. Redémarrez le système. Contactez votre revendeur TQ si l’erreur persiste. ERR 453 DRV SW Erreur d’initialisation du Redémarrez le système. Drive Unit...
- Page 100 ERR 487 DRV SW ERR 488 DRV SW ERR 489 DRV SW Redémarrez le système. ERR 48A DRV SW Erreur d’exécution du Contactez votre revendeur TQ si logiciel ERR 48B DRV SW l’erreur persiste. ERR 48C DRV SW ERR 48D DRV SW...
- Page 101 Rupture de phase du Drive Unit ERR 497 DRV HW Erreur de calibrage du Drive Unit Redémarrez le système. Contactez votre revendeur TQ si ERR 4C8 DRV SW Erreur générale de logiciel l’erreur persiste. ERR 498 DRV COMM Périphérique Erreur de...
- Page 102 Erreur générale de logiciel ERR 4AA DRV SW WRN 4AB DRV SENS Erreur capteur de Redémarrez le système. cadence Contactez votre revendeur TQ si ERR 4AD DRV SW Erreur de régulation du l’erreur persiste. Drive Unit ERR 4AE DRV SW...
- Page 103 (Walk) de la Remote jusqu’à ce que Walk apparaisse sur Display. Relâcher ensuite directement le bouton et l’actionner à nouveau pour utiliser l’aide à la poussée. Contacter votre revendeur TQ si l’erreur persiste. Tab. 5: Codes d’erreur FR - 25...
- Page 104 REMARQUE Pour plus d‘informations et consulter le mode d‘emploi en d‘autres langues, veuillez vous rendre sur www.tq-group.com/ebike/downloads ou scanner ce le QR-code suivant: Nous avons vérifié la conformité du contenu du présent document avec le produit qui y est décrit. Ne pouvant toutefois exclure toute divergence, nous ne pouvons pas nous porter garants de la conformité...
- Page 105 Display V01 & Remote V01 Manuale d’uso...
- Page 106 Sicurezza Queste istruzioni contengono informazioni che dovete osservare per la vostra sicurezza personale e per evitare lesioni personali e danni alla proprietà. Sono evidenziate da triangoli di avverti- mento e mostrate di seguito secondo il grado di pericolo. ► Leggere completamente le istruzioni prima della messa in funzione e dell’uso.
- Page 107 Destinazione d’uso Il Display V01 e il Remote V01 del sistema di azionamento sono destinati esclu- sivamente alla visualizzazione di informazioni e al funzionamento della vostra e-Bike e non devono essere utilizzati per altri scopi. Qualsiasi altro uso o impiego che va oltre questo è considerato improprio e comporterà...
- Page 108 Istruzioni di sicurezza per la guida Osservare i seguenti punti per evitare lesioni da caduta quando si inizia con una coppia elevata: — Si raccomanda di indossare un casco adatto e un abbigliamento protettivo ogni volta che si pedala. Si prega di osservare le norme del proprio paese. —...
-
Page 109: Dati Tecnici
-5 °C a +40 °C / da 23 °F a 104 °F Temperatura di conservazione da 0°C a +40 °C / da 32 °F a 104 °F Tab. 1: Dati tecnici - Display V01 Remote Classe di protezione IP66... - Page 110 Elementi operativi e di visualizzazione Panoramica del Display Punta Descrizione Fig. 1 Stato di carica della batteria (max. 10 tacche, 1 tacca corrisponde a 10 %) Stato di carica del Range Extender (max. 5 tacche, 1 tacca corrisponde a 20 %) Pannello di visualizza- zione per diverse visua- lizzazioni dello schermo...
-
Page 111: Messa In Funzione
Messa in funzione ► Assicurarsi che la batteria sia sufficientemente carica prima dell’uso. Accendere il sistema di trasmissione: ► Accendere l’unità premendo brevemente il pulsante di comando sul Display (vedi Fig. 3). Spegnere il sistema di azionamento: ► Spegnere l’azionamento premendo a lungo (>3 s) il pulsante di comando sul Display (vedi Fig. - Page 112 Modalità di configurazione Attivare la modalità di configurazione ► Spegnere il sistema di aziona- mento. ► Tenere premuto il pulsante di controllo sul Display (punta 5 in Fig. 1) e il pulsante operativo IN >5 s BASSO sul Remote (punta 2 in Fig.
- Page 113 Informazioni per la guida Nella parte inferiore del display, le informazioni di guida possono essere visualizzate in 4 viste diverse. Indipendentemente dalla vista attualmente selezionata, lo stato di carica della batteria e del range extender opzionale è mostrato al centro e il livello di assistenza selezionato è mostrato in alto. ►...
- Page 114 Vista dello schermo Informazioni di guida — Potenza attuale del pilota in watt (in questo esempio 163 W) — Potenza di azionamento corrente in watt (in questo esempio 203 W) — Velocità attuale (in questo esempio 24 km/h) in chilometri all’ora (KPH) o miglia all’ora (MPH) —...
- Page 115 ALTO e il pulsante operativo IN BASSO acceso. A seconda che la e-Bike sia dotata di luci e TQ Smartbox. (Per maggiori informazioni, vedere le istruzioni della Smartbox). — Luce disattivata (LUCE OFF) — La luce si accende premendo contem-...
- Page 116 Selezionare il livello di supporto Si può scegliere tra 3 livelli di supporto o spegnere il supporto del Drive Unit. Il livello di supporto sele- zionato I, II o III viene visualizzato sul Display con il corrispondente numero di barre (vedere punta 1 in Fig. 5). —...
- Page 117 Impostare le connessioni Connessione e-Bike allo smartphone NOTA — Puoi scaricare l’applicazione TQ E-Bike dall’Appstore per IOS e dal Google Play Store per Android. — Scarica l’applicazione TQ E-Bike. — Seleziona la tua e-Bike (devi asso- ciare il tuo smartphone solo la prima volta).
- Page 118 Connessione e-Bike a smartphone NOTA — Per stabilire una connessione con il smartphone, la e-Bike deve tovarsi nel raggio d’azione (distanza massima circa 10 m). — Accoppia il smartphone (Bluetooth o ANT+). — Seleziona almeno uno dei tre sensori (vedi Fig. 8) mostrati. —...
- Page 119 Aiuto alla spinta L’aiuto alla spinta rende più facile spingere l’e-Bike, ad esempio sul campo. NOTA — La disponibilità e le caratteristiche dell’aiuto alla spinta sono soggette a leggi e regolamenti specifici del paese. Per esempio, in Europa, l’assi- stenza fornita dall’aiuto alla spinta è limitata a una velocità max. 6 km/h. —...
- Page 120 Reset alle impostazioni di fabbrica ► Accendere il sistema di aziona- mento. ► Tenere premuto il pulsante di controllo sul Display e il pulsante di controllo DOWN sul Remote per almeno 10 s. Viene visualizzata per prima la modalità di configu- razione, seguita da RESET (vedi Fig.
- Page 121 Istruzioni generali per la guida 11.1 Funzionalità del sistema di azionamento Il sistema di guida vi supporta nella guida fino a un limite di velocità consen- tito dal legislatore, che può variare a seconda del paese. Il prerequisito per l’assistenza motoria è che il pilota pedali. A velocità superiori al limite di velo- cità...
-
Page 122: Manutenzione E Servizio
Manutenzione e servizio Fate eseguire tutti i lavori di assistenza, riparazione o manutenzione da un rivenditore di biciclette autorizzato TQ. Il tuo rivenditore di biciclette può anche aiutarti con domande sull’uso, l’assistenza, la riparazione o la manuten- zione delle e-Bike. -
Page 123: Codici Di Errore
Errore generale del software ERR 403 DRV COMM Errore di comunicazione Riavviare il sistema. Contattate il della periferica vostro rivenditore TQ se l’errore si verifica ancora. ERR 405 DISP COMM Errore di comunicazione dell’aiuto alla spinta ERR 407 DRV SW... - Page 124 Errore di sovratempera- per lasciarla raffreddare, se tura del Drive Unit necessario. Riavviare il sistema. Contattate il vostro rivenditore TQ se l’errore si verifica ancora. ERR 453 DRV SW Errore di inizializzazione Riavviare il sistema. Contattate il del Drive Unit vostro rivenditore TQ se l’errore...
- Page 125 Rimedio ERR 480 DRV SENS Errore di supporto del Riavviare il sistema ed evitare Drive Unit un uso improprio. Contattate il vostro rivenditore TQ se l’errore persiste. ERR 481 BATT COMM Errore di comunicazione della batteria ERR 482 DRV SW...
- Page 126 Riavviare ERR 4A1 DRV COMM Errore di comunicazione il sistema. Contattate il vostro del CAN bus rivenditore TQ se l’errore si veri- fica ancora. ERR 4A2 DRV COMM Microcontrollore per gli errori elettronici ERR 4A3 DRV SW...
- Page 127 Problema di comunica- Controllare che la porta di zione CAN bus ricarica non sia sporca. Riavviare il sistema. Contattate il vostro rivenditore TQ se l’errore si veri- fica ancora. ERR 5401 DRV CONN Errore di comunicazione Riavviare il sistema. Contattate il tra Drive Unit e Display vostro rivenditore TQ se l’errore...
- Page 128 (Walk) sul Remote finché Walk non appare sul Display. Poi rila- sciare direttamente il pulsante e premerlo di nuovo per utilizzare l’aiuto alla spinta. Contattate il vostro rivenditore TQ se l’errore persiste. Tab. 5: Codici di errore IT - 24...
- Page 129 IT - 25...
- Page 130 NOTA Per ulteriori informazioni e per le istruzioni per l’uso di TQ in varie lingue, visitate www.tq-group.com/ebike/downloads o scansionare questo codice Abbiamo controllato che il contenuto di questa pubblicazione sia conforme al prodotto descritto. Tuttavia, non si possono escludere discrepanze, per cui non possiamo accet- tare alcuna responsabilità...
- Page 131 Display V01 & Remote V01 Gebruiksaanwijzing...
- Page 132 Veiligheid Deze instructies bevatten informatie die u in acht moet nemen voor uw persoonlijke veiligheid en om persoonlijk letsel en schade aan eigendommen te voorkomen. Ze worden gemarkeerd door gevarendriehoeken en hieronder weergegeven, afhankelijk van de mate van gevaar. ► Lees voor ingebruikname en gebruik de gebruiksaanwijzing volledig door. Dit zal u helpen gevaren en fouten te vermijden.
-
Page 133: Beoogd Gebruik
Beoogd gebruik Het Display V01 en de Remote V01 van het aandrijfsysteem zijn uitsluitend bedoeld voor de weergave van informatie en de bediening van uw e-bike en mogen niet voor andere doeleinden worden gebruikt. Elk ander gebruik of gebruik dat verder gaat dan dit wordt beschouwd als oneigenlijk en zal leiden tot het verlies van de garantie. - Page 134 — Wanneer de duwhulp is geactiveerd, moet u ervoor zorgen dat uw benen op een veilige afstand van de pedalen zijn. Anders bestaat er gevaar voor letsel door de draaiende pedalen. Veiligheidsinstructies voor het rijden Neem de volgende punten in acht om letsel door een val te voorkomen wanneer u met een hoog draaimoment start: —...
-
Page 135: Technische Gegevens
Bedrijfstemperatuur -5 °C tot +40 °C / 23 °F tot 104 °F Temperatuur bij opslag 0°C tot +40 °C / 32 °F tot 104 °F Tab. 1: Technische gegevens - Display V01 Remote Beschermingsklasse IP66 Gewicht met kabel 25 g / 0,88 oz Bedrijfstemperatuur -5 °C tot +40 °C / 23 °F tot 104 °F... -
Page 136: Bedienings- En Weergave-Elementen
Bedienings- en weergave-elementen Display overzicht Pos. in Beschrijving Fig. 1 Laadniveau van de Battery (max. 10 streepjes, 1 streepje komt overeen met 10 %) Staat van lading range extender (max. 5 streepje, 1 streepje komt overeen met 20 %) Displaypaneel voor verschillende scherm- weergaven met rij-infor- matie (zie hoofdstuk 6... - Page 137 Ingebruikneming ► Zorg ervoor dat de Battery voldoende opgeladen is voor gebruik. Inschakelen aandrijfsysteem: ► Schakel de aandrijving in door kort op de bedieningsknop op het Display te drukken (zie Fig. 3). Uitschakelen van het aandrijfsysteem: ► Schakel de aandrijving uit door lang te drukken (>3 s) op de bedieningsknop op het Display (zie Fig.
- Page 138 Setupmodus Activeer setupmodus ► Schakel het aandrijfsysteem uit. ► Houd de regeltoets op het Display (Pos. 5 in Fig. 1) en de regel- toets DOWN op de Remote (Pos. 2 in Fig. 2) gedurende minstens 5 s ingedrukt. >5 s ►...
- Page 139 Rijden informatie Onderaan het display kan de rij-informatie in 4 verschillende weergaven worden getoond. Ongeacht de momenteel geselecteerde weergave wordt de laadstatus van de accu en de optionele range extender in het midden weerge- geven en wordt het geselecteerde ondersteuningsniveau bovenaan weerge- geven.
- Page 140 Schermweergave Rijden informatie — Huidig ruitervermogen in watt (in dit voorbeeld 163 W) — Huidig aandrijfvermogen in watt (in dit voorbeeld 203 W) — Huidige snelheid (in dit voorbeeld 24 km/h) in kilometers per uur (KPH) of mijl per uur (MPH) —...
- Page 141 UP en DOWN gelijk- tijdig in te drukken. Afhankelijk van of de e-bike is uitgerust met verlichting en TQ Smartbox. (Voor meer infor- matie, zie de instructies van de Smartbox). — Uitgeschakeld licht (LICHT UIT) — Het licht wordt uitgeschakeld door de bedieningsknoppen OMHOOG en OMLAAG gelijktijdig in te drukken.
- Page 142 Selecteer ondersteuningsniveau U kunt kiezen tussen 3 ondersteu- ningsniveaus of de ondersteuning van het station uitschakelen. Het gese- lecteerde steunniveau I, II of III wordt op het Display gevisualiseerd met het overeenkomstige aantal balken (zie Pos. 1 in Fig. 5). —...
- Page 143 Set verbindingen Verbinding e-bike met smartphone OPMERKING — De TQ E-Bike app kun je downloaden in de Appstore voor IOS en de Google Play Store voor Android. — Download de TQ E-Bike app. — Selecteer uw e-bike (u hoeft alleen de eerste keer uw smartphone te koppelen).
- Page 144 Aansluiting e-bike op fietscomputers OPMERKING — Om een verbinding met de fietscomputer tot stand te brengen, moeten de e-bike en de fietscomputer zich binnen radiobereik (maximale afstand ca. 10 m) bevinden. — Koppel uw fietscomputer (Bluetooth of ANT+). — Selecteer ten minste één van de drie afgebeelde sensoren (zie Fig.
- Page 145 Duwhulp De duwhulp maakt het makkelijker om de e-bike te duwen, bijv. off-road. OPMERKING — De beschikbaarheid en kenmerken van push assistance zijn afhanke- lijk van landspecifieke wet- en regelgeving. In Europa bijvoorbeeld is de door de duwhulp verleende hulp beperkt tot een snelheid van max.
-
Page 146: Terugzetten Naar Fabrieksinstellingen
Terugzetten naar fabrieksinstellingen ► Schakel het aandrijfsysteem in. ► Houd de regeltoets op het Display en de regeltoets DOWN op de Remote minstens 10 s ingedrukt. Eerst verschijnt de instelmodus, gevolgd door RESET (zie Fig. 10). ► Maak uw keuze met de bedie- ningstoetsen op de Remote en bevestig uw keuze door op de bedieningstoets op het Display te... - Page 147 Algemene rij-instructies 11.1 Functionaliteit van het aandrijfsysteem Het aandrijfsysteem ondersteunt u bij het rijden tot een door de wetgever toegestane maximumsnelheid, die per land kan verschillen. Voorwaarde voor Drive Unitische hulp is dat de berijder trapt. Bij snelheden boven de toege- stane maximumsnelheid schakelt het aandrijfsysteem de ondersteuning uit totdat de snelheid weer binnen het toegestane bereik ligt.
-
Page 148: Onderhoud En Service
Onderhoud en service Laat alle service-, reparatie- of onderhoudswerkzaamheden uitvoeren door een door TQ erkende rijwielhandelaar. Uw fietshandelaar kan u ook helpen met vragen over het gebruik, de service, reparatie of onderhoud van e-bikes. Milieuvriendelijke verwijdering De onderdelen van het aandrijfsysteem en de Batterijn mogen niet bij het restafval worden gegooid. - Page 149 Perifere communicatie Start het systeem opnieuw fout op. Neem contact op met uw ERR 405 DISP COMM Duwende communicatie TQ-dealer als de fout zich nog fout steeds voordoet. ERR 407 DRV SW Elektronische fout Drive Unit ERR 408 DRV HW...
- Page 150 Drive Unit overtempera- deze indien nodig te laten tuurfout afkoelen. Start het systeem opnieuw op. Neem contact op met uw TQ-dealer als de fout zich nog steeds voordoet. ERR 453 DRV SW Fout bij initialisatie Drive Start het systeem opnieuw Unit op.
- Page 151 Fout in Drive Unitonder- Start het systeem opnieuw op steuning en voorkom onjuist gebruik. Neem contact op met uw TQ-dealer als de fout zich blijft voordoen. ERR 481 BATT COMM Fout in de Battery commu- nicatie ERR 482 DRV SW...
- Page 152 Fout in de kalibratie van Start het systeem opnieuw de Drive Unit op. Neem contact op met uw ERR 4C8 DRV SW Algemene softwarefout TQ-dealer als de fout zich nog steeds voordoet. ERR 498 DRV COMM Perifere communicatie ERR 499 DRV COMM fout...
- Page 153 WRN 4AB DRV SENS Fout cadans sensor op. Neem contact op met uw ERR 4AD DRV SW Fouten in de Drive Unitbe- TQ-dealer als de fout zich nog sturingr steeds voordoet. ERR 4AE DRV SW Fout cadans sensor ERR 4AF DRV SW...
- Page 154 Remote te drukken totdat Walk op het Display verschijnt. Laat de knop dan direct los en druk hem opnieuw in om de duwhulp te gebruiken. Neem contact op met uw TQ-dealer als de fout zich blijft voordoen. Tab. 5: Foutcodes NL - 24...
- Page 155 NL - 25...
- Page 156 OPMERKING Voor meer informatie en TQ-gebruiksaanwijzingen in verschillende talen kunt u terecht op www.tq-group.com/ebike/downloads of scan deze QR code. Wij hebben de inhoud van deze publicatie gecontroleerd op overeenstemming met het beschreven product. Afwijkingen kunnen echter niet worden uitgesloten, zodat wij geen aansprakelijkheid kunnen aanvaarden voor volledige conformiteit en juistheid.
- Page 157 © SCOTT Sports SA 2022. All rights reserved. The information contained in this manual is in various languages but only the English version will be relevant in case of conflict. P.E.D Zone C1, Rue Du Kiell 60 | 6790 Aubange | BelgiumDistribution: SSG (Europe) Distribution Center SA SCOTT Sports SA | 11 Route du Crochet | 1762 Givisiez | 2022 SCOTT Sports SA www.scott-sports.com Email: webmaster.marketing@scott-sports.com...
Need help?
Do you have a question about the Display V01 and is the answer not in the manual?
Questions and answers
Wie kann ich die Reichweite in % ins Display über die App eingeben.
You cannot enter the range percentage into the TQ Display V01 using the app. The range is a calculated estimate based on several parameters and is displayed automatically on the screen.
This answer is automatically generated