Table of Contents

Related Manuals for HPE TFT7600 G2

Summary of Contents for HPE TFT7600 G2
- Page 1 HPE TFT7600 G2 Rackmount Keyboard Monitor KVM Console User Guide Abstract This guide provides operational guidance for the HPE TFT7600 G2 Rackmount Keyboard Monitor KVM Console. Part Number: 615930-003R January 2016 Edition: 4...
- Page 2 © Copyright 2010, 2016 Hewlett Packard Enterprise Development LP The information contained herein is subject to change without notice. The only warranties for Hewlett Packard Enterprise products and services are set forth in the express warranty statements accompanying such products and services. Nothing herein should be construed as constituting an additional warranty.
-
Page 3: Table Of Contents
ENERGY STAR compliant ..........................6 Installation ............................. 7 Kit contents ................................7 Installing the HPE TFT7600 G2 Rackmount Keyboard Monitor KVM ..............7 Connecting and routing cables ..........................11 Accessing the HPE TFT7600 KVM Console ......................12 Removing the HPE 1U Adjustable Toolless Rails ....................12 Removing PS2 cables with cable-locking mechanism ................... - Page 4 Index ..............................36 Contents 4...
-
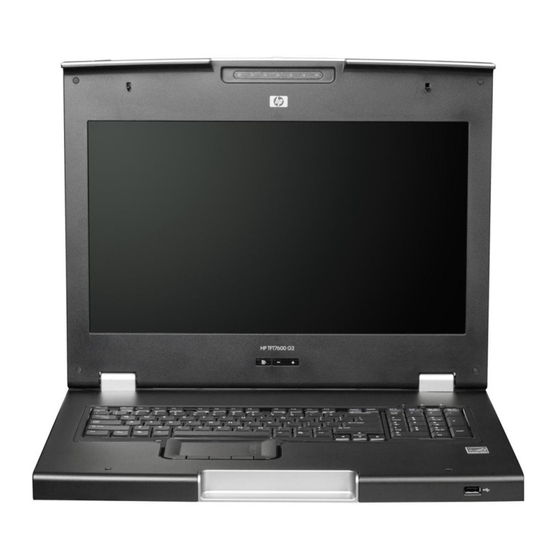
Page 5: Introduction
Display release latch Pushes down to unlatch the display assembly Blue LED • Turns on when the display is closed • Helps identify the HPE TFT7600 KVM Console in a rack OSD activation button • Launches OSD menus • Selects •... -
Page 6: Rear Components
PS2 mouse port VGA input port Power connection port Serial firmware port ENERGY STAR compliant The HPE TFT7600 KVM Console is ENERGY STAR® qualified. For more information about the ENERGY STAR® qualifications, see the Hewlett Packard Enterprise website (http://www.hpe.com/hpeinfo/globalcitizenship/environment/products/ecolabels.html). Introduction 6... -
Page 7: Installation
Power cords USB cable labels This kit might contain extra hardware. Installing the HPE TFT7600 G2 Rackmount Keyboard Monitor KVM Align the 1U Adjustable Toolless Rails with the holes marked on the rack, and snap them into place. Snap one end of the 1U Adjustable Toolless Rails into the retna rails. - Page 8 Extend the inner slides until they lock into place. Align the unit with the extended inner slides, and then insert the unit into the rack. Installation 8...
- Page 9 From the rear of the rack, slide the brace rail assembly in between the 1U Adjustable Toolless Rails. Align the screw holes on the brace rail with the screw holes on the 1U Adjustable Toolless Rails. Using two 6-32 screws, secure the brace rail to the 1U Adjustable Toolless Rails. Installation 9...
- Page 10 Remove and discard the two shipping screws from the rear of the unit. Attach the cable management arm to the rear of the unit with two 6-32 screws. Installation 10...
-
Page 11: Connecting And Routing Cables
Connect and route the cables through the cable management arm and unit opening. Installation is complete. Connecting and routing cables When connecting and routing the cables through the cable management arm and cable tray to the TFT7600 KVM Console, use the following cable-routing method to ensure that the cables fit into the tray. IMPORTANT: Use either the PS/2 cables or USB keyboard/mouse cable when connecting the unit to a device. -
Page 12: Accessing The Hpe Tft7600 Kvm Console
USB pass-through cable Accessing the HPE TFT7600 KVM Console Gently extend the TFT7600 KVM Console until the slides lock. Push the display release latch, and then lift the display. Removing the HPE 1U Adjustable Toolless Rails Locate the spring release. Installation 12... -
Page 13: Removing Ps2 Cables With Cable-Locking Mechanism
Place your hand on the outside of the 1U Adjustable Toolless Rails so that you can move the spring release. Gently move the spring release toward the inside of the rack (1) while moving the 1U Adjustable Toolless Rails out toward you and away from the rack (2). NOTE: If you cannot gain access to the spring release from the outside of the 1U Adjustable Toolless Rails, a tool might be required to unlock the spring release from the inside of the 1U Adjustable Toolless Rails. -
Page 14: Enabling The Native Display Resolution Of 1440X900 In Hp-Ux
To fix issues related to wide screen panels, verify that you have at least one of the following server patches (or newer) installed: • PHSS_40809 (11.31) • PHSS_40810 (11.23) For more information about setting resolutions in HP-UX, see the Graphics Administration Guide for HP-UX 11.x servers on the Hewlett Packard Enterprise website (http://www.hpe.com/info/docshpcom). Installation 14... -
Page 15: Operational Overview
Operational overview On-screen display The OSD buttons are used to operate the TFT7600 KVM Console OSD menus. Callout Component Function OSD activation button • Launches OSD menus • Selects menu options • Exits menus and OSD OSD scroll up and down button Used to scroll in the OSD menu and adjust the function Launching OSD menu... -
Page 16: Osd Menu
To exit the OSD menu: Press the Down (-) button to scroll to the Exit function. Press the OSD activation button to select the Exit function and exit the OSD menu. OSD menu The OSD menu provides access to display settings and functions, enabling the user to customize the TFT7600 KVM Console display settings. -
Page 17: Advanced
Phase The Phase option displays a slider bar to enable the adjustment of the analog signals phase. Advanced The Advanced option provides access to the following options: • OSD settings menu • Exit sub-menu OSD settings The OSD settings option provides access to the following options: •... -
Page 18: Factory Settings
Factory settings The Factory settings option enables the user to set the TFT7600 back to its original factory settings. The following options are available in the Factory settings menu list: • • • Exit sub-menu Language The Language option allows the user to change the language in which the menu options are displayed. The following languages are available: •... -
Page 19: Maintenance
Maintenance Maintenance guidelines To protect your unit from overheating and other types of damage: • Use only a power source and connection appropriate for this unit, as indicated on the marking label and back plate. • If an extension cord or power strip is used, be sure that the cord or strip is rated for the product. Also, be sure that the total ampere ratings of all products plugged into the extension cord or power strip do not exceed 80% of the extension cord or power strip ampere ratings limit. -
Page 20: Moving A Rack With The Hpe Tft7600 Kvm Console Installed
Moving a rack with the HPE TFT7600 KVM Console installed When moving the TFT7600 KVM Console installed in a rack, Hewlett Packard Enterprise recommends that you install the lock plates, included in your kit, on each side of the unit and rack. -
Page 21: Warranty And Regulatory Information
Warranty and regulatory information Warranty information HPE ProLiant and x86 Servers and Options (http://www.hpe.com/support/ProLiantServers-Warranties) HPE Enterprise Servers (http://www.hpe.com/support/EnterpriseServers-Warranties) HPE Storage Products (http://www.hpe.com/support/Storage-Warranties) HPE Networking Products (http://www.hpe.com/support/Networking-Warranties) Regulatory information Safety and regulatory compliance For important safety, environmental, and regulatory information, see Safety and Compliance Information for Server, Storage, Power, Networking, and Rack Products, available at the Hewlett Packard Enterprise website (http://www.hpe.com/support/Safety-Compliance-EnterpriseProducts). -
Page 22: Turkey Rohs Material Content Declaration
• Russia: • Belarus: • Kazakhstan: Manufacturing date: The manufacturing date is defined by the serial number. CCSYWWZZZZ (serial number format for this product) Valid date formats include: • YWW, where Y indicates the year counting from within each new decade, with 2000 as the starting point;... -
Page 23: Electrostatic Discharge
Electrostatic discharge Preventing electrostatic discharge To prevent damaging the system, be aware of the precautions you need to follow when setting up the system or handling parts. A discharge of static electricity from a finger or other conductor may damage system boards or other static-sensitive devices. -
Page 24: Support And Other Resources
Hewlett Packard Enterprise Support Center. You must have an HP Passport set up with relevant entitlements. Websites • Hewlett Packard Enterprise Information Library (http://www.hpe.com/info/enterprise/docs) • Hewlett Packard Enterprise Support Center (http://www.hpe.com/support/hpesc) • Contact Hewlett Packard Enterprise Worldwide (http://www.hpe.com/assistance) -
Page 25: Customer Self Repair
Single Point of Connectivity Knowledge (SPOCK) Storage compatibility matrix (http://www.hpe.com/storage/spock) • Storage white papers and analyst reports (http://www.hpe.com/storage/whitepapers) Customer Self Repair Hewlett Packard Enterprise products are designed with many Customer Self Repair (CSR) parts to minimize repair time and allow for greater flexibility in performing defective parts replacement. If during... - Page 26 Pour plus d'informations sur le programme CSR de Hewlett Packard Enterprise, contactez votre Mainteneur Agrée local. Pour plus d'informations sur ce programme en Amérique du Nord, consultez le site Web Hewlett Packard Enterprise (http://www.hpe.com/support/selfrepair). Riparazione da parte del cliente Per abbreviare i tempi di riparazione e garantire una maggiore flessibilità nella sostituzione di parti difettose, i prodotti Hewlett Packard Enterprise sono realizzati con numerosi componenti che possono essere riparati direttamente dal cliente (CSR, Customer Self Repair).
- Page 27 Weitere Informationen über das Hewlett Packard Enterprise Customer Self Repair Programm erhalten Sie von Ihrem Servicepartner vor Ort. Informationen über das CSR-Programm in Nordamerika finden Sie auf der Hewlett Packard Enterprise Website unter (http://www.hpe.com/support/selfrepair). Reparaciones del propio cliente Los productos de Hewlett Packard Enterprise incluyen muchos componentes que el propio usuario puede reemplazar (Customer Self Repair, CSR) para minimizar el tiempo de reparación y ofrecer una mayor...
- Page 28 Packard Enterprise, póngase en contacto con su proveedor de servicios local. Si está interesado en el programa para Norteamérica, visite la página web de Hewlett Packard Enterprise CSR (http://www.hpe.com/support/selfrepair). Customer Self Repair Veel onderdelen in Hewlett Packard Enterprise producten zijn door de klant zelf te repareren, waardoor de reparatieduur tot een minimum beperkt kan blijven en de flexibiliteit in het vervangen van defecte onderdelen groter is.
- Page 29 Para obter mais informações sobre o programa de reparo feito pelo cliente da Hewlett Packard Enterprise, entre em contato com o fornecedor de serviços local. Para o programa norte-americano, visite o site da Hewlett Packard Enterprise (http://www.hpe.com/support/selfrepair). Support and other resources 29...
- Page 30 Support and other resources 30...
- Page 31 Support and other resources 31...
- Page 32 Support and other resources 32...
-
Page 33: Remote Support
Hewlett Packard Enterprise, which will initiate a fast and accurate resolution based on your product’s service level. Hewlett Packard Enterprise strongly recommends that you register your device for remote support. For more information and device support details, go to the Insight Remote Support website (http://www.hpe.com/info/insightremotesupport/docs). Support and other resources 33... -
Page 34: Acronyms And Abbreviations
Acronyms and abbreviations keyboard, video, and mouse on-screen display rackmount keyboard monitor thin film transistor universal serial bus Acronyms and abbreviations 34... -
Page 35: Documentation Feedback
Hewlett Packard Enterprise is committed to providing documentation that meets your needs. To help us improve the documentation, send any errors, suggestions, or comments to Documentation Feedback (mailto:docsfeedback@hpe.com). When submitting your feedback, include the document title, part number, edition, and publication date located on the front cover of the document. For online help content, include the product name, product version, help edition, and publication date located on the legal notices page. - Page 36 6 regulatory compliance notices 21, 22 grounding methods 23 Removing the Brace Rail Assembly 12 removing the HPE 1U Adjustable Toolless Rails 12 removing the unit 12 Hewlett Packard Enterprise website 24 Horizontal Position 16 shipping the unit 19...
- Page 37 website, Hewlett Packard Enterprise 24 Index 37...
Need help?
Do you have a question about the TFT7600 G2 and is the answer not in the manual?
Questions and answers