Table of Contents
Advertisement
Quick Links
AXION micro5 Instruction Manual
Read This First
THIS INSTRUCTION MANUAL IS THE MOST IMPORTANT ACCESSORY OF THE MICRO5.
IT SHOULD BE READ AT LEAST TWICE BEFORE OPERATION OF THE INSTRUMENT.
THE MICRO5 IS A VERY ADVANCED ELECTRONIC DEVICE. THE MICRO-PROCESSOR
CONTROLS ARE DESIGNED TO SIMPLIFY TREATMENT DELIVERY. WE HAVE MADE
THE OPERATION OF THE micro5 VERY SIMPLE IF YOU FOLLOW THE BASIC GUIDE-
LINES OF THE INSTRUCTION MANUAL. REMEMBER, MOST PROBLEMS ARE A RESULT
OF FAILURE TO FOLLOW DIRECTIONS RATHER THAT EQUIPMENT FAILURE.
THE MICRO5 IS SHIPPED WITH A LOW BATTERY CHARGE. IT MUST BE CHARGED AT
LEAST 15 HOURS BEFORE FIRST USE.
IF YOU HAVE DETERMINED THAT A SYSTEMS FAILURE EXISTS, CALL FOR INSTRUC-
TIONS.
1
Advertisement
Table of Contents

Related Manuals for Axion micro5


Summary of Contents for Axion micro5
- Page 1 LINES OF THE INSTRUCTION MANUAL. REMEMBER, MOST PROBLEMS ARE A RESULT OF FAILURE TO FOLLOW DIRECTIONS RATHER THAT EQUIPMENT FAILURE. THE MICRO5 IS SHIPPED WITH A LOW BATTERY CHARGE. IT MUST BE CHARGED AT LEAST 15 HOURS BEFORE FIRST USE.
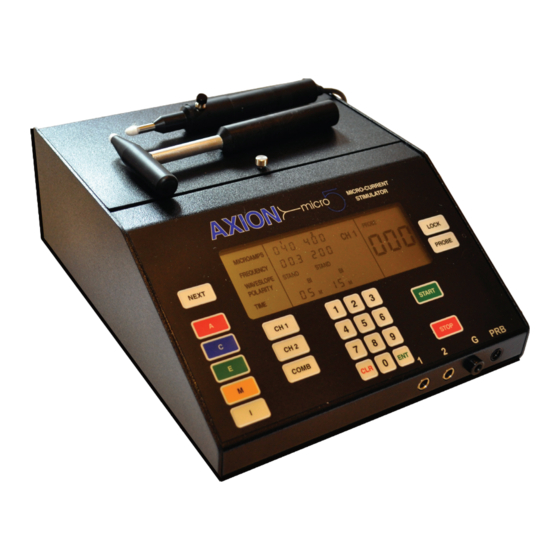
- Page 2 Power Up The micro5 is turned ON by a momentary switch located on the back of the instrument, in the lower Right hand corner. The switch will activate the unit with a slight touch and the entire LCD display will light up.
-
Page 3: Front Panel Operation
Front Panel Operation “A”. Pressing this red key sets the parameters of the selected channels for the “A” default. “C”. Pressing this blue key sets the parameters of the channels selected for the “C” default. “E”. Pressing this green key sets the parameters of the selected channels for the “E” default. “M”. - Page 4 Active Probe Indifferent Probe Pad lead wires NEXT. Pressing this key when programming the waveslope or polarity will toggle between the various options available. This key also allows access to m5 special features PROBE. Pressing this key turns on the probe operation and the three segment LCD probe display.
- Page 5 Features Pre-programmed Treatment Modes The AXION micro5 is the first microcurrent instrument to offer six pre-programmed treatment modes. This feature allows the clinician to set the output, frequency, waveslope, polarity and treatment times at the touch of a single keypad. These treatment modes represent the most effective applications available for microcur- rent stimulation.
-
Page 6: Using Presets
S.”I”.The “I’ preset is used when a large area is treated. This preset uses both channels to deliver the current through four pads. The micro5 uses both a rate scan and vector scan. When using the “I” preset you will notice the numbers on the display might change rapidly during treatment. -
Page 7: Manual Override
2. Select Preset 3. Press START Adjustable Parameters The micro5 provides you with complete control over the following parameters; microamps, frequency, waveslope, polarity and time. This allows for maximal flexibility when programming treatment param- eters for each patient The Parameter Ranges Are As Follows:... - Page 8 COMB then STOP. Pressing the START key after STOP will resume the treatment where you left off. After the timer has timed out, the micro5 will hold the current settings in memory until any changes are made. The instrument will go into a “sleep” mode five minutes after time has expired.
- Page 9 (they don’t conduct electricity), and be sure to watch the instruction video on the proper insertion of the Q-Tip. Reusable electrodes have a life span of about 4-5 uses. The micro5 will alert you through it Secure Alert warning tones if the electrode is failing.
-
Page 10: Using The Probe
See Video Scan the area to be treated. You will notice that when contact with the skin is made the micro5 emits a tone. This tone rises and falls in pitch as the resistance increases and decreases. The higher the pitch the lower the resistance. - Page 11 You MUST use a solution that is capable of moving the electrons through the solution. Not all are created equal. Below are three pictures of conductivity using the probe meter of the micro5 as a simple conductivity meter. The higher the reading on the meter the better the conductivity.
-
Page 12: During Operation
Probe Lock A unique feature of the AXION micro5 is PROBE LOCK. Pressing this key while in the probe mode allows the clinician to scan the area for exactly two seconds. After two seconds the highest reading encountered will remain on the LCD display until another point is touched. -
Page 13: Display Memory
USB port or auto USB port. Charging time is about 6 hours for a full charge. When charging make sure the charging indicator light is on. This light is located on the back of the micro5. The low battery indicator will turn on when it is time to recharge. - Page 14 CPT Billing Codes Suggestions 64550 (TENS) 97118 (electrical Stimulation) 97200 (physical medicine, combined modalities, 1/2 hr.) 97201 (additional 15 min. added to 97200) 97014 (electrical stimulation) Contraindications Do not stimulate over the Carotid Sinus region. The use of T.E.N.S. on individuals with demand type cardiac pacemakers may be hazardous. Do not stimulate transcerebrally (through the head).
-
Page 15: Special Features
Continuous Operation (NEXT 1) Pressing the NEXT key followed by 1 on the numerical key pad allows continuous operation of the micro5 regardless of the time indicated on the timer. The instrument will continue to operate but the timer will not count down. - Page 16 Memory The micro5 offers an open memory option for the clinician to program a specific treatment. The output, fre- quency, waveslope, polarity and time can be programmed and stored for later recall. To store a MEMORY preset (Button “M”). Set all desired parameters in CHl.
- Page 17 More about the “I” Interferential Preset Your AXION micro5 has a very special factory preset for microcurrent interferential. This setting is very useful in bathing a larger area with the stimulation. Below is a very simple ex planation of how interferntial...
-
Page 18: Charging System
IMPORTANT NOTE: It takes the micro5 12 hours to fully charge. To fully charge the micro5, plug the wall module into an AC outlet and then plug into the micro5 using the USB cable. After four hours of charging, unplug the USB cable from the back of the micro5 momentarily and then plug back in. - Page 19 Anker Astro3E 10000mAh external battery pack Several companies manufacture external battery packs that can be used to quickly recharge the AXION micro5. We have tested and recommend the Anker Astro3E. Our tests show that the Anker can recharge the micro5 from dead batteries to 90% charge in 1 hour.
-
Page 20: Battery Access
Battery Access Under normal circumstances you should not need to access the battery packs used by the micro5. Only ac- cess the batteries after communicating with VenturaDesigns for complete instructions. The micro5 uses two battery packs. The first uses 3 “D” cell rechargable batteries. This powers the main board and Channel 1. -
Page 21: Technical Specifications
The Factory warrants the AXION micro5 to be free from defects for a period of two years from date of pur- chase. Factory further warrants all accessories, including batteries and chargers, to be free from defects for a period of 90 days from date of purchase.
Need help?
Do you have a question about the micro5 and is the answer not in the manual?
Questions and answers
What amp of rechargeable AA batteries do you use if the Axion Micro 5 Current Stimulant?
The Axion Micro 5 does not use AA batteries. It uses two battery packs: one with 3 rechargeable D cell batteries for the main board and Channel 1, and another with 3 AAA batteries for Channel 2. Therefore, AA batteries are not compatible.
This answer is automatically generated